How to Verify an Email Address Using Python, Flask, and Twilio Verify
Time to read:
May 19, 2021
Written by
Reviewed by

Most web applications accept the user’s email address during the sign up process. To keep the creation of fake accounts under control, it is always a good idea to confirm that the user can receive email on the provided address.
Twilio Verify is an easy to use service for user verification through numeric codes that can be sent via SMS, voice call or email. In this tutorial you’ll learn how to implement an email verification flow using Flask, Twilio Verify, and SendGrid.
Tutorial requirements
- Python 3.6 or newer. If your operating system does not provide a Python interpreter, you can go to python.org to download an installer.
- A Twilio account. If you are new to Twilio click here to create a free account now and receive $10 credit when you upgrade to a paid account. You can review the features and limitations of a free Twilio account.
- A SendGrid account. Click here to create a free account, which allows you to send up to 100 emails per day.
SendGrid configuration
To configure an email verification solution you have to connect your Twilio and SendGrid accounts. In this section you will make all the necessary preparations in the SendGrid side.
Creating a dynamic template
The first step is to create an email template that the Twilio Verify service can use when emailing verification codes to users.
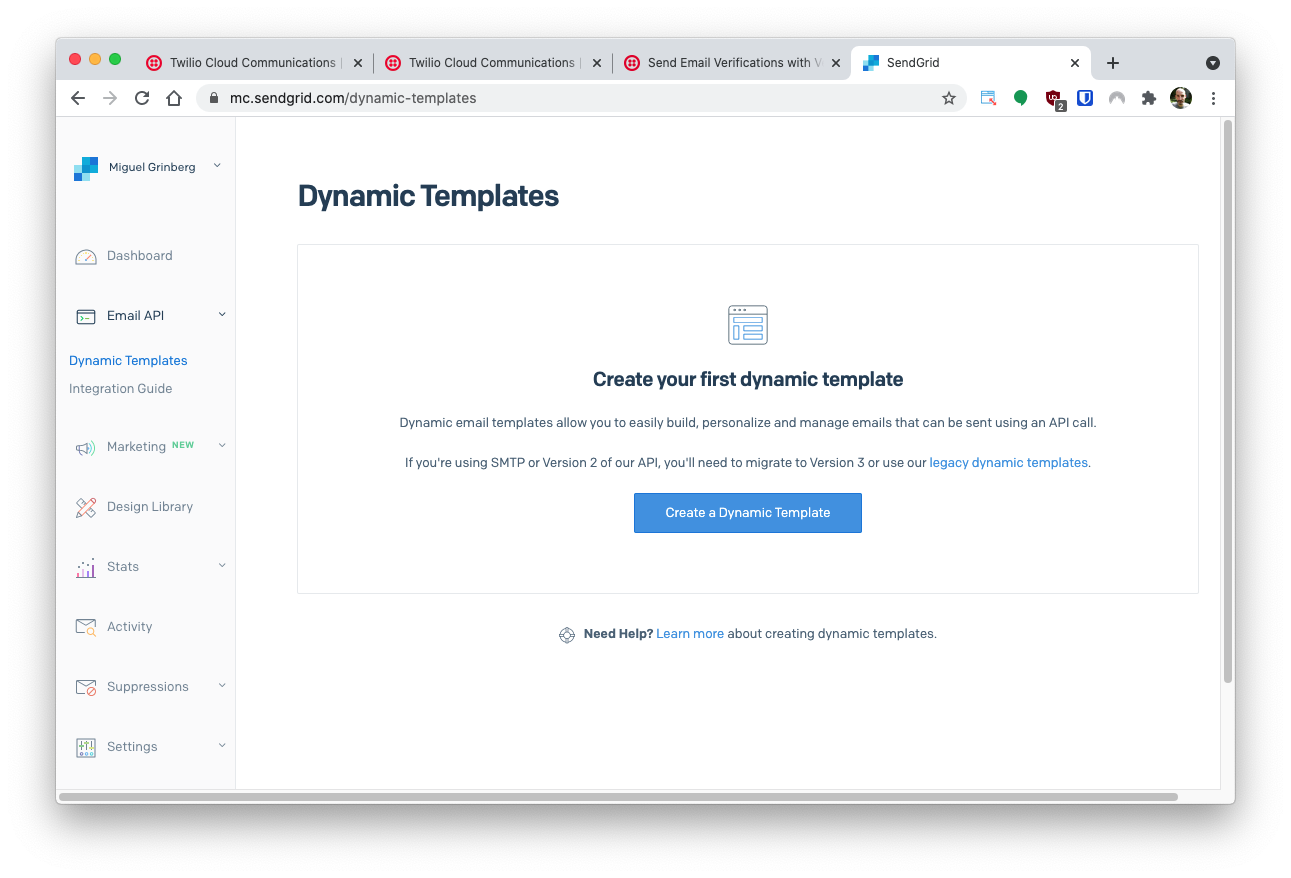
From the SendGrid dashboard, click on “Email API” on the left-side menu, and then on “Dynamic Templates”.
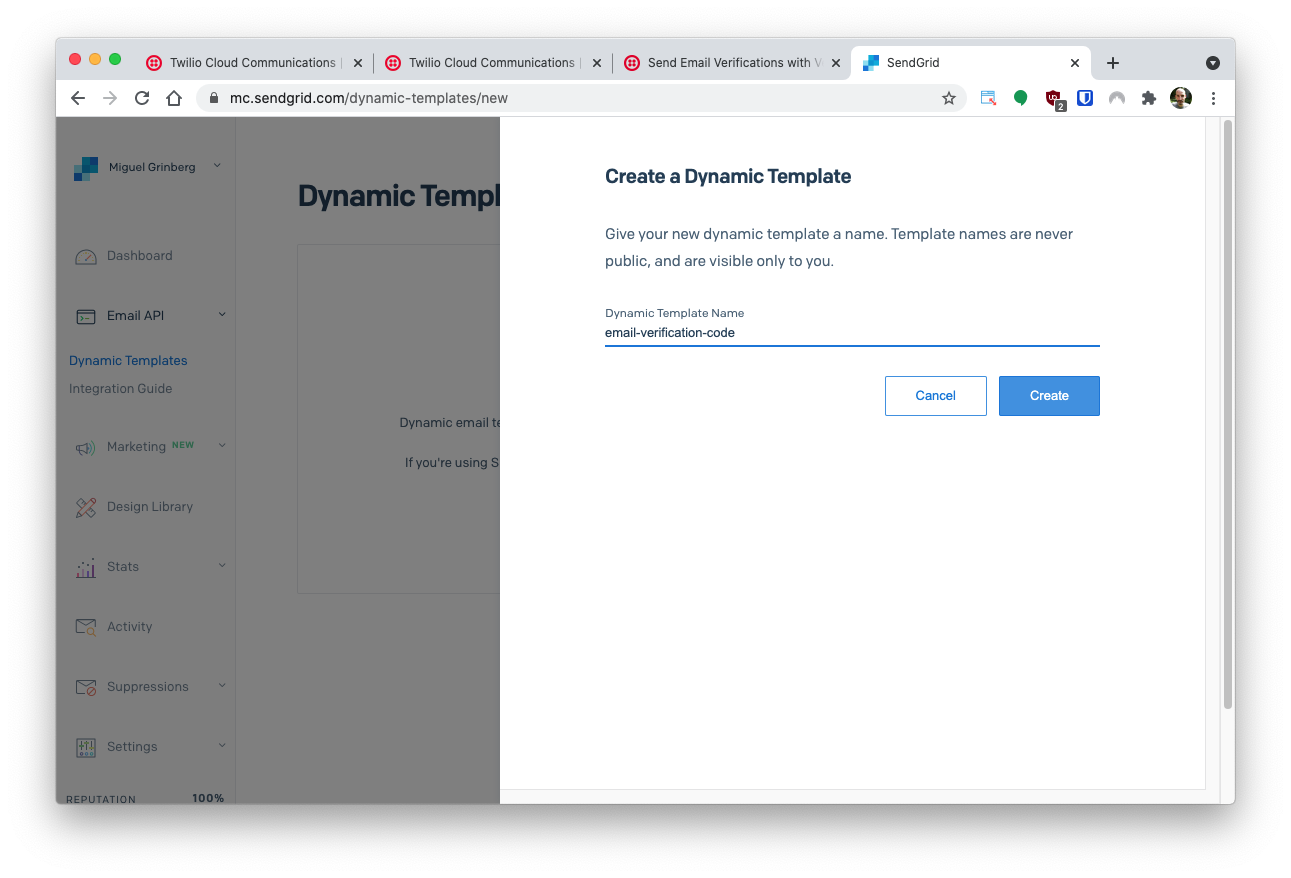
Click the “Create Dynamic Template” button to create a new template. You will need to give your new template a name. Feel free to use any name that you like. For this tutorial I have used the name "email-verification'.
Clicking on the Create button will redirect you to the Dynamic Templates page where you will see the newly created "email-verification" template. Click on it to expand the details as shown in the screenshot below:

Click the Add Version button to create a first version for the template, and you will be offered a choice of pre-made templates to choose from. For the needs of this tutorial, you can select the “Blank Template”, but if you are familiar with HTML you can try one of the more interesting options.
The next prompt will ask you to select an editor for your template. Select the “Code Editor” option to have direct access to the HTML code of the email body.
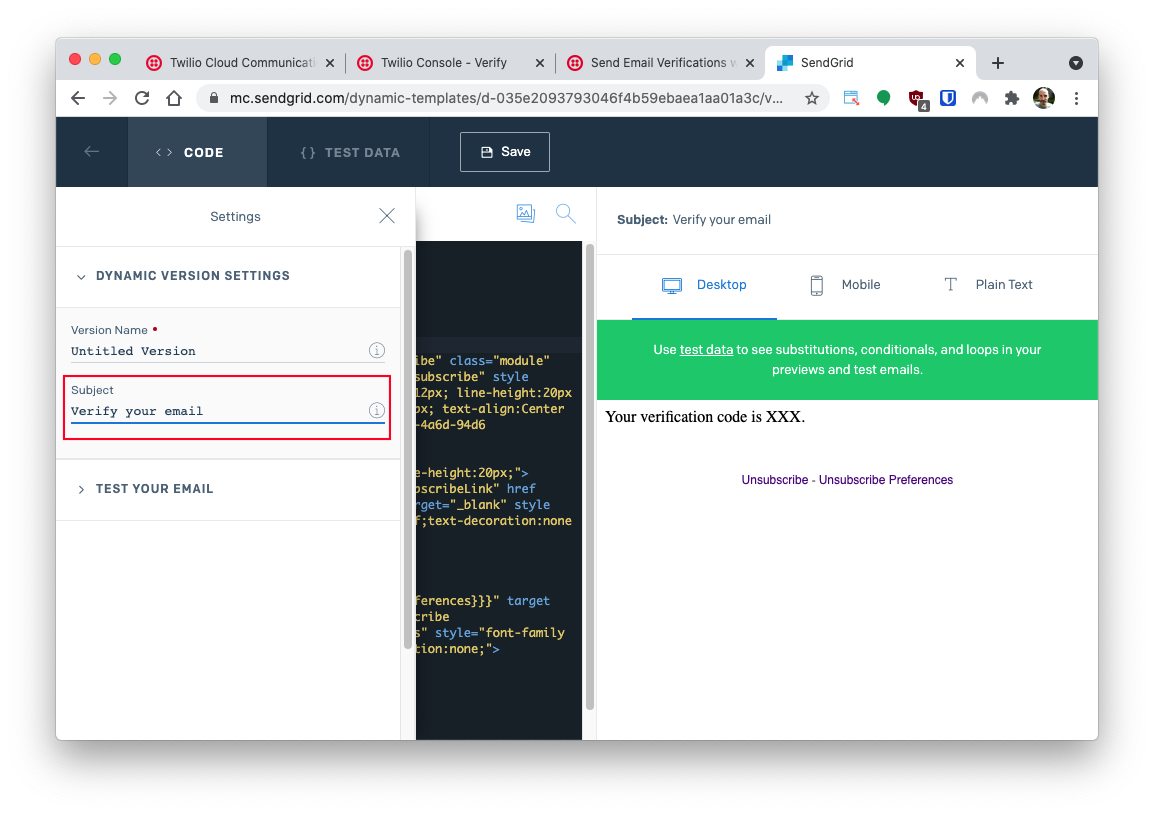
You will notice that the blank template isn’t really blank, as it comes with a footer with unsubscribe links. Leave those links alone and add the following HTML line to insert a paragraph with the email body above them, right after the <body> element tag:
Below you can see how this paragraph fits within the email in the code editor:
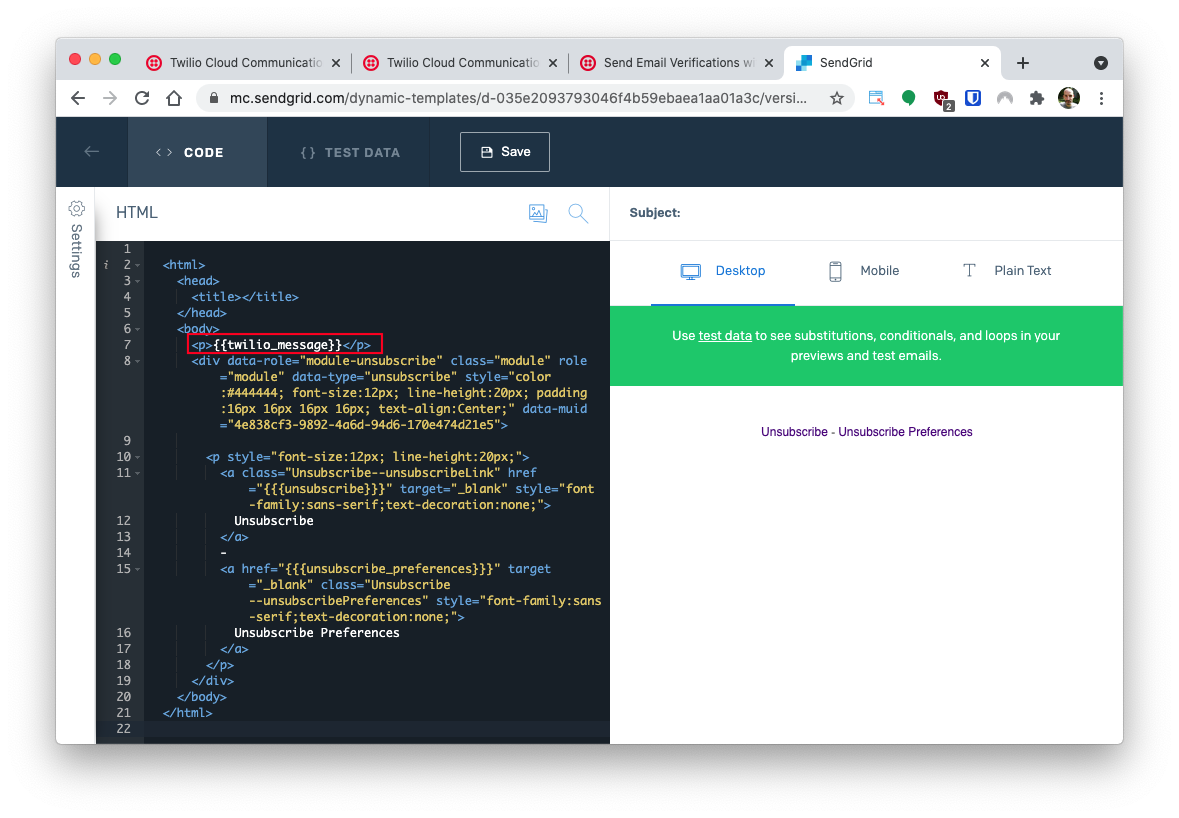
In this template, {{twilio_message}} is a placeholder that will be replaced with the text of the email by Twilio. The email will read something like “Your verification code is: xxxxxxxx”.
There are a handful of placeholder variables that you can use to design the email body if {{twilio_message}} does not work for your needs. See the documentation to learn about them.
If you’d like to see how the email will look with actual data, you can click on the “Test Data” tab on the top of the page and enter an example value for the twilio_message variable in JSON format. For example, you can enter the following:
Once you are happy with the template, click the “Settings” vertical button on the top-left corner of the page and enter a subject for your email.
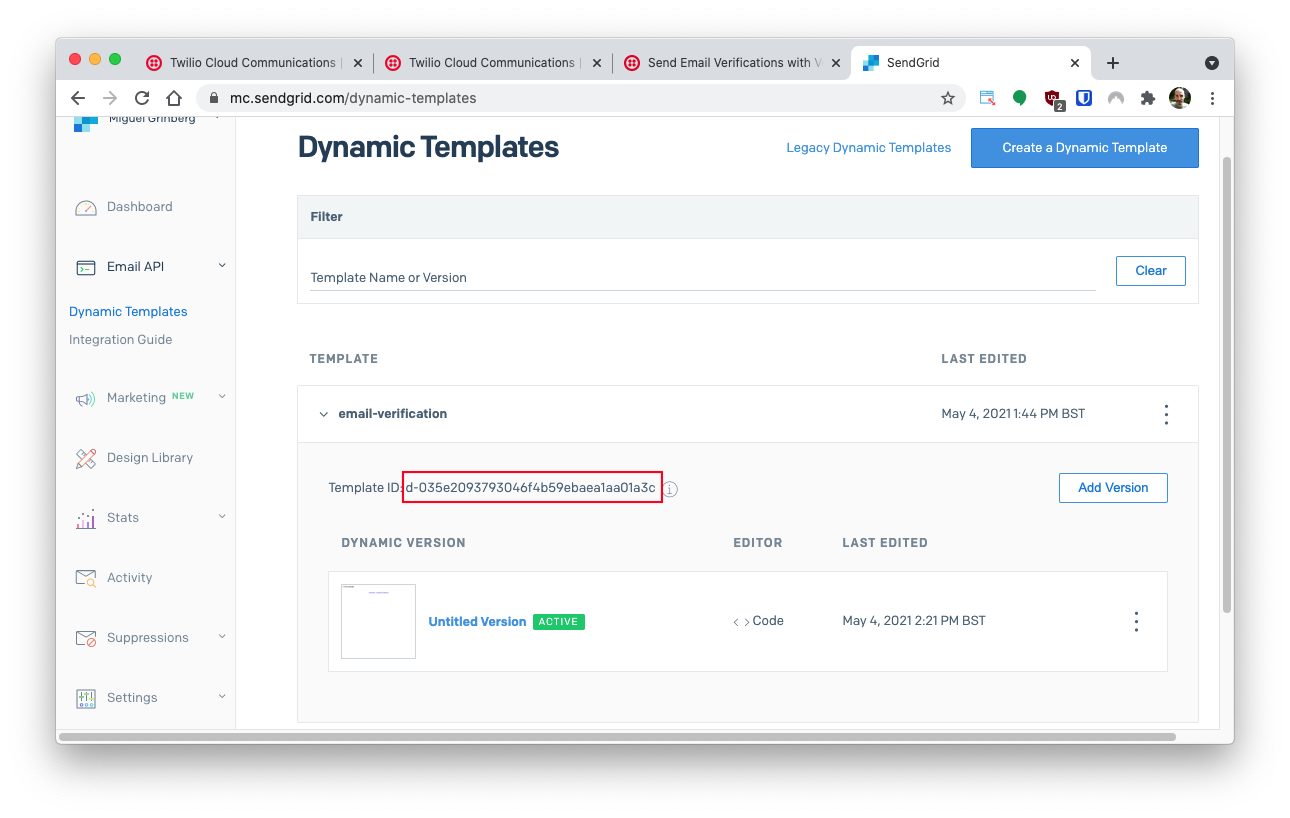
Click the Save button in the navigation bar and return to the Dynamic Templates page by hitting the back arrow button in the top left corner of the page.
Your new email template will have a “Template ID” assigned to it, which you will need later when configuring the Twilio account. You can see where to find it in the screenshot below.
Creating an API key
The second part of the SendGrid configuration is to create an API key that Twilio can use when sending verification emails to users.
From the dashboard, select “Settings” and then “API Keys”. In the API Keys page click the “Create API Key” button.
You will need to give your API key a name. Once again you are free to use any name that you like. I have used email-verification. From the three options below the name, select Full Access.
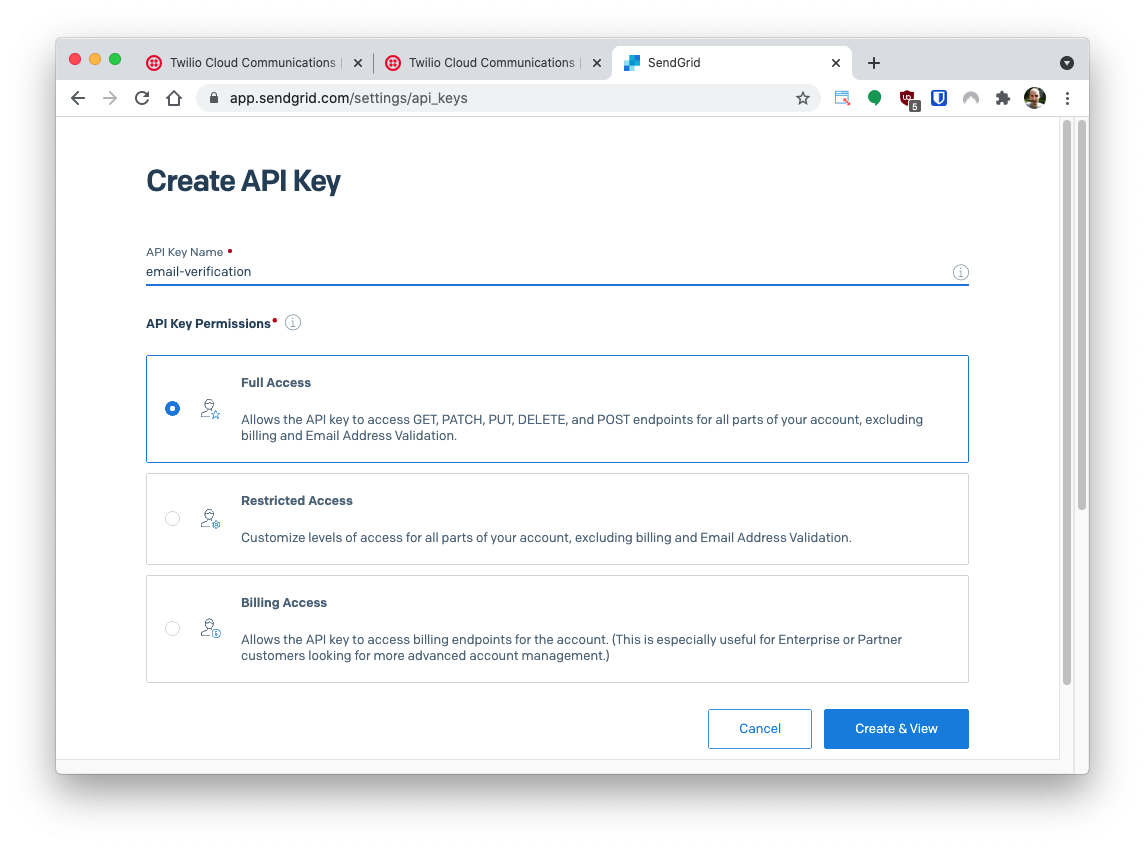
Click the “Create & View” button to create the key. In the next page your API key will be displayed. This is the only time you will be able to see your key, so copy the key and paste it in a text document to keep it handy until you need it in the next section.
Twilio configuration
The Twilio Verify service will send email through the SendGrid API key and dynamic template configured in the previous section. You will now move to your Twilio account to complete the configuration and link your Twilio and SendGrid accounts.
Creating an email integration
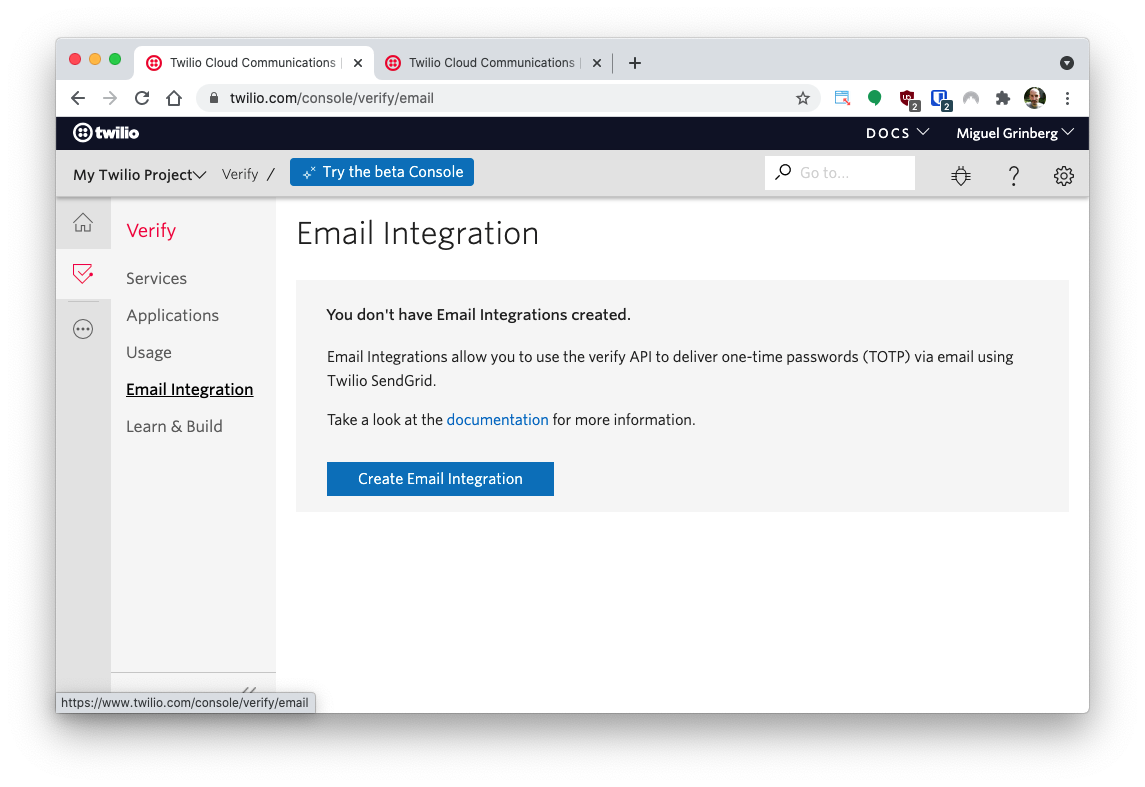
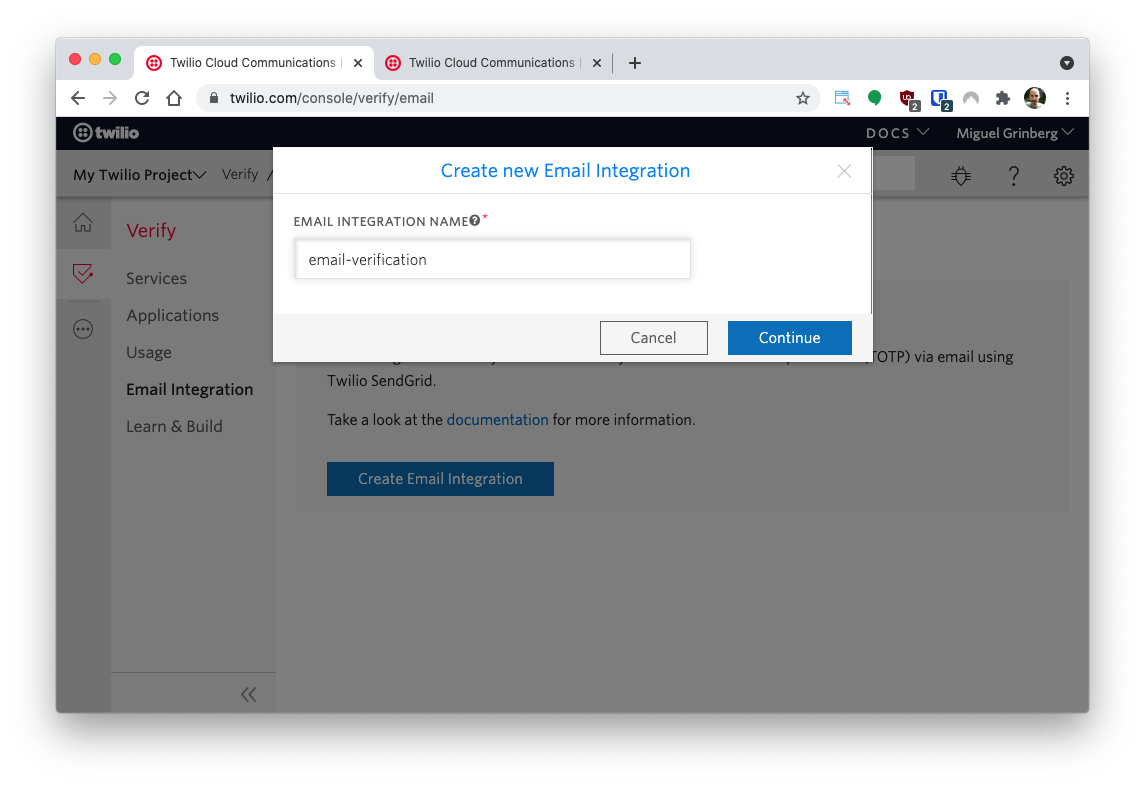
From the Twilio Console, click the “All Products & Services” button and find “Verify”. Then click on “Email Integration” in the Verify menu.
Click the “Create Email Integration” button to create a new email integration. If you already have one or more email integrations, click the “+” sign to add one more.
You will be prompted to give your email integration a name. I’ve used email-verification.
After you provide the name, you will have to enter the details of your SendGrid account. You will need to provide the following information:
- Your SendGrid API key, created in the previous section.
- The Template ID of the dynamic template, created in the previous section.
- An email address to use in the “From” field of the verification emails.
- A name to use in the “From” field of the verification emails. You can enter your website or company name in this field.
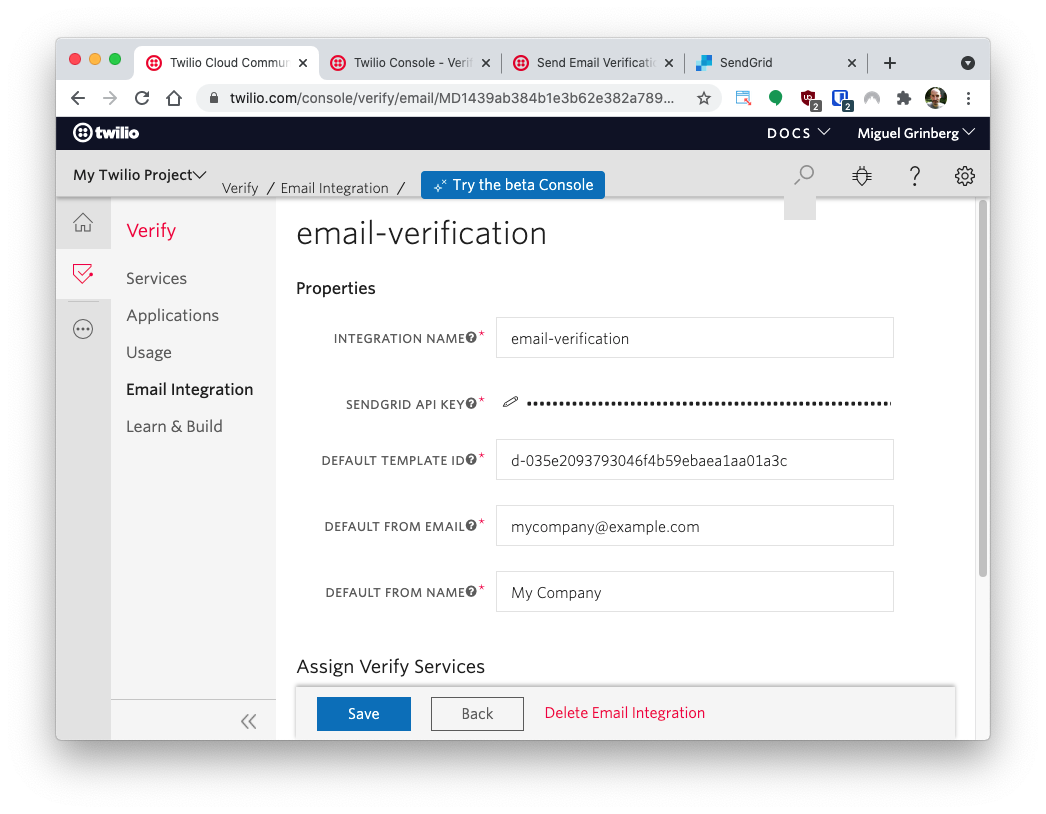
Once you complete the fields indicated above, click Save to store the email integration.
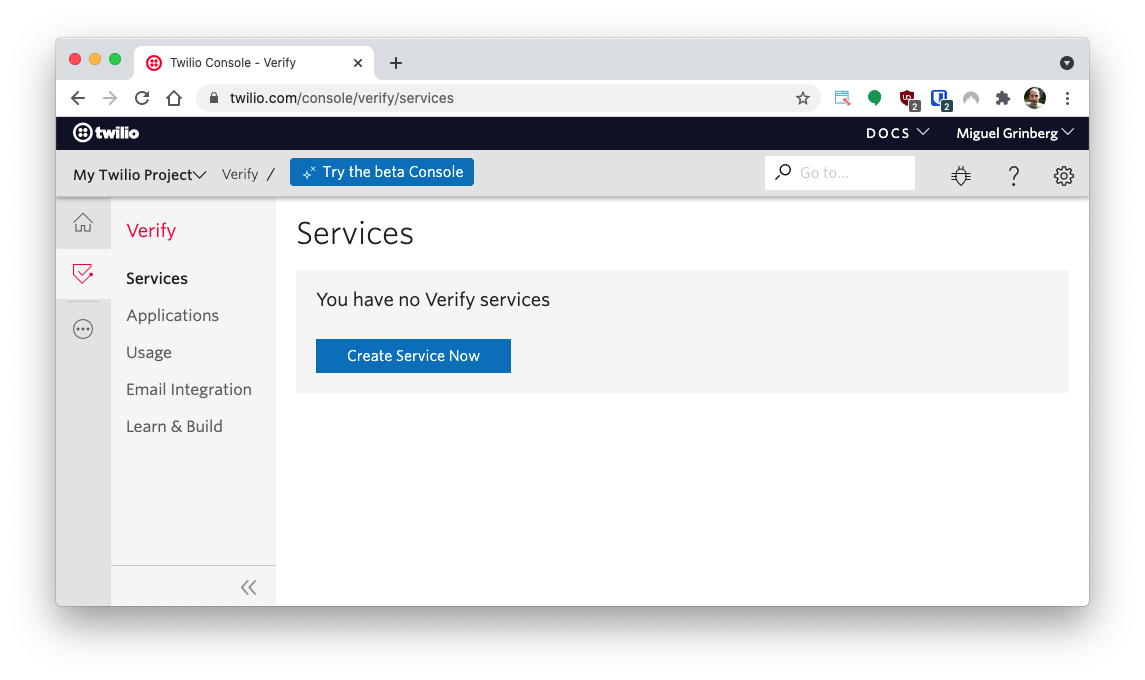
Creating a Verify service
Select Services from the Verify menu, and then click the Create Service Now button. Note that if you already have one or more Verify services in your account, you will need to click the + button to add a new service.
Give the service a friendly name. This name will appear in the verification emails that are sent out to your users, so it is a good idea to use your website or company name. For this tutorial I’ve used the name "My Company".

You will now have a list of configuration settings that you can edit on this service. Near the top of the page you will see a dropdown that configures how many digits are used in the verification codes. I’ve chosen 8 digits, as shown below.
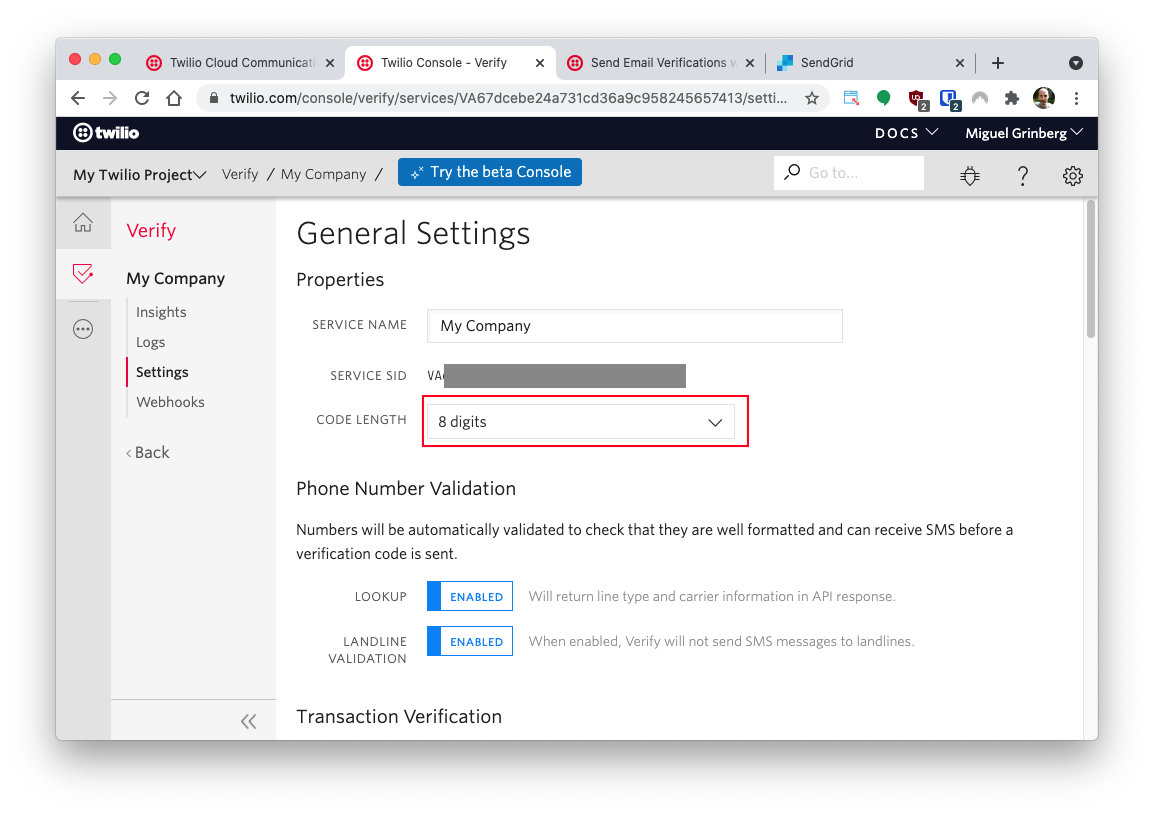
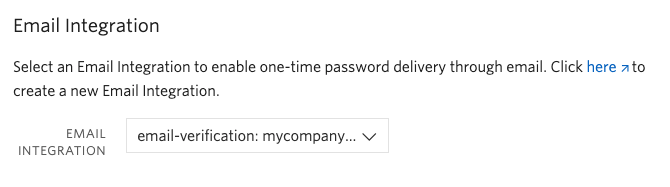
Scroll down to the “Email Integration” section and select the email integration that you created above in the drop down.
Keep scrolling down to the bottom to find the “Delivery Channels” section. Since you are only going to use emails in this example, it is a good idea to disable the other two channels.

Click the Save button to record your changes. Congratulations, your email verification service is now fully configured and you are ready to start coding the Python application!
Project setup
In this section you are going to set up a brand new Flask project. To keep things nicely organized, open a terminal or command prompt and find a suitable place to create a new directory where the project you are about to create will live:
Creating a virtual environment
Following Python best practices, you are now going to create a virtual environment, where you are going to install the Python dependencies needed for this project.
If you are using a Unix or Mac OS system, open a terminal and enter the following commands:
If you are following the tutorial on Windows, enter the following commands in a command prompt window:
With the virtual environment activated, you are ready to install the Python dependencies required for this project:
The Python packages that this project uses are:
- python-dotenv, to import the application configuration from a .env file.
- Twilio Python Helper library, to work with the Twilio APIs.
- The Flask framework, to create the web application that will receive message notifications from Twilio.
Set up a development Flask server
Make sure that you are currently in the virtual environment of your project directory. Since we will be utilizing Flask throughout the project, we must set up the development server. Add a .flaskenv file (make sure you have the leading dot) to your project with the following lines:
These incredibly helpful lines will save you time when it comes to testing and debugging your project.
FLASK_APPtells the Flask framework where our application is locatedFLASK_ENVconfigures Flask to run in debug mode
These lines are convenient because every time you save the source file, the server will reload and reflect the changes.
Then, type flask run in your terminal to start the Flask framework.
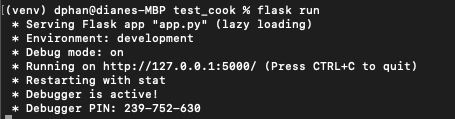
The screenshot above displays what your console should look like after running the command flask run. The service is running privately on your computer’s port 5000 and will wait for incoming connections there. You may also notice that debugging mode is active. When in this mode, the Flask server will automatically restart to incorporate any further changes you make to the source code.
Defining application settings
To send verification emails with Twilio Verify, the Flask application will need to have access to your Twilio account credentials to authenticate. The application will also need to know the ID of the Twilio Verify service you created above.
The most secure way to define these configuration values is to set environment variables for them, and the most convenient way to manage your environment variables in a Flask application is to use a .env file.
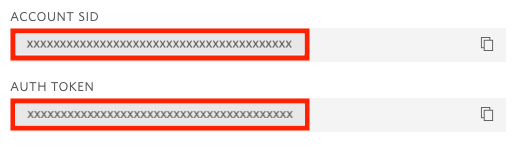
Open a new file named .env (note the leading dot) in your text editor and enter the following contents in it:
You will need to replace all the xxxxxxxxx with the correct values that apply to you. The first two variables are your Twilio “Account SID” and your “Auth Token”. You can find them in the dashboard of the Twilio Console:
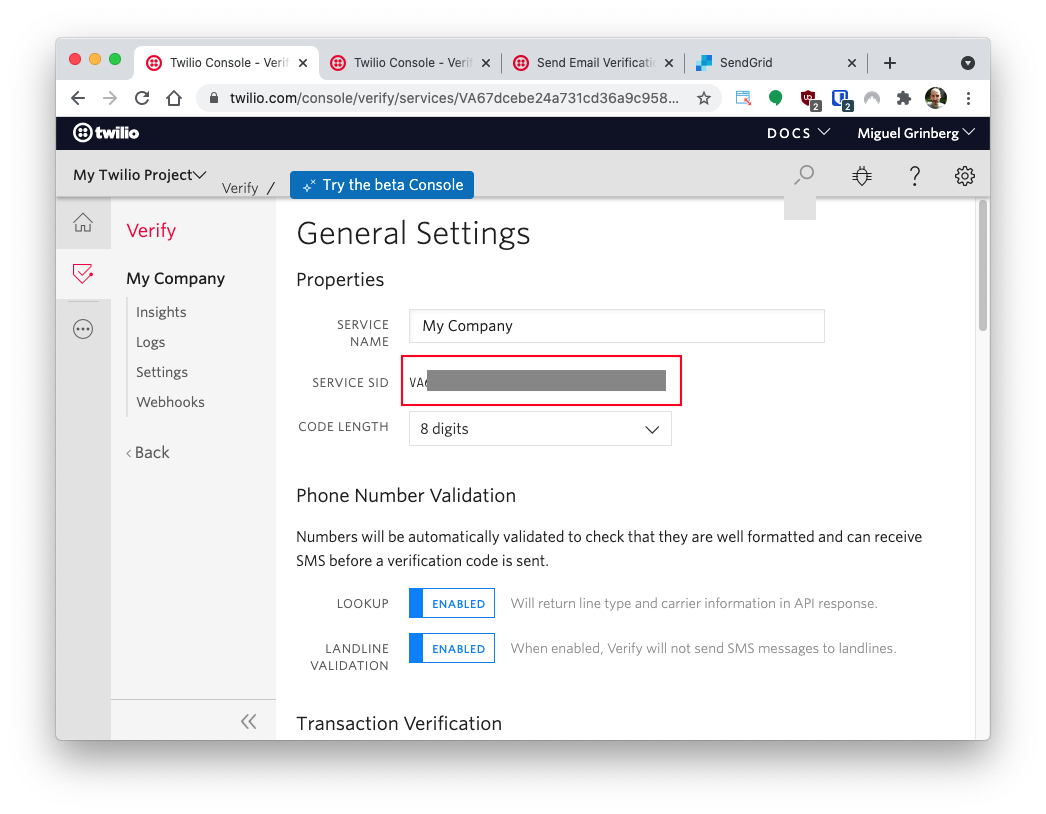
The TWILIO_VERIFY_SERVICE variable is the “SERVICE SID” value assigned to the service. You can find this value in the configuration page for your service.
Plan the logic of the project
The flow of logic for the project goes as follows:
- A user will enter their email on the website homepage.
- The Flask application sends a one time passcode to the email entered on the homepage.
- The user is prompted to enter the verification code they received from their email to verify their identity.
With that said, let's start coding!
In your working directory, create a file named app.py and copy and paste the following code:
At the top of the file, we imported the necessary Python modules and libraries so that the project can load the environment variables.
The Flask application will also have a secret_key for some level of security. Any random string can replace "'secretkeylol'". This is also required in our project since we need to store the users' account information and pass it along to other routes on the site using Flask's session.
Create the template folder for HTML pages
To build the UI for this project, you’ll be using Flask templates. Create a folder in the working directory named templates and create the following files inside of the folder:
- index.html - the landing page for the user to enter their email and request a verification token.
- verifypage.html - for the user to enter the verification code when prompted.
- success.html - page indicating the success of protection for the user's account!
Build the user login page
For this project, the user will go to the website and enter their email. Copy and paste the following code at the bottom of your app.py file:
The @app.route(‘/’) decorator defines an endpoint that is mapped to the root URL of the application. The implementation of this endpoint returns a response that is loaded from a static file named index.html.
A POST request is made to allow the participant's email to be stored in the Flask session. That email is stored in the current Flask session and the verification token is sent to the email address entered. The participant is redirected to another route where they will see a second form allowing them to submit the verification code.
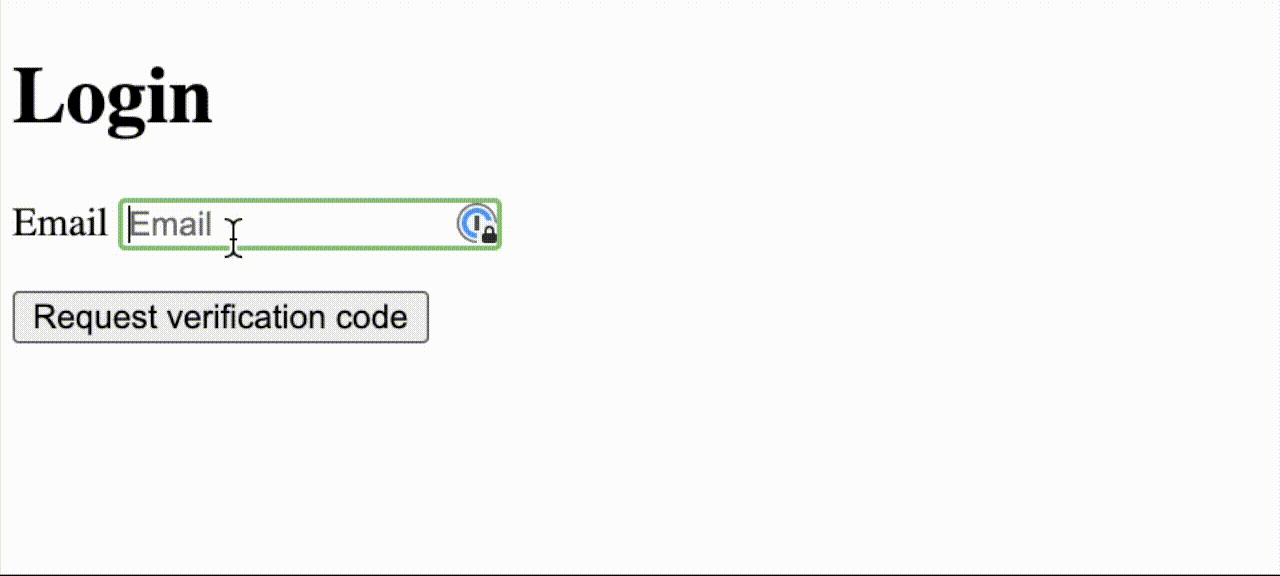
In order to retrieve the text from the participant, a proper HTML form must be created for the participant to interact with. Create a form that takes in a email input, as well as a button to submit. Feel free to copy and paste this barebones HTML form into the index.html file:
The Twilio Client sends a verification token to the email stored in the current Flask session. The specified channel in this case is email but it can be sent as SMS or a phone call if you prefer to change it later.
Keep in mind that this is a simple function that sends a verification passcode and does not yet account for error handling.
Time to test it out. On the webpage, enter your personal email address to send the verification code to. Check your email to see the notification for the verification code provided by Twilio Verify.
Verify the user's email
In this route, we will be taking the code received by the user from a new form and making sure it is the same exact verification code that Twilio emailed to the provided email address.
Let's wrap it up by creating the form on the HTML side. Copy and paste the HTML into the body of verifypage.html:
Awesome! Now the user is able to verify their identity with the 8 digit code that was sent to their email.
But wait - how can we verify the 8 digit code if Twilio is the one that sends out the code? We need to define the /verifyme route and define the appropriate functions so that the user can verify the passcode.
Copy and paste the following code to the bottom of the app.py file:
We need to define the check_verification_token() function beneath the verify_passcode_input() code so that this function can be called within this route:
The check_verification_token() function takes in the Flask session's email and the verification_code that the user typed into the textbox and calls the Verify API to make sure they entered the one time passcode correctly.
So once the user submits the form, which then makes the POST request to the /verifyme route, the verify_passcode_input() function is called. If the passcode was correct, the success page is rendered. Similar to the logic for the login page, if the participant enters an incorrect verification code, the page will refresh and show an error message. The page will also let the user enter the verification code again.
Display a success message
At this point, the user has entered their credentials and verification code correctly. You can now redirect them somewhere else as you please, but in this tutorial, you’ll redirect them to a success page, as coded in the verify_passcode_input() function.
Copy and paste the HTML into the success.html file within the templates directory:
Authenticate your account with Twilio Verify
It's time to test out the app. Make sure that Flask is running on your terminal with flask run. Visit http://localhost:5000/ and enter your personal email address.
Check your email to see an email from "mycompany@example.com" and find the verification code provided by Twilio Verify.
Enter the code correctly to see the success message as seen below:
What’s next for authenticating users with Twilio Verify?
Congratulations on implementing safe practices and incorporating security measures into your project!
Twilio Verify supports several channels through which the user can can be verified, including SMS and voice calls. Consult the documentation to learn about these and other verification methods.
You can also build a one-time passcode protected conference line with Twilio Verify and Python or add two-factor authentication to a blog.
Let me know if you used Twilio Verify API to protect your users in your project by reaching out to me over email!
Diane Phan is a Developer on the Developer Voices team. She loves to help beginner programmers get started on creative projects that involve fun pop culture references. She can be reached at dphan [at] twilio.com or LinkedIn.


Related Resources
Twilio Docs
From APIs to SDKs to sample apps
API reference documentation, SDKs, helper libraries, quickstarts, and tutorials for your language and platform.
Resource Center
The latest ebooks, industry reports, and webinars
Learn from customer engagement experts to improve your own communication.
Ahoy
Twilio's developer community hub
Best practices, code samples, and inspiration to build communications and digital engagement experiences.