Build a Cellular Connected Raspberry Pi Fax Machine with Node.js
Time to read:
May 23, 2018
Written by
This post is part of Twilio’s archive and may contain outdated information. We’re always building something new, so be sure to check out our latest posts for the most up-to-date insights.

Here at Twilio, one of our core objectives is to inspire and equip you to you build new things – even just for fun. Our latest experiment along those lines? A cellular connected portable fax machine.
You heard that right: a fax machine! While a fax machine probably won’t be the next hit holiday gift, we think it’s great inspiration for your next IoT project.
What you’ll need to build your cellular Raspberry Pi fax machine
We’ve provided a shopping list of services and hardware required to recreate this project:
- A Twilio account
- Everything on this Amazon portable fax machine shopping list
- A Programmable Wireless SIM card
- This project’s source code
Overview
Hardware
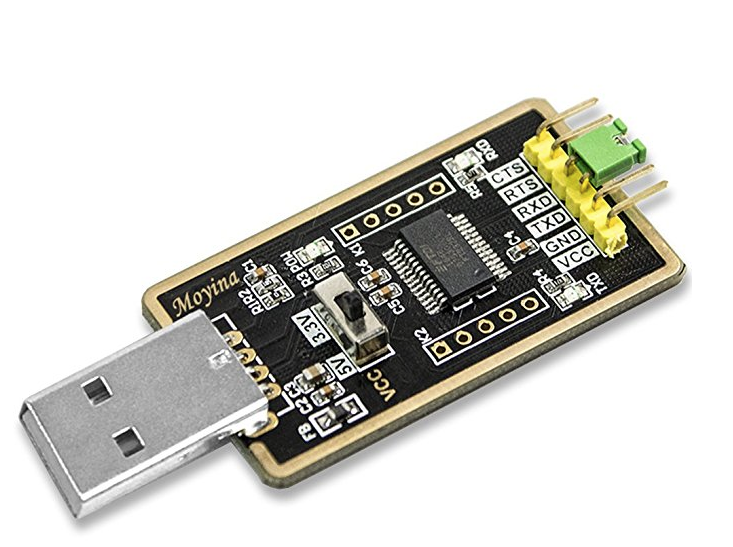
A Raspberry Pi and thermal printer are at the center of the required hardware to build this beast. You’ll use a USB to TTL serial cable to connect to the Raspberry Pi headlessly and won’t need a mouse, keyboard, or monitor. The whole thing is connected to an LTE USB modem for optimal speeds. Expect to need extra thermal printer paper? Amazon has that too.
Dashboard
Built with Vue.js and used to preview and manage the faxes that come through.
Software & Services
All the Twilio. Sync is used to keep your fax statuses up to date, Functions is used for some serverless architecture, and of course Programmable Fax will receive those important documents. All code is in Javascript and Node.js for language consistency across platforms.
Putting the hardware pieces together

Set up the Raspberry Pi
Follow along with our quickstart to configure your headless Raspberry Pi. You’ll set up the Raspbian LITE operating system, a USB to UART bridge, a Huawei E397 (Cricket) USB Modem and some packaged scripts and finish with a Raspberry Pi on the internet using cellular connectivity.
Connect the thermal printer to the Raspberry Pi
The printer requires a female DC power adapter to connect to your 5V 2A power supply. (You should have it if you followed the shopping list.)
Pull firmly on the plastic casing covering the DC printer cable then screw the red and black cables into their respective terminals in the female DC power adapter. Consult the image below if you need a visual.
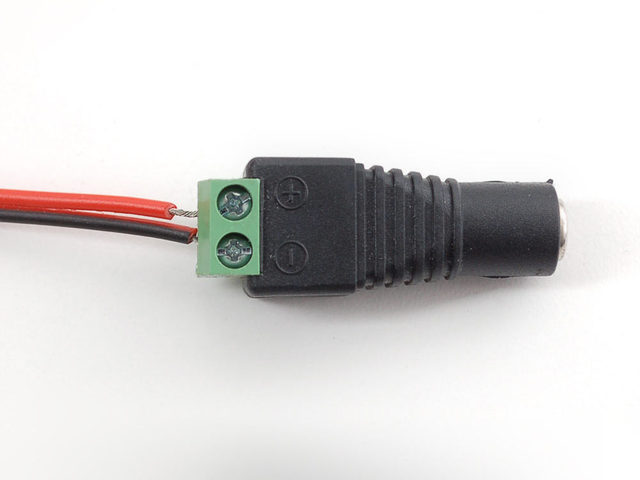
You can connect the GND, RX, and TX printer cables directly to your Raspberry Pi GPIO header or you can preferably connect to the USB to TTL adapter. I used the USB adapter for versatility – by doing so I also gained the option to plug the printer into my laptop. For the USB adapter, plug the black wire of the printer cable into GND, the yellow wire into TX, and the green wire into RX.
Go ahead and plug your DC power adapter into the printer and the USB adapter into the Raspberry Pi. Finally, power up the Raspberry Pi – you’re done with the hardware configuration!
Set up the Twilio services
There are a couple necessary steps to have a Twilio virtual phone number receive faxes and forward them to the printer. Navigate to our project’s Github repository for step by step set up instructions.
After following along with the instructions in the repository, you’ll have:
- A Sync Service Instance
- An API Key
- The necessary configuration variables for your Twilio Functions
- The mysterious Portable Fax Machine Received Function
- A Portable Fax Token Function
- TwiML to receive faxes
- A Twilio fax-enabled virtual phone number
Set up the server
There are many options for you to host the backend. In general, you can either host the code on a cloud hosting platform such as Heroku or run it locally.
A quick disclaimer is in order: It’s a better idea to run this code locally and to not upload to a cloud hosting platform. The code for this project is meant for demo purposes and was not created with security in mind.
Follow along with the step by step instruction in this project’s repository to set up the server required to run the Vue.js dashboard and send bitmaps to the printer for printing.
Set up the cellular fax client
Next up, we’re going to Node.js to run the fax client software on the Raspberry Pi.
Type the following in the terminal on the Raspberry Pi (or feel free to wget it locally and examine it first):
Install git
Clone the repository to your Raspberry Pi:
- Navigate to the pi folder
- Update line 6 of config.js to your Portable Fax Machine Received Function created in setting up your server
- Update line 12 of portable-fax-receiver.js with the path of your USB interface
Follow along with the Raspberry Pi client instructions to learn how to find your USB interface and install the Node.JS modules.
Send all the faxes
The time has come to send a fax to the printer.
Don’t have a fax machine? No worries – we kind of expected that! You can send faxes to any printer via the Faxes API:
POST to the Faxes Resource
Because let’s be real, you don’t have a fax machine...
Receive the fax in the web dashboard
Your fax will show in the web dashboard after a few moments of processing.
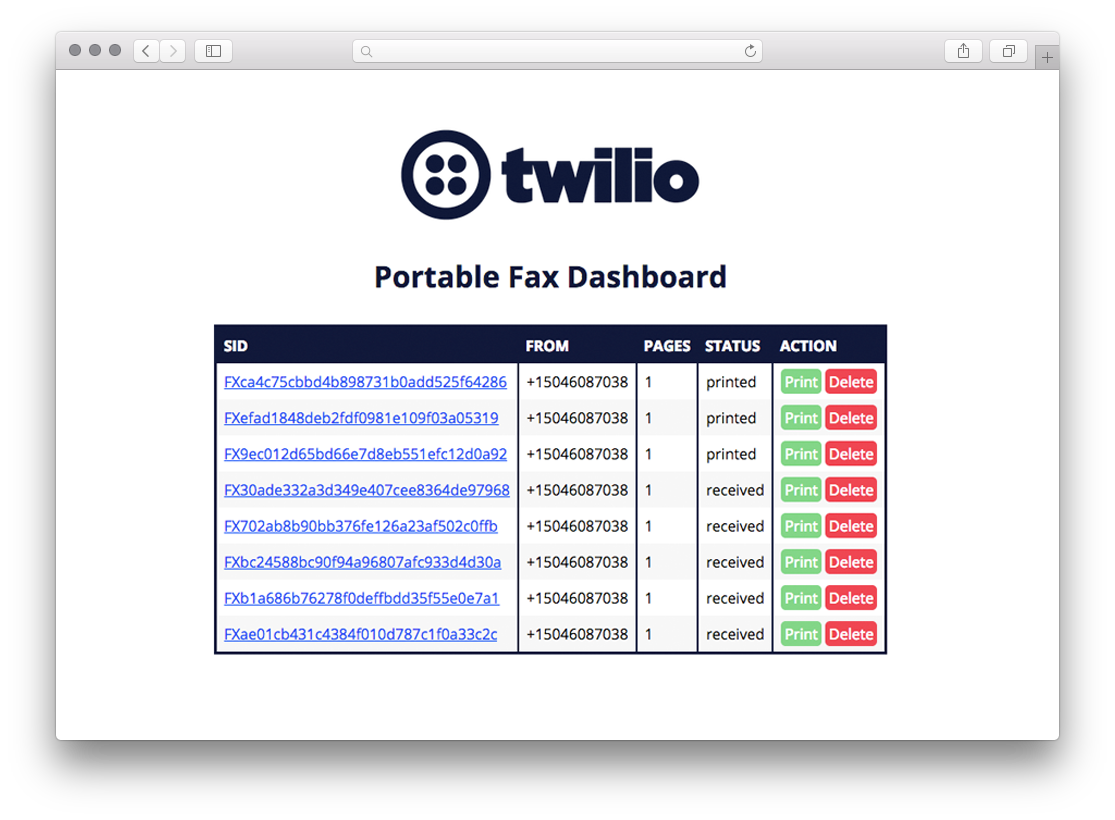
Click the Print button to send the fax to the printer.
Printing out your cellular fax
Watch with amazement as the printer starts with near instantaneous speeds. Notice the status of the fax update in the dashboard.

Click the Delete button to remove the fax resource.
Feel free to click the Print button again for fun.
Next level stuff
You’ve probably noticed by now that this is really just a fax printer. Grab a Raspberry Pi camera and use opencv to take photos and send it out to another fax machine by updating the dashboard to send an event to the printer to capture a photo and accept a phone number. Then create a pull request to the wireless-portable-fax repository and share the knowledge. Looking for more inspirational material? Take a look at our other Programmable Wireless tutorials and our Blueprints.
Happy hacking!
Want to see the cellular Raspberry Pi Fax Machine in action? Join us at Engage Santa Clara, play with the fax machine, and play the new TwilioQuest Wireless mission!
Watch the Twilio Engage page for details.


Related Resources
Twilio Docs
From APIs to SDKs to sample apps
API reference documentation, SDKs, helper libraries, quickstarts, and tutorials for your language and platform.
Resource Center
The latest ebooks, industry reports, and webinars
Learn from customer engagement experts to improve your own communication.
Ahoy
Twilio's developer community hub
Best practices, code samples, and inspiration to build communications and digital engagement experiences.