Build an Office Phone Manager with Django, Heroku and Twilio
Time to read:
November 24, 2014
Written by
This post is part of Twilio’s archive and may contain outdated information. We’re always building something new, so be sure to check out our latest posts for the most up-to-date insights.


A common desire that I often hear from office managers is the need to replace their entire office phone stack with a collection of “work” phone numbers that they can program to call employee’s personal or work phones. This would remove their need to invest in at-desk phone hardware and get tied into long term contracts. They also want to be able to easily change what happens when those numbers are called. People often want to use Twilio for this, and I often get asked if Twilio can. The simple answer to that question is yes.
The more complex answer is: Yes… if you have a bunch of developers who can build a system like this for you. A lot of these folks just want a solution, but don’t know how to produce one with the toolbox of features that Twilio provides. It became obvious to me that showing how to build an Office Phone Manager with Twilio would be beneficial. As I wanted to flex my engineering skills a bit, I dedicated some time to building an open source version that people could use, or could study so they could build their own.
This is the first in a series of blog posts that takes you through the steps needed to create and deploy an application that let’s you:
- Create “office hours” schedules for your staff.
- Create new actions for when a phone number is called. These actions are plain TwiML templates and all you have to do to replace the important bits.
- Configure a Twilio number to use a schedule and a set of actions.
Then that number can be handed out and used as a professional number for a single person, a voicemail service, or even a menu tree for a larger organisation.
You can either follow this guide and build your own (using a different web framework or programing language) or you can download an open source version of the project we’ll be building on Github here: https://github.com/phalt/hermes
What you’ll learnIn this post, we will:
- Describe the components within this application
- Look at the design choices for the technical implementation and determine the components for it.
- Set up a basic Django project using a template.
- Show you how to create the required components in Django.
- Build and install the database schema migrations for the components.
- Write some basic logic for the Twilio endpoint.
You’ll need the following tools:
- Git
- Python
- pip
- Virtualenv
- Access to the World Wide Web
The application that this series of posts will help you to build will have a reasonably complex data structure. Luckily for us, the web framework we’re using, Django, has a collection of APIs for managing the data structure and abstracting it, leaving us to just use high-level python to manipulate the data how we like. We won’t have to touch a single line of SQL.
In order to understand the data structure, we first need to realise how the components in our Office Phone Manager application interact:
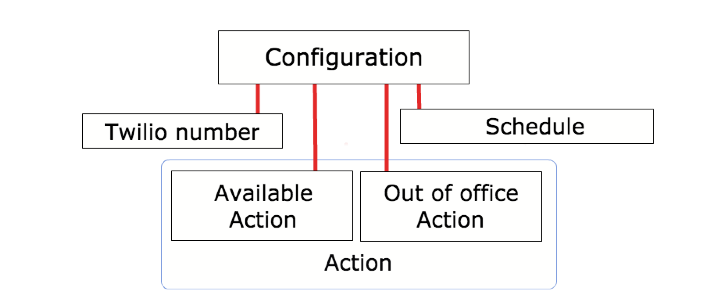
Each Phone Number can be configured with a set of actions that occur based on a work schedule. Each action is made up of a TwiML template and some parameters. Each schedule has a start time and end time, as well as the days of the week. Each configuration will link to a name, a phone number, a schedule, a “in” action and “out of office” action.
When a phone number is called, the configuration will look at the schedule to determine which action and which TwiML to respond with.
This is the explicit description of what we want the Office Phone Manager to be able to do. I’ve taken the liberty to highlight the components within this description that can be turned into object models within our Django application:
- Action – A TwiML template with some configurable options.
- Schedule – A start time and end time, as well as a collection of days. If the time is between the start and end time and on a certain day, the schedule will be considered “available”, otherwise it will be considered “out of office”.
- Configuration – Links a Twilio Number to a Schedule and an “available” Action and an “out of office” Action.
Here is a visual representation of how the different components would be linked together:
The other key consideration is how Twilio will interact with all the Configurations, Schedules and Actions when a phone number is called. I drew up a flowchart to describe the flow of this function:
The application will only need a single endpoint, or URL, that Twilio will need to make a request to. When that endpoint receives a TwiML Request from Twilio, the first thing that needs to be done is to make sure the phone number that is being called has been configured by our application yet. If it hasn’t, we just reject the call using the <Reject /> TwiML tag. If it has been configured, the current time is compared to the start time, end time, and the day in the Schedule component related to this Configuration. Depending on the time and date, either the standard Action is computed from a template or the Out Of Office Action is. Finally, the TwiML from the appropriate Action is returned back to Twilio.
Setting up the projectIn an ideal world, this article would be a huge comprehensive step-by-step guide that would give you hours of enjoyment. However, it’s likely that a lot of what would be covered would already be known, or would be considered mundane. To cut out most of the project set up and let us focus on building the interesting parts, I’ve created a template project for you with a few parts of the project already set up (the Actions model, which is very complex, for example). The code we’re going to add builds the Configuration and Schedule models, as well as the Twilio endpoint.
To get started, use git to clone the repository to your local computer. To do this, navigate to a desired directory in your terminal and type the following commands:
This will create a local cloned copy of the template application on your computer. As this is a Python project, the best practice is to use Virtualenv to create an isolated developer environment:
The virtualenv can be activated with:
Finally, all the requirements can be installed using pip:
This should take 1-2 minutes to complete. After that, we’re ready to start writing some code.
Building Django ModelsWe’ve described the components we’ll need for the Office Phone Manager, now let’s build them in Django. Open the configurations/models.py file to see some code for the Actions and Parameter model. The Parameter model is used by the Action model. The code being added, the Configuration and Schedule model, should be start on line 11 between the two comments.
The Configuration model is the top level component in the application – it links everything else together. This means it will have many foreign keys to other models in the application. The desired Configuration model should look like this:
Nearly every attribute in this data model is a foreign key relation to another object model:
- name – the name of this Configuration, for humans.
- number – a foreign key link to a TwilioNumber, another object model that you can find in twilio_numbers/models.py file. This component stores references to Twilio phone numbers to reduce the number of HTTP requests made to Twilio.
- action – a foreign key relation to the standard Action of this Configuration.
- oof_action – a foreign key relation to another Action that is called when the time is outside the desired Schedule time. This is a weird word for it, oof is supposed to be an abbreviation of Out Of oFfice.
- schedule – a foreign key relation to the Schedule for this Configuration.
- active – a boolean field to determine if this Configuration is active or not. This will allow users to turn off Configurations when they don’t want it being used, without deleting it.
The next object model that is needed is the Schedule component. This can go directly below the Configuration model you’ve just written:
Things are a bit different compared to the Configuration model, so let’s go over it all. There is another name attribute here, for humans to understand this object. There is a start_time and end_time attribute that are TimeField fields. That all seems pretty standard.
The days attribute is a ManyToMany field to a new object model, Day, that doesn’t exist yet. Let’s quickly add this component above the Schedule model and then it’s importance should make more sense. we put it above because Python is an interpreted language and will need to load the Day class into memory before referring to it.
This component is very simple, but very important. Django and Python do not ship with a way of selecting distinct days in a week, i.e. – Monday, Tuesday et cetera. You can pick specific ISO 8601 dates, but that isn’t very useful for this application. This way, our application can use human-readable days of the week and provide a much easier interface that is also date agnostic.
Now back to the Schedule model. This model includes a very important method called on_call:
This method first determines the current time and day using Python’s datetime module. The datetime method isoweekday() will return a number from 1 to 7 based on the day of the week, for example: 1 is Monday, 7 is Sunday. The on_call method ends by searching through the list of associated days. If today is in the schedule, it will return True if the current time is between start_time and end_time, otherwise it will return False. This method will be used later on to determine which Action is used when a Configuration is called by Twilio.
To prove that this works, we’ve written some tests in the full version here. These tests will check certain dates and times to make sure the results turn correctly.
Now MigratingNow that all the components for this application have been created, the next step is to build their database schema migration files. Since Django 1.7, this is an integrated tool so nothing else needs to be installed. The command needed to build the migrations is:
The resulting output should look similar to this:
We can confirm these migration files are built correctly by running the migrate command:
This should produce the following output (or similar):
Building the Twilio endpoint
With the object models created within the application, the Twilio endpoint described earlier can be built to return the desired TwiML based on the Configuration, Schedule and Action.
As this is logic not related to configurations, we should keep it in a separate file, so open the file hermes/views.py. The flowchart described earlier can be translated into the following python code, which can be added to the end of the file:
This does looks quite different from the flowchart, but it follows the same logic. This function is using the Django-twilio decorator @twilio_view, which will handle most of the HTTP formatting so our application logic doesn’t have to. The Twilio Parameters are discovered from the inbound request using Django-twilio’s decompose function and stored in a twilio_params variable. A new Twilio Response is also instantiated and stored in twilio_response.
On line 6, a quick sanity check is made to make sure the incoming Twilio request is a voice call because the Office Phone Manager only supports voice. Then the function checks to see if any Configuration model exists where the phone number is the same as the number currently calling the endpoint. If it exists, another check is made to see if the schedule is currently on_call, using the method developed earlier in this article. If it is on call, the standard action has a method called get_twiml() (which you can see here) that returns the correct TwiML. If the schedule is not on call, the Out Of Office or oof_action is returned.
If at any point any of these checks fail, a standard reject response is sent back to Twilio.
What’s next?That concludes the first part in a series of posts to create an Office Phone Manager.
This article has helped you to build the basic object models needed in the application. It has supplied a basic template for getting started, and it has even described the logic needed behind the complex Twilio endpoint. We won’t be able to run the application yet, but it doesn’t really do much yet so there isn’t much point.
But what’s next? Well, for one – the intended audience for this application is not developers, so currently they can’t use it at all as no views or forms have been created. With some simple views or forms, non-technical users can create, read and update new Configurations, Schedules and Actions. How to create views and forms for this application will be described in the next blog post, but you’re welcome to jump ahead and try to create your own if you can’t wait.
Another thing that is currently missing here – how do the Twilio Phone Numbers know how to point their Voice URLs to this application? Currently, a user will have to go to twilio.com and do this manually. That’s not very efficient, but using the REST API, it is possible to update the configuration of a number. In the next post, the logic for doing this automatically whenever a Configuration is saved will be given.
Finally: you’ve got to host this somewhere, so a guide on how to deploy this application to Heroku will wrap up the next post nicely.

Related Resources
Twilio Docs
From APIs to SDKs to sample apps
API reference documentation, SDKs, helper libraries, quickstarts, and tutorials for your language and platform.
Resource Center
The latest ebooks, industry reports, and webinars
Learn from customer engagement experts to improve your own communication.
Ahoy
Twilio's developer community hub
Best practices, code samples, and inspiration to build communications and digital engagement experiences.