How we built a COVID-19 volunteer support line for our local community using Twilio Studio
Time to read:
March 18, 2020
Written by

Update 3/20/20: If you are building something like this to help out your community, please check whether the Twilio.org Impact Access Program can help you. We have expanded eligibility to include volunteer groups and companies working on communications for public benefit to support COVID-19 response.
I am sure many of you saw posts from people setting up groups of Covid-19 volunteers on social media over the weekend. We did, and joined a group of volunteers coordinating how to support the vulnerable in our villages in Somerset, UK.
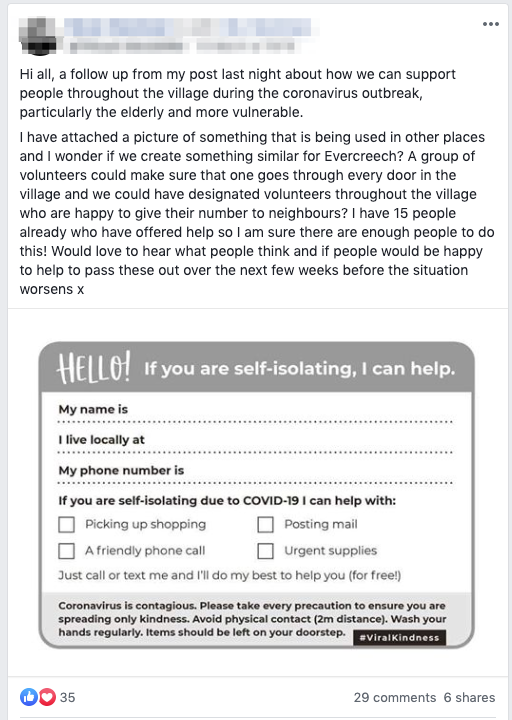
The volunteer group's first idea was to post leaflets through peoples doors with our own phone numbers as a point of contact, following the advice of Covid-19 Mutual Aid UK.
“Bear in mind that whilst Facebook or WhatsApp are good organising platforms, they might not be the easiest way for vulnerable people in your area to find and contact your group. Those most at risk might not have access to smart phones or feel comfortable having social media accounts.”
To make it easier for volunteers to work as a team, we decided to use Twilio to create a single number that people could call or send SMS to, and Twilio Studio to manage the flow of interaction with the person who needed help and to alert a group of volunteers that someone was in need.
In this post we will show how you can quickly create the same setup for your local community.
Twilio Studio
Twilio Studio is a tool for visually creating and managing communication workflows. With Studio you can build Flows which define behaviour for incoming SMS and voice calls. Studio allows import and export of these Flows as JSON.
By following this post you can import a JSON flow definition which needs a small amount of customisation to build a support line for your local community. Incoming SMS will be forwarded to multiple volunteers and incoming voice calls will be prompted to record a message and a link to the recording is then forwarded to multiple volunteers by SMS.
Building your own volunteer support line
To build this you will need a Twilio account, which has been upgraded from Trial to a paid account. If you don’t have an account already, create a trial account then follow these instructions to upgrade it. The link to create your account above contains a referral code to get an extra $10 credit when you upgrade.
Let’s look at the Studio Flow first, then after that is complete you can buy a phone number and let the flow handle incoming calls and SMS.
Creating the Studio Flow
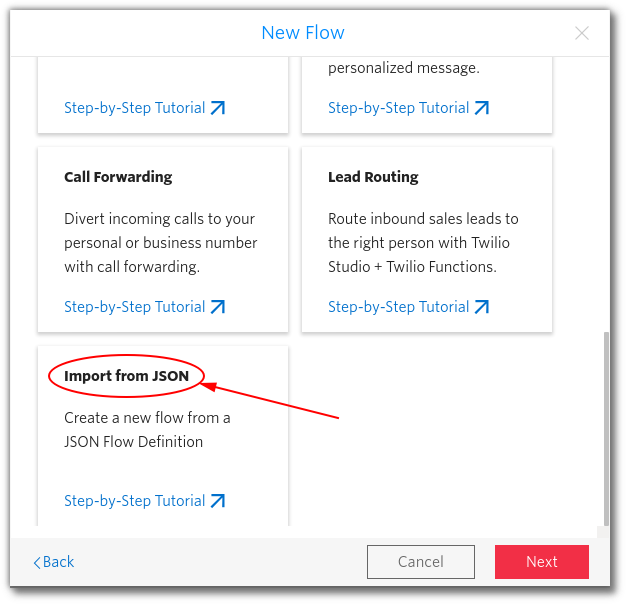
Head to the Studio Dashboard and click the red + button to create a new flow. You will be prompted for a name. I used “VILLAGE_NAME volunteer support” - you should use something appropriate for your community. Once you have named your flow you will be taken to the New Flow template. Choose “Import from JSON” then the “Next” button.
Copy the JSON from here and paste it into the page then continue by clicking “Next”. You will be taken to the Studio canvas, with a flow that looks like this:
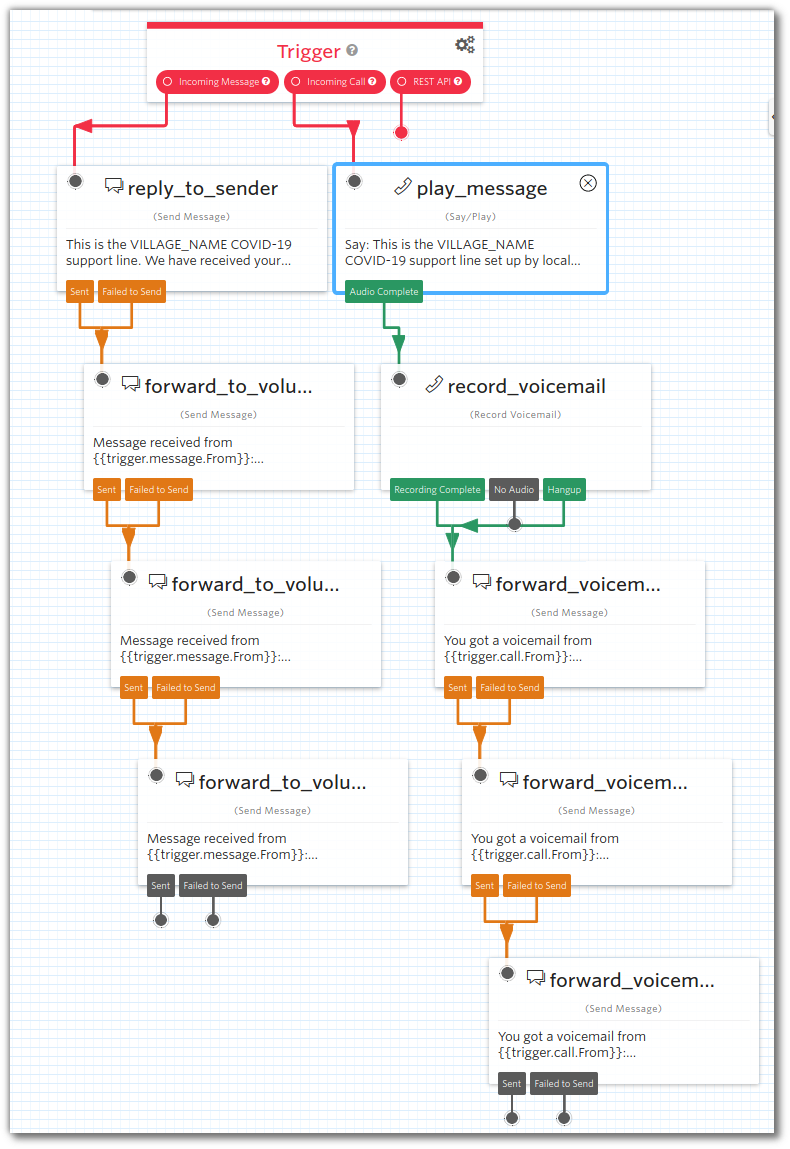
At the top there is the Trigger widget. When a call or SMS comes in to your support line phone number, flows will start here. Let’s take each case separately.
Incoming SMS messages
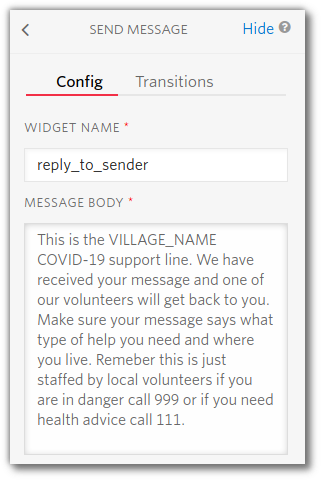
When an SMS arrives to your support line, the “Incoming Message” connector will be followed from the Trigger widget. The next step is to reply to the sender to reassure them that their message has been received. Click on that Send Message widget and its config will be shown on the right side of the canvas. Here customize the Message Body to be relevant for your community. You can leave the rest of the config as it is, and don’t forget to click the “Save” button at the bottom of the config after you’ve edited the message.
After the reply_to_sender widget is complete the flow continues to another Send Message widget called forward_to_volunteer_1. This is connected by both Sent and Failed to Send to ensure the best chance of volunteers being informed even if the phone network is not 100% reliable. SMS has a high delivery success rate, but in cases like these it’s better to be safe than sorry.
The forward_to_volunteer_1 widget has a message of Message received from {{trigger.message.From}}: {{trigger.message.Body}}. You don’t need to edit this message - the parts in curly braces are filled in with the correct values by Studio. You do need to expand the “Messaging & Chat Config” section of the widget config to fill in the “Send Message To” value.
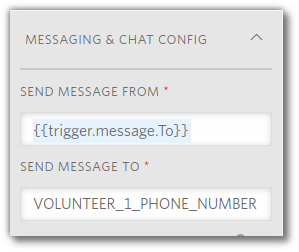
This should be the real phone number of the first member of your volunteer team, in E164 format, eg +44 7588 xxxxxx. Your volunteers will have to be able to receive SMS. Remember to click “Save” once you’ve added that.
This widget leads into another called forward_to_volunteer_2, then into another called forward_to_volunteer_3, which should be edited and saved in the same way, with two more volunteers’ phone numbers.
If you have fewer than three volunteers, you can remove unnecessary “Send Message” widgets, using the trash can icon at the bottom of the widget config.

If you have more than three then you can duplicate the last one using the copy icon next to the trash can. Remember to connect these to the bottom of the flow in the same manner as the others, add your extra volunteer’s phone number and Save the config each time.
Incoming voice calls
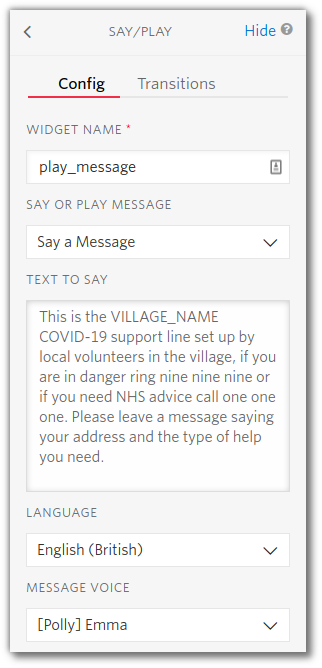
When a person dials the support line the “Incoming Call” flow is started from the Trigger widget. First a message is read out to the caller by a Say/Play widget. You will need to click on this widget to customize the message. You can also choose from a number of different voices and languages.
Once the message has been read out, flow continues to a Record Voicemail widget. You do not need to change the configuration of this widget. The end of message recording is caused by 5 seconds of silence, a total message length of ten minutes, or by the caller hanging up. Flow will continue to three more Send Message widgets, similar to the three in the “Incoming Message” flow.
These Send Message widgets are configured with a message of You got a voicemail from {{trigger.call.From}}: {{widgets.record_voicemail.RecordingUrl}}.mp3, and in each case the “Messaging & Chat Config” options should be expanded to insert your volunteer’s phone number. As before, you can add copies of these widgets or remove them if you have a different number of volunteers.
Volunteers will receive an SMS with the caller’s phone number and the URL of the recorded message which will open in the phone’s browser if clicked.
Make sure you have clicked “Save” on all the widgets that you have edited. The Studio Flow is complete, but so far it’s only a draft. Publish it by clicking the button at the top of the canvas:

You’ll see that the flow is now up-to-date, so it’s time to hook it up to a real phone number.
Configuring a Twilio phone number to use the Studio Flow
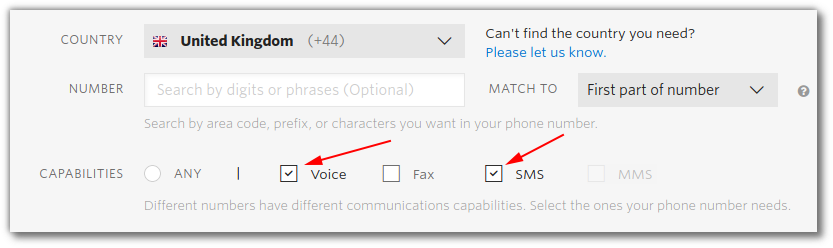
Head over to the Phone Numbers management console, click the + to buy a new number. Choose a number that you like, remembering that it needs to support Voice and SMS.
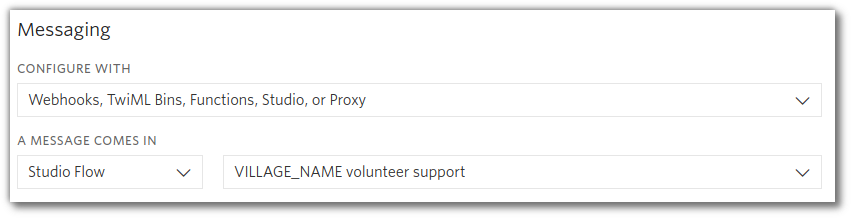
Then on the phone number configuration screen choose the Studio Flow you created to be called when a call or message comes in:

Save that configuration, and your phone number is ready to use. Make sure you test it with both a voice call and an SMS before sharing it with your local community.
This setup does not cover coordinating responses between volunteers - we use a WhatsApp group for that, but you could use a Google Sheet or anything else which is convenient for you.
Summary
Please stay safe, and follow all local instructions and guidelines. I use this setup for helping my local community, and I hope it can be useful for yours too.
If you have any comments, questions or suggestions we’d be delighted to speak to you, so email us at mgilliard@twilio.com and cbook@twilio.com.


Related Resources
Twilio Docs
From APIs to SDKs to sample apps
API reference documentation, SDKs, helper libraries, quickstarts, and tutorials for your language and platform.
Resource Center
The latest ebooks, industry reports, and webinars
Learn from customer engagement experts to improve your own communication.
Ahoy
Twilio's developer community hub
Best practices, code samples, and inspiration to build communications and digital engagement experiences.