Create Video Conferencing Application with Zoom

March 06, 2024
Written by
Joseph Udonsak
Contributor
Opinions expressed by Twilio contributors are their own
Reviewed by

Create a Video Conferencing Application With Zoom

Twilio’s Programmable Video API made it very simple to integrate video communication into applications. However this service offering is being discontinued, with End of Life (EOL) expected on December 5, 2024.

It’s not all bad news, however. In this tutorial I will show you how to use an alternative, the Zoom Video SDK, to build a video chat application with Symfony.

The Zoom Video SDK provides a similar process flow to what you were used to with Twilio Video. To start (or join) a session, you first generate a JSON Web Token (JWT) on the backend. After that, you initiate a client using the Video SDK and render the video stream onto a designated HTML element. In addition to that, the Zoom Video SDK allows you to determine video size and position, as you will see later on.

Prerequisites

To follow this tutorial, you will require the following.

  • A Zoom Video SDK account
  • A basic understanding of and familiarity with PHP and Symfony
  • PHP 8.2 or above
  • Composer globally installed
  • The Symfony CLI
  • A JavaScript package manager ( Yarn will be used in this tutorial)

Get Zoom Video SDK credentials

To generate your Zoom Video JWT, sign into your Video SDK account, go to the Zoom App Marketplace , hover over Develop, and click Build Video SDK.

Then, scroll down to the SDK credentials section to see your SDK key and SDK secret.

Your SDK credentials are different from your API keys.

Copy the values for SDK Key and SDK Secret as they will be used for JWT generation, later in the tutorial.

Create a new Symfony project

Create a new Symfony project and change into the new project directory using the following commands.

symfony new video_demo
cd video_demo

Next, add the project dependencies using the following commands.

composer require doctrine firebase/php-jwt security symfony/twig-pack twig uid webpack 
composer require maker orm-fixtures --dev 

Docker won’t be used in this tutorial, so press the n key when prompted to create a docker.yaml file.

Here’s what each dependency is for.

  • Doctrine: This package will be used to handle database-related activity.

  • Firebase/PHP-JWT: This package will be used for JWT generation.

  • Maker: This bundle helps with the auto generation of code associated with authentication, controllers, fixtures, and user entities. 

  • Orm-fixtures: This package is used in collaboration with the Maker bundle to auto-generate fixtures.

  • Security: This bundle provides the required features for authentication in your Symfony application.

  • Twig and Symfony/twig-pack: These packages allow you to use Twig templating in your application.

  • Uid: This will be used for generating unique identifiers for your video chat rooms. 

  • Webpack: This will be used to compile CSS and JS assets. It will also be used to pass data from Twig templates to JavaScript modules.

Set the required environment variables

You need a secure way to save your Zoom Video SDK credentials, as well as variables that change depending on the application environment. To do that, create a .env.local file from the .env file, which Symfony generated during creation of the project, by running the command below.

cp .env .env.local

Then, update the relevant values in .env.local as shown below.

ZOOM_VIDEO_SDK_KEY=<YOUR_ZOOM_VIDEO_SDK_KEY>
ZOOM_VIDEO_SDK_SECRET=<YOUR_ZOOM_VIDEO_SDK_SECRET>
TOKEN_TTL=3600

Then, comment out the default DATABASE_URL setting, and uncomment the one below.

DATABASE_URL="sqlite:///%kernel.project_dir%/var/data.db"

For this tutorial, SQLite will be used for the database. The database will be saved to a file named data.db in the var folder. Create this file using the following command.

symfony console doctrine:database:create

Create entities

The application you build will have two entities: User and Room. First, create the User entity using the following command. 

symfony console make:user

Respond to the prompted questions as shown below. Press Enter to accept the default option.

 The name of the security user class (e.g. User) [User]:
 > 
 Do you want to store user data in the database (via Doctrine)? (yes/no) [yes]:
 > 
 Enter a property name that will be the unique "display" name for the user (e.g. email, username, uuid) [email]:
 > 
 Will this app need to hash/check user passwords? Choose No if passwords are not needed or will be checked/hashed by some other system (e.g. a single sign-on server).
 Does this app need to hash/check user passwords? (yes/no) [yes]:
 > 

Open the newly created file, src/Entity/User.php, and update the code to match the following:

<?php

namespace App\Entity;

use App\Repository\UserRepository;
use Doctrine\ORM\Mapping as ORM;
use Symfony\Component\Security\Core\User\PasswordAuthenticatedUserInterface;
use Symfony\Component\Security\Core\User\UserInterface;

#[ORM\Entity(repositoryClass: UserRepository::class)]
class User implements UserInterface, PasswordAuthenticatedUserInterface
{
    #[ORM\Id]
    #[ORM\GeneratedValue]
    #[ORM\Column]
    private ?int $id = null;

    #[ORM\Column]
    private array $roles = [];

    /**
     * @var string The hashed password
     */
    #[ORM\Column]
    private ?string $password = null;

    public function __construct(
        #[ORM\Column(length: 180, unique: true)]
        private readonly string $email,
    ) {
    }

    public function setPassword(string $password):void {
        $this->password = $password;
    }
    
    /**
     * A visual identifier that represents this user.
     *
     * @see UserInterface
     */
    public function getUserIdentifier(): string
    {
        return (string) $this->email;
    }

    /**
     * @see UserInterface
     */
    public function getRoles(): array
    {
        $roles = $this->roles;
        $roles[] = 'ROLE_USER';

        return array_unique($roles);
    }

    /**
     * @see PasswordAuthenticatedUserInterface
     */
    public function getPassword(): string
    {
        return $this->password;
    }

    /**
     * @see UserInterface
     */
    public function eraseCredentials(): void
    {   
    }
}

There isn’t a big difference from what was autogenerated. All you did was create a constructor function which takes the user’s email address as a parameter. The appropriate attributes are also included, as this parameter corresponds to a column in the user table. 

Next, create the Room entity with the following command.

symfony console make:entity Room

Respond to the prompted questions as shown below. Press Enter to accept the default option or finish the process.

 New property name (press <return> to stop adding fields):
 > name
 Field type (enter ? to see all types) [string]:
 > 
 Field length [255]:
 > 200
 Can this field be null in the database (nullable) (yes/no) [no]:
 > 
 updated: src/Entity/Room.php
 Add another property? Enter the property name (or press <return> to stop adding fields):
 > owner
 Field type (enter ? to see all types) [string]:
 > ManyToOne
 What class should this entity be related to?:
 > User
 Is the Room.owner property allowed to be null (nullable)? (yes/no) [yes]:
 > no
 Do you want to add a new property to User so that you can access/update Room objects from it - e.g. $user->getRooms()? (yes/no) [yes]:
 > no
 updated: src/Entity/Room.php 
 Add another property? Enter the property name (or press <return> to stop adding fields):
 > publicId
 Field type (enter ? to see all types) [integer]:
 > string
 Field length [255]:
 > 
 Can this field be null in the database (nullable) (yes/no) [no]:
 > no
 updated: src/Entity/Room.php
 Add another property? Enter the property name (or press <return> to stop adding fields):
 >

Open the newly created src/Entity/Room.php and update the code to match the following.

<?php

namespace App\Entity;

use App\Repository\RoomRepository;
use Doctrine\ORM\Mapping as ORM;
use Symfony\Component\Uid\Uuid;

#[ORM\Entity(repositoryClass: RoomRepository::class)]
class Room {
    #[ORM\Id]
    #[ORM\GeneratedValue]
    #[ORM\Column]
    private ?int $id = null;
    #[ORM\Column]
    private string $publicId;

    public function __construct(
        #[ORM\Column(length: 200)]
        private readonly string $name,
        #[ORM\ManyToOne]
        #[ORM\JoinColumn(nullable: false)]
        private readonly User   $owner,
    ) {
        $this->publicId = Uuid::v4();
    }

    public function getPublicId()
    : string {
        return $this->publicId;
    }

    public function getName()
    : string {
        return $this->name;
    }

    public function getOwner()
    : string {
        return $this->owner->getUserIdentifier();
    }

    public function belongsToUser(User $user)
    : bool {
        return $this->owner === $user;
    }
}

In this file, you added a constructor function which takes the name of the room, and the owner of the room. Similar to the constructor of the User entity, these parameters correspond to columns in the room table hence the appropriate attributes are specified. 

When the __construct() function is called, the public ID for the room is created using the Uid component provided by Symfony. 

Since there is no need for the setter functions in this class, they’ve been removed. An additional function named belongsToUser() is used to determine if the room belongs to the user provided as an argument. 

With your entities in place, update the database schema to create tables for the entities using the following command.

symfony console doctrine:schema:update --force --complete

Create default users and rooms

To quickly get started, add some fixtures for rooms and users. To do that, open src/DataFixtures/AppFixtures.php and update the code to match the following.

<?php

namespace App\DataFixtures;

use App\Entity\{Room, User};
use Doctrine\Bundle\FixturesBundle\Fixture;
use Doctrine\Persistence\ObjectManager;
use Symfony\Component\PasswordHasher\Hasher\UserPasswordHasherInterface;

class AppFixtures extends Fixture 
{
    public function __construct(
        private UserPasswordHasherInterface $hasher
    ) {
    }

    public function load(ObjectManager $manager): void 
    {
        $user = new User('test@test.com');
        $user->setPassword($this->hasher->hashPassword($user, 'test1234'));
        $manager->persist($user);

        $this->addRooms($user, $manager);
        $this->addUsers($manager);

        $manager->flush();
    }

    private function addRooms(User $owner, ObjectManager $manager): void 
    {
        for ($i = 1; $i <= 5; $i++) {
            $room = new Room("Demo Room $i", $owner);
            $manager->persist($room);
        }
    }

    private function addUsers(ObjectManager $manager): void 
    {
        for ($i = 1; $i <= 5; $i++) {
            $user = new User("test$i@test.com");
            $user->setPassword($this->hasher->hashPassword($user, 'test1234'));
            $manager->persist($user);
        }
    }
}

This function adds six users and five rooms to the database. Load the fixtures with the following command.

symfony console doctrine:fixtures:load -n

Confirm that the database is seeded with the rooms and users using the following commands.

symfony console doctrine:query:sql "SELECT * FROM room" 
symfony console doctrine:query:sql "SELECT * FROM user"

Implement user authentication

To join a room, the user must be logged in. This requires some form of authentication. You can take advantage of the default implementation provided by Symfony using the following command.

symfony console make:auth

Respond to the prompted questions as shown below. Press Enter to accept the default option or finish the process.

What style of authentication do you want? [Empty authenticator]:
  [0] Empty authenticator
  [1] Login form authenticator
 > 1
 The class name of the authenticator to create (e.g. AppCustomAuthenticator):
 > FormLoginAuthenticator    
 Choose a name for the controller class (e.g. SecurityController) [SecurityController]:
 > 
 Do you want to generate a '/logout' URL? (yes/no) [yes]:
 > 
 Do you want to support remember me? (yes/no) [yes]:
 > 
 How should remember me be activated? [Activate when the user checks a box]:
  [0] Activate when the user checks a box
  [1] Always activate remember me
 > 0

Symfony writes most of the code for you. The only thing you need to do is specify where the user should be redirected to on successful authentication. To do this, open the newly created src/Security/FormLoginAuthenticator.php and update the onAuthenticationSuccess() function to match the following.

public function onAuthenticationSuccess(Request $request, TokenInterface $token, string $firewallName): Response
{
    if ($targetPath = $this->getTargetPath($request->getSession(), $firewallName)) {
        return new RedirectResponse($targetPath);
    }

    return new RedirectResponse($this->urlGenerator->generate('room_index'));
}

When the user is successfully authenticated, the application will redirect to list all the rooms available for joining. The controller responsible for handling this action will be created later. 

Create the JWT generation service

As mentioned earlier, to start a video session on the backend, you need a JWT created and signed using your Zoom Video SDK credentials. Create that now. In the src folder, create a new folder named Service, and in it create a new file named JWTGenerator.php. Add the following code to the newly created file. 

<?php

namespace App\Service;

use DateInterval;
use DateTimeImmutable;
use Firebase\JWT\JWT;
use Symfony\Component\DependencyInjection\Attribute\Autowire;

readonly class JWTGenerator
{
    public function __construct(
        #[Autowire('%env(ZOOM_VIDEO_SDK_KEY)%')]
        private string $zoomVideoKey,
        #[Autowire('%env(ZOOM_VIDEO_SDK_SECRET)%')]
        private string $zoomVideoSecret,
        #[Autowire('%env(TOKEN_TTL)%')]
        private string $tokenTTL
    ) {
    }

    public function generate(string $roomIdentity, string $userIdentity, bool $isHost): string
    {
        $issuedAt = new DateTimeImmutable();
        $expiry = $issuedAt->add(new DateInterval("PT{$this->tokenTTL}S"));

        $payload = [
            'app_key' => $this->zoomVideoKey,
            'role_type' => $isHost ? 1 : 0,
            'version' => 1,
            'tpc' => $roomIdentity,
            'user_identity' => $userIdentity,
            'iat' => $issuedAt->getTimestamp(),
            'exp' => $expiry->getTimestamp(),
        ];
        return JWT::encode($payload, $this->zoomVideoSecret, 'HS256');
    }
}

Using the Autowire attribute provided by Symfony, you retrieve the Zoom Video SDK credentials from your .env.local file. You also retrieved the TOKEN_TTL variable, which determines the validity period of the generated JWT. For this tutorial, the validity period is 3600 seconds (one hour).

Next, the generate() function takes the room identity, a unique identifier for a user, and a boolean corresponding to whether or not the user is the host. Using these (and the injected constructor parameters) a JWT is created and returned.  

Create a controller for room-related activity

So far, you have created the backend functionality for your application. You have a functional database and token generation service. Before creating the frontend, you’ll need some controller functions to tie the frontend and backend together. These functions will be kept in a controller class. 

Create a new controller class using the following command.

symfony console make:controller RoomController

Open the newly created file, src/Controller/RoomController.php, and update the code to match the following. 

<?php

namespace App\Controller;

use App\Entity\{Room, User};
use App\Repository\RoomRepository;
use App\Service\JWTGenerator;
use Symfony\Bundle\FrameworkBundle\Controller\AbstractController;
use Symfony\Component\HttpFoundation\Response;
use Symfony\Component\Routing\Attribute\Route;
use Symfony\Component\Security\Http\Attribute\CurrentUser;

#[Route('/room', name: 'room_')]
class RoomController extends AbstractController 
{
    #[Route('', name: 'index', methods: ['GET'])]
    public function index(RoomRepository $roomRepository): Response {
        return $this->render('room/index.html.twig', [
            'rooms' => $roomRepository->findAll(),
        ]);
    }

    #[Route('/{publicId}', name: 'join', methods: ['GET'])]
    public function join(
        #[CurrentUser] User $user,
        Room                $room,
        JWTGenerator        $jWTGenerator
    ): Response {
        $jwt = $jWTGenerator->generate($room->getPublicId(), $user->getUserIdentifier(), $room->belongsToUser($user));

        return $this->render('room/join.html.twig', [
            'controller_name' => 'RoomController',
            'room'            => $room,
            'jwt'             => $jwt,
        ]);
    }
}

The index() function retrieves all the rooms in the database and passes them to the room/index.html.twig file in the templates folder. 

The join() function takes three parameters:

  • The currently logged in user (provided via the CurrentUser attribute)

  • The room to be joined (retrieved via Parameter Conversion)

  • The JWTGenerator service you created earlier

Using these, a new JWT is generated for the user and returned as part of the parameters for the Twig template to render. 

Specify the default route

At the moment, the index route redirects to the default Symfony page, which you can see below.

For this application, the default page will show the list of rooms in the application. To do this, open the config/routes.yaml file and update it to match the following.

homepage:
    path: /
    controller: App\Controller\RoomController::index
    
controllers:
    resource:
        path: ../src/Controller/
        namespace: App\Controller
    type: attribute

With this configuration, the index() function in the src/Controller/RoomController.php file will be called to handle the request. 

Restrict room joining to authenticated users

While anybody can see the available rooms, only authenticated users should be able to join a room and start a video session. To do this, open config/packages/security.yaml and update the access_control section to match the following.

access_control:
    - { path: ^/room/*, roles: IS_AUTHENTICATED_FULLY }

With this, if an unauthenticated user tries to join a room, they will first be redirected to the login page before they can start a video session. 

Prepare webpack assets

For this tutorial, Webpack Encore is used to bundle the CSS and JS assets in the application. In this section, we will prepare and compile those assets. 

When Webpack Encore was added to the project, a folder named assets was created at the root of the project folder. Update the content of assets/styles/app.css to match the following.

.form-container {
    border-top-left-radius: .25rem;
    border-top-right-radius: .25rem;
    border-width: 1px;
    padding: 1.5rem;
    margin: auto;
    width: 40%;
}

Create a JS module for Zoom functionality

The next asset you will prepare is a JavaScript module which connects the user to the Zoom session and renders the video streams on the appropriate elements. In the assets folder, create a new folder named js for your JavaScript assets. Next, create a new file named zoom.js in the assets/js folder and add the following code to it.

document.addEventListener("DOMContentLoaded", async () => {
    const videoContainer = document.querySelector(".video-container");
    const {sessionName, jwt, userIdentifier} = videoContainer.dataset;
    await connect(sessionName, jwt, userIdentifier);
});

const connect = async (sessionName, jwt, userIdentifier) => {
    const ZoomVideo = window.WebVideoSDK.default;
    let client = ZoomVideo.createClient();
    let stream;

    await client.init("en-US", "Global", {patchJsMedia: true});
    await client.join(sessionName, jwt, userIdentifier);

    stream = client.getMediaStream();
    const currentUser = client.getCurrentUserInfo().userId;

    await stream.startVideo({
        videoElement: document.getElementById("self-view-video"),
    });

    const coordinates = [
        {x: 0, y: 135},
        {x: 240, y: 135},
        {x: 480, y: 135},
        {x: 0, y: 0},
        {x: 240, y: 0},
        {x: 480, y: 0},
    ];

    filteredParticipants(client.getAllUser(), currentUser).forEach(
        (participant, index) => {
            if (participant.bVideoOn) {
                renderParticipant(stream, participant, coordinates[index]);
            }
        }
    );

    client.on("peer-video-state-change", (payload) => {
        if (payload.action === "Start") {
            const index = filteredParticipants(
                client.getAllUser(),
                currentUser
            ).findIndex(({userId}) => userId === payload.userId);
            const participantCoordinates = coordinates[index];
            renderParticipant(stream, payload, participantCoordinates);
        } else if (payload.action === "Stop") {
            stream.stopRenderVideo(
                document.getElementById("participant-videos-canvas"),
                payload.userId
            );
        }
    });
};

const filteredParticipants = (participants, currentUserId) =>
    participants.filter(({userId}) => userId !== currentUserId).slice(0, 5);

const renderParticipant = (stream, participant, coordinates) => {
    stream.renderVideo(
        document.getElementById("participant-videos-canvas"),
        participant.userId,
        240,
        135,
        coordinates.x,
        coordinates.y,
        2
    );
};

This module handles the connection to a session and the rendering of video streams. The renderParticipant() function is used to render a single participant video on the canvas. It does this by calling the renderVideo() function on a Zoom Video stream. This function takes seven parameters namely:

  • A <canvas> element on which the participant video can be rendered. You can use the same element to render multiple participants as will be done in this tutorial.

  • The user identifier of the participant whose video is to be rendered

  • The width of the video being rendered

  • The height of the video being rendered

  • The x-axis coordinate of the video on the canvas

  • The y-axis coordinate of the video on the canvas

  • The resolution of the video

For the application, your video will be rendered separately from that of other participants. Hence, when rendering the participants, you will need to exclude the current user from the list. This is done using the filteredParticipants() function. This function also returns a maximum of six participants as that will be the maximum number of participants to be rendered in this tutorial.

The connect() function is called when the page is loaded. This function requires three parameters: the session name, a valid JWT, and the user identifier (whom the JWT is associated with). Using these parameters, a Zoom Video client is instantiated and used to start a video stream; one for the logged in user (rendered on a <video> element with id self-view-video, and the rest for the other participants in the video session (rendered by a call to the previously mentioned renderParticipants() function.

Next, you need to register the newly created module as an entrypoint in your webpack config. To do that, open your webpack configuration (webpack.config.js) located at the root folder of the project, and update the code to match the following. 

const Encore = require('@symfony/webpack-encore');

if (!Encore.isRuntimeEnvironmentConfigured()) {
    Encore.configureRuntimeEnvironment(process.env.NODE_ENV || 'dev');
}

Encore
    .setOutputPath('public/build/')
    .setPublicPath('/build')
 
    .addEntry('app', './assets/app.js')
    .addEntry('zoom', './assets/js/zoom.js')
    
    .splitEntryChunks()
    .enableSingleRuntimeChunk()

    .cleanupOutputBeforeBuild()
    .enableBuildNotifications()
    .enableSourceMaps(!Encore.isProduction())
    // enables hashed filenames (e.g. app.abc123.css)
    .enableVersioning(Encore.isProduction())

    // enables and configure @babel/preset-env polyfills
    .configureBabelPresetEnv((config) => {
        config.useBuiltIns = 'usage';
        config.corejs = '3.23';
    })
;

module.exports = Encore.getWebpackConfig();

Compile your assets using the following command.

yarn install
yarn dev

Update the templates

The next step is to update the project’s Twig templates. For this tutorial, Bootstrap will be used for the layouts. Start by updating the Twig configuration to include Bootstrap. Open config/packages/twig.yaml and update the twig configuration to match the following. 

twig:
    default_path: '%kernel.project_dir%/templates'
    file_name_pattern: '*.twig'
    form_themes: ['bootstrap_5_layout.html.twig']

Next, update the base template to include the Bootstrap CDN. Open templates/base.html.twig and update the code to match the following.

<!DOCTYPE html>
<html>
<head>
    <meta charset="UTF-8">
    <title>{% block title %}Welcome!{% endblock %}</title>
    <link rel="icon"
          href="data:image/svg+xml,<svg xmlns=%22http://www.w3.org/2000/svg%22 viewBox=%220 0 128 128%22><text y=%221.2em%22 font-size=%2296%22>⚫️</text></svg>">
    <link href="https://cdn.jsdelivr.net/npm/bootstrap@5.3.2/dist/css/bootstrap.min.css" rel="stylesheet"
          integrity="sha384-T3c6CoIi6uLrA9TneNEoa7RxnatzjcDSCmG1MXxSR1GAsXEV/Dwwykc2MPK8M2HN" crossorigin="anonymous">

    {% block stylesheets %}
        {{ encore_entry_link_tags('app') }}
    {% endblock %}

    <script src="https://cdn.jsdelivr.net/npm/bootstrap@5.3.2/dist/js/bootstrap.bundle.min.js"
            integrity="sha384-C6RzsynM9kWDrMNeT87bh95OGNyZPhcTNXj1NW7RuBCsyN/o0jlpcV8Qyq46cDfL"
            crossorigin="anonymous"></script>

    {% block javascripts %}
        {{ encore_entry_script_tags('app') }}
    {% endblock %}
</head>
<body>
<div class="container my-5">
    {% block body %}{% endblock %}
</div>
</body>
</html>

Next, update the login form. Open templates/security/login.html.twig and update the content to match the following.

{% extends 'base.html.twig' %}

{% block title %}Log in!{% endblock %}

{% block body %}

    <form method="post">
        {% if error %}
            <div class="alert alert-danger"
                 role="alert">{{ error.messageKey|trans(error.messageData, 'security') }}</div>
        {% endif %}

        {% if app.user %}
            <div class="mb-3">
                You are logged in as {{ app.user.userIdentifier }}, <a href="{{ path('app_logout') }}">Logout</a>
            </div>
        {% endif %}

        <div class="form-container">
            <h1 class="h3 mb-3 font-weight-normal">Please sign in</h1>

            <div class="mb-3">
                <label for="inputEmail">Email</label>
                <input type="email" value="{{ last_username }}" name="email" id="inputEmail" class="form-control"
                       autocomplete="email" required autofocus>
            </div>

            <div class="mb-3">
                <label for="inputPassword">Password</label>
                <input type="password" name="password" id="inputPassword" class="form-control"
                       autocomplete="current-password" required>
            </div>

            <input type="hidden" name="_csrf_token"
                   value="{{ csrf_token('authenticate') }}"
            >

            <button class="btn btn-lg btn-primary" type="submit">
                Sign in
            </button>
        </div>
    </form>
{% endblock %}

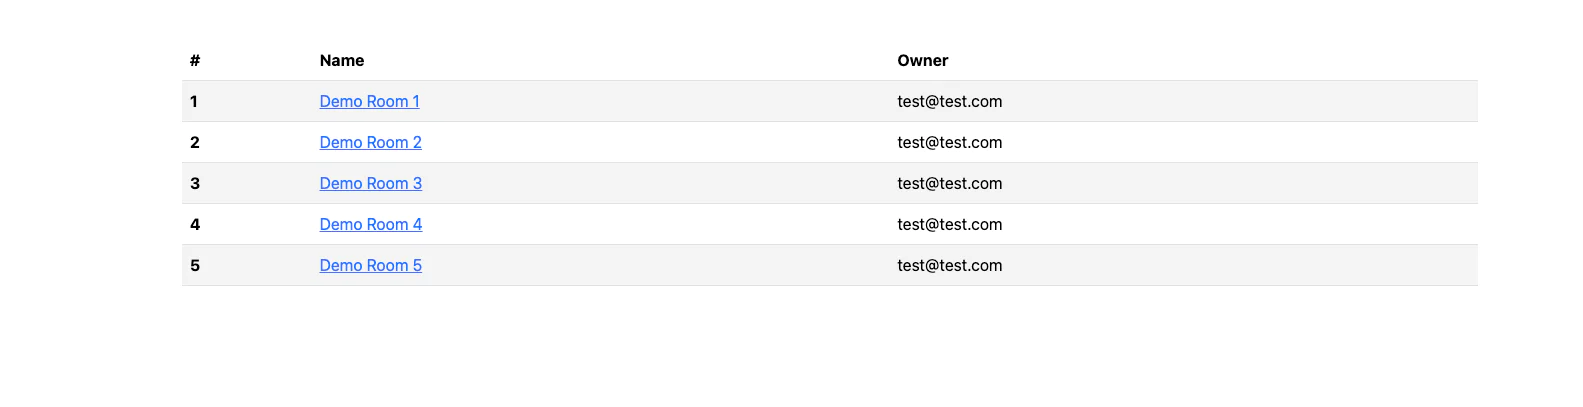
When you created the RoomController, a template was created to render the view for the index() function. This view will be a simple table to display the list of rooms and their owners. Update the templates/room/index.html.twig file to match the following.

{% extends 'base.html.twig' %}

{% block title %}Rooms{% endblock %}

{% block body %}
    <table class="table table-striped table-hover">
        <thead>
        <tr>
            <th scope="col">#</th>
            <th scope="col">Name</th>
            <th scope="col">Owner</th>
        </tr>
        </thead>
        <tbody>
        {% for room in rooms %}
            <tr>
                <th scope="row">{{ loop.index }}</th>
                <td><a href="{{ path('room_join',{publicId: room.publicId}) }}">
                        {{ room.name }}</a>
                </td>
                <td>{{ room.owner }}</td>
            </tr>
        {% endfor %}
        </tbody>
    </table>
{% endblock %}

The last step is to prepare the Twig template that will be rendered when a user joins a room. In the templates/room folder, create a new file named join.html.twig and add the following code to it.

{% extends 'base.html.twig' %}

{% block title %}Join Room "{{ room.name }}"{% endblock %}

{% block body %}
    {% if jwt is not null %}
        <div class="container text-center  video-container" data-user-identifier="{{ app.user.userIdentifier }}"
             data-jwt="{{ jwt }}" data-session-name="{{ room.publicId }}">
            <div class="row">
                <div class="col">
                    <video id="self-view-video" width="960" height="540"></video>
                </div>
            </div>
            <div class="row">
                <div class="col">
                    <canvas id="participant-videos-canvas" width="720" height="270"></canvas>
                </div>
            </div>
        </div>
    {% endif %}

{% endblock %}

{% block javascripts %}
    <script src="https://source.zoom.us/videosdk/zoom-video-1.9.8.min.js"></script>
    {{ encore_entry_script_tags('zoom') }}
{% endblock %}

In the body block, you declare a <video> element which renders the video stream for the logged in user, and a <canvas> element for the other participants. These elements are targeted in the zoom.js module and used by the Zoom client in rendering the appropriate video streams. 

You also declared a <div> with class name video-container. This element has three data attribute tags (data-user-identifier, data-jwt, and data-session-name). This element is used to pass the relevant data from your Twig template to your JavaScript module (courtesy of Webpack Encore). 

In the javascripts block, the Zoom Video SDK is loaded via CDN, while your zoom.js module is also loaded via the encore_entry_script_tags() Twig directive. 

With these in place, your application is ready for a test run. Start your application using the following command.

symfony serve

By default, your application will listen on localhost on port 8000. So, opening http://localhost:8000 will show you a list of rooms you can join, as shown below:

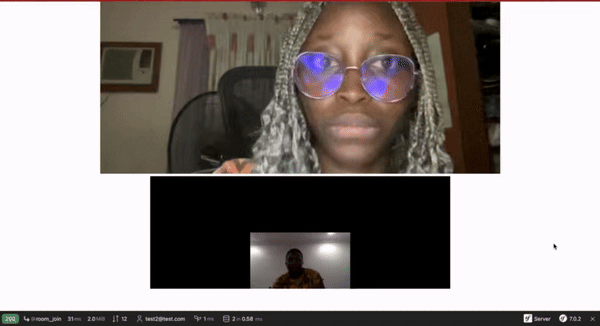
Select one of the rooms and login to start a video session. With one or more users connected to the same room, you should see an output similar to the recording below. 

That's how to create a video conferencing application with Zoom's Video SDK

There you have it. You’ve successfully integrated Zoom Video into your Symfony application. 

If you have used the Twilio Programmable Video offering, you will see that the overall concept is the same. You generate a JWT on the backend and use it to render a video on the frontend. The only difference (perhaps) is with regards to video rendering. 

To render the self view, Twilio appends a video element inside the specified div. Zoom requires more logic to start and render video because Zoom optimises video performance for each device and browser. This is why you had to write more code with regards to handling state changes on the session.

You can review the final codebase for this article on GitHub, should you get stuck at any point. I’m excited to see what else you come up with. Until next time, make peace not war ✌🏾

Joseph Udonsak is a software engineer with a passion for solving challenges – be it building applications, or conquering new frontiers on Candy Crush. When he’s not staring at his screens, he enjoys a cold beer and laughs with his family and friends. Find him at LinkedIn, Medium, and Dev.to.