Microservice for Handling SendGrid Inbound Parse
Time to read:
October 24, 2023
Written by
Reviewed by
Microservice for Handling SendGrid Inbound Parse
As I’ve discussed during this email microservice series, Twilio SendGrid is an extremely powerful email platform – but it does require some building.
In the first two posts in the series, I showed you a microservices architecture to handle outgoing API calls to Twilio SendGrid and how to handle SendGrid Event Webhooks. In this post, I’ll bring it all home and show you how to handle SendGrid’s Inbound Parse Webhook.
Like the other two posts, I use SAM (Serverless Application Model) templates so if you are familiar with AWS, you should not have any problem getting this microservice running in your account. GCP and Azure users can take the patterns (and even code) in this template and translate them into equivalent products in their respective platforms.
Be sure to check out the entire Three Part SendGrid Microservices Blog Series:
- Serverless Microservice for Sending Emails using SendGrid Email API
- Serverless Microservice for handling SendGrid Event Webhooks
- Serverless Microservice for handling SendGrid Inbound Parse
All three of these blog posts have three different components. This page walks you through the entire solution. The companion video actually talks you through the solution, how to spin it up, and how to try it out. Lastly, the actual code is heavily commented with tons of details, configuration options, and best practices.
Part 3: Serverless Microservice for handling SendGrid Inbound Parse
Let’s get started!
Learning by video can be effective. You can watch the video before proceeding or come back to it later!
Here is what we are going to spin up:
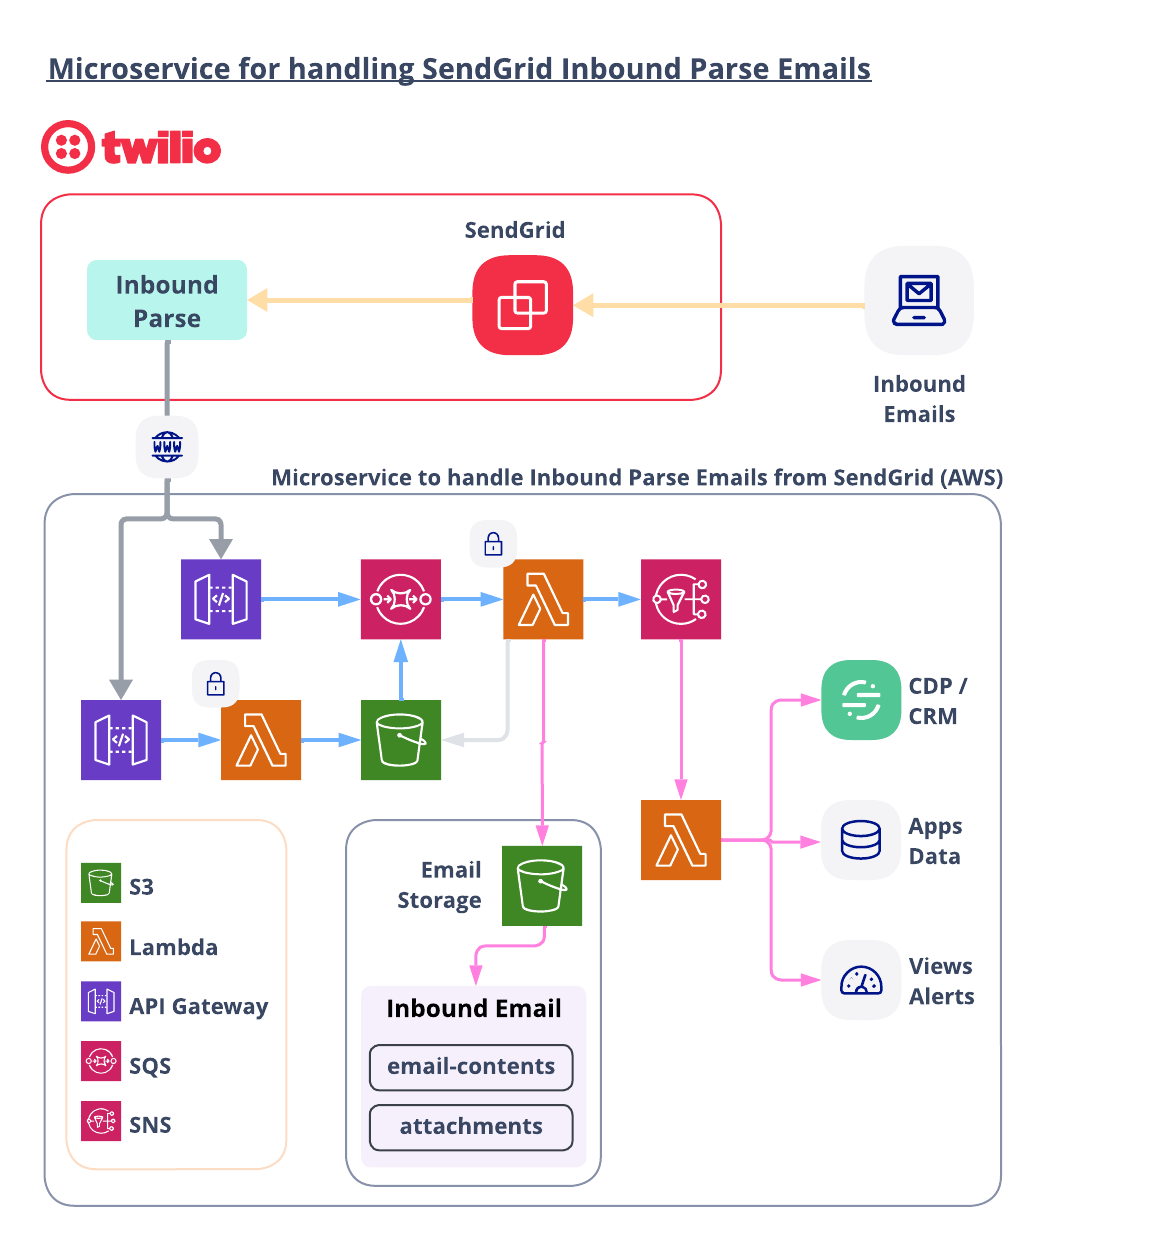
Let’s walk through the flow starting from the top right.
A. SendGrid Receives an inbound email
The first step to using SendGrid Inbound Parse is to configure your MX records for the desired subdomain or domain to point to SendGrid. That configuration is not a part of this blog post, but you can read about it here.
With MX records in place, inbound emails to a domain or subdomain will be routed to SendGrid and then forwarded to an endpoint of your choosing. When SendGrid Inbound Parse receives an inbound email, it forwards the email to your endpoint. SendGrid keeps track of the quantity of inbound emails it forwards but no other metrics about the actual content of these messages.
B. Receive the Inbound Email from SendGrid
Inbound Emails can have spiky demand. You need scalable systems in place to be able to handle incoming requests and place them in a queue for additional processing.
This template offers two approaches to handling incoming events from SendGrid.
- Events go from API Gateway directly into an SQS Queue.
- Events go from API Gateway to a Lambda function which dumps the request into an S3 bucket. An S3 bucket triggers an event which feeds into the SQS Queue.
Which approach should you use?
Approach A is the simplest way, but because SQS has a maximum payload size, this option would not work well with larger emails. You can search for an “average size of an email” and consider the size of emails that you expect to receive when you consider this option. Approach A would work well with small, text only emails.
Approach B will be best for larger emails AND emails that will include attachments. Emails are dumped directly into an S3 bucket (with any attachments) so there is no concern about maximum SQS payload size. The SQS queue is still utilized to control flow to downstream processors.
C. Process Inbound Email
All inbound emails must first pass Basic Authentication.
All emails passing the Basic Auth test are decoded and parsed and then saved to an S3 Bucket.
In addition, basic details on each email are published to an SNS Topic for additional processing. Examples of additional processing could include:
- Update a CDP, CRM, or any other data store.
- Inspect and route emails to an application for additional handling (support, chat, inquiry, etc.).
- Inspect emails for errors or preference changes (unsubscribe, bounce, spam).
- Whatever else you want to do with inbound emails!
If you have read this far, then I think you are ready to see how you can spin this up yourself!
Let’s get started…
AWS Resources
All of the AWS components of the serverless application are provided as "Infrastructure as Code" (oft-shortened to IaC) and deployed via CloudFormation into AWS. Here is an overview of the components:
- AWS SAM => an open-source framework that enables you to build serverless applications on AWS
- AWS CLI => a command line interface to AWS services. Not required, but recommended because it simplifies credentials when deploying
- AWS Lambda => serverless compute service
- S3 => Object Storage
- SQS => Simple Queue Service
- SNS => Simple Notification Service
Prerequisites
This is not a beginner level build! You should have some knowledge of AWS, serverless computing, and programming.
If you have already completed part 1 or part 2 of this series, then you should already have these in place!
- Twilio SendGrid Account. If you don’t yet have one, you can sign up for a free account here.
- An authenticated domain and a verified sender in your SendGrid account.
- AWS Account with permissions to provision Lambdas, step functions, S3 buckets, IAM Roles & Policies, an SQS queue, and SNS topics. You can sign up for an account here.
- AWS CLI installed with AWS credentials configured.
- AWS SAM CLI installed.
- Node.js installed on your computer.
Let’s Build it!
Here are the basic steps of our build today.
- Download the code
- Deploy the stack
- Set up an Event Webhook from your SendGrid Account
- Try it out!
1. Download the Code for this Application
Download the code from this repo and then open up the folder in your preferred development environment.

Note that this repo has an “aws_stacks” folder which contains 2 separate microservices. SendGridInboundParseHandler is the primary stack and must be installed first.
The other stack (GenericInboundHandler) shows how you can add on additional processing of inbound emails.
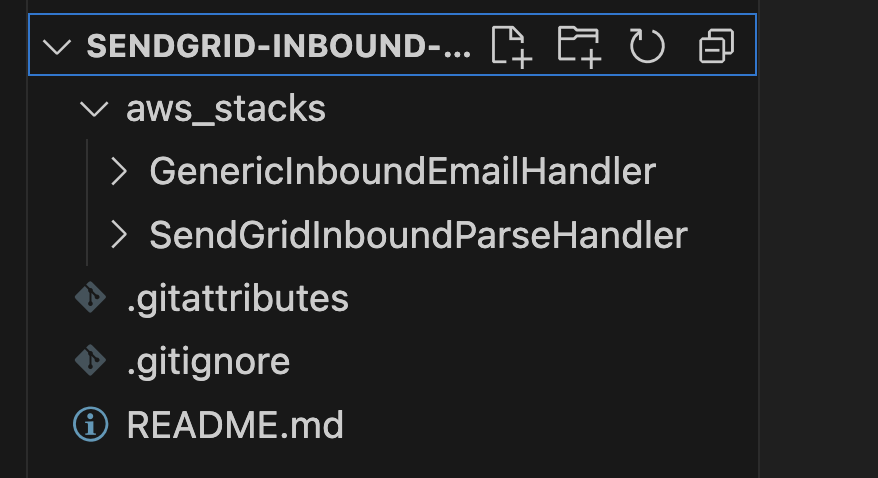
Open up a terminal window and go into the primary stack aws_stacks/SendGridInboundParseHandler.
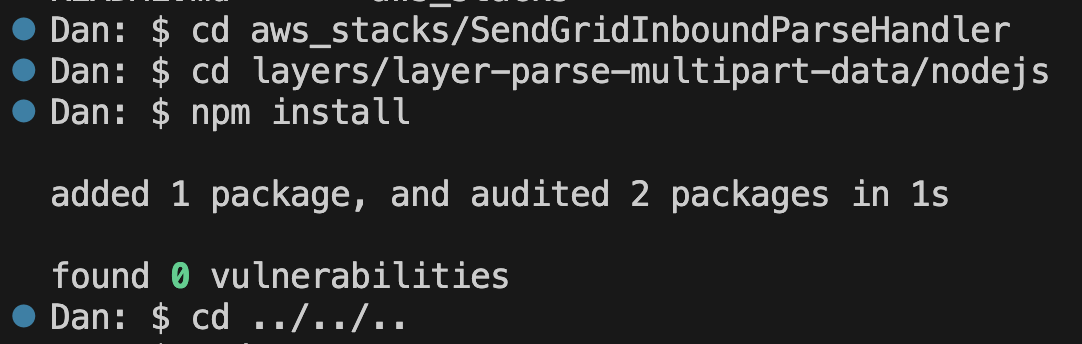
First we need to install a SendGrid node package to help us validate requests. From that parent directory, cd into the primary stack directory and then do the following:
The command sequence should look like this:
Now we are ready to enter our SendGrid credentials…
2. Enter your credentials for Basic Authentication
Open up the file template.yaml in the parent “SendGridInboundParseHandler” directory. This yaml file contains the instructions needed to provision the AWS resources.
To secure our endpoint we will use Basic Authentication. In the template.yaml file, use FIND and search for INBOUND_PARSE_USER. Set your own username and password combination, and note that for anything other than your initial testing, be sure to save credentials using more secure means like AWS Parameter Store or Secrets Manager.
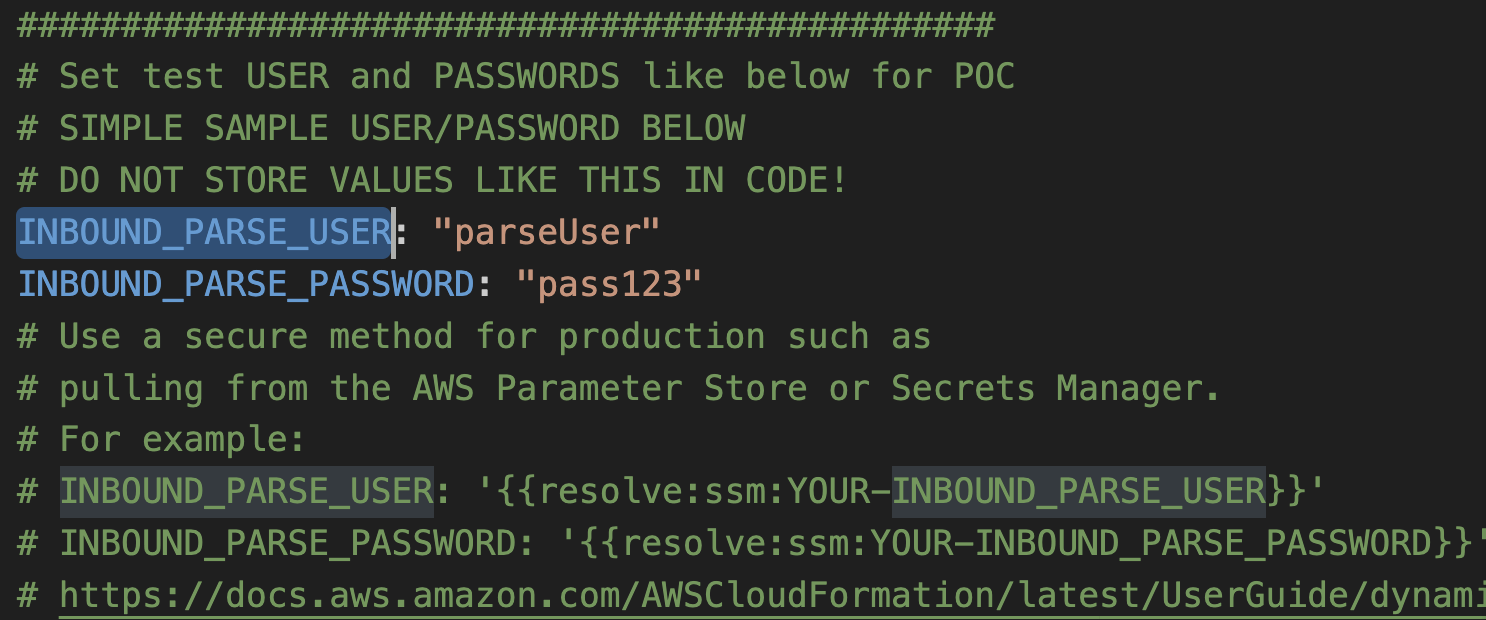
These credentials exist in two places so be sure to find both occurrences and set your username and password in each.
3. Deploy Code
With those settings in place, we are ready to deploy! From a terminal window, go into the parent (aws_stacks/SendGridInboundParseHandler) directory and run:
This command goes through the yaml file template.yaml and prepares the stack to be deployed.
In order to deploy the SAM application, you need to be sure that you have the proper AWS credentials configured. Having the AWS CLI also installed makes it easier, but here are some instructions.
Once you have authenticated into your AWS account, you can run:
This will start an interactive command prompt session to set basic configurations and then deploy all of your resources via a stack in CloudFormation. Here are the answers to enter after running that command (except, substitute your AWS Region of choice – be sure to use the same region as step 2 above!):
After answering the last questions, SAM will create a changeset that lists all of the resources that will be deployed. Answer “y” to the last question to have AWS actually start to create the resources.
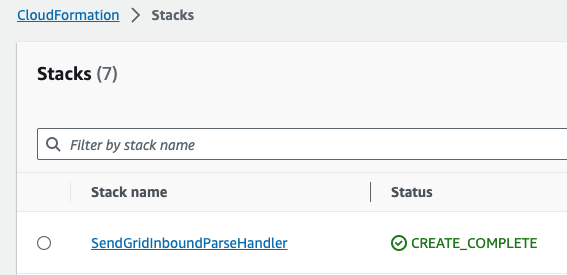
The SAM command prompt will let you know when it has finished deploying all of the resources. You can then go to your AWS Console and CloudFormation and browse through the new stack you just created. All of the Lambdas, Lambda Layers, S3 buckets, IAM Roles, SQS queues, SNS topics are all created automatically. (IaC – Infrastructure as Code – is awesome!)
Also note that the first time you run the deploy command, SAM will create a samconfig.toml file to save your answers for subsequent deployments. After you deploy the first time, you can drop the --guided parameter of sam deploy for future deployments.
The template only has one simple “downstream” processor to install. You could expand this processor to inspect inbound emails and take additional action (for example: update databases, update CDP/CRMs, trigger other events, or send reply emails).
Open a terminal window from the parent directory and enter the following:
Once that completes, continue to the next step.
4. Set up Inbound Parse from your SendGrid Account
Now we are ready to tell SendGrid where to send inbound emails. In the AWS Console, go to CloudFormation and then select the Stack you just created (SendGridInboundParseHandler). Click on the OUTPUTS tab to reveal key::value pairs generated by this stack.
We are looking for these two key::value pairs:
SGInboundEmailToS3ApiSGInboundEmailToSQSApi
These two options correspond to the two types of endpoints as described in top introduction section B earlier in this blog. To recap, one endpoint takes requests and dumps them into an S3 bucket while the other dumps the requests into an SQS queue. You can review top introduction section B above for more details but you can use either or even both options.
For this blog, we will proceed with SGInboundEmailToS3Api. The value for that key should look something like this:
To add in Basic Authentication, we add the username and password combination entered in the template.yaml file in section 2 above, to the beginning of the url. You would of course use your own user/password but the resulting url should look like this:
These endpoints require specific paths added to the base url (SGInboundEmailToS3Api and SGInboundEmailToSQSApi both use “/sendgrid-inbound”).
So our final URL using using the SGInboundEmailToS3Api key would be:
Now we return to the SendGrid Console and go to SETTINGS => INBOUND PARSE. Click on the button that says ADD HOST & URL.
Fill out the screen below:

You would enter your own subdomain and your verified domain. The URL you configured above goes in the Destination URL field.
You can optionally check the Check incoming emails for spam checkbox to receive a spam score for each inbound email.
Leave the POST the raw, full MIME message checkbox unchecked because the template uses the email data sent as multipart.
Click the ADD button and we are ready to go!
6. Try it out…
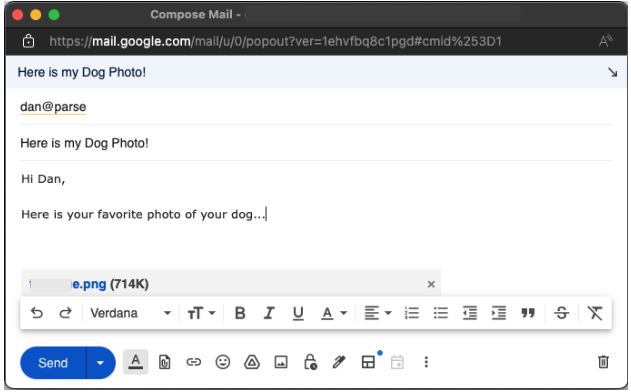
Now the fun part! Simply send an email to your parse address and watch the magic happen!
I will send a simple email with an attachment of my dog.
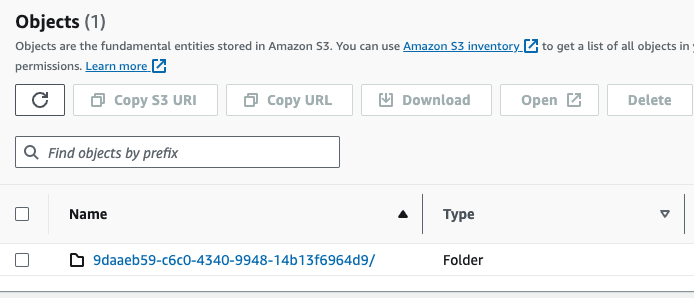
Now I will open up S3 in the AWS Console and go into the bucket that starts with twilio-sendgrid-inbound-parse-.
Each inbound email gets its own unique id and a “folder” in S3. Here is the email I just sent:
…and when you go into that folder you will always see an email.json file with all of the text key / value pairs and also any attachments. For the email I just sent I see this:
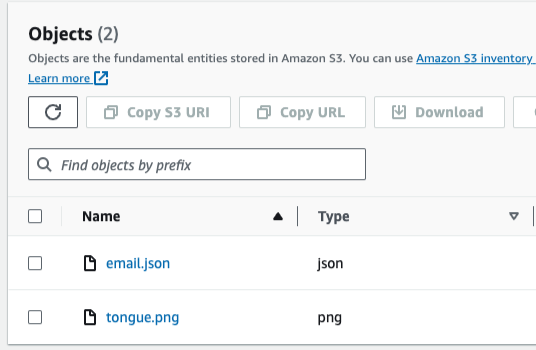
…clicking into email.json reveals:
…all of the text data from the email is included in the JSON file. Clicking on the attachment (tongue.png) reveals:

At this point you have a solution to save emails to your own AWS S3 Bucket.
We are often asked how we recommend keeping a copy of emails sent out via SendGrid. You could use this solution to save a copy of all outbound emails by including a BCC to your parse domain in your outbound emails (note: BCCs do count against your email credits!). All of the emails would then be saved for archival purposes. You could even attach a S3 Lifecycle Policy to your S3 bucket to automatically delete files once they reach a set age.
Saving emails for archival purposes is terrific, but you also can act on these events for all sorts of use cases.
In the AWS Console, go to Lambda, and then open the Lambda that starts with GenericInboundEmailHandle-. This is just a simple Lambda function that writes the inbound event to logs. This is a stub for you to build whatever functionality you need:
- Update your CDP, CRM or other data sources.
- Handle a sales inquiry.
- Route or reply to a customer support request.
- Update a dashboard.
- Trigger other events.
- Receive images or files programmatically.
- Build an email-based “chatbot”.
- Whatever you can think of!
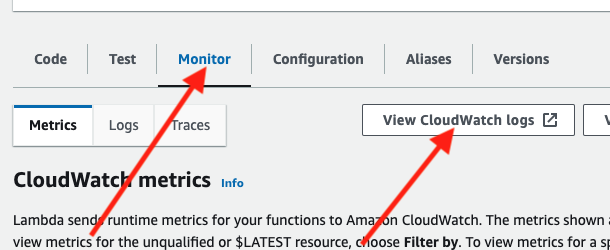
You can look at the code of the function and see that it is pretty simple as it just sends the incoming event to console.log. Click on the Monitor tab and then click View CloudWatch logs. This will take you to CloudWatch and let you see the output from the Lambda function.
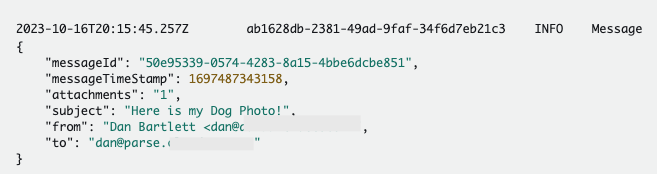
Again, this function is just a stub so the logs in CloudWatch will just show the console.logs as shown below. It is up to you to handle these inbound email events however you need to!
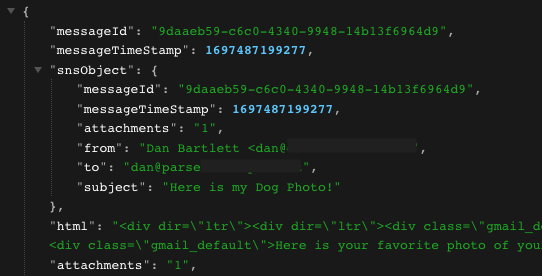
The data sent to the downstream processors via SNS is a subset of all of the data included in the email. For example:
With that data, you can make updates or trigger additional events. If you need the full email contents (or the attachments) you can use the messageId to easily retrieve the email.json file from the S3 Bucket.
Cleanup
To avoid any undesired costs, you can delete the application that you created using the AWS CLI and the console.
First, delete the S3 buckets. From the S3 “home” page, first empty the buckets by selecting the bucket and then select the EMPTY option. Next, delete the actual bucket by selecting the bucket and then the DELETE button.
Next, delete the stack from CloudFormation in the AWS console. Select the DELETE STACK option. AWS SAM also creates a stack and an S3 bucket to manage deployments. You can delete them from CloudFormation in the AWS console following the same procedure as above.
Deploy to production
While you can get this system working pretty quickly, it is not ready for your production environment. Be sure to customize and refine this codebase for your needs, thoroughly test your version of this system in your environment, and configure tests, error handling, and anything else required by your development standards.
Conclusion
In short order you have the foundation for a serverless microservice for handling email events from Twilio SendGrid Webhook Events!
The code is heavily-commented. Dive in and see how you can configure your enterprise systems to leverage this event-based microservice AND how you can use SendGrid’s robust tracking capabilities to get a much better sense of what you are sending and how your users are engaging with your emails.
Speaking of engaging with your emails, be sure to check out part 1 and part 2 of this blog series to learn about SendGrid Webhook Events AND Inbound Parse!
Dan Bartlett has been building web applications since the first dotcom wave. The core principles from those days remain the same but these days you can build cooler things faster. He can be reached at dbartlett [at] twilio.com.


Related Resources
Twilio Docs
From APIs to SDKs to sample apps
API reference documentation, SDKs, helper libraries, quickstarts, and tutorials for your language and platform.
Resource Center
The latest ebooks, industry reports, and webinars
Learn from customer engagement experts to improve your own communication.
Ahoy
Twilio's developer community hub
Best practices, code samples, and inspiration to build communications and digital engagement experiences.