Passwordless SMS Authentication Using Xamarin
Time to read:
April 21, 2015
Written by
This post is part of Twilio’s archive and may contain outdated information. We’re always building something new, so be sure to check out our latest posts for the most up-to-date insights.

Let’s face it: passwords are a liability. If a password is easy enough to remember it’s probably not secure. This leads to using applications such as 1Password to manage very secure passwords for us. It’s not an ideal situation but it works. It works right up until major websites get their databases hacked. Chances are someone has seen one of your beloved passwords before. Take a look at haveibeenpwned.com if you don’t believe me. If you’re in the clear, you’re quite lucky. Passwords are a flawed security solution on their own. Do we even need them at all?
Ricky Robinett recently wrote a blog post detailing how to build a passwordless authentication solution using PHP with Laravel. He was inspired by the Cover app’s implementation of this idea to get rid of passwords. In this post we’ll build a cross-platform mobile frontend in Xamarin that uses the authentication method from Ricky’s post. Xamarin is a platform for developing mobile applications using the C# language. We’ll be using a feature of Xamarin called Xamarin.Forms which allows us to write our user interface in a shared project. This shared project will generate UI for iOS, Android and Windows Phone from the same source. Once complete, your iOS, Android and Windows Phone applications can use this technique to remove passwords from the login workflow.
Tools
- Twilio account with an SMS-enabled number. Sign up for a free trial here.
- Xamarin – I’m using version 5.8 from the stable branch. You’ll need at least an Indie license to use Xamarin.Forms. The project will not run without at least a trial. Sign up for a free 30-day trial of the Business license.
- Xamarin Studio or Visual Studio (you’ll need Visual Studio if you want to build for Windows Phone)
- Microsoft HTTP Client Libraries NuGet package
- Json.Net NuGet package
- ASP.NET MVC port of Ricky’s Laravel backend. We won’t walk through the backend code so you’ll want to get the code from this Github repo and get it running with your Twilio credentials. Instructions are provided in the README.md.
To follow along with completed code I’ve prepared this Github repo for you.
How Does the Backend Work?
This post will focus on building a cross-platform frontend that performs logins against a very simple backend as described in this tutorial. PHP isn’t an obvious first choice for a C# developer so I’ve ported that backend to work on ASP.NET MVC. The backend has the following endpoints:
- /user/validate/ – POST requests to this endpoint with a phone number validate that a user account is associated with that phone number and send a verification token.
- /user/auth/ – POST requests to this endpoint with a token validates that the token is correct for current session.
- /profile – GET requests to this endpoint will return some super secret data. This endpoint can only be accessed after a user has authenticated.
Since we’re focused on the frontend and Ricky already did a great job of detailing how the process works, reading his tutorial is highly recommended. The .NET version provided above is heavily commented and matches up with the endpoints built in that post.
Setting Up Our Xamarin.Forms Application
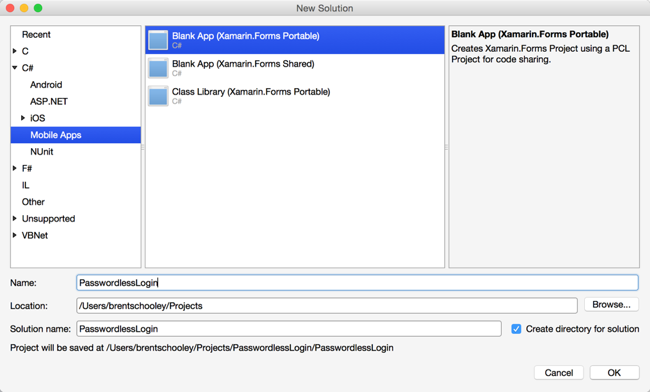
Let’s get started by creating a new Xamarin.Forms application. There are two options for creating a Xamarin.Forms application and the difference is in how they share code. If you’re curious about the differences between the two options, the Xamarin documentation has a great explanation. If you want to support Windows Phone you’ll need to use Visual Studio to create the application. We’ll use the “Blank App (Xamarin.Forms Portable)” option to create our application and name it PasswordlessLogin:
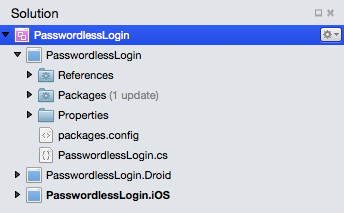
A Xamarin.Forms Solution consists of one Portable Class Library (PCL) that will hold our shared UI code for the application and a platform-specific project for iOS, Android and Windows Phone. Note: Windows Phone support requires the project to be created and built from Visual Studio. We’ll work exclusively in the PCL project which is shown in the following screenshot:
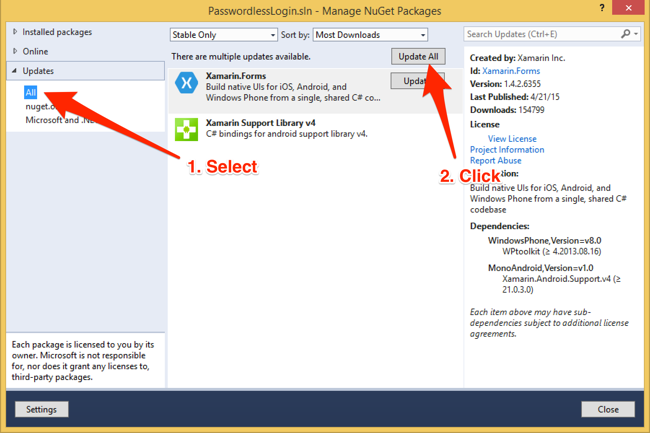
If the Packages node under your project says it has updates like the screenshot above this means there is an update to Xamarin.Forms available. Right-click the Solution and click Update NuGet Packages. If you’re using Visual Studio, right-click the Solution and click Manage NuGet Packages…. Click the Update node in the list and then click Update All:
Now we’ll add some NuGet packages to the project. The packages we need for our application are:
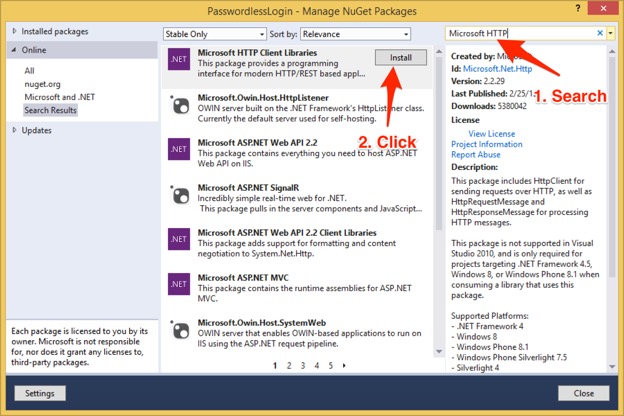
- Microsoft HTTP Client Libraries – adds support for the HttpClient object we will use to make requests to the backend from our app
- Json.NET – to parse the JSON results that are returned by the backend during the authentication process
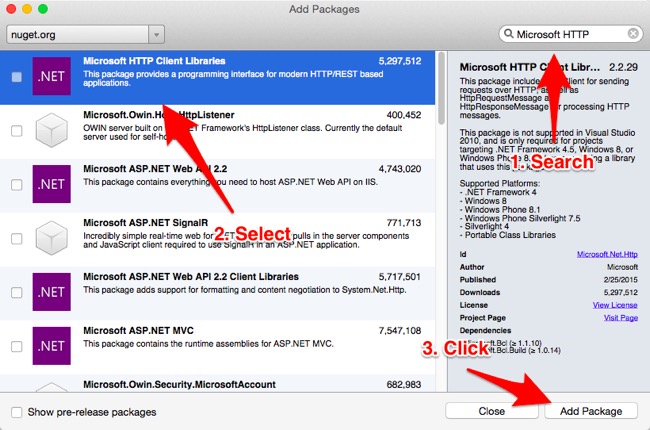
To install a package, right-click on the Packages node in the PasswordlessLogin project and select Add Packages… Search for the package name in the search box and add it by clicking the Add Package button as shown below:
Xamarin Studio:
For Visual Studio, right-click the Solution and click Manage NuGet Packages for Solution… and add packages as shown below:
With these packages added we have all that we need to start building our application.
Can I Have Your Number?
The passwordless authentication process starts by sending a POST request with the user’s phone number to the /user/validate. The first thing we need to implement is a screen for the user to enter this phone number. A screen is called a Page in Xamarin.Forms and there are two ways to create them. One way to create a page is using C# code. Open up the PasswordlessLogin.cs file in the main project and you’ll see the following code in the App class constructor (if you’re using Visual Studio, this file may be named App.cs):
This is what the code-based API looks like for creating UI. In our application we will use the second method for creating UI: XAML. XAML (eXtensible Application Markup Language) is a markup language that allows you to create your UI using a declarative syntax. Though the tooling support is minimal at this point, in the future XAML will allow Xamarin.Forms to have great tooling for creating UI so it’s good to invest some time learning it.
Right-click on the PasswordlessLogin project and select Add->New File… (Add-> New Item… in VS) and add a Forms ContentPage Xaml (or Forms Xaml Page in VS) named PhoneNumberPage:
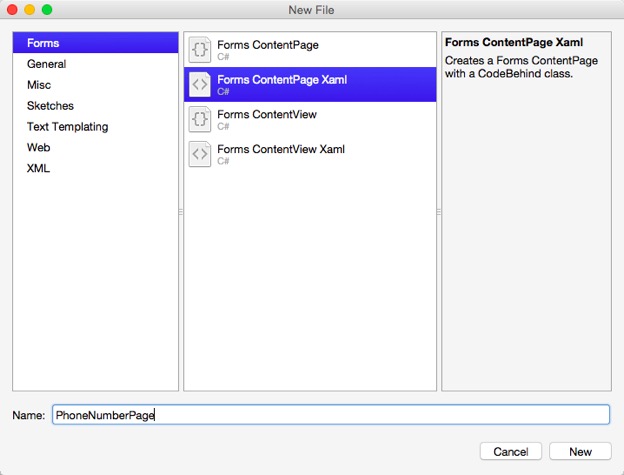
This will create two files: PhoneNumberPage.xaml and PhoneNumberPage.xaml.cs. The former will contain our UI markup and the later will hold the code that works with the objects in our UI. Open PhoneNumberPage.xaml and replace its contents with the following markup:
This markup specifies that the content of our page will be a StackLayout that fills the screen and centers its contents vertically. Anything added to this layout will stack vertically on top of each other. Inside of this StackLayout we add a Label, an Entry, and a Button. We provide an x:Name for the Entry and the Button so that we can refer to them from the codebehind file (PhoneNumberPage.xaml.cs). This is all we need to do to layout the UI for the PhoneNumberPage. However, if we launched the application at this point we wouldn’t see this page because we haven’t set it as the main page for our Xamarin.Forms app. To do this, open up PasswordlessLogin.cs (or App.cs in the Visual Studio template) and replace the App class constructor with the following code:
This code creates a NavigationPage, which will allow us to move forward and backwards through pages in our app, and sets the root page for the navigation to be an instance of PhoneNumberPage. At this point it’s a good idea to test to make sure our UI is setup properly by running the application. Pick a platform-specific project of your choice (PasswordlessLogin.iOS, PasswordlessLogin.Droid or PasswordlessLogin.WinPhone) and set it as the startup project by right-clicking on the project node and selecting Set As Startup Project. Run the application (either on device or in a simulator) and you should see the following screen:
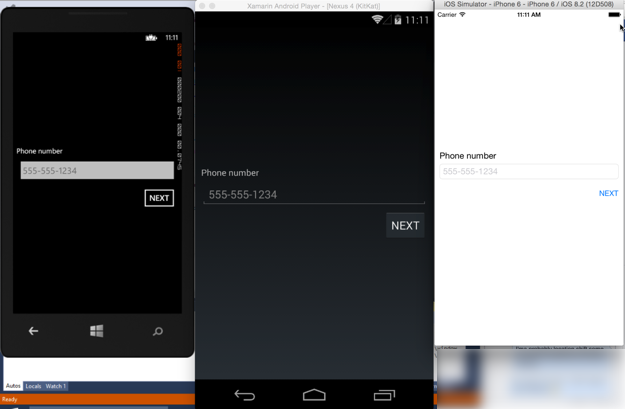
You’ll be able to enter a phone number in the Entry field but nothing will happen if you tap NEXT because we haven’t written any code yet. Let’s do that now. Open PhoneNumberPage.xaml.cs and add the following using statements:
Next, we’ll add a field for an HttpClient object:
Add a line to the constructor to hook up the Clicked event for our NextButton:
Finally, add the event handler for the button:
The event handler creates an HttpClient instance. Next, it creates a KeyValuePair containing the phone number entered in the PhoneNumberEntry field to be passed as form encoded content to the backend. Then it makes a POST request to the /user/validate endpoint and checks the result for a Success value of true. Make sure to update the URL in the PostAsync call to your backend’s URL. For now we just display a popup on success or failure since we haven’t created the next page yet. Run the application and test with your phone number (make sure to use the format ‘+15555551234’). If you get the valid alert and a text message with a token is sent to your phone, you are ready to move on to the next step.
This Game Requires Tokens
In the previous step we were sent a token via SMS. To complete the authentication process we need to allow the user to enter that token in the next page of the application. Let’s create the token entry page now by adding a new Forms ContentPage Xaml file to the application called TokenPage. Open up TokenPage.xaml and replace the contents with the following markup:
This markup should look very familiar since it’s almost identical to our previous screen. The only real difference is that the Entry field accepts a token instead of a phone number on this page. Let’s work on sending that token to the backend for verification. Open up TokenPage.xaml.cs and add the following using statements:
Then add a field for an HttpClient object to the TokenPage class:
Replace the constructor with the following code:
This time we are passing in an HttpClient instance to the page instead of creating a new one. This is because the backend uses cookies and we want to ensure that we use the same session when making the token request. Now add the NextButton_Clicked event handler:
This code is also nearly identical to the previous page except this time we are passing a token value to the /user/auth endpoint for verification. Make sure to update the URL in the PostAsync call to your backend’s URL If Success is true we’ll display an alert indicating success. In a real world application you would probably want to navigate the user to the protected part of your application. One last thing we need to do is replace the Alert in PhoneNumberPage with a navigation to the TokenPage on a successful phone number entry. Edit the response checking in the NextButton_Clicked handler of PhoneNumberPage.xaml.cs to contain the following:
The highlighted line creates a new TokenPage passing in the HttpClient object and pushes it on the navigation stack for the app.
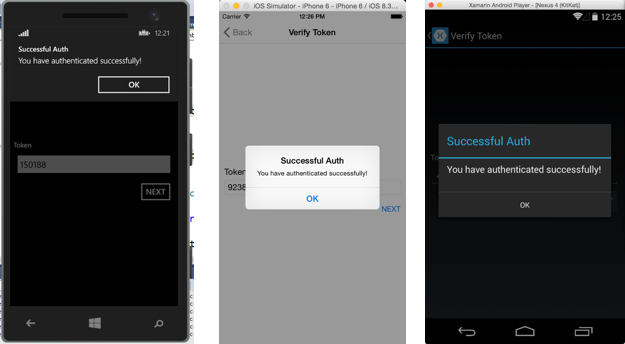
At this point the entire app is ready for testing. Run it on your favorite platform and test it out. Enter your phone number and hit NEXT. Then on the next page enter the token you receive and hit NEXT. If all goes well you should see an alert message indicating success:
Next Steps
Shout it from the rooftops, the password is dead! Or at least, it can be now that we’ve built a passwordless authentication solution that works on all three major mobile platforms. What could we do to improve upon the solution built in this post:
- Create a registration page to create new users
- Provide a backup authentication method in the event the user doesn’t have access to SMS
- Implement a voice solution to provide the token in addition to SMS
- Build a profile page for the user that they can only access once they’ve successfully authenticated
I’m really excited to see what kind of things you are building with Twilio. Feel free to reach out to me at any time via email at brent@twilio.com or hit me up on Twitter @brentschooley.

Related Resources
Twilio Docs
From APIs to SDKs to sample apps
API reference documentation, SDKs, helper libraries, quickstarts, and tutorials for your language and platform.
Resource Center
The latest ebooks, industry reports, and webinars
Learn from customer engagement experts to improve your own communication.
Ahoy
Twilio's developer community hub
Best practices, code samples, and inspiration to build communications and digital engagement experiences.