Bring Twilio Studio and Programmable Voice into your Genesys Cloud Account
Time to read:
April 17, 2024
Written by
Reviewed by
In this post, learn how to connect Twilio Programmable Voice and Twilio Studio to your Genesys Cloud environment using Genesys’s BYOC configuration.
Twilio offers two main avenues for voice carriage: Programmable Voice, and Elastic SIP Trunking. Traditionally, platforms and PBXs would use Elastic SIP when they were using Twilio as a carrier because it is straightforward to set up, reliable, able to dynamically grow with a business’s needs, and available around the globe.
Why add Programmable Voice to Genesys Cloud?
Programmable Voice is where the breadth of Twilio’s capabilities become accessible. Tools such as Studio, Functions, and more advanced offerings such as Twilio Pay and Voice Insights all become accessible.
Programmable Voice operates differently from Elastic SIP in that you break the call into call legs. With Elastic SIP, your call is a single leg through Twilio from Caller to PBX as shown below.

With Twilio’s Programmable Voice, your call has two legs now, from Caller to Twilio, and Twilio to PBX, and that piece in the middle is where the magic happens – as shown below.

Today, learn to set up your own Programmable Voice connection into Genesys Cloud BYOC and utilize Twilio Studio to make an announcement to the caller before the call reaches the contact center.
Prerequisites
You won’t need a lot to get started.
- A Twilio account (free or paid). If you are new to Twilio, click here to create a free account
- A Twilio phone number to make and receive calls
- Genesys Cloud account enabled for Bring Your Own Carrier (BYOC) Cloud
- Genesys Cloud access role: Telephony > Plugin > All permission
Create your SIP Domain
This step will guide you through creating the initial configuration in Twilio to establish your SIP connection inside the Programmable Voice API.
Access Controls
The first thing you need to do is create some access credentials that will allow Twilio and Genesys to securely talk to each other. To begin, log into your Twilio Console and go to Voice > Manage > IP Access Control Lists, then create a new list.
Give this list a Friendly Name that will make it easy to keep track of, such as Genesys BYOC. This list will reference your Genesys Cloud IP addresses and allow them to connect to your new SIP domain.
You’ll need to obtain the CIDR Network Addresses from Genesys Cloud. These can be found in the Genesys Cloud documentation. Once you have obtained all four of the IPs for your region you can add them to your Access Control List and Save.

Now you also need to create some credentials as well. Select Credential Lists from the left and Create a new List. Give this List the same name as your IP Access Control List.
The username and password can be anything you like. I recommend using your Twilio phone number as a username. Once you have created your credentials, click Save.

SIP Domain
Even though you’re using the Voice API, you still need to create a SIP Domain that can be reached by Genesys Cloud or other platforms. To begin, go to Voice > Manage > SIP domains, then add a new domain.

Use the same Friendly Name again for the SIP Domain so you can quickly see that all these components are connected to each other.
Your SIP domain can be called anything you like, but the name needs to be globally unique, so don’t try call it “test”, that one is taken.
Instead, pick a name that is unlikely to be used anywhere else, but which is still easy to remember – and most importantly, to spell. Conveniently, the Twilio console will automatically check any name you enter and determine if it is available.

The next step is to configure Voice Authentication. You need to add in your IP Access Control List and your Credential List from the previous steps by selecting them from their respective drop downs.

You can now Save your SIP domain, but leave the page open, as you’ll need to come back here later.
Create your BYOC trunk in Genesys Cloud
You can find the complete instructions to set up and enable your BYOC Cloud trunk in your Genesys Cloud platform here. The section that is relevant to us today is Generic BYOC Carrier.
Open your Genesys Cloud instance and navigate to the External Trunks page, as per the instructions linked above, then follow the below guide to complete your setup.
Termination
In the Inbound / Termination field, add a unique identifier. This is separate from the name you gave your Twilio SIP domain, and is what Genesys Cloud will use to send calls out to Twilio.
At the bottom of the page you can see the Inbound Request URI reference. This is where you can find and check your full SIP URI if you ever need it.

Origination
Scroll down to the Outbound section (calls originating from the PSTN and coming inbound to the contact center). This is where information from the Twilio SIP domain will be used to configure Genesys Cloud to connect to the trunk you configured earlier.
For the SIP Termination FQDN use the name of your SIP URI defined in your Twilio SIP domain. This is the unique name you chose in step one, followed by “.sip.twilio.com”
For SIP Servers and Proxies, use the localized termination point, specific for your Genesys Cloud region, e.g., au1 for Australia.
The Realm should be set to “sip.twilio.com”.
Lastly, make sure Digest Authentication is Enabled, and enter in your credentials to match what you created in your Twilio Credential List.

Phone Numbers
Now scroll down to the Calling section. In the address field, specify the Twilio phone number you wish to assign to this trunk.

SIP Access Control
The SIP Access Control section contains the default IP Addresses used by Twilio to communicate with Genesys Cloud. You will need to add the IP addresses for all regions, and can find them in the Twilio SIP Documentation.
Enter the IP addresses for each region like in the screenshot below. Click + to add each into the list. It is required to add ALL of Twilio’s IP address ranges and ports on your firewall for SIP signaling. This is important if you have numbers in different edge locations, and also for resiliency purposes.

Once all the IP addresses have been entered, scroll down to the External Trunk Configuration area. You are going to make changes in two sections: Identity and Media.
Under Identity, locate the Calling and Called sections. Each will need to have the Address Omit + Prefix toggles disabled. By default these are enabled. This will ensure that Genesys Cloud sends correctly formatted numbers when sending outbound calls to Twilio.

In the Media section, you need to remove the Opus codec. Leave the PCMU and PCMA ones there.
You can now Save your trunk settings.
You now have two sides of a SIP trunk configured, one in Twilio, and one in Genesys Cloud. It’s time to tell them what to do.
Create your outbound path
Programmable Voice calls contain two legs. The first leg of an outbound call (Genesys Cloud into Twilio) comes from a SIP URI. In order for those calls to go out to the PSTN, the second leg needs to come from an E.164 formatted phone number.
To do this, you are going to utilize a Twilio Function. Open a new tab in your Twilio Console and go to Functions and Assets > Services > Create a Service.
Create a Function and call it To_PSTN.
Replace the sample code with the below, and Save. This Function converts the SIP URI to a formatted phone number, and directs those calls out to the PSTN using a TwiML Dial verb.
Lastly, don’t forget to click Deploy All at the bottom of the screen to make your Function live.
Call Control Configuration
Copy the URL for your To_PSTN function using the shortcut at the bottom right, then go back to your SIP domain configuration page. Here you need to paste in your webhook URL for the To_PSTN Function, and Save.

Create your inbound path
We are now going to create a call flow in Studio which all incoming calls will be routed through. This call flow will sit in front of your Genesys Cloud application, meaning you can use it to call other applications, orchestrate flows, or trigger events.
In your Twilio console , select Studio > Flows > Create new Flow. Give your Flow an easy-to-identify name, then select a template or Start from scratch.
For now, you are going to keep your Flow simple, and use it to play a message to an incoming caller, before passing that call off to your Genesys Cloud contact center.
From the Voice Widget menu on the right, select Say/Playand click-drag it onto the flow canvas.
Drag the red dot from the Incoming Call trigger and connect it to your Widget.
Fill out the fields on the right with your widget settings. Here, you are going to select Say a Message and use Twilio’s built in text-to-speech to type in your message, then select a language and voice to say it in.

If you wish to use a pre-recorded audio file, set the widget to Play a Message and input the URL of your audio file instead.
Next, go back to your Widget Library and drag in a Connect Call ToWidget onto your canvas and connect it to the Say Widget.
Select SIP Endpoint from the drop down on the right. Fill in the Endpoint field with the SIP Invite to send the call to Genesys. The format is:
sip:[phone number]@[Genesys Cloud SIP URI]
Rather than type in the phone number, which would lock this flow to only being usable in one place, you are going to use a Liquid variable to input the number dialed by the caller.
To do this, start typing double curly braces {{ and you should see a list of Liquid variables which you can select from. The variable trigger.call.To is the phone number that the caller dialed to reach the flow.
Lastly, you are going to add in the “@” symbol followed by the Genesys Cloud SIP URI you created earlier. You can check the complete URI in the Inbound Request URI Reference in Genesys Cloud.
It should look something like this:
sip:{{trigger.call.To}}@nimbus.byoc.mypurecloud.com.au

Now all that’s left is to Publish your flow.
Connect your Phone Number
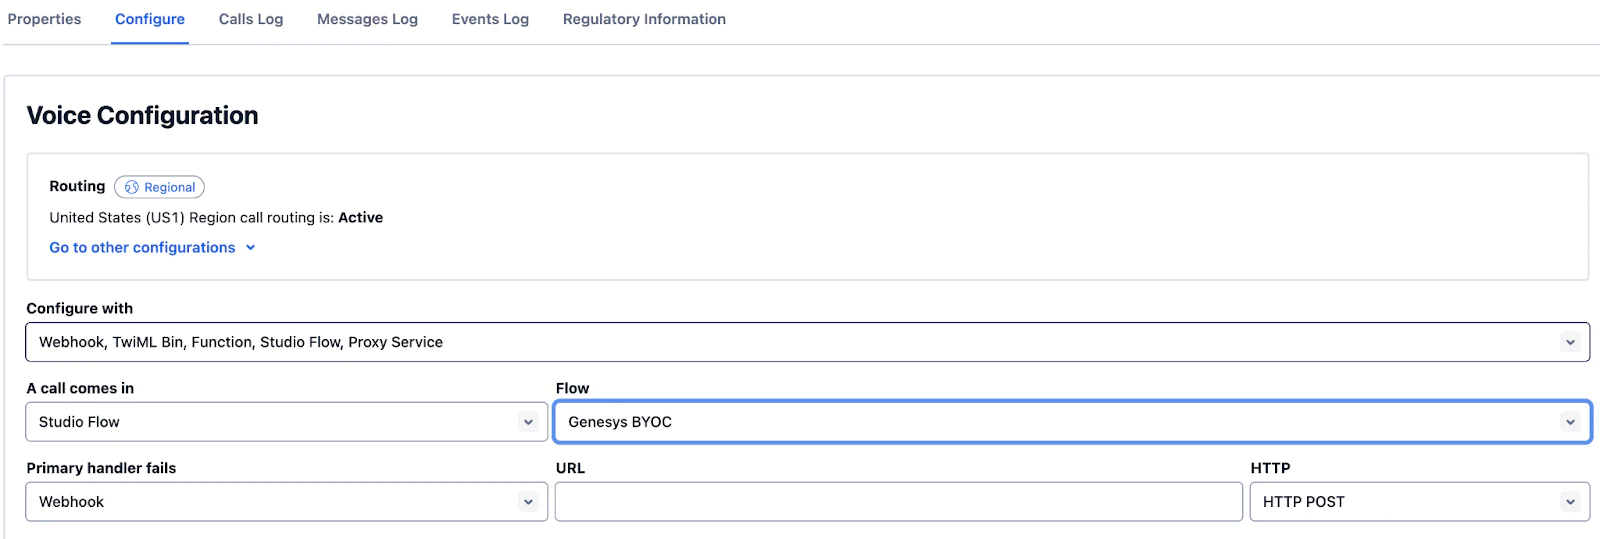
Next, you need to configure our Twilio Phone Number so that all incoming calls from the PSTN are directed to your Studio Flow, and then onwards to Genesys Cloud.
In your Twilio Console navigate to Phone Numbers > Manage > Active Numbers and select the Phone Number you wish to use and go to the Configure tab.
In the A call comes in section, select your new Studio Flow and Save.
If you have not done so, you will also need to add your phone number into Genesys Cloud using the instructions in Manage DID and Toll Free Number Ranges.
Make a phone call
Now it’s time to test out your new connection. Place a call to your Twilio Phone Number using your mobile phone or another device. You should hear your custom message played from Studio, and then see your call routed through to your Genesys Cloud queue, ready to be answered by an agent.
Calls not connecting?
If you can hear your message from Studio play, but then your call drops, check that your SIP Endpoint is configured correctly in the Connect Call To Widget of your Studio Flow. It can be helpful to type it out in a notepad and then copy/paste it into the field, as the Liquid variable formatting can sometimes add/remove a space. The correct format should be:
sip:{{trigger.call.To}}@terminationName.byoc.mypurecloud.com
What next?
You now have a Genesys Cloud BYOC instance connected into Twilio Programmable Voice, with a Studio Flow orchestrating your inbound calls, and a Function to handle your outbound calls.
But why stop there? Check out other Twilio Blog Posts for some inspiration on what else you can do with Studio, Functions, and the Voice API.
Courtney Harland is a Senior Solutions Engineer at Twilio, with over 10 years of experience in the Contact Centre industry. As a millennial, the writing of this blog constituted the most phone calls she has made in her life. She can be reached at charland [at] twilio.com

Related Resources
Twilio Docs
From APIs to SDKs to sample apps
API reference documentation, SDKs, helper libraries, quickstarts, and tutorials for your language and platform.
Resource Center
The latest ebooks, industry reports, and webinars
Learn from customer engagement experts to improve your own communication.
Ahoy
Twilio's developer community hub
Best practices, code samples, and inspiration to build communications and digital engagement experiences.