How I Potty Trained My Kid Using Twilio and an AWS IoT Button
Time to read:
March 06, 2018
Written by
This post is part of Twilio’s archive and may contain outdated information. We’re always building something new, so be sure to check out our latest posts for the most up-to-date insights.

As a dad of 2 young kids, a non-trivial portion of my day is devoted to poop. Lots and lots of poop.
When my oldest began potty training, they would wake up in the middle of the night needing to use the bathroom. And while toddlers’ lungs make a great alarm, we needed to find a solution that wouldn’t disturb the younger one sleeping 10 feet away.
I’m always on the lookout for how I can win my kids’ cooperation in novel and fun ways. Bonus points if it involves getting to tinker on an engineering project myself.
Enter the Poop Button.
Behind the smiling emoji facade is an Amazon IoT button, a variant of Amazon’s dash button. When my kid presses this button, it triggers an AWS Lambda function that uses Twilio’s Python Helper Library to call my iPhone from a Twilio number. The Twilio number is stored in my contacts with “emergency bypass” turned on, so even when it’s 2am and I’m on “do not disturb” I still get the call.
Before we start: IoT poop button prerequisites
Let’s walk through setting one up – here’s what you’ll need to build your very own poop button.
Buy a AWS IoT Button
The hardware behind the IoT Poop Button is the 2nd Generation AWS IoT Button. You can purchase your own through this link.
Set up a local dev environment
To write the code for the Lambda, you’ll need a computer with Python 3.6 installed. If you’re on a Mac that came with Python 2, I recommend installing 3.6 via Homebrew:
If you have Python 2 installed as well, make sure nothing on your PYTHONPATH
points to your Python 2 packages:
Sign up for a Twilio account
If you don’t have an account already, sign up for Twilio. After you’ve signed up, buy a number. Make a note of the phone number you’ve bought, your Account SID, and your Auth Token. You’ll need them all later.
Now, go to the list of Verified Caller IDs and make sure the number you want the poop button to call is listed. If not, add it.
Sign up for an AWS account
Sign up for AWS if you haven’t already. Note, an AWS account is not the same as an Amazon account, so even if you have an Amazon account already, you’ll need a separate AWS account.
Make a phone call with Twilio in Python
All set? Ok, time to get down to the code!
Project directory and dependencies
Because Lambdas have no way to manage code dependencies, we have to vendor all of our dependencies into our project directly. Then once everything’s ready, we create a zip file that we can upload to AWS when configuring our Lambda function.
For this function, our only Python dependency is Twilio’s client library. Let’s configure our project directory and install it:
You should now see a bunch of subdirectories and Python files in your project directory. Remember, twilio has its own dependencies, so don’t be surprised to see things like requests and pytz.
(The setup.cfg bit is only required if you installed python 3 via Homebrew. It circumvents a nasty bug in Homebrew’s python.)
Python phone call source code
Now, create a file called index.py and paste this code into it:
The astute reader will notice 4 variables taken from the environment:
- TWILIO_ACCOUNT: The Account SID you copied from your Twilio account dashboard
- TWILIO_TOKEN: The Auth Token you copied from the same place
- TWILIO_PHONE: The phone number you purchased (In E.164 Format)
- ALERT_PHONE: The phone number you want the button to call (Also in E.164 format)
The script instantiates a Twilio client and creates a new call using these environment variables. For the content of the call, we’re using a Simple Message Twimlet, a URL that takes a list of messages in its query string and returns a TwiML document. Twilio reads that document and generates a voice message from it.
Try out a phone call with Python and the Twimlet
Let’s give our code a shot locally to make sure it’s working. Remember to substitute the fake values below with your real ones:
Did your phone ring? If not, double check that the environment variables are correct and take a look at your Twilio phone number’s call logs to see if the call showed up. If you’re using a Twilio trial account, make sure the alert phone number is listed in your Verified Caller IDs.
If it did congratulations, you have a working Twilio integration! The only remaining step on the code side is to prepare the zip file to upload to AWS:
AWS IoT and Lambda integration
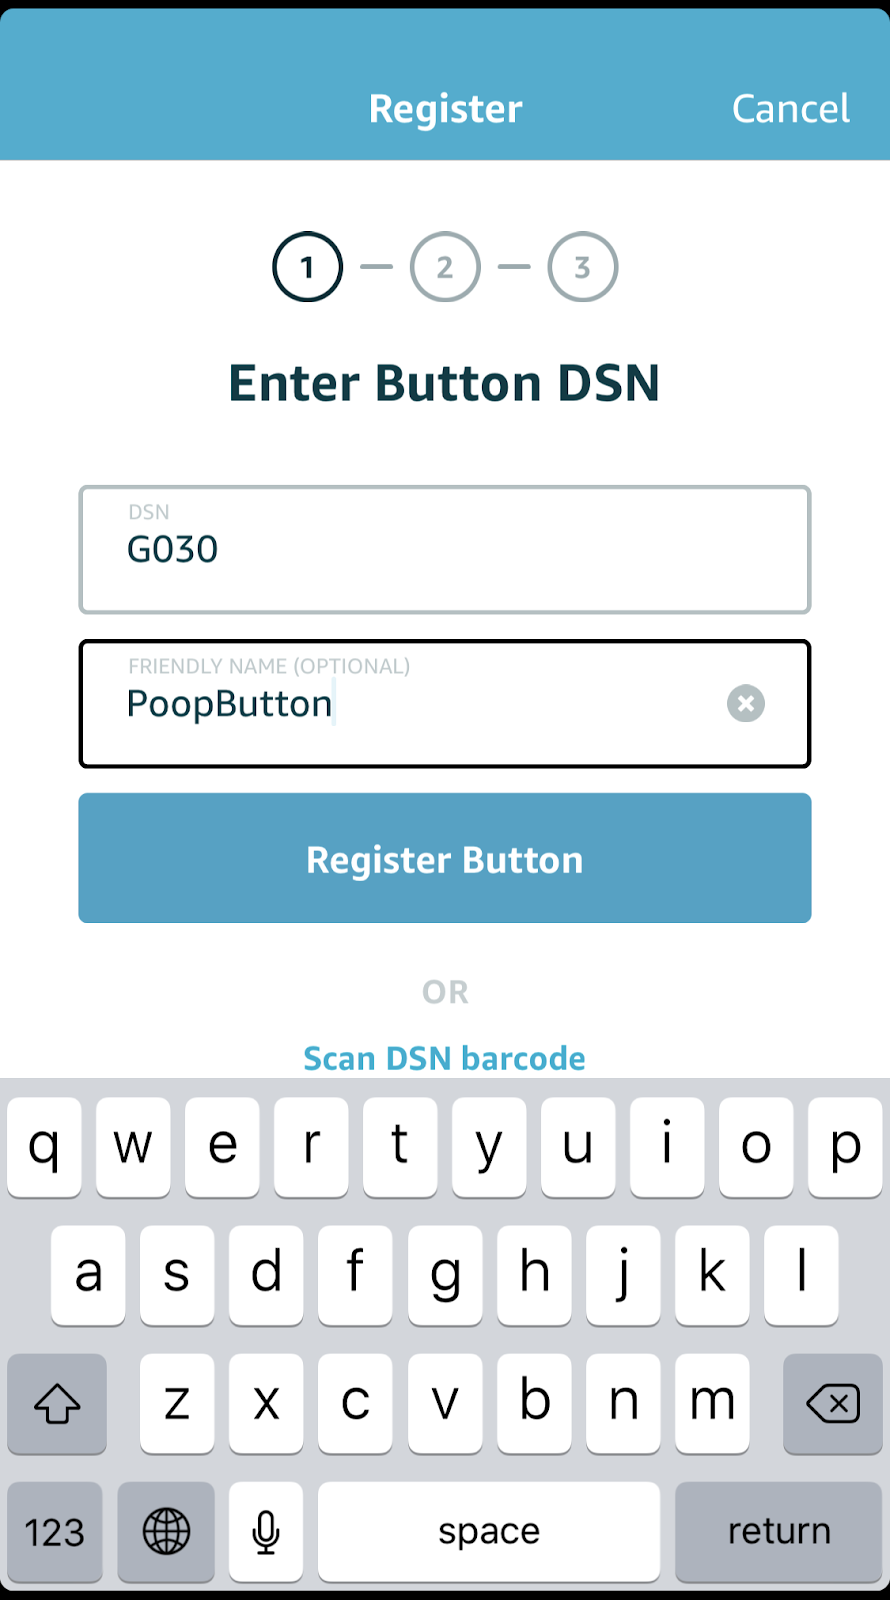
If you haven’t already, open up your shiny new Amazon IoT button. Take note of the DSN printed on the back. (It probably starts with “G030”.) This is your button’s identifier, and you’ll see the number on a lot of the auto-generated resources AWS creates for you.
Set up the button using a native phone app
Next, install and launch the AWS IoT Button Dev iOS or Android app to configure your AWS IoT button. I have an iPhone, so the screenshots you see are from the iOS app. Here’s how to connect your button using the app:
- Click the button to Set Up AWS IoT Button
- Enter the button DSN and give it a name (or, if available, you can scan the box barcode)
- Hold the button for 6 seconds until the light starts flashing blue
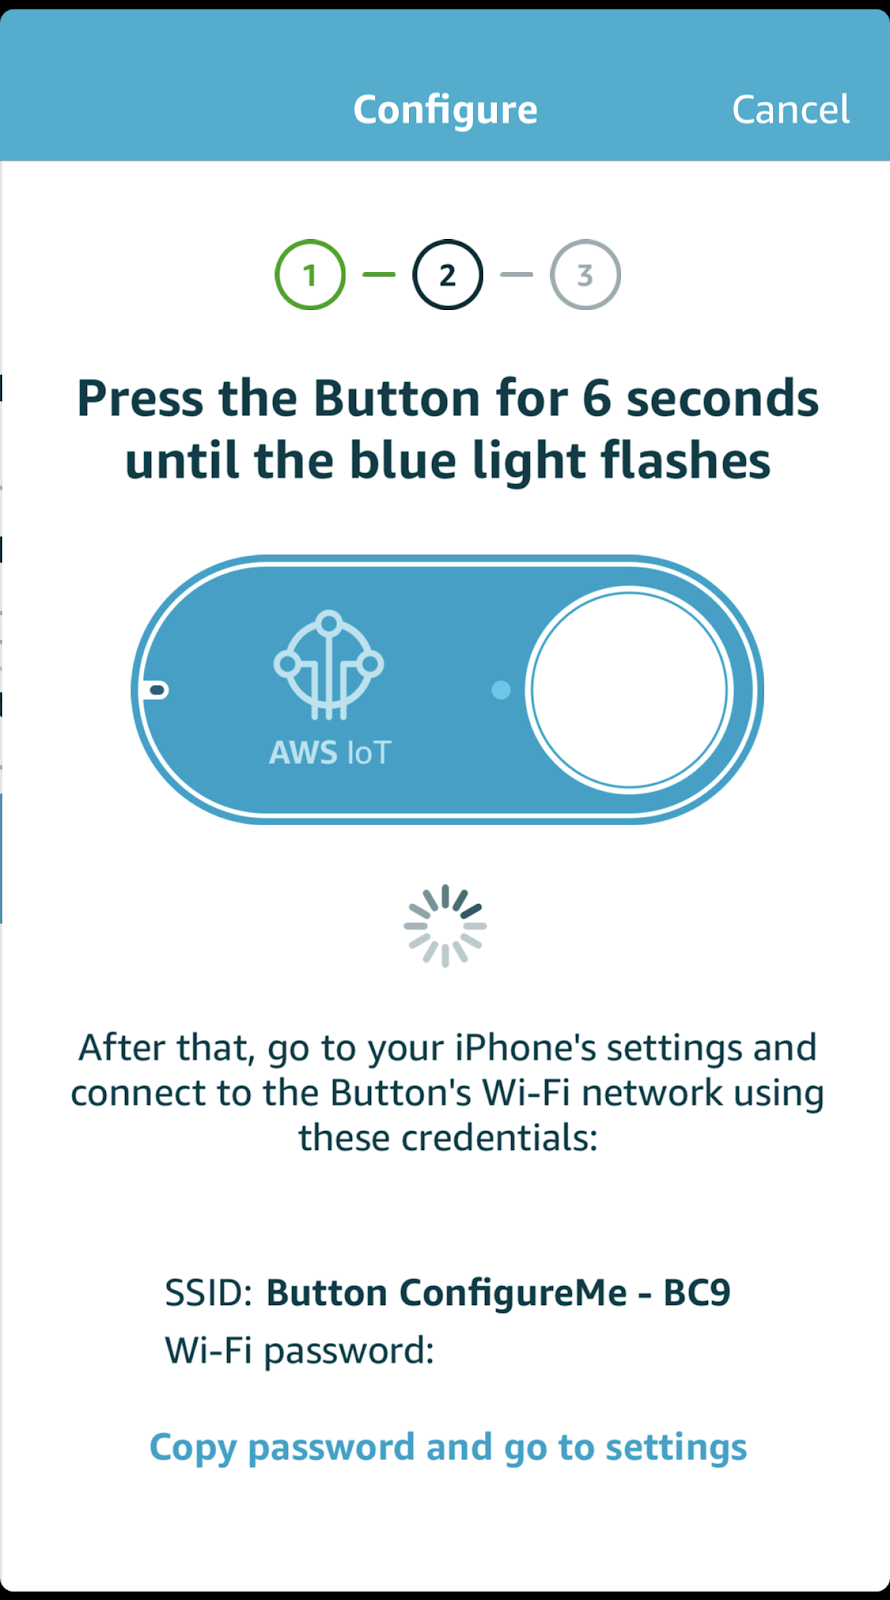
- Tap the “copy password and go to settings” link, connect to the SSID that was displayed in the app, and paste the password it put in your clipboard to connect to the button’s wifi network
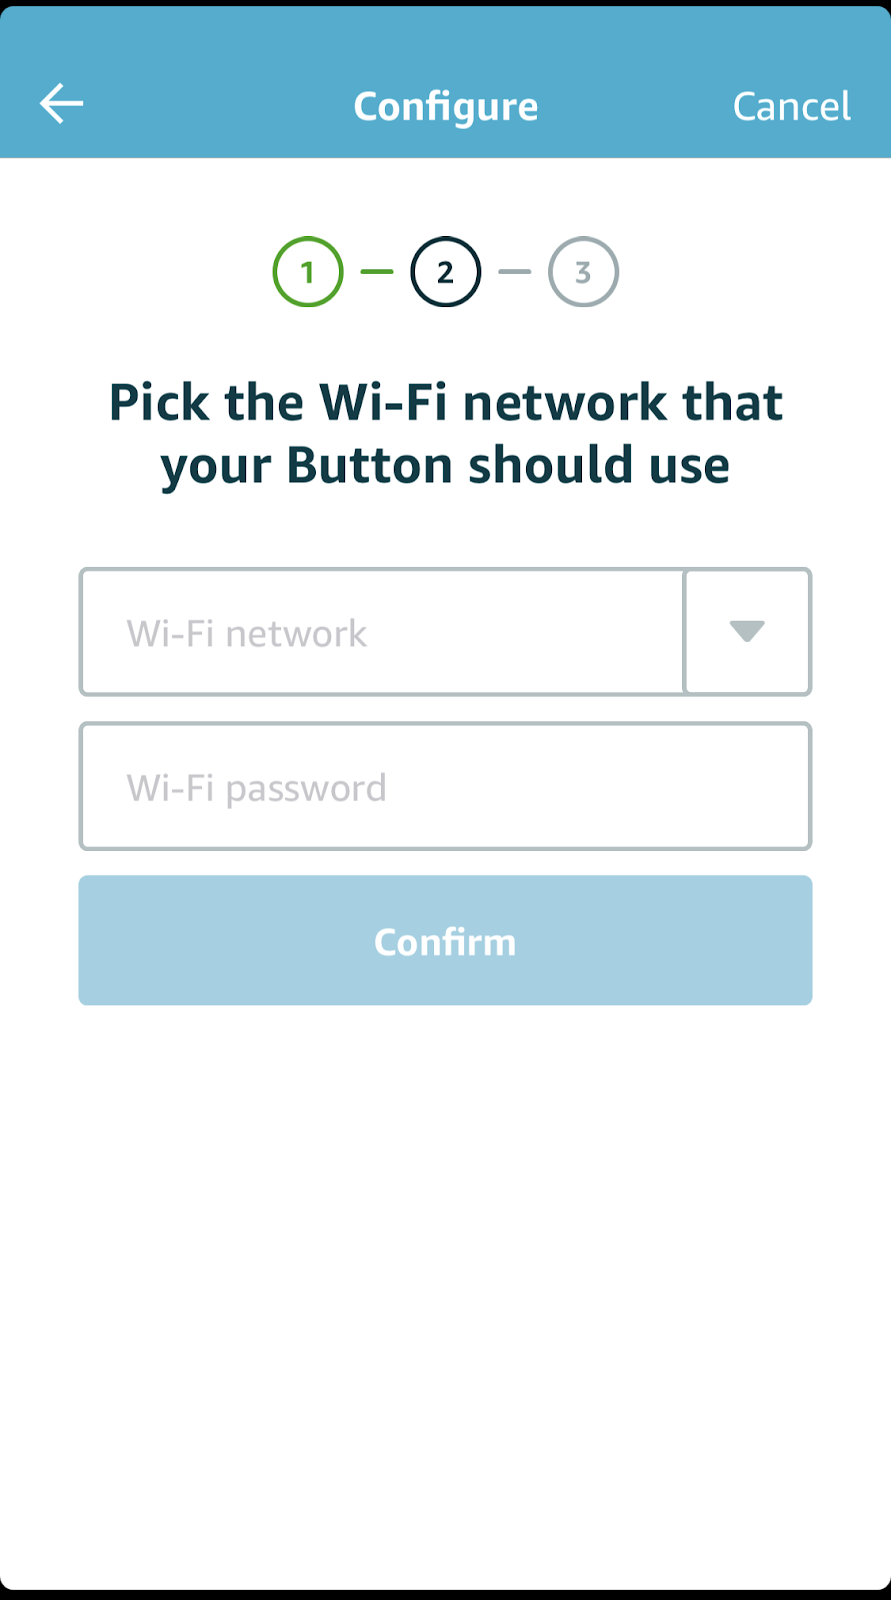
- Go back to the app. It should recognize that you’re on the button’s wifi and switch to asking you for your home wifi network’s SSID and password.
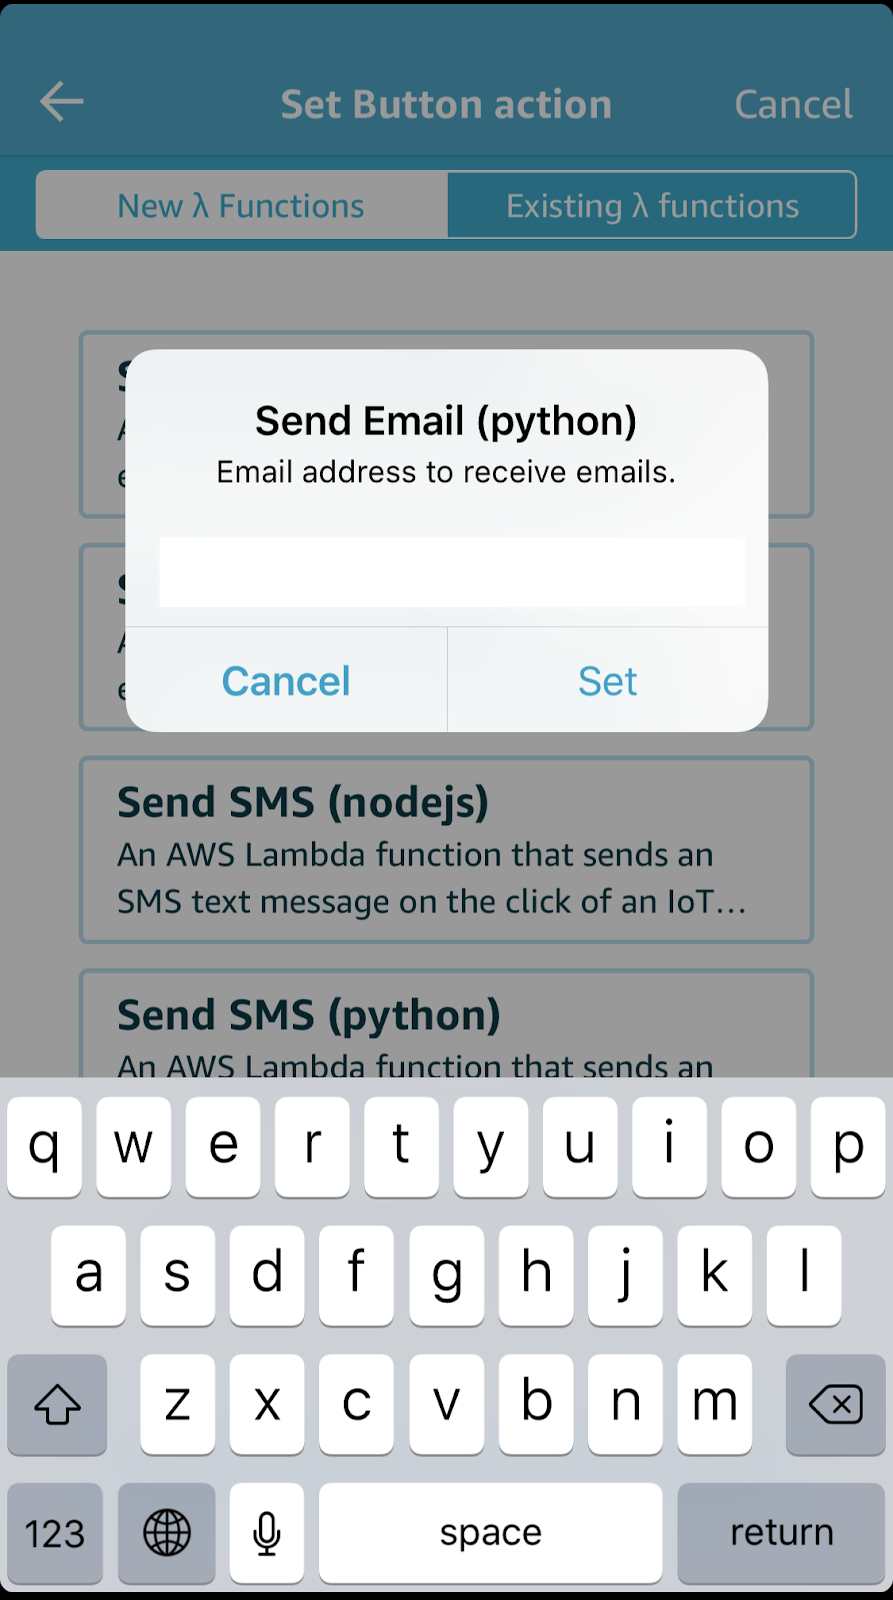
- After that, you’ll set the button’s action. Since we haven’t created our Lambda function yet, let’s start by creating one of their boilerplate functions. Choose “Send Email (python)” and hit “Set action”.
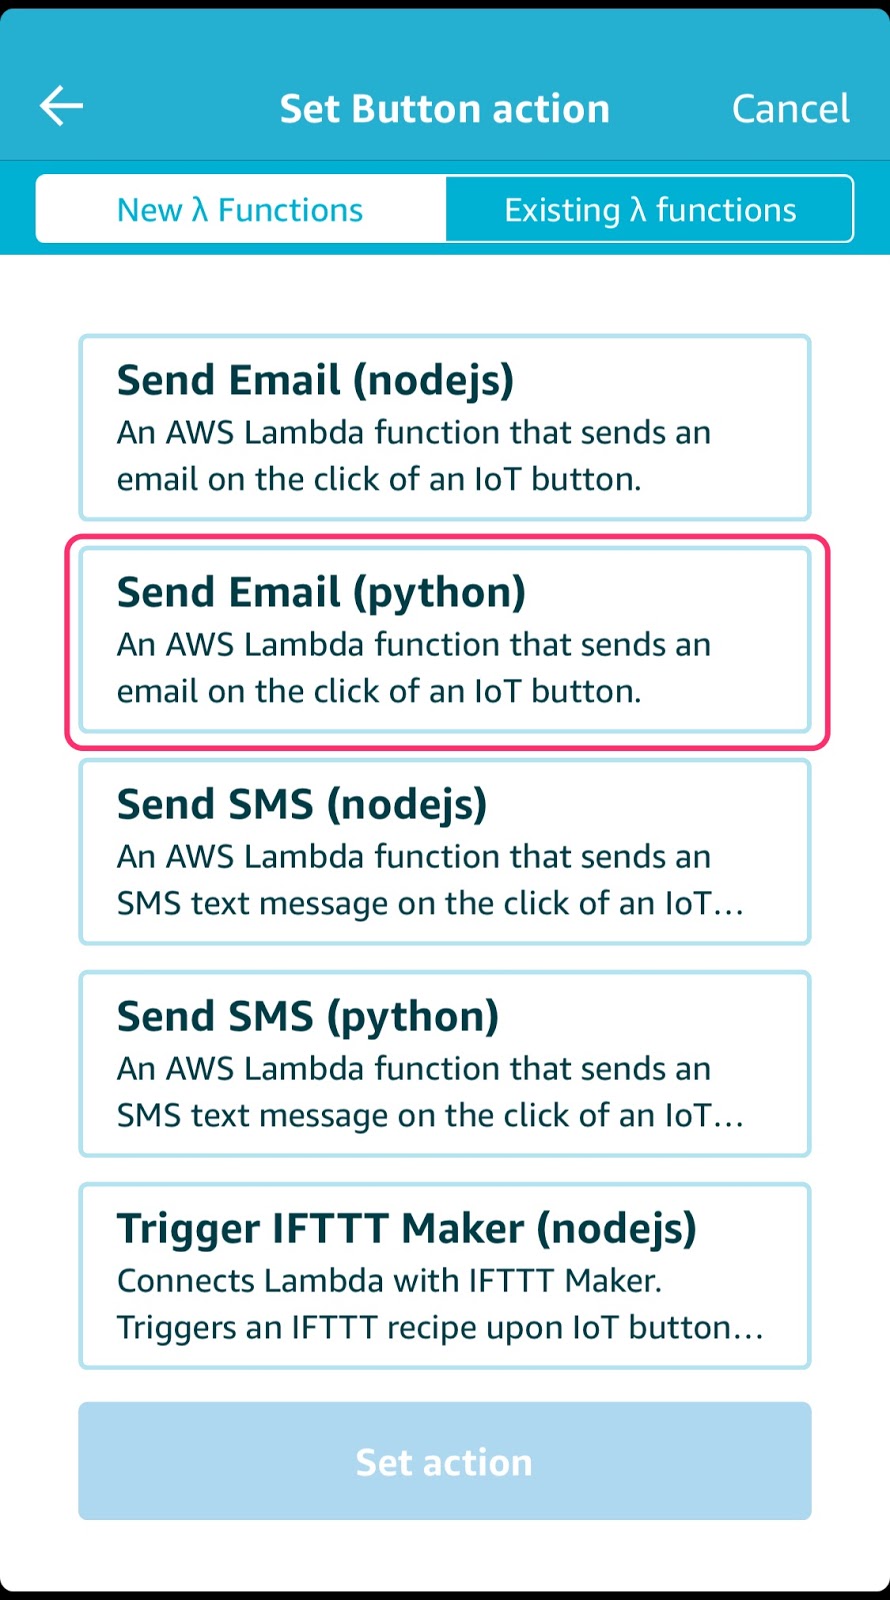
- Enter your email address in the box, and you should be all set.
Give it a whirl. Push the button. You should see the light blink white and then turn green after the request succeeds. The first time through, you’ll probably get an email from AWS asking you to verify your email. Even that email is proof enough that the button worked, but if you click through the verification link and push the button again you should receive an email with the subject “Hello from your IoT button”.
Create a new Lambda function
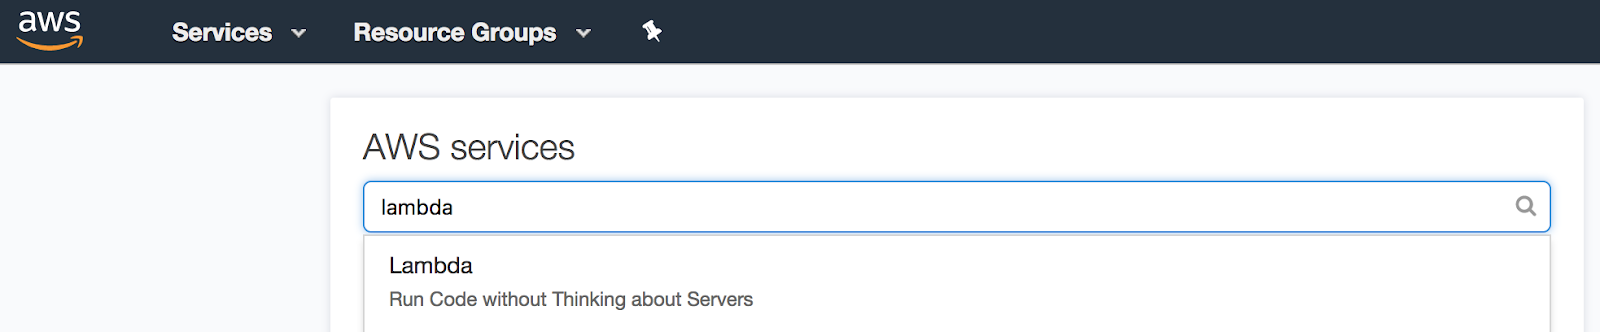
Log into your AWS console and search for the Lambda service.
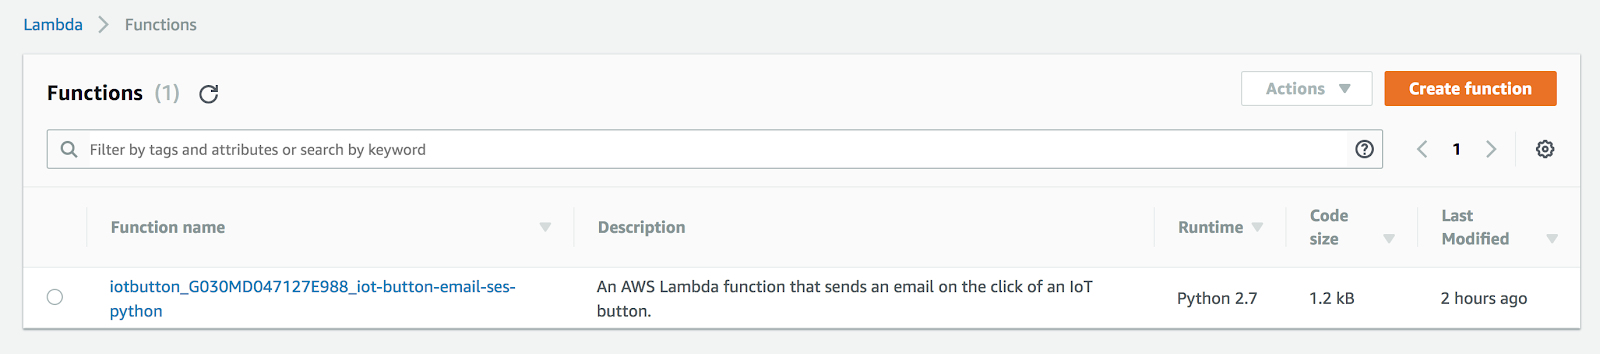
You should see the function we just created in the phone app. Click on the “Create function” button.
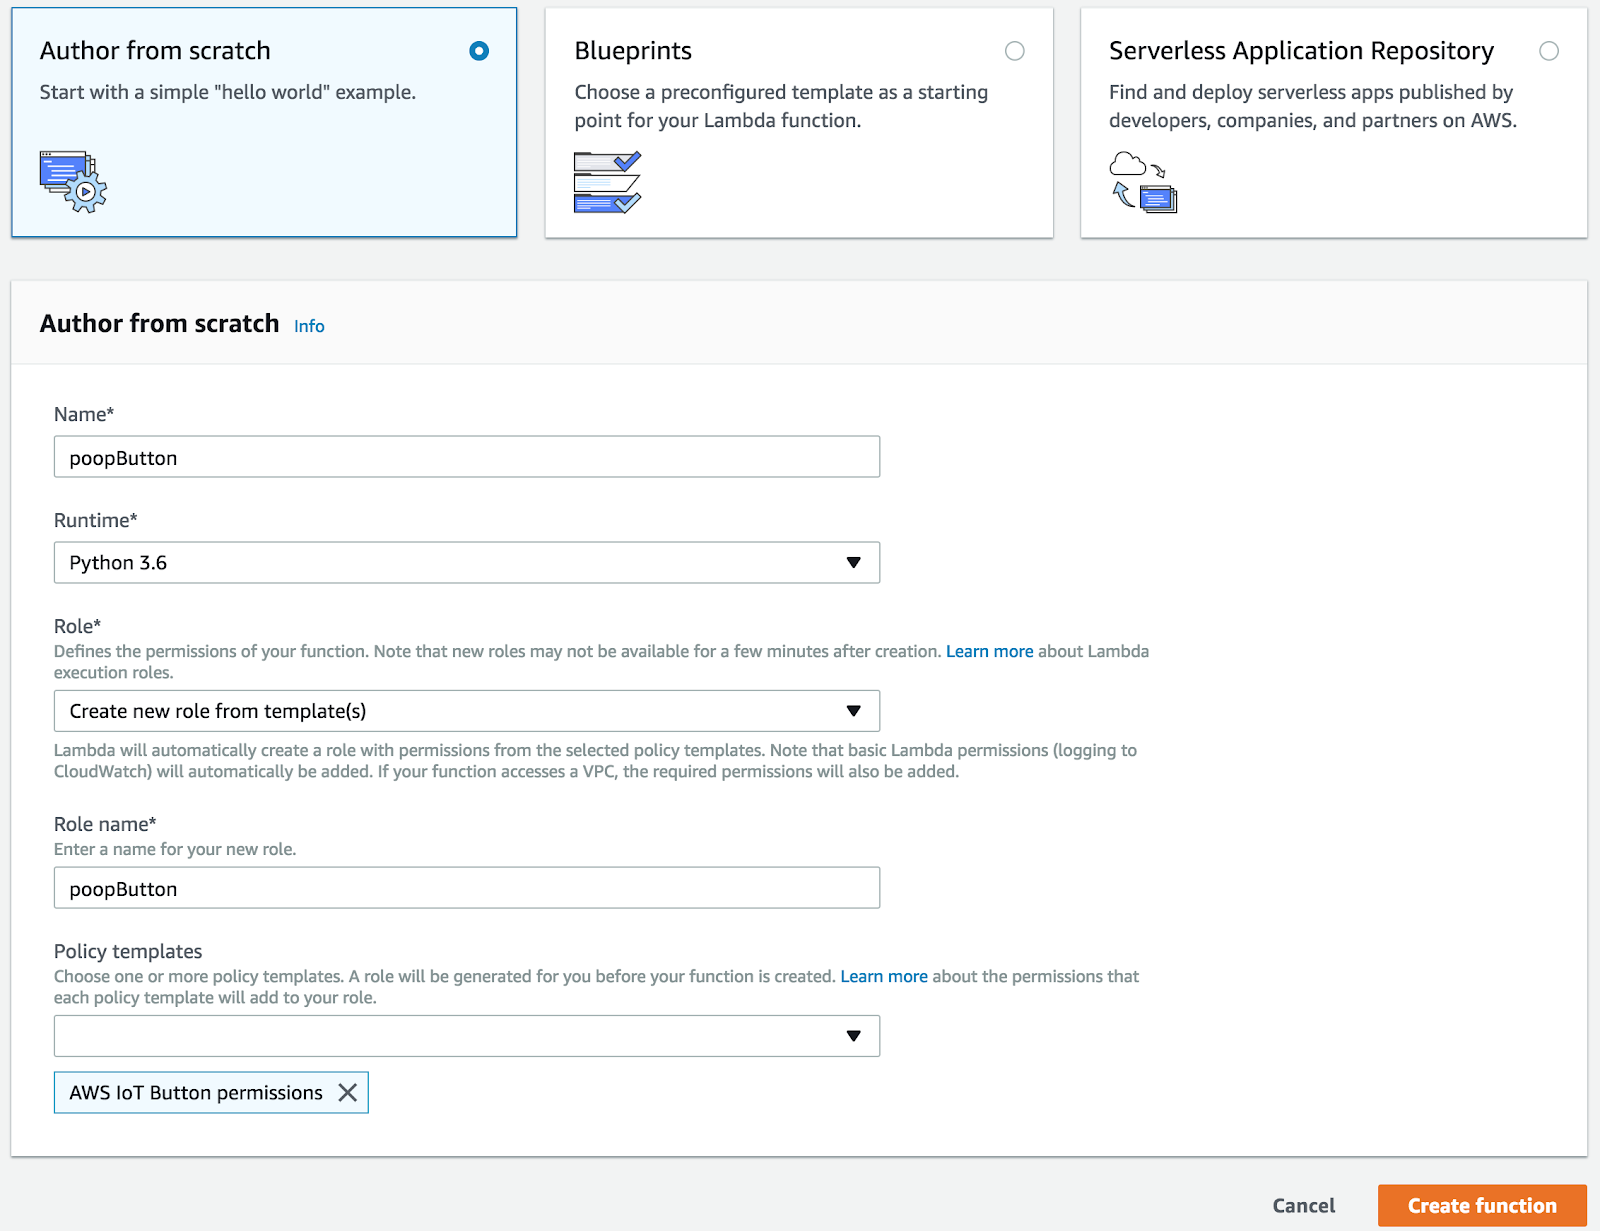
Choose “Author from scratch”, name your function, choose Python 3.6 as the runtime, and “Create new role from template(s)” for role. Then name your role and choose “AWS IoT Button Permissions” from the Policy templates dropdown. Finally, click “Create function”. A loading indicator will spin for a bit, and then you’ll be taken to your new function.
Configure the function’s trigger
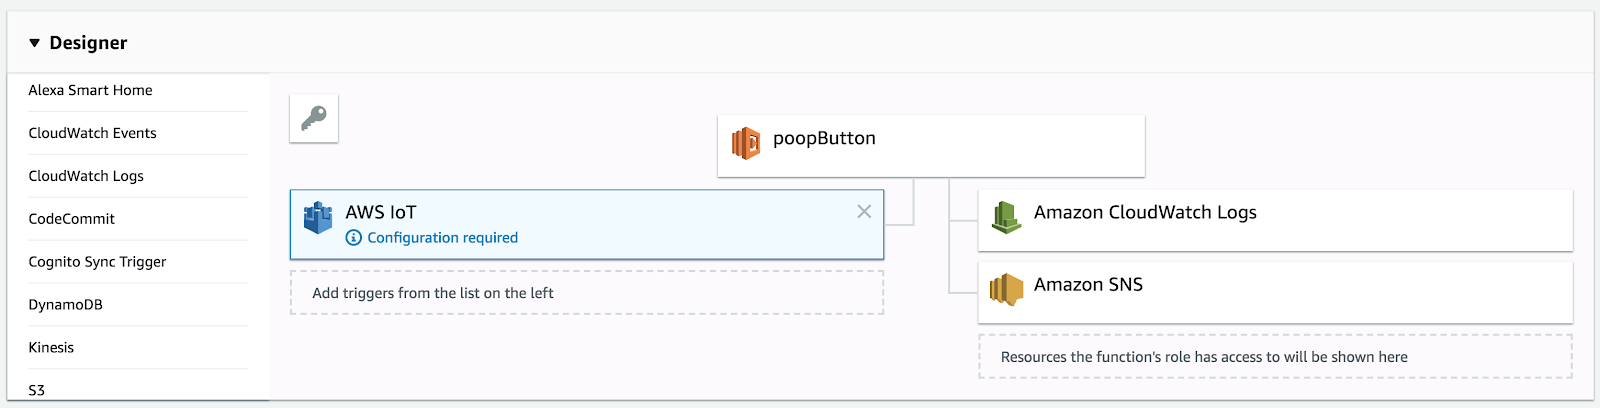
In the designer, choose AWS IoT from the list of triggers on the left.
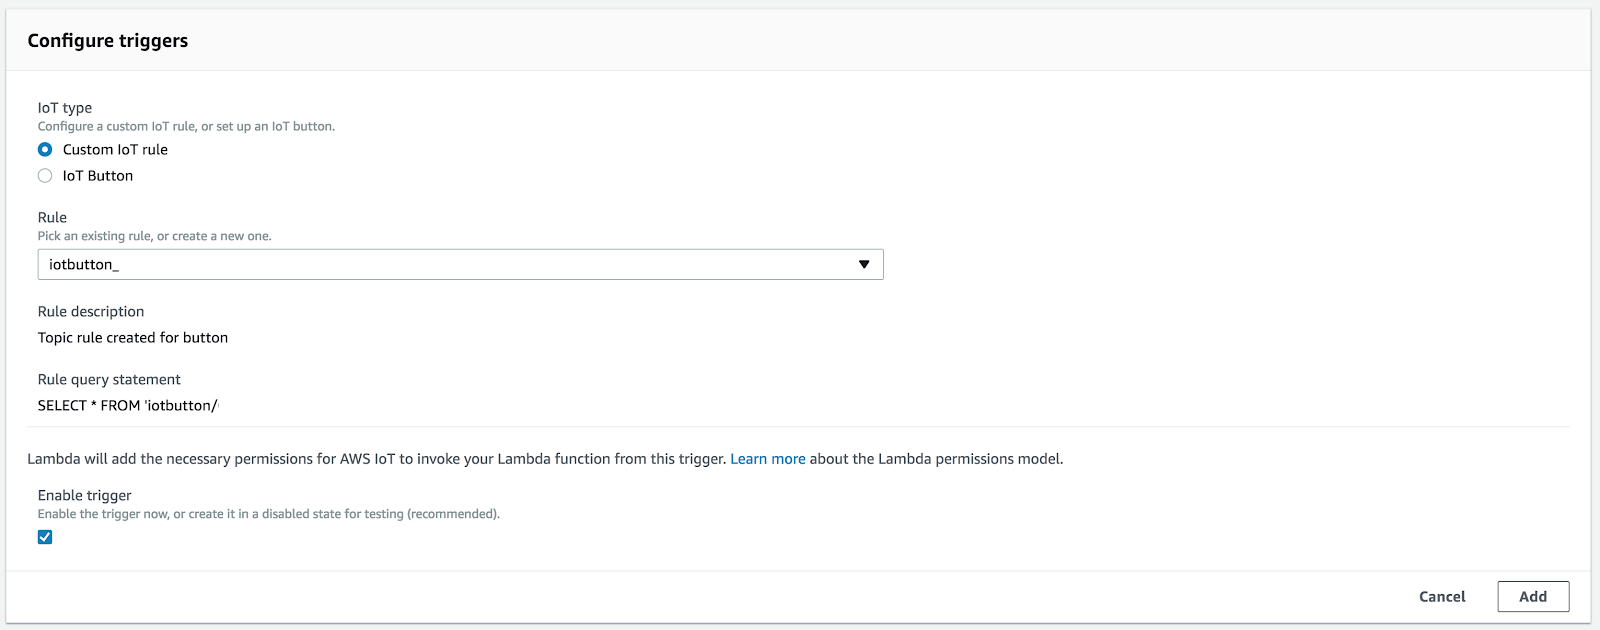
Below, configure the trigger. Choose “Custom IoT rule” as IoT type and find the rule created when we created our initial function. (You should see the DSN in the rule name.) Make sure “Enable trigger” is checked and click “Add”.
Upload the source code archive
Back up in the designer, click on the Lambda function and you should see a “Function code” section show up blow the designer. Change “Code entry type” to “Upload a .ZIP file”, make sure the runtime is set to Python 3.6, and enter “index.handler” as the Handler path. Then click the “Upload” button and select the zip file we created earlier. (~/poop-button.zip)

Configure environment variables
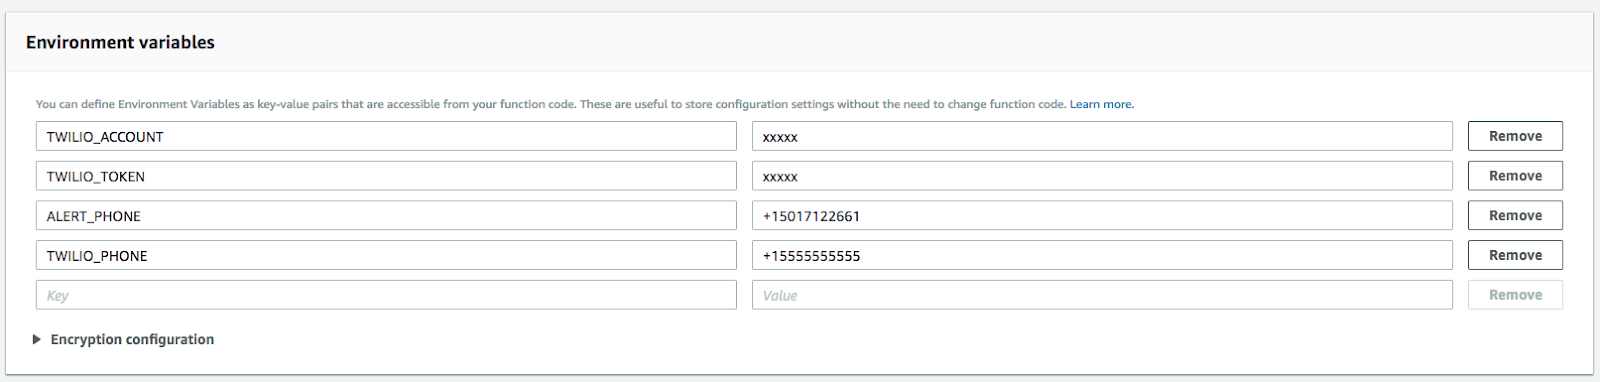
Below the “Function code” section, you should see an “Environment Variables” section. Fill this section out with the same 4 variable names and values we used earlier for local testing. Encrypting the variables with a KMS key is recommended but beyond the scope of this post.
Now, save all of your changes by scrolling to the top of the window and clicking the “Save” button.

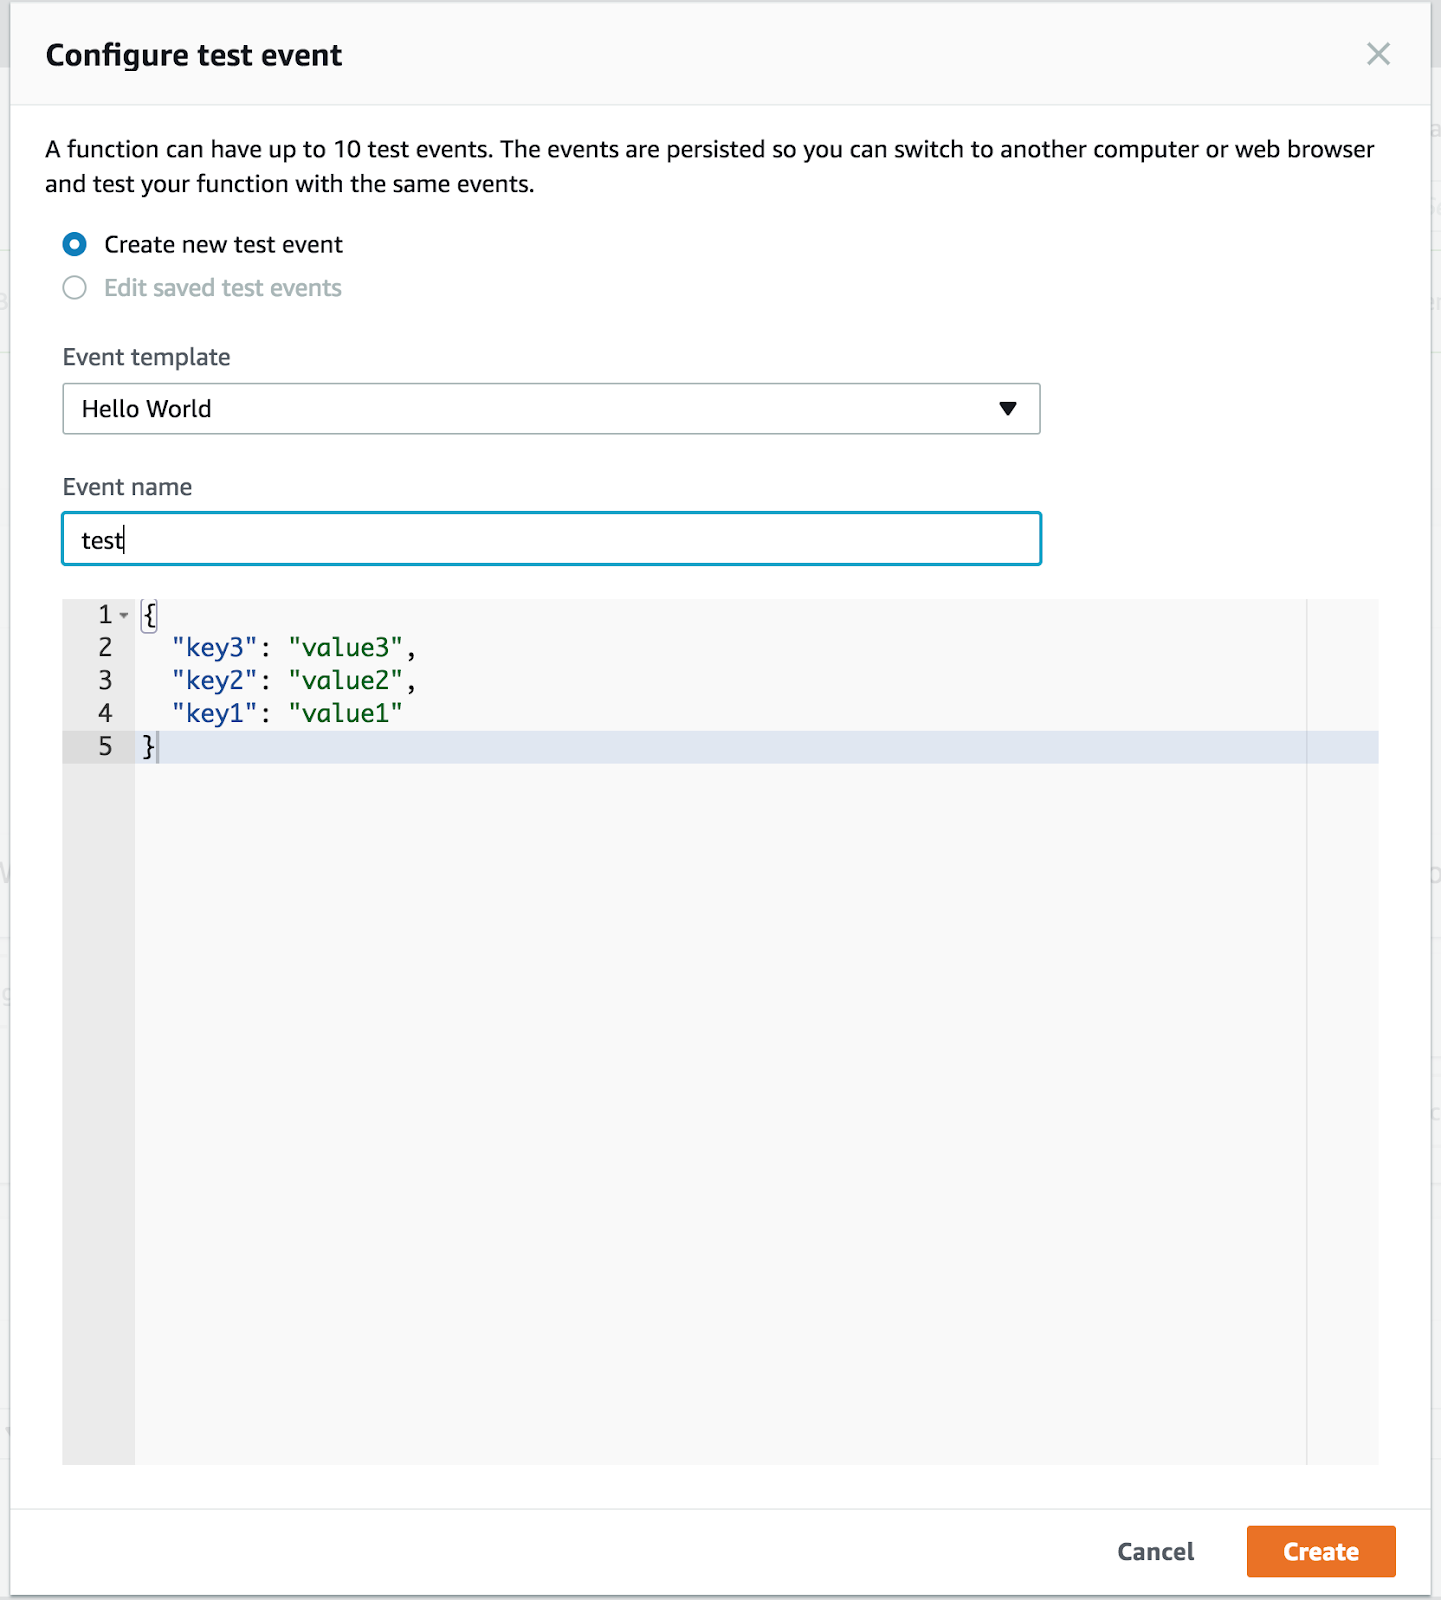
Configure and run a test event
At the top of the window, click the “Select a test event” drop-down and choose “Configure test events”. We don’t care about the test input, so the default “Hello world” event will work just fine. Name it and click “Create”.
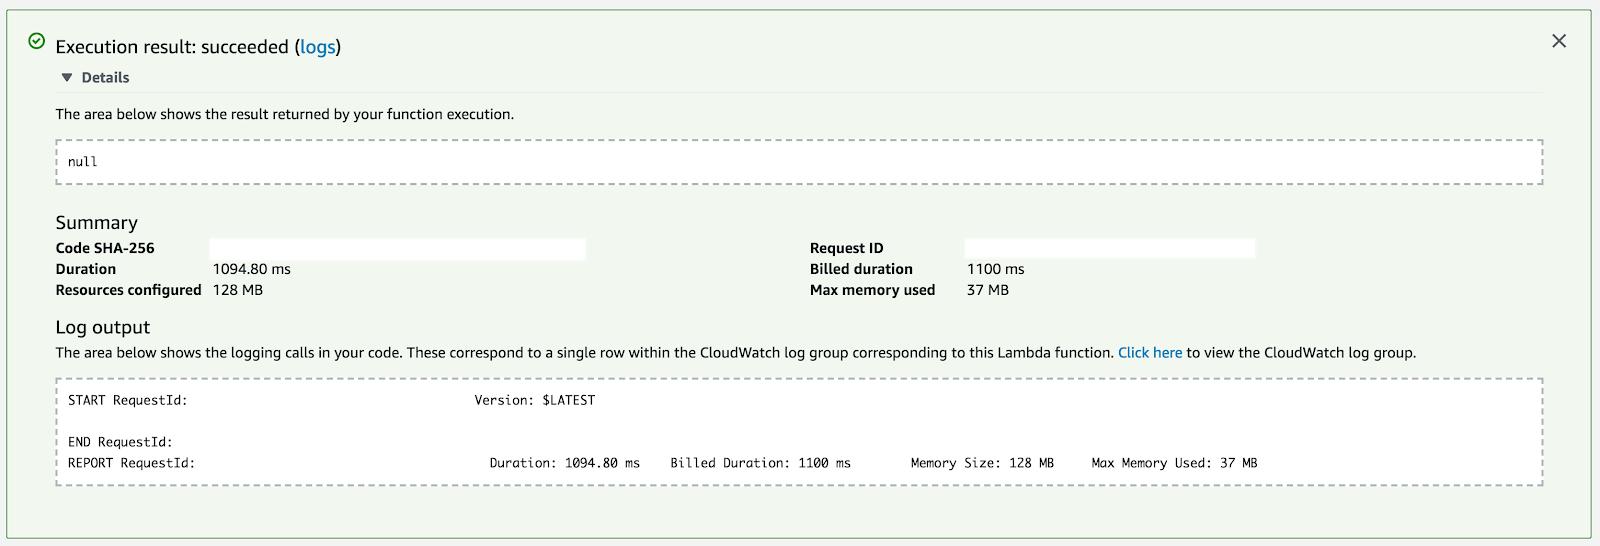
Now click the “Test” button. You should see an execution result. (Hopefully a successful one which includes a phone call.) If your phone didn’t ring, check to make sure the code was actually uploaded and your environment variables are copied correctly using the same values you used to test locally.
Try out the button!
At this point, you should have a fully configured button. Go ahead and give it a push!
Did your phone ring? If not, check to make sure the AWS IoT trigger doesn’t say it needs configuration, its identifier contains the DSN on the back of your button, and it’s enabled.
If it rang – congratulations. You have a poop button!
You may have noticed that you received both a phone call and an email. IoT buttons can trigger multiple Lambda functions at once. If you’d like to disable the email, either delete the original Lambda function or disable its AWS IoT trigger.
Troubleshooting a toddler
The great thing about this approach is all of the technology is built and operated by 3rd parties, and pretty reliable ones. In months of daily use, I haven’t yet seen the hardware or software fail. But any parent knows that kids are tough QAers, so let me propose some tips for common failure modes you’re likely to experience.
My kid had the button when they went to sleep, but now it’s [lost in the blanket | tossed across the room | stuck between the mattress and the bed]. They have to pee and are freaking out because they can’t find it!
Adhesive velcro strips work wonders. Stick one to side to the back of the button and the other side to the wall or a part of the bed they’re not likely to knock it off. Make sure it’s close enough to easily reach but far enough away to avoid accidental presses.
My kid pushes the button after being in bed for 15 minutes as an excuse to get out of bed.
Yeah, mine wised up to this one pretty fast. Now we’re very intentional about giving them multiple chances to go to the bathroom right before bed, but we keep the button with us until they’re asleep. Then one of us sneaks in and puts it in its place. They’ve since learned to use the opportunity to go before bed.
My kid refuses to push the button. When we ask them why, they respond “I chose not to.”
Believe it or not, we initially had slow button adoption. We normalized button use by requiring our kid to push the button in order to get out of bed in the morning. Of course, this hastened the realization that it was a “get out of bed” pass, which led to the issue above.
Poop is as poop does: living with the poop button
Our poop button is a life saver. Kid 1 is pretty consistently waking with a dry pull-up, and kid 2 is getting more continuous sleep in the absence of a sibling yelling for Mom and Dad. It’s amazing the difference a small hack can make.
When kid 1 started potty training, we gave them this “poop button” to push after going to bed if they needed to go potty.
It’s an Amazon IoT button hooked up to @twilio to call my phone. Works like a charm.
/ht @pavel_lishin for the sticker. pic.twitter.com/ZI64XWM76Y
— David Gouldin (@dgouldin) February 24, 2018
On Twitter, I’ve been encouraged to do everything from apply to be on Shark Tank to start a Kickstarter, but I think if anyone is going to make a business out of a button with a poop emoji on it, it’s going to be @internetofshit:
I’m sorry yes, where can I order 150,000 of these? https://t.co/WK3KRiD8Uw
— Internet of Shit (@internetofshit) February 26, 2018
As for AWS, whether they’re chagrined or awed at the crappy repurposing of their technology, I think it’s fair to say they didn’t see it coming:
1) create building blocks. 2) let unexpected innovation happen. #AWS /via @dens https://t.co/LGj1I9nVYQ
— Werner Vogels (@Werner) February 24, 2018
For my part, I’ll continue to try to apply practical (ok, and sometimes not so practical) engineering to dad-problems. Whether that’s using Python, Twilio, AWS IoT and Lambda to prevent night-time emergencies or using InfluxDB and a Raspberry Pi to monitor temperature with a Grafana front end I’ve always got multiple projects going. If you have any bright ideas, drop me a line – maybe we can work on something together!
David has been developing web applications in python for over a decade. Originally from Texas, he’s been living in San Francisco for the past 6 years working in the tech startup scene. David currently works at Clara Labs on Clara, a scheduling service that combines the precision of machine intelligence and the judgement of an expert team. You can find him on Twitter, on Github, or on his bicycle.
Related Posts


Related Resources
Twilio Docs
From APIs to SDKs to sample apps
API reference documentation, SDKs, helper libraries, quickstarts, and tutorials for your language and platform.
Resource Center
The latest ebooks, industry reports, and webinars
Learn from customer engagement experts to improve your own communication.
Ahoy
Twilio's developer community hub
Best practices, code samples, and inspiration to build communications and digital engagement experiences.