How to Broadcast SMS Text Messages from Python 3 Django Web Applications
Time to read:
October 26, 2019
Written by

Short Message Service (SMS) text messages are ubiquitous for time-sensitive communication. They’re also easy to send at scale by combining a Django web application with an application programming interface (API).
In this tutorial, we will build a straightforward Django project with SMS capability that transmits messages to multiple recipients.
If you want to go further in learning either Python or the Twilio SMS API, check out the amazing TwilioQuest training game.
Required Project Dependencies
Python 3 is required for this tutorial because Python 2 will no longer be supported after December 31, 2019. We’ll use Python 3.8 to build this tutorial.
We will also use the following application dependencies in our application:
- Django web framework, version 2.2.x
- pip and virtualenv
- The Twilio Python helper library, version 6.32.0 or greater
- A free Twilio account. Sign up to get an account so you can use the Twilio APIs
If you need help getting your development environment configured before running this code, take a look at this guide for setting up Python 3 and Django on Ubuntu 16.04 LTS.
This blog post's code is also available on GitHub within the django/djsms directory of the python-twilio-example-apps Git repository on GitHub.
Installing Python Project Dependencies
Our code will use the Twilio helper library to make it easier to send text messages from Python. We are going to install the helper library from PyPI into a virtualenv.
But first we need to create the virtual environment. In your terminal use the following command to create a new virtualenv and activate it:
Install Django and the Twilio helper library:
When the command is finished you should see some output similar to the following lines:
At this point, we’ve installed the required dependencies and can now use them to create our project.
Creating the Django Project
We'll start our project by using Django's django-admin tool to create a boilerplate code structure.
Change into the directory where you develop your applications. For example, I typically use /Users/matt/devel/py/ on my Mac or /home/matt/devel/py on Linux.
Run the following command to start a Django project named djsms and change into the newly-created directory:
Create a new Django app named broadcast within the djsms project:
Django generates a new folder named broadcast after the command finishes. We need to update the project's settings and URLs files, so make sure the broadcast app is available.
Open djsms/settings.py:
Make sure you change the default DEBUG and SECRET_KEY values in settings.py before you check in your files to Git or deploy any code to production. Secure your app properly with the information from the Django production deployment checklist so that you do not add your project to the list of hacked applications on the web.
Save and close settings.py. Open the djsms/urls.py file and add the broadcast app's URLs to your main project URLs list:
The above two new lines of code connect the main urls.py file to the broadcast/urls.py file which will write next.
Coding the Broadcast App
Next change into the broadcast directory. Create a new file named urls.py to contain a URL route for sending SMS:
Open the empty urls.py file and add these lines of code:
In the above code, we have a single URL route that matches broadcast as a path that maps to a yet-to-be-written broadcast_sms view function.
We need to write that function within broadcast/views.py to handle sending the messages. Save urls.py and open views.py, then update it with the following lines:
In this above code we import Django's settings file so we can access our project's settings as well as the HttpResponse class to return a simple HTTP 200 status code with a text response. We also import the Twilio Python helper library.
The broadcast_sms function handles the bulk of the work. It specifies a message to send, instantiates the helper library client, and loops through each phone number listed in the SMS_BROADCAST_TO_NUMBERS variable. If a phone number is specified (not blank) it will call the Twilio API to send the SMS to the recipient's phone number. After the loop completes we return an HTTP 200 response with the text "messages sent!".
Before we test our application we need to obtain a phone number from Twilio and credentials to authenticate ourselves to the API.
Access the Twilio SMS API
Sign into your existing Twilio account or sign up for a free Twilio account.
After the registration (or login) process you’ll be in the Twilio Console where you can access your Account SID and Auth Token, as shown below:
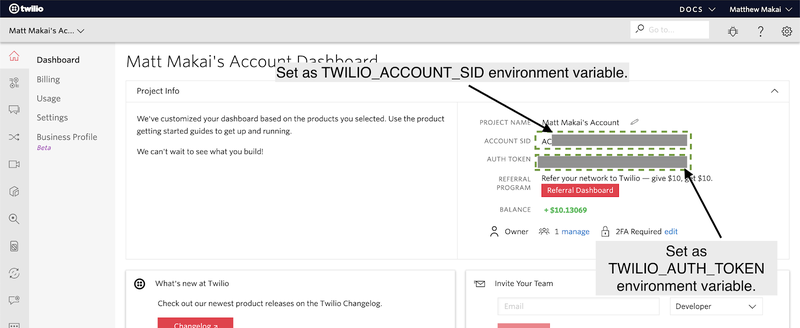
Set the Account SID and Auth Token as environment variables for your Django application to read and use. Create a new file named .env and paste in the following contents.
(You can also copy the template.env file included with the Git repository under the django/djsms/ directory and rename it to .env.)
Populate the TWILIO_ACCOUNT_SID and TWILIO_AUTH_TOKEN variables with your credentials from the Console. You should also have a Twilio phone number from the registration process, or you can purchase a new phone number to use for this tutorial.
Invoke .env file to set these variables:
Note that if you are on Windows, setting environment variables is slightly different so take a peek at this tutorial for those detailed instructions.
We have our code and credentials in place, now it's time to give the project a spin.
Testing an SMS Broadcast
Fire up the Django development server:
Go to https://localhost:8000/broadcast in your web browser to kick off sending the messages. In the browser you should see:

Then after a moment all of the phone numbers listed in SMS_BROADCAST_TO_NUMBERS will receive their SMS:
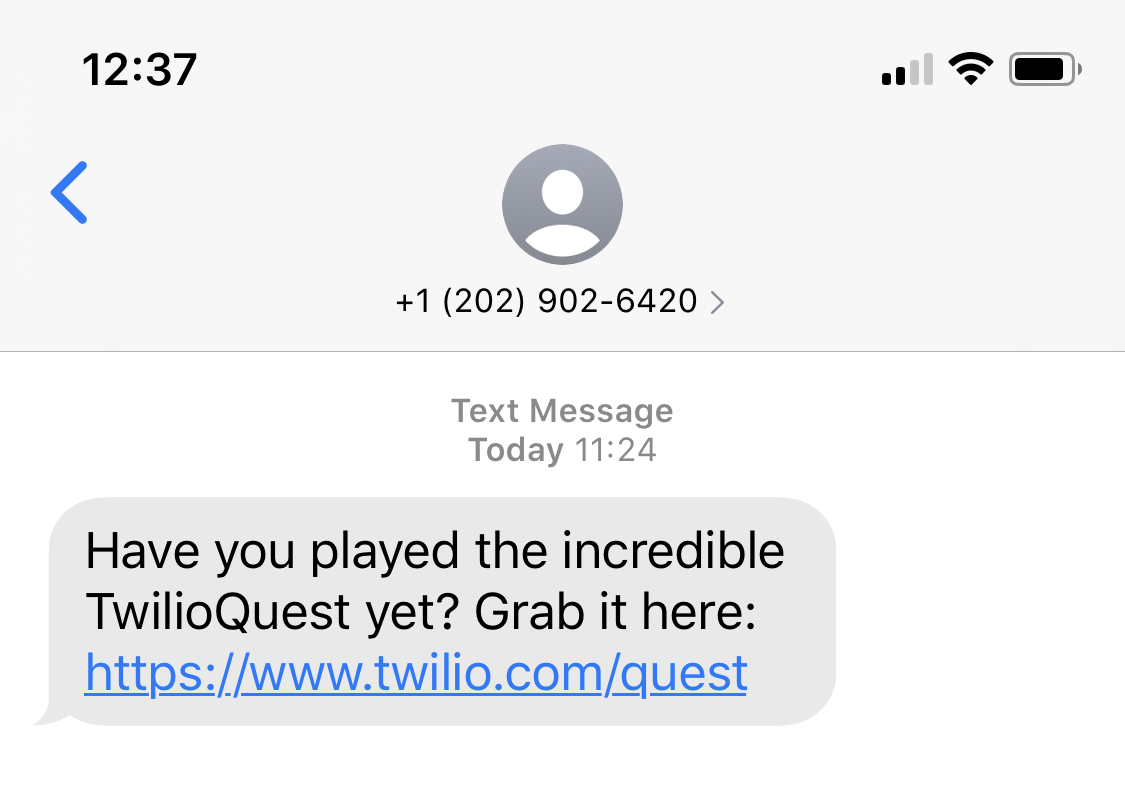
Awesome, it worked! Time to see what that link is all about and check out TwilioQuest to learn what more you can do with Python and Programmable SMS.
Wrapping up Our Django SMS Broadcaster
We just built an application to send SMS to multiple recipients using Python 3.8 and the Django web framework.
You can now build on top of my code and expand your application by storing phone numbers in the database with the Django ORM, or building out the user interface to make it easier to customize your messages.
Here are a few other great Python tutorials you should try:
- The Mysteries of the Pythonic Template in TwilioQuest
- Build Your Own Personal Training Exercise Bot with Python, Zappa, AWS and Twilio SMS
- How to Send Emails in Python with SendGrid
Happy coding!

Related Resources
Twilio Docs
From APIs to SDKs to sample apps
API reference documentation, SDKs, helper libraries, quickstarts, and tutorials for your language and platform.
Resource Center
The latest ebooks, industry reports, and webinars
Learn from customer engagement experts to improve your own communication.
Ahoy
Twilio's developer community hub
Best practices, code samples, and inspiration to build communications and digital engagement experiences.