Build a Spoiler App in PHP with Twilio SMS and Laravel
Time to read:
June 27, 2019
Written by

In this tutorial, we’ll be building an SMS application that sends out spoiler alerts to our friends every week after the show has been aired. We’ll be making use of Twilio’s Copilot feature to learn how we can send outbound SMS to a large number of people at once.
Technical Requirements
To follow along, you’ll need the following:
- PHP version 7.1 or Higher
- Laravel 5.8
- Composer
- A Twilio Account
Create New Laravel Project
Let’s install a new Laravel project via the Composer create-project command. From your terminal, run the following command:
This will install a new Laravel project for us in the twilio-got-spoiler directory.
Creating Models and Migrations
We’ll be needing two migrations. One for storing the spoilers to be sent out and the other for storing the phone numbers that should receive those spoilers.
From your terminal, run the following command:
Tip: The -m flag will create a migration file associated with the model.
Next, let’s edit the migration files to reflect the structure each of those tables will need. Head over to the database/migrations directory and edit the spoiler migration with the following code:
Also, edit the phone_number migration with the following code:
Next, edit the .env file with your database details and execute the following command to run all of our migrations.
Also, it’s important that we identify the attributes on our models that can be mass assignable. Add the following code to the Spoiler and PhoneNumber models respectively. They are located in the app folder.
Saving Spoilers and Phone Numbers
Next, we’ll add the routes for our application that allow us to save spoiler messages, as well as register phone numbers. Edit the routes/web.php file with the following code:
To add the corresponding controller methods, from the terminal, run the following command to create a new controller:
Next, head over to the app/Http/Controllers directory and edit the HomeController file we just created with the following code:
In the index method, we query the database to fetch all the spoilers and phone numbers we’ve created - which is none so far - and then pass them down to a view file we’ll be creating shortly.
The storeSpoiler method validates the incoming request to ensure a message field is present and not empty, and then stores the spoiler messages to be sent out.
The storePhoneNumbers method also performs a validation check to ensure the phone_number field is required and then stores the phone number.
Building the Frontend
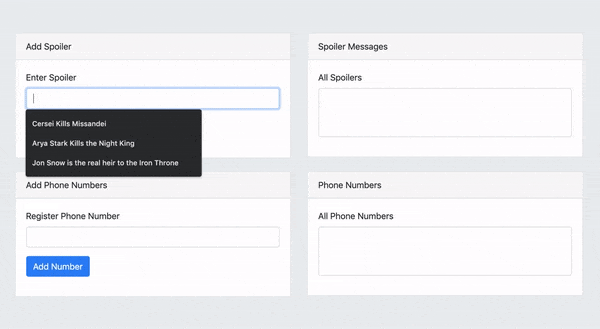
Let’s create the simple view our application will have. We’ll be needing two forms. One for creating the spoiler messages and the other for registering the phone numbers. In the resources/views directory, create a home.blade.php file and add the following code to the file:
If you take a closer look at the code above, you’ll notice we included an alert partial with the following line @include('alert'). Let’s create the partial in the resources/views directory by creating a alert.blade.php file and add the following code to the file:
This partial is used to display any message that has been flashed into the session.
Next, navigate to the app’s homepage and you should see the following page:
Setting up Twilio
We will be using the Twilio SDK for PHP library to interact with Twilio’s API. Run the following command to install the library:
Handling Bulk SMS using Copilot
We can safely assume that we’ll be sending out spoiler outbound SMS messages to hundreds of users at once. To make this process easy and seamless, Twilio provides a feature called Copilot which is perfect for bulk messaging.
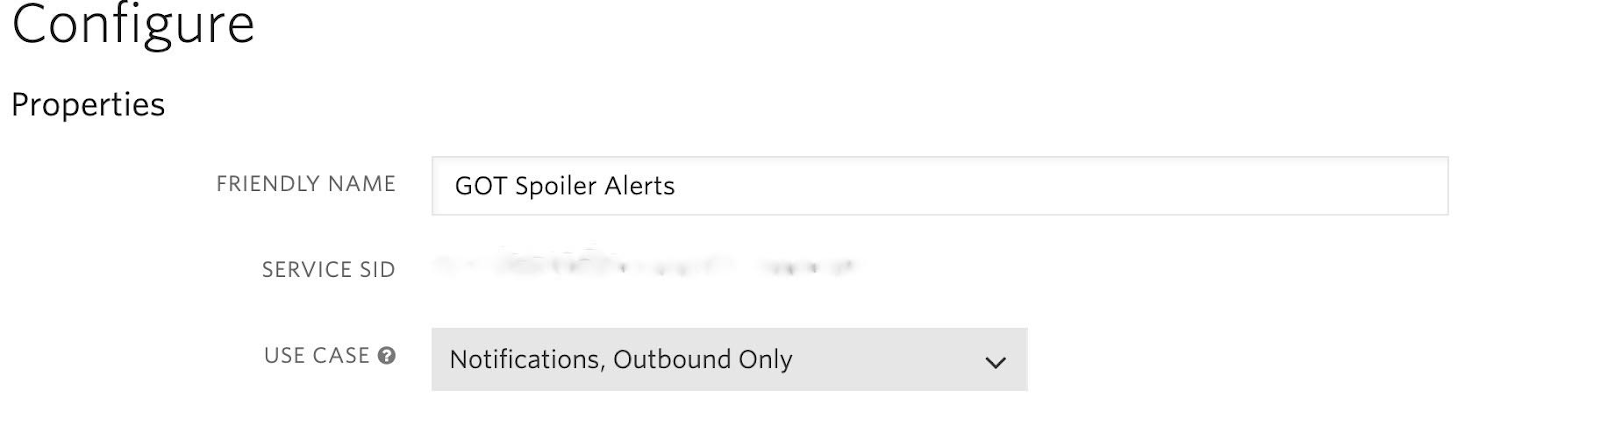
Before we can make use of Twilio’s Copilot, we first need to create a new Messaging Service. Head over to your Twilio dashboard to create one. Next, you’ll be prompted with a modal similar to the one below.
After you’ve created the messaging service, take note of the Service SID as we’ll be needing it shortly.
Also, it’s important to note that we’ll need to add phone numbers, short codes or an Alpha Sender ID to the Messaging Service we just created. This helps Copilot to select an identity to use when sending our messages.
Environment and Config Variables
Edit the .env file with your Twilio credentials:
Next, we’ll add a new Twilio array in the config/services.php file so that we can easily reference the environment variables we just defined.
Creating a Twilio Wrapper
Since our Messaging Service has been configured, we are ready to start sending spoilers. We’ll be using a Twilio wrapper that we’ll create shortly to interact with the Twilio SDK library we installed earlier. Create a new Twilio.php file under the app\Services directory and then add the following code:
In the constructor, we initialized the Twilio credentials we added to our config\services.php file earlier. We also created a new Twilio Rest Client and assigned it to the client property of our class.
The notify method handles sending outbound SMS using the Twilio API. It accepts two arguments, the phone number that we’ll be sending the spoiler too as well as the spoiler message itself.
Creating a Job
We’ll make use of a Job to handle dispatching the spoiler alerts to all the phone numbers registered in our application. Run the following command:
This will create a new class for us in the app/Jobs directory. Edit the file with the following code:
Let’s break this class into parts so that we can understand what’s happening here.
Here, the constructor accepts the Twilio class we created in the previous section as a dependency. We fetch the most recent spoiler that has been created and assign it to the spoiler property of the class. Similarly, we fetch all the registered phone numbers as well and then assign them to the phone numbers property of the class.
In the handle method, we map all the registered phone numbers and then send the spoiler message to each of them.
Creating a Custom Command
Let’s create a custom command that we can use via the terminal to trigger sending the spoiler messages. Run the following command:
This will create a SendGotSpoilerCommand.php file for us in the app/Console/Commands directory. Edit the file with the following code:
In this class we import the SendGotSpoiler job, and then pass it as a dependency to the handle method of the class. We then call the handle method on the SendGotSpoiler job and then display a comment to let us know when the command has finished executing.
Testing
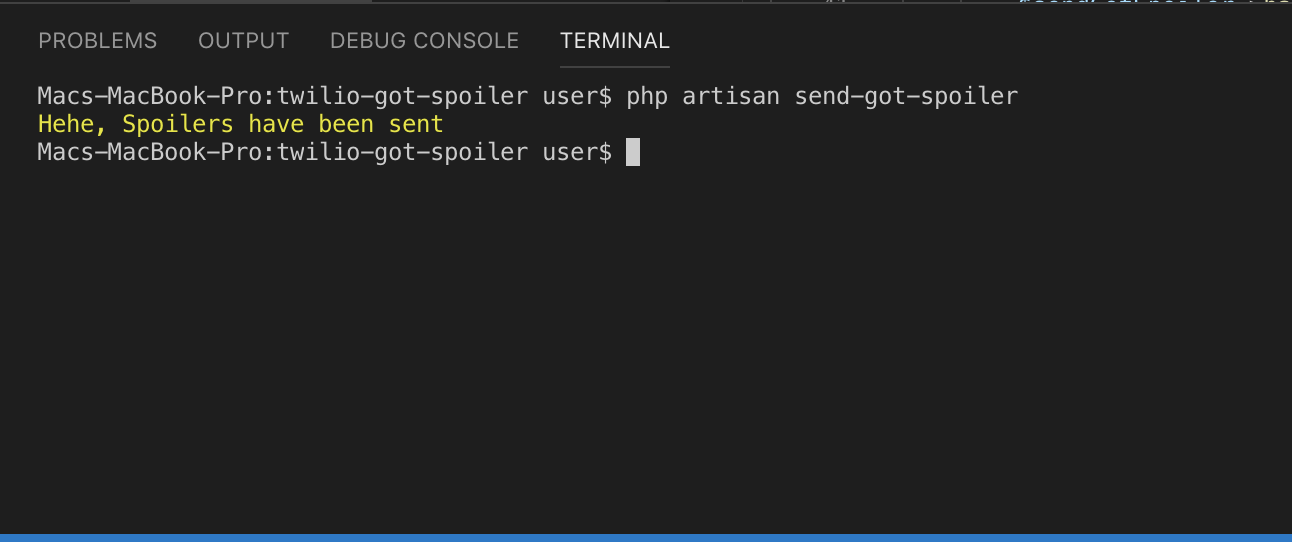
It’s time to finally test what we’ve been building so far. Head over to the homepage and create a spoiler. Then register the phone number that should receive the spoiler.
Next, run the following command to send the spoiler:
You should see the following
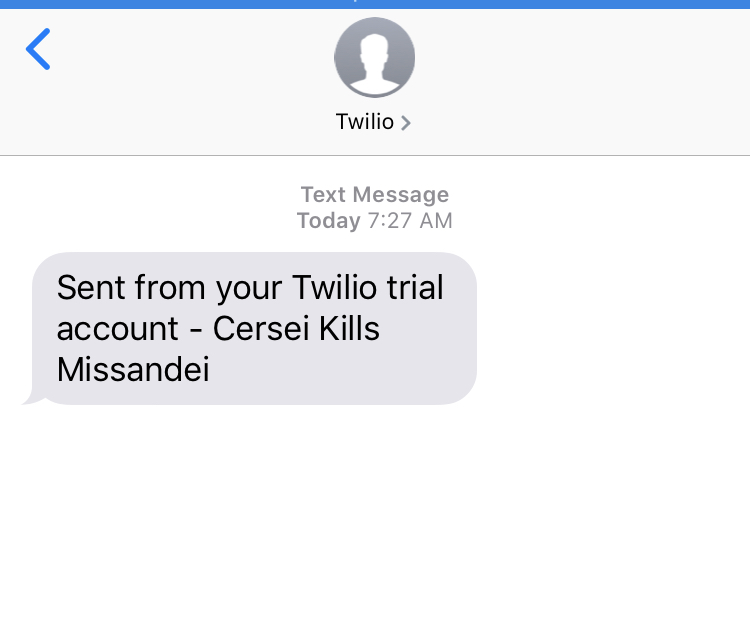
You should receive the following SMS
Taking it Further
My spoiler of choice is for Game of Thrones. Since it aired every Sunday, you can go ahead and schedule a cron job that automatically calls the send-got-spoiler command every Sunday. Note that you’ll always have to create the latest spoiler yourself after the episode has been aired.
Conclusion
In this tutorial, we’ve built a simple spoiler application that sends out spoiler alerts to our friends. We’ve also learned how to send bulk SMS to a group of people at once using Twilio’s Copilot. You can find the repo on Github.
Dotun Jolaoso
Twitter: @dotunj_
Github: @dotunj

Related Resources
Twilio Docs
From APIs to SDKs to sample apps
API reference documentation, SDKs, helper libraries, quickstarts, and tutorials for your language and platform.
Resource Center
The latest ebooks, industry reports, and webinars
Learn from customer engagement experts to improve your own communication.
Ahoy
Twilio's developer community hub
Best practices, code samples, and inspiration to build communications and digital engagement experiences.