Build a Speech Translation Bot with Twilio Programmable Voice and IBM Watson
Time to read:
March 17, 2021
Written by
Reviewed by

In this tutorial, you'll build a speech translation bot that analyzes your voice on a call and responds with a translated version in the language of your choice. Most speech translation services require an internet connection. However, the bot you’re going to build would just require your cellular network and as a result, could be used on even the simplest feature phones.
To build this, you'll use Twilio Programmable Voice and IBM Watson’s Speech Translation API.
Prerequisites
In order to complete this tutorial you will need the following:
- IBM Watson API Account
- Node.js knowledge
- A free Twilio account (if you sign up with this link, we'll both get $10 in Twilio credit when you upgrade)
- A Twilio phone number
Setting Up Twilio
To get started, you will need a Twilio account. If you don’t have one, you can register for a free Twilio account and begin with a free trial number and $10 credit.
What are webhooks?
To receive calls with a Twilio phone number, you must configure a webhook. Webhooks are HTTP callbacks that are triggered by an event. The event, in this case, would be an incoming phone call to your Twilio phone number.
To create a webhook, you’ll have to create a REST service able to handle incoming HTTP requests and perform some function. This service would need to be accessible from a URL. This is where Twilio Functions comes in.
What are Twilio Functions?
Twilio Functions is a serverless environment maintained and deployed by Twilio’s cloud infrastructure. With it, you can create webhooks to respond to emitted Twilio events. In this case, you will use Twilio Functions to return TwiML in response to the webhooks.
What is TwiML?
TwiML, short for Twilio Markup Language, is a way to instruct Twilio on what to do when an event is triggered. For this tutorial, you'll need to respond to users dialing your Twilio number.
For example, this TwiML says hello:
This TwiML collects phone number pad inputs during a call:
Commands after a <Gather> verb don’t run if the caller presses the keypad, so the following command would say "You didn't pick a number" if the user doesn't press the keypad:
The <Gather> verb can have nested <Say> commands. This has the effect of speaking while waiting for user input:
You’ll learn later how to use Twilio Functions to store the TwiML for our bot.
Setting Up Your Local Development Environment
To develop Twilio Functions on your local computer, you’ll need to install the Twilio Serverless Toolkit plugin. First the Twilio CLI will need to be installed, followed by the plugin.
Here’s how to do this:
After the packages have been successfully installed, you’ll need to login to your Twilio account via the CLI:
Upon execution, you'll be asked for your Twilio Account SID and Auth Token. These can be obtained from your Console dashboard.
With that done, you'll create a new Twilio project:
This command will create a new directory with a file structure similar to this:
Each Twilio function is a *.js file in the aptly named functions folder. These files can be nested arbitrarily without any issue.
Next, install the Twilio npm library:
Anatomy of a Twilio Function
Open up the functions/hello-world.js file in a text editor. It should have the following content:
Every Twilio function exports a handler function. This handler function accepts three arguments: context, event, and callback. For now, the important one to focus on is the callback argument. It is a callback function to respond and complete a Twilio Functions execution. Its first parameter is an error message, while the second is a response.
The response in this case is a TwiML <Say> verb, which tells Twilio to speak to the user. Apart from the <Say> verb, in this tutorial you'll also use the <Gather> verb to collect user input and the <Redirect> verb to transfer control of the call to another Twilio Function.
Setting up IBM Watson
You’re done setting up Twilio. Now you’ll need to get access to IBM Watson’s Translation API. Watson has a generous free tier which is perfect for this tutorial. Register or login if you already have an account.
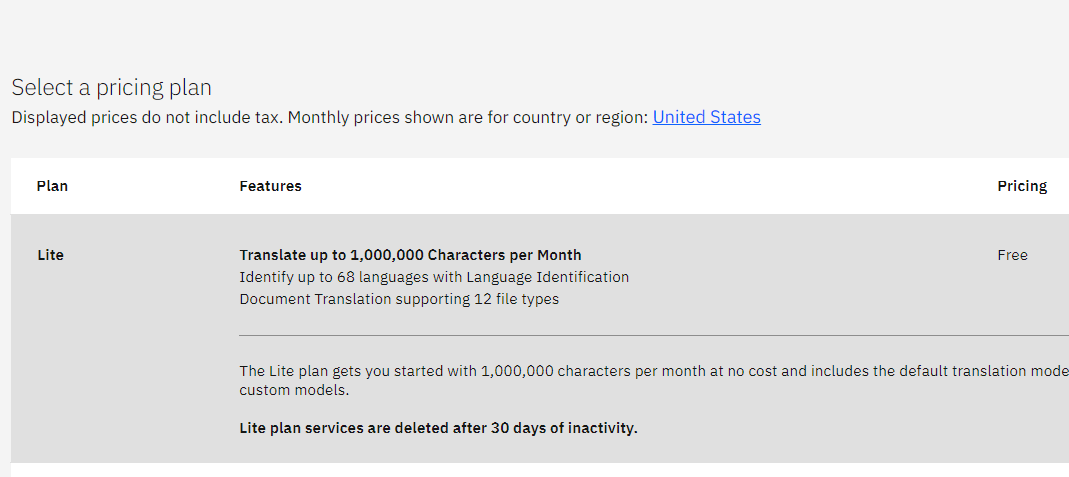
Next, head over to the IBM Cloud Language Translator. Select the free Lite plan and create a new service.
You’ll be redirected to the Language Translator service page. Select Service credentials from the left-hand menu.
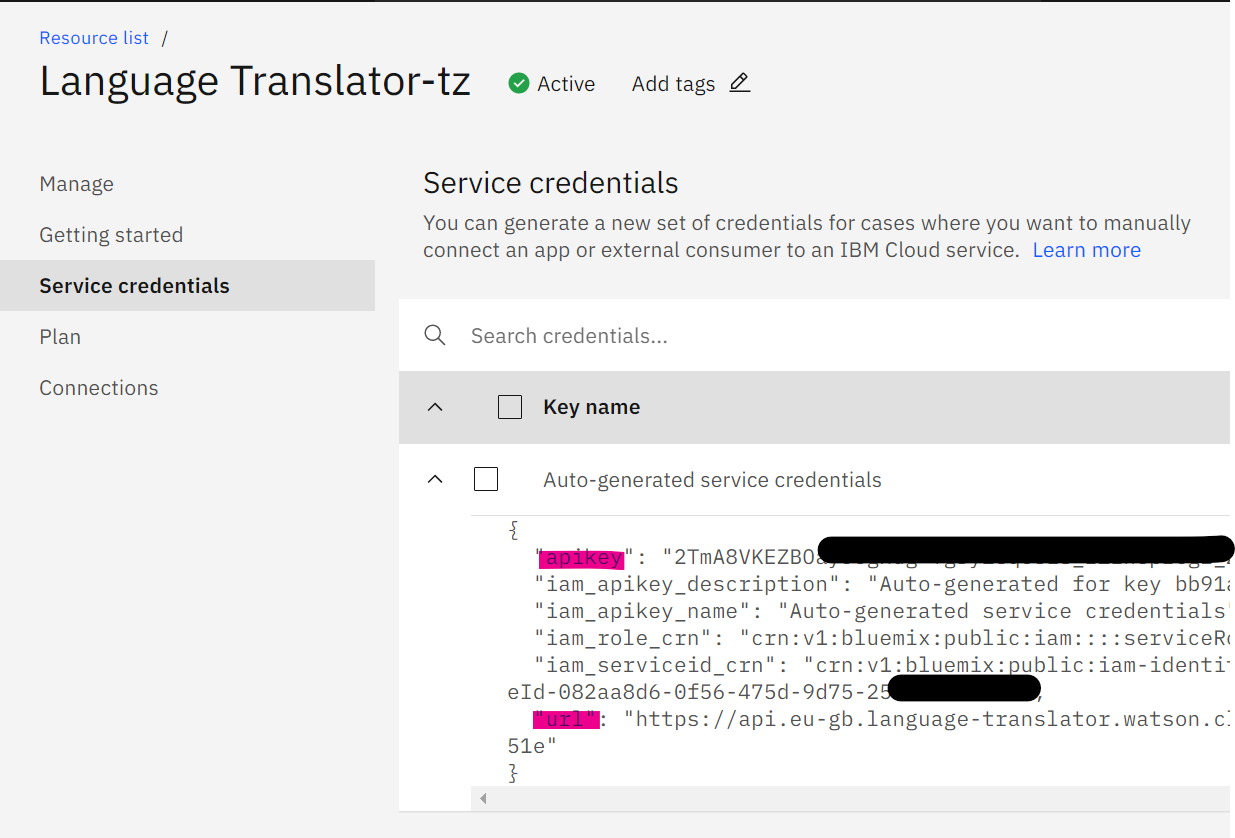
Copy the apiKey from the Auto-generated service credentials dropdown.
Now head back to your project folder and open your .env file. On a new line, add an additional environment variable called WATSON_KEY with a value of the API key you just obtained.
Now copy the url field from the Auto-generated service credentials dropdown as well. Save this URL somewhere handy, you’ll use it later on.
With that completed, you’re done setting up the Watson Translate service.
Structure of the Speech Translation Service
The translation service you’re building has three functions:
- greeting.js - Greets the user and asks the user to select a language. Directs control of the call to handle-language.js.
- handle-language.js - Checks that the inputted language is supported by the Watson API. If it is, then the user is prompted to say the message to be translated. Directs control of the call to translate-message.js.
- translate-message.js - Checks if the message to be translated is valid. If so, it calls the Watson API and speaks the translated message. This is the concluding function.
The following sections will show you how to create these functions.
Responding to incoming calls
Create a greeting.js file
Create a greeting.js file in the functions folder. This file will contain the handler triggered when a call has started:
Windows:
Copy and paste the following code into this new file:
The gather() function receives an object as an argument with details that it uses to construct a <Gather> TwiML verb.
These arguments are:
finishOnKey: Tells Twilio to stop waiting for user input and continue the flow of the call.action: Tells Twilio to transfer flow of the call to the endpoint specified. Notice you’re using a relative URL. This decision makes your code more dynamic for different environments.. Twilio uses the domain the current function is located at.
The say() function has two arguments. The first is a voiceConfig object which allows you to choose the voice of the narrator. The second is the message to be narrated.
Notice how you loop through each language in the supportedLanguages array, constructing a new TwiML <Say> verb for each language.
When the caller enters a number with the keypad, Twilio calls the /handle-language endpoint with a Digits request value containing the caller’s numeric input.
NOTE: If the tone of voice isn't your taste, check Twilio's list of supported voices.
Handle the caller's input language
Now that you’ve collected the user’s speech input from the previous /greeting endpoint, you'll instruct Twilio to <Say> the caller’s language input.
Create a new file called handle-language.js:
Windows:
Copy and paste the following code into this file:
The caller's reply from the /greetings endpoint is accessible from event.Digits.
Checkpoint
Let’s check what you have so far. Deploy the functions with the following command:
Head to the Phone Number section of the Twilio Console:
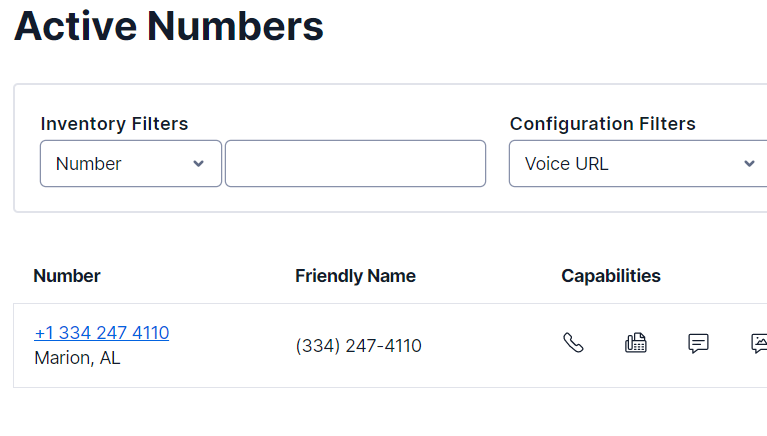
Purchase the desired phone number (or select the trial one provided) and on the phone number’s configuration page, scroll down to the Voice & Fax section:
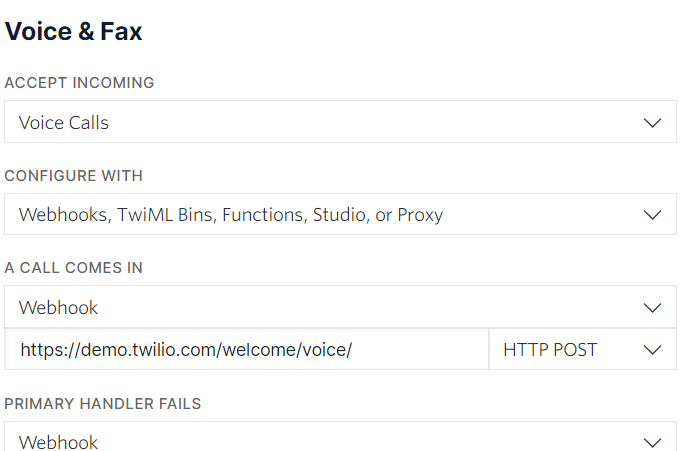
Select Function from the A call comes in dropdown:
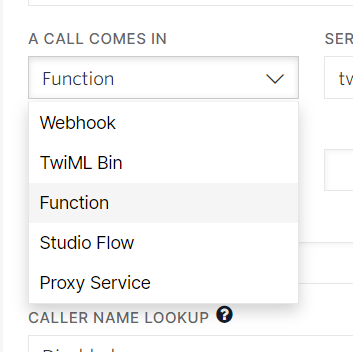
Update the remaining dropdowns to satisfy the image below:
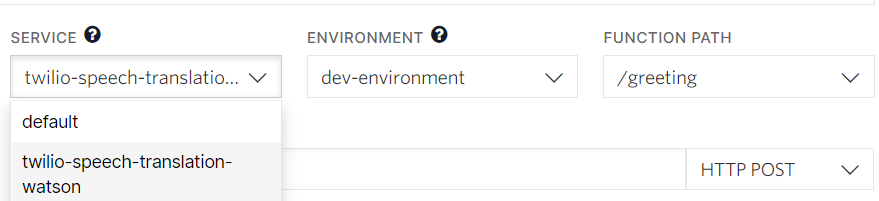
Remember to save.
Now try calling the phone number. If you’ve done everything right, you should get a prompt asking you to enter the translation target language. After this, you should also hear a confirmation message reiterating the language you picked.
If this doesn’t work, check the following:
- The code you typed for the various functions
- The endpoint URL you inputted in the “A call comes in” webhook
Validate the User's Language Input
Next, check if the user’s selected target language is supported. You'll use the ibm-watson library to query Watson’s language API.
Install the ibm-watson npm library:
Update the handle-language.js file to import ibm-watson by adding the following two lines to the very top of the file:
Now create functions to consume the library you just imported. Add these functions at the bottom of the handle-language.js file:
Remember the URL you copied from the Watson service page? Replace the value of the serviceURL above with your URL. Truncate the URL to not include the string after “ibm.com”.
For example, if your URL is:
https://api.eu-gb.language-translator.watson.cloud.ibm.com/instances/af3dasf833
You should shorten it to:
https://api.eu-gb.language-translator.watson.cloud.ibm.com
Replace the exports.handler function in this file with the following code in order to make use of your new functions:
Notice you pass context.WATSON_KEY to the getLanguageCode() function. As you may have guessed, the context argument is an object with the environment variables you defined in the .env file.
When a language is supported, you reaffirm the user’s language input with the <Say> verb. you then ask the user to speak the message to be translated using the <Gather> verb. Lastly, you redirect the conversation flow to be handled by the /translate-message endpoint.
Let’s look at the gather() function:
The action endpoint you specify has two query parameters: languageCode and voiceCode. You need languageCode to specify the Watson Translate API’s target language. Then you need voiceCode to specify the Twilio narrator’s voice.
When query parameters are specified in a Twilio endpoint, it is exposed under the event function argument for the function translate-message.js.
Translating the Message and Replying
Create a translate-message.js file with the following command:
Windows:
Add the following content:
This simply repeats what the user says in the previous step. Twilio exposes the transcript of the caller’s voice input from the previous endpoint in event.SpeechResult.
You’re now ready to deploy your code and test it out to make sure everything is working so far.
Now it’s time to make the function translate the voice response and say it to the caller.
Replace all the code in translate-message.js with the following:
Remember to replace the <watson-url> placeholder with the URL you noted in the IBM Watson dashboard.
Here’s a break down what’s happening:
First, you obtain the request parameters voiceCode and languageCode from the events object. Remember, the previous function passed these parameters.
You pass two attributes to the translate function’s object argument:
text: The text to be translatedtarget: The target language
NOTE: Check the Watson Translate docs for more details on the arguments supported.
With that done, deploy your code one last time:
Try calling the phone number. Everything should work. If it doesn't, try retracing your steps or check out the source code.
Conclusion
In this tutorial you’ve learned how to build a simple speech translating bot. You used TwiML to instruct Twilio how to handle incoming calls and callback requests. You also learned how a Twilio function works and the contents of its various arguments. Lastly, you learned how to call the Watson Translate API with the watson-api npm library.
If you get stuck, here’s the source code: https://github.com/scroobius-pip/twilio-speech-translation-watson-tutorial
For more details of Twilio functions, check:
https://www.twilio.com/docs/runtime/functions/invocation
For more details on the Translate API, check:
https://cloud.ibm.com/apidocs/language-translator?code=node#translate
Chisimdiri (or Simdi for short) is a software developer, but prefers to think of himself as a creator. He loves building practical solutions to his problems, sometimes sharing these solutions to the public. When Simdi isn’t coding, he is writing about ideas, reading, and watching anime.
Follow Simdi on:
- Twitter: https://twitter.com/simdi_jinkins
- Medium: https://sim04ful.medium.com
Related Resources
Twilio Docs
From APIs to SDKs to sample apps
API reference documentation, SDKs, helper libraries, quickstarts, and tutorials for your language and platform.
Resource Center
The latest ebooks, industry reports, and webinars
Learn from customer engagement experts to improve your own communication.
Ahoy
Twilio's developer community hub
Best practices, code samples, and inspiration to build communications and digital engagement experiences.