Create a GraphQL Server with Rust using Juniper
Time to read:
November 12, 2023
Written by
Reviewed by
As far as modern applications are concerned, there are fewer things more important than an efficient communication medium between the client and server. Traditionally, RESTful APIs are the go-to choice for many developers, offering a structured approach to data exchange. However, GraphQL has challenged the status quo in recent years as it solves the problem of under-fetching or over-fetching - a common occurrence in RESTful communications.
Building a GraphQL server has been well-documented for several languages but not so much for Rust, so in this article, I will show you how to bring all that Rust-y goodness to the world of GraphQL by building one using Juniper. Juniper is a GraphQL server library for Rust that helps you build servers with minimal boilerplate and configuration. Additionally, by using Rust, performance and type safety are guaranteed.
What you will build
In this article, you will build the GraphQL server for a bird API. This API holds data for endangered species and has four key entities:
- Bird: This entity holds information on the bird such as the common name, scientific name etc
- Threat: This entity corresponds to a potential threat to a bird such as poaching
- Attribute: This entity corresponds to a bird’s attribute as identified by an attributor
- Attributor: This entity holds information on the attributor
To get familiar with writing queries your server will be able to handle the following queries:
- Get all birds
- Get a single bird
To get familiar with writing mutations, your server will be able to handle the following mutations:
- Add a new attribute
- Delete an existing attribute
Your API will save data to a MySQL database, with Diesel as an ORM. Because Juniper does not provide a web server, you will use Rocket to handle requests and provide the appropriate responses. The Juniper integration with Rocket also embeds GraphiQL for easy debugging.
Requirements
To follow this tutorial, you will need the following:
- A basic understanding of Rust
- Rust ≥ 1.67 and Cargo
- Access to a MySQL database
- A MySQL client, such as the MySQL Command-Line Client
- The MySQL C API, as Cargo needs the MySQL headers to install Diesel CLI.
Additionally, Diesel recommends using the Diesel CLI for managing your database. It will be used in this tutorial to manage migrations. You can install it (with only the MySQL feature) using the following command:
Get started
Where you create your Rust projects, create a new Rust project and change into it using the following commands.
Add project dependencies
In your editor or IDE of choice, update the dependencies section of the Cargo.toml file to match the following.
Here’s what each crate does:
- Diesel: Diesel is the ORM that will be used to interact with the database. The MySQL feature is specified to provide the requisite API for interacting with a MySQL-based database. The r2d2 feature will be used to set up a connection pool for the database.
- Dotenvy : Dotenvy helps with loading environment variables. It is a well-maintained version of the dotenv crate.
- Juniper: Juniper is a GraphQL server library for Rust
- Juniper_rocket: Juniper_rocket is an integration that allows you to build GraphQL servers with Juniper, and serve them with Rocket.
- Rocket: Rocket will be used for handling incoming requests and returning appropriate responses.
Lock project dependencies
Between the review and publishing stage of this tutorial, some third party crates have released updates which would break your application.
As a short term solution (pending updates to the Juniper crate), you can download this Cargo.lock file to the project’s top level folder. This will ensure that all the crate versions are compatible and that your application will run as expected.
Set the required environment variable(s)
Next, create a new file called .env in the project's top-level folder. Then, in the configuration entry below, replace the placeholder values with your database credentials and paste it into .env.
Set up database
Next, create your database using the following command.
After that, create a migration for your database, by running the following command. This migration will create the database tables, and seed them:
You will see a response similar to the one below:
For each migration, the up.sql file contains the SQL for changing the database. The commands to revert the changes in up.sql will be stored in the down.sql file.
Replace the contents of the newly created up.sql and down.sql migration files to match the respective files in this Gist.
Next, apply the changes in the migrations using the following command:
When the migration has run, you can check that the database has been updated successfully using the following SQL command with your MySQL client of choice.
The resulting table should match the one shown below:
| TABLE_NAME | TABLE_ROWS |
|---|---|
| __diesel_schema_migrations | 1 |
| attribute | 25 |
| attributor | 22 |
| bird | 16 |
| bird_threat | 85 |
| threat | 14 |
In addition to setting up the database, the Diesel CLI created a new file named schema.rs in the src folder. This file contains macros based on your table structure, making it easier for you to interact with the database. Have a read about Diesel’s schema if you'd like to know more.
Next, add a module for the database. In the src folder, create a new file named database.rs and add the following code to it.
The first declaration in this module is a type declaration named MySqlPool, for the database pool. Next, a function named init_pool() is declared. This function takes a string corresponding to the database URL and returns a Result enum. If the pool was successfully built, the Ok variant of the result will be the earlier declared type (MySqlPool).
The next function (establish_connection()) retrieves the DATABASE_URL environment variable and passes it to the init_pool. The result is unwrapped and returned to the function caller. In the event that an error is encountered, the application will panic and shut down.
Next, a Database struct is declared. This struct has only one field named pool of type MySqlPool. Finally, a function named new() is implemented for the Database struct. This function calls the establish_connection() function to create a new database pool.
Declare models
In addition to the Attribute, Attributor, Bird, and Threat models mentioned in the What you will build section, your application will include the following models:
BirdThreat: This model links a bird to an associated threat.BirdResponse: This model corresponds to the GraphQL response when a query is made for a single bird.AttributeInput: This model corresponds to the expected type of the mutation argument to add a new Attribute for a bird.AttributeResponse: This model corresponds to the GraphQL response when a mutation for adding a new attribute is received.
In the src folder, create a new file named model.rs and add the following code to it:
Structs (or Enums) with the GraphQLObject attribute, are exposed to GraphQL — allowing you to query for specific fields. In the same vein, the GraphQLInputObject attribute exposes structs as input objects. The Associations, Identifiable, Insertable, Queryable, and Selectable attributes are provided by Diesel for a simplified means of interacting with the database.
Implement GraphQL functionality
In the src folder, create a new file named resolver.rs and add the following code to it.
The first step is to make the Database struct usable by Juniper. This is done by making it implement the Context marker trait.
Next, a Schema type is declared. This combines the Query and Mutation (defined afterwards). The application does not support subscriptions, so the EmptySubscription struct provided by Juniper will be used instead.
Next, the Query struct is declared. It also has the graphql_object attribute which gives it access to the application’s shared state (the database in this case). This makes the database available to the resolver functions declared within the Query struct.
In the same manner, the Mutation struct is declared, marked with the graphql_object attribute, and the corresponding mutation functions declared as struct implementations.
Putting it all together
You’ve built the database, declared your models, and implemented your GraphQL functionality. All that’s left is for you to add are some endpoints to expose your GraphQL server via Rocket. To do this, open the main.rs file in the src folder and update the code in it to match the following.
The graphiql() function is the entry point to the application and serves the GraphQL playground as a response, while the get_graphql_handler() and post_graphql_handler() functions are used to handle GraphQL requests and return the appropriate response.
In the main() function, a new Rocket instance is created using the build() function. Then a Database instance, and Schema instance are passed to the manage() function, which enables Rocket’s state management for both resources. Finally the instance is launched via the launch() function.
Running the application
If you haven't already, download this Cargo.lock file to the project’s top level folder to avoid issues with some third party crates.
Then, run the application using the following command.
By default, the application will be served on port 8000. Open https://localhost:8000 in your browser.
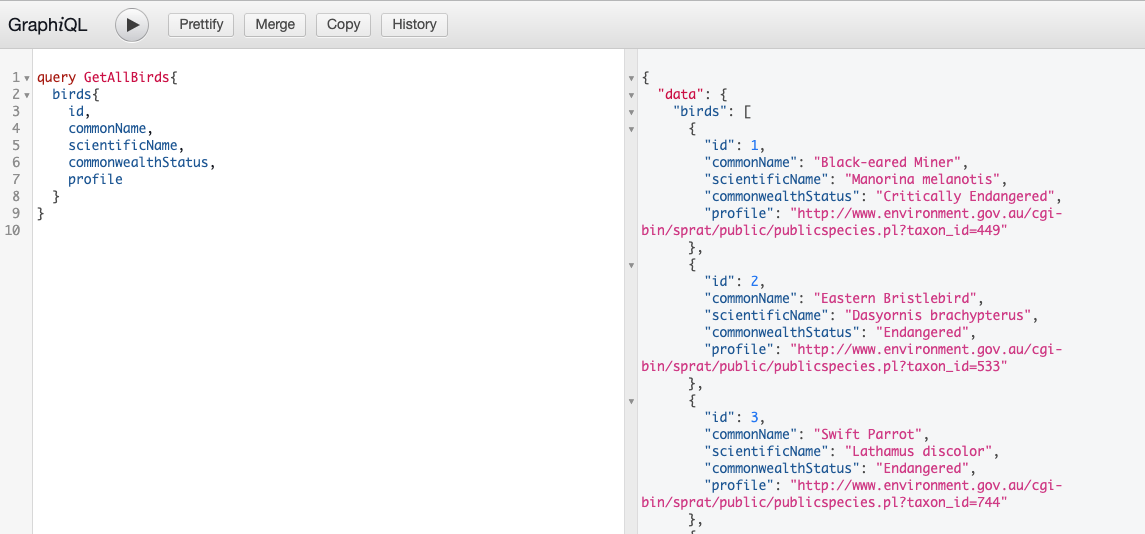
Get all birds
Paste the following code to get all birds.
For each bird, you will receive the id, commonName, scientificName, commonwealthStatus, and profile as shown below.
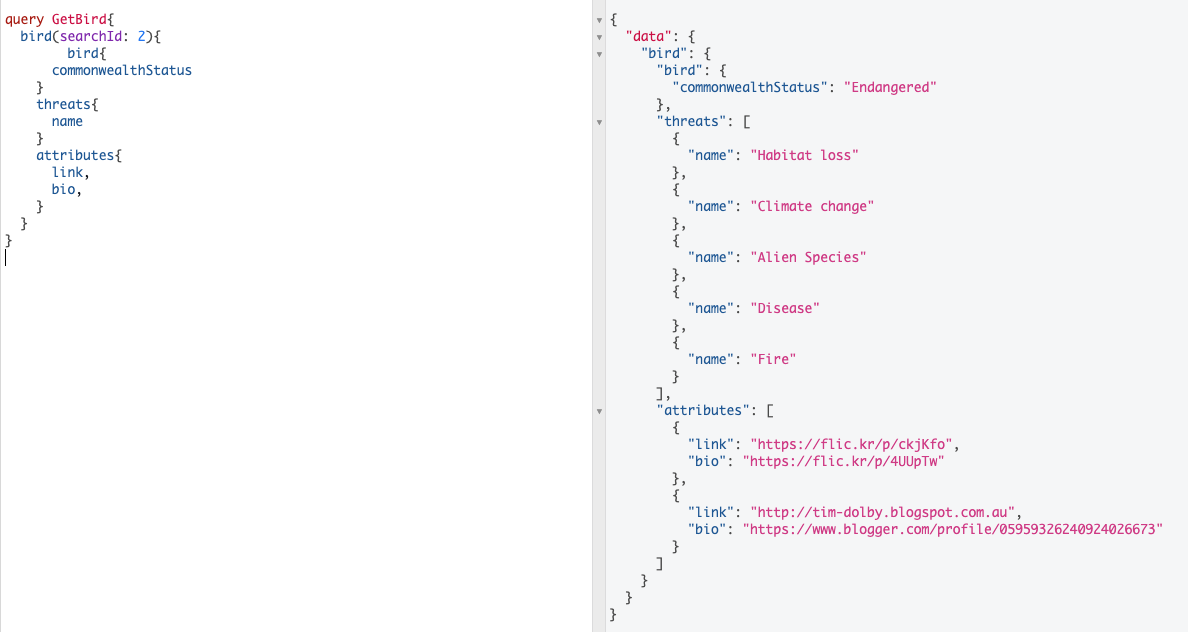
Get a single bird
Use the following query to retrieve the details for a single bird.
For the returned bird, you will receive the commonwealth status. In addition you will see the associated threats (only by name), and the bird attributes (link and bio) as shown below.
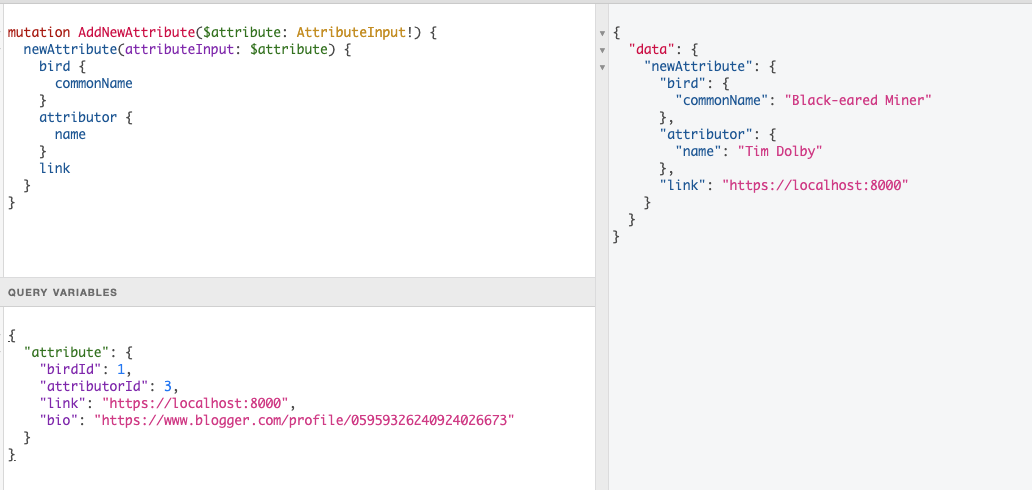
Add new attribute
Use the following to send a mutation which adds a new attribute for the specified bird.
For the $attribute variable, add a query variable as follows:
Delete an attribute
Use the following command to send a mutation which deletes an attribute from the database.

There you have it!
Well done! I bet building the GraphQL server was easier than you expected. With five small modules, you were able to set up a shiny new GraphQL server. Not only that, you made it performant by setting up a connection pool for your MySQL database. Pretty neat right?
There’s still some other things to try out, such as adding more queries and mutations to expand the application’s functionality.
The entire codebase is available on GitHub should you get stuck at any point. I’m excited to see what else you come up with. Until next time, make peace not war ✌🏾
Joseph Udonsak is a software engineer with a passion for solving challenges – be it building applications, or conquering new frontiers on Candy Crush. When he’s not staring at his screens, he enjoys a cold beer and laughs with his family and friends. Find him at LinkedIn, Medium, and Dev.to.


Related Resources
Twilio Docs
From APIs to SDKs to sample apps
API reference documentation, SDKs, helper libraries, quickstarts, and tutorials for your language and platform.
Resource Center
The latest ebooks, industry reports, and webinars
Learn from customer engagement experts to improve your own communication.
Ahoy
Twilio's developer community hub
Best practices, code samples, and inspiration to build communications and digital engagement experiences.