Expose a local Django server to the Internet using ngrok
Time to read:
July 19, 2021
Written by
Reviewed by

Django comes with a lightweight server that allows you to serve your project on your local machine at http://localhost:8000. This is a great way to test and troubleshoot your application code.
Your local server isn't exposed to the real Internet, though, so your Django project can't receive requests from an external source, such as a Twilio webhook.
For development purposes, you may need to test that your app code properly handles requests from external sources. To do that, you must expose your app to the Internet.
What is ngrok?
The ngrok utility generates public URLs that map to your local server, enabling you to test how your development code handles requests from external sources. Read more about ngrok and how it works in the official documentation.
Prerequisites
All you need for this tutorial is an existing Django project running on Python 3.
Install the pyngrok package
The pyngrok package provides a Python wrapper around the core ngrok functionality. If you're using a virtual environment, remember to source the virtual environment before installing the package. Install the most recent version of pyngrok:
Create a requirements.txt file if you don’t have one already. Add pyngrok to the file, making sure to pin the version installed by pip as shown in the code snippet below to avoid complications in the future. The version you need to pin will be the latest version at the time of this writing (v5.0.5), or a later version if available in the future:
Allow Django to use ngrok URLs
We have to tell Django it's OK to allow ngrok to serve our Django code. To do that, add '.ngrok.io' to the 'ALLOWED_HOSTS' list in your Django project's settings.py file, along with the allowed local hosts:
The randomly-generated URL provided by ngrok will be in the form: https://<randomstring>.ngrok.io.
Even though we can't predict the random string in the URL, we can omit the random string portion of the URL and still tell Django that it's OK to allow the .ngrok.io domain.
Start the local Django server
In your Django project's root directory, start the local Django server by running one of the commands given below. Which command you run will depend on which version of Python your local machine runs by default. It’s safe to try both of these commands if needed. Your project will be served at http://localhost:8000 and 127.0.0.1:8000 as usual.
Open the ngrok tunnel
Open a new command line window. Navigate to your Django project's root directory and source your virtual environment again if you're using one. Start the ngrok tunnel with the command given below. Note that the same port for ngrok to use must be the same as the port Django is using, which is port 8000 by default.
You'll see output like this:
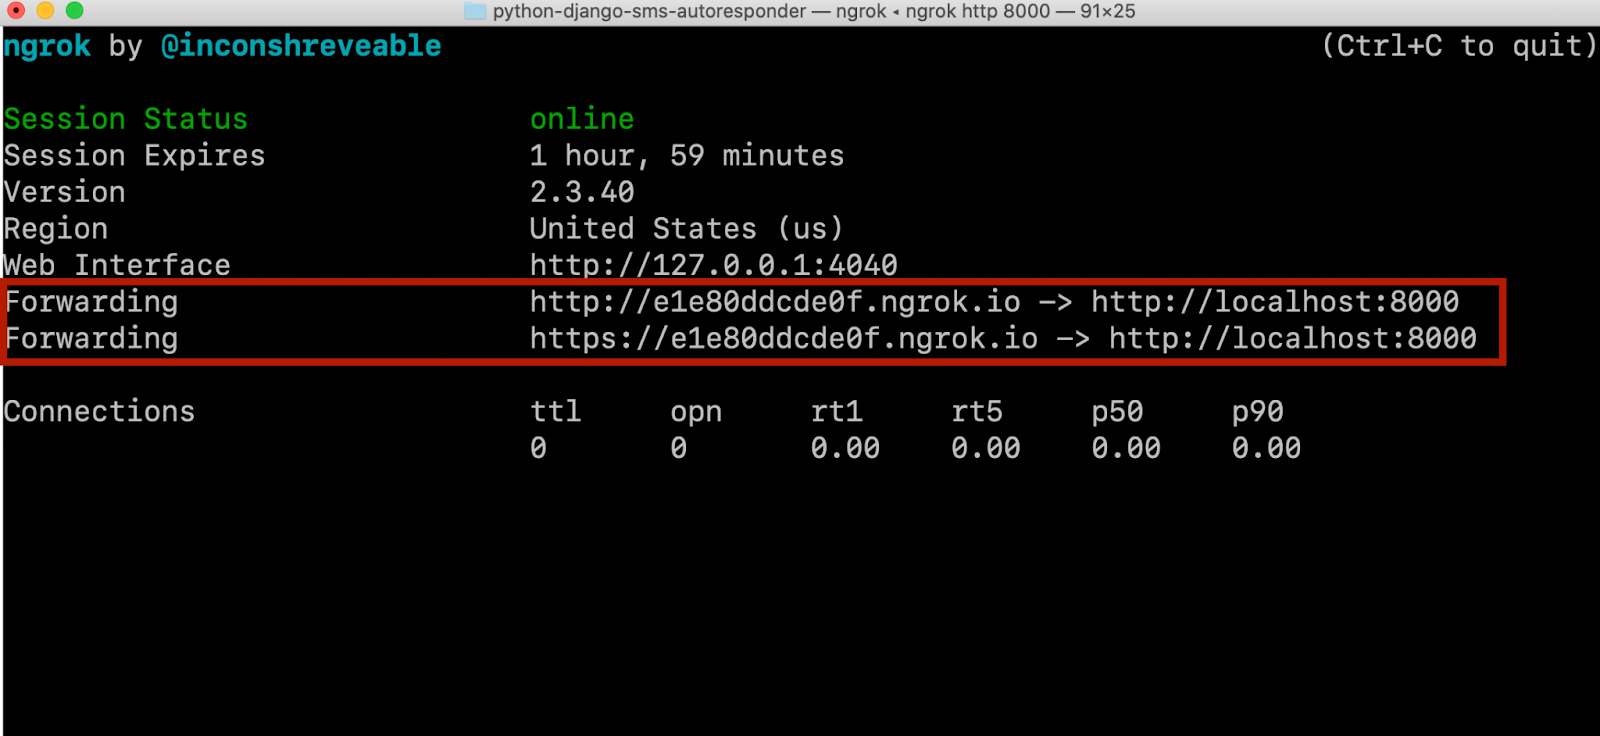
Note the Forwarding URLs highlighted in the red box in the screenshot above. Notice that ngrok exposes both a secure (HTTPS) and an insecure (HTTP) URL. Both of these forward to http://localhost:8000 which is insecure (HTTP).
Copy the secure (HTTPS) URL provided by ngrok and paste it into your web browser. You should see the same webpage you saw when you navigated to http://localhost:8000 after starting the local Django server.
Test your app's functionality using the ngrok URL
Trigger a request to be sent from the external source to the ngrok URL and corresponding Django URL pattern. This should correspond with the Django view that handles incoming requests from external sources.
For example, if you have a Django view that processes an incoming Twilio SMS message and the view is associated with the /process-sms URL pattern, you'd trigger the Twilio SMS webhook to https://<randomstring>.ngrok.io/process-sms.
Next steps for Django projects
I hope this tutorial gets your Django project up and running on the "real" Internet quickly so you can test your project's ability to respond to incoming web requests. Check out these Django tutorials on the Twilio blog for useful features you can add to your existing application:
- Build a Contact Form for a Python Django Application with Twilio SendGrid
- Build an Email Newsletter with Django and Twilio SendGrid
- How to Build Chat into Django Applications with Twilio Programmable Chat
I can’t wait to see what you build!
August is a Pythonista on Twilio's Developer Voices team. She loves Raspberry Pi, real pie, and walks in the woods.

Related Resources
Twilio Docs
From APIs to SDKs to sample apps
API reference documentation, SDKs, helper libraries, quickstarts, and tutorials for your language and platform.
Resource Center
The latest ebooks, industry reports, and webinars
Learn from customer engagement experts to improve your own communication.
Ahoy
Twilio's developer community hub
Best practices, code samples, and inspiration to build communications and digital engagement experiences.