Integrate Twilio with Apaleo for an Enhanced Guest Experience
Time to read:
May 31, 2022
Written by

Planning your vacation or work trip – or just going on a road trip – always ends up requiring you to book a hotel room for the night. And this has become straightforward with the help of hotel booking applications and automated processes. But this requires hotels set up their infrastructure, integrate it with multiple systems, and depend on what those systems allow. Let’s face it – customization is limited, and when it comes to hospitality there are a LOT of different wants and needs from guests.
In this tutorial we will demonstrate a way to automate your communication with your guests.
Being connected to your existing infrastructure (in this case Apaleo), Twilio allows you to create your own custom solution, allowing a guest to create, update, or cancel their reservations.
What will we build
This tutorial consists of 3 major parts.
- A WhatsApp chatbot built with Twilio Studio.
- An Apaleo app to connect, get user information, and use it with the WhatsApp chatbot.
- The guest journey will be forwarded to an agent if the guest would like to talk to an actual person (using Twilio Flex).
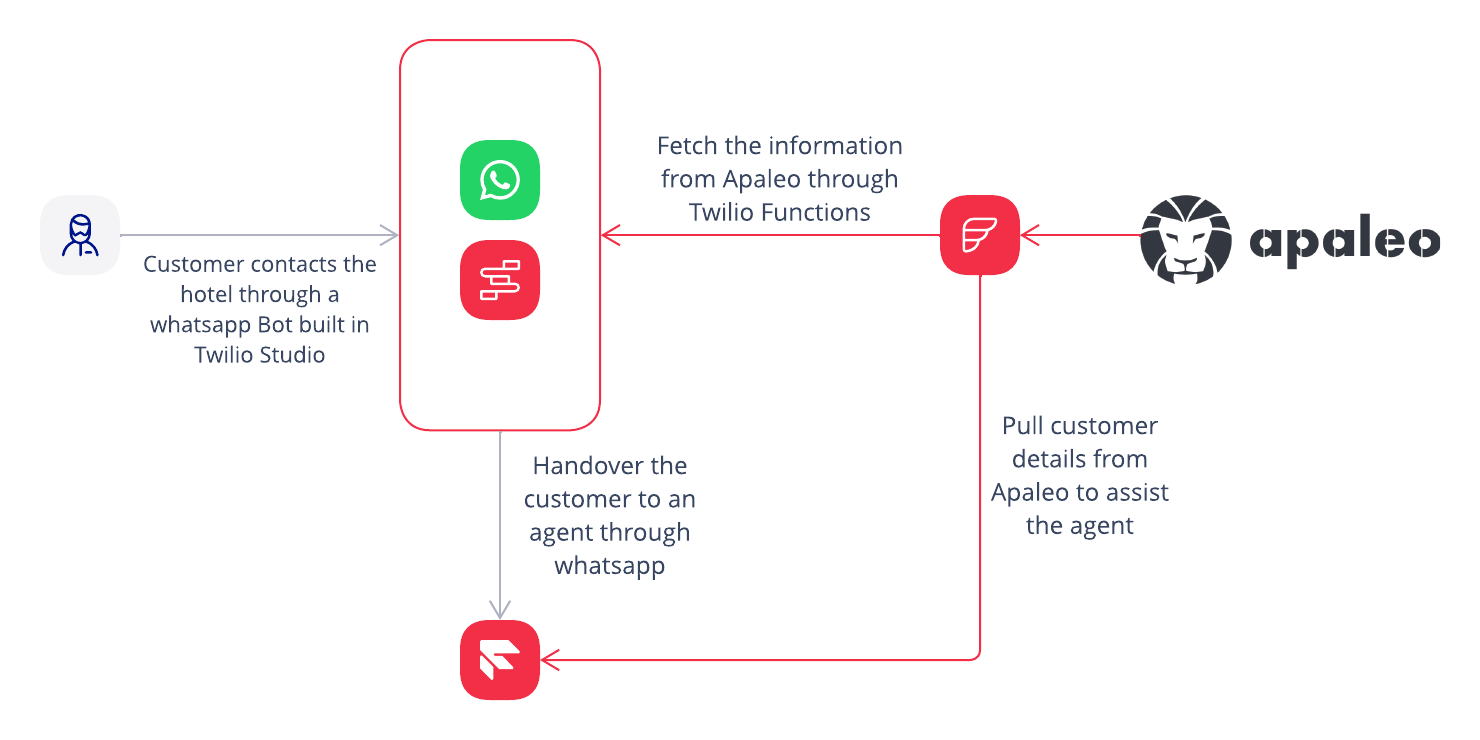
How does the flow work
- The hotel guests use the WhatsApp chatbot to interact with the system.
- The guest will be able to:
- Inquire about an existing reservation
- Add a new comment
- Cancel an existing reservation
- The chatbot will connect with your Apaleo instance and make the self-service functionality work automatically.
- When the guest wants to talk to an actual human, the guest’s journey will be forwarded to an agent.
- The agent will be able to see the reservation that the guest is interested in immediately inside Apaleo through Flex (the Twilio contact center solution).
Prerequisites
Before you can build today’s demo, you’re going to need to complete a few steps and sign up for a few accounts.
- Apaleo Account
- A free Twilio account
- Access to the Twilio API WhatsApp Sandbox
- Node.js knowledge
- An installation of the Twilio CLI
If you don’t yet have an account with these services – don’t worry. In the next few sections, we’ll walk you through how to set things up.
Create a free Apaleo account
If you don’t already have an Apaleo account, please follow the instructions to get access to the Apaleo Cloud platform:
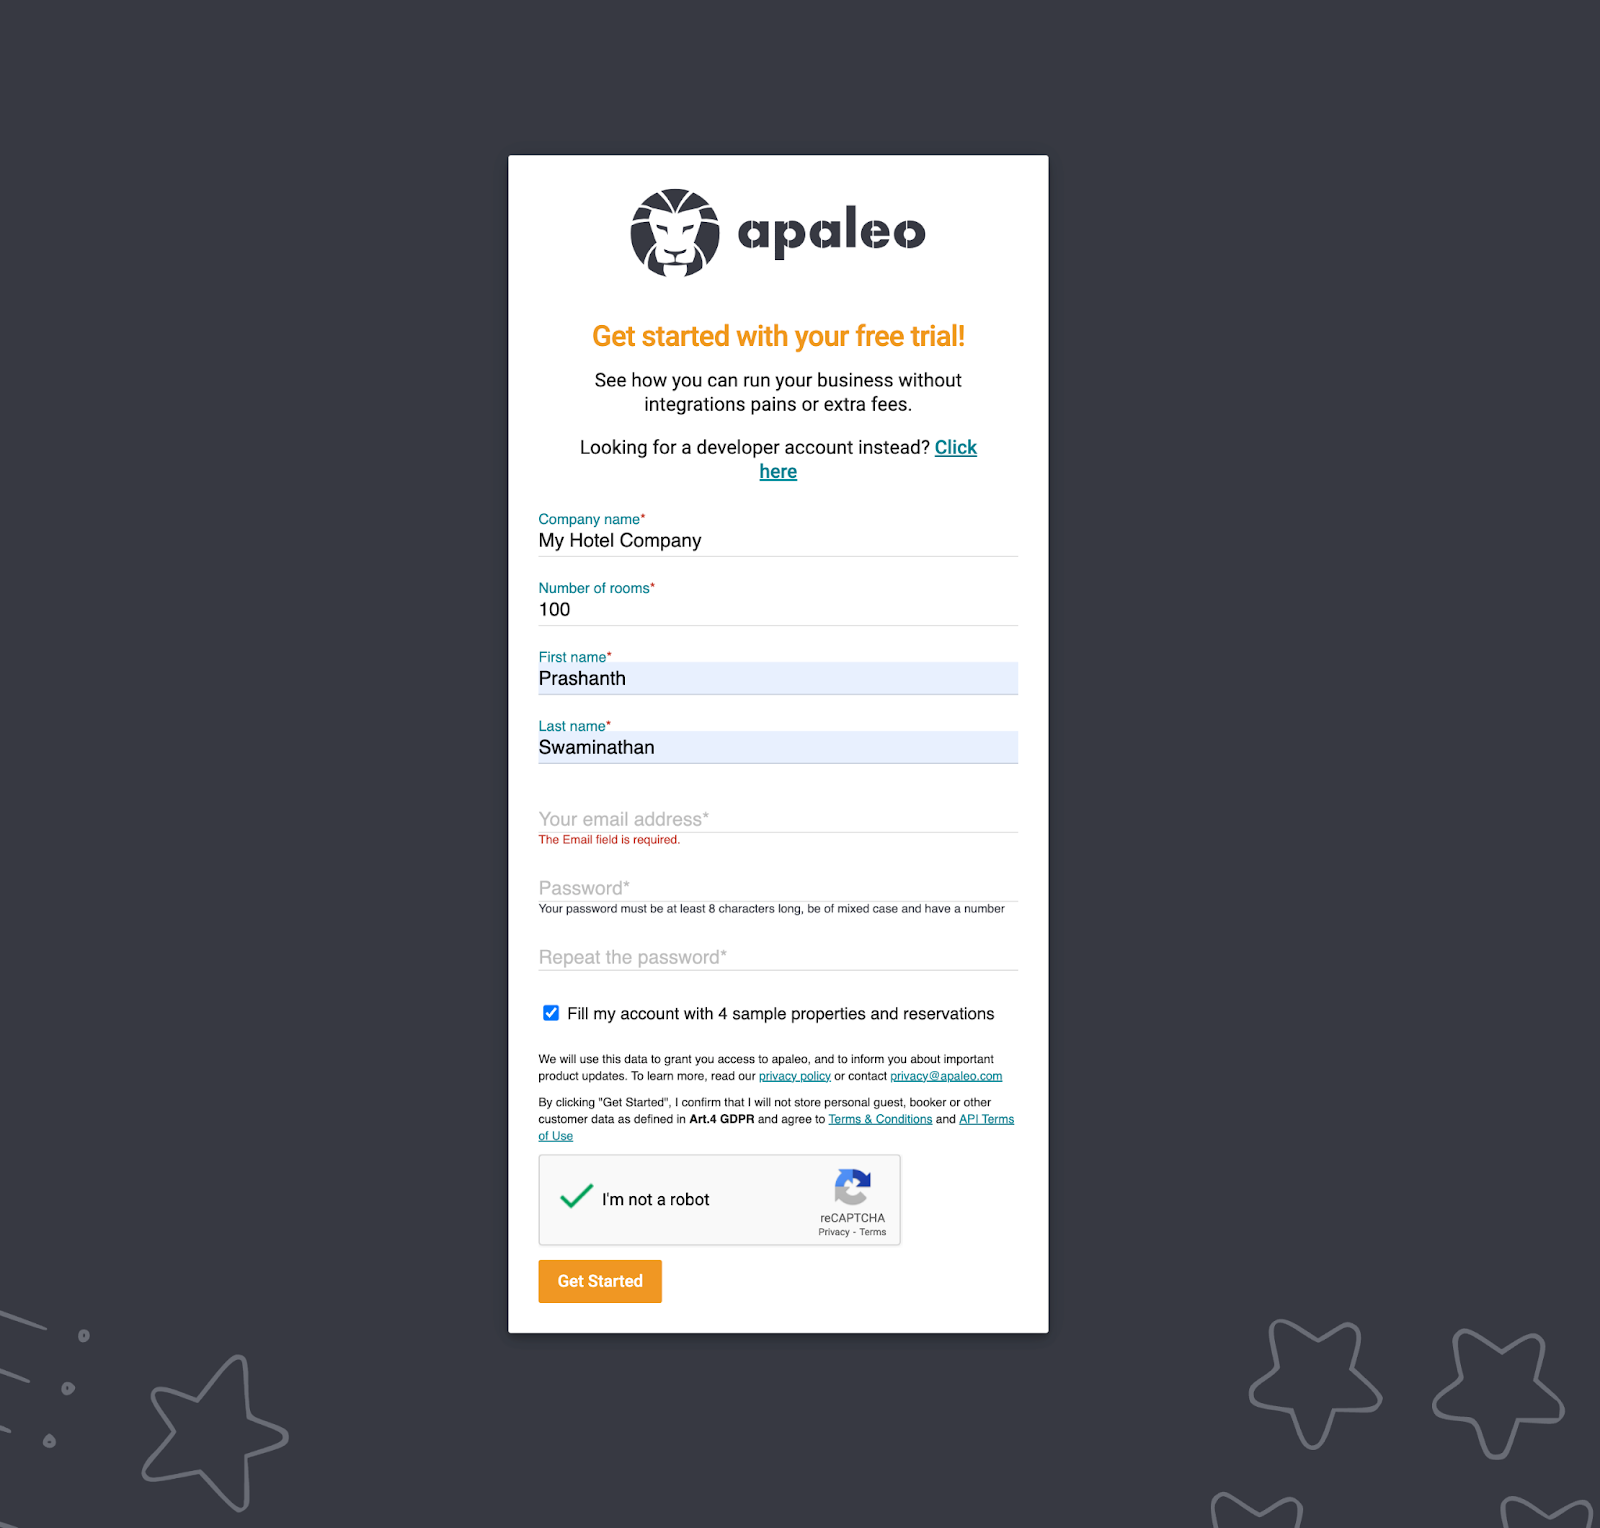
- Go to this page and provide the information needed to create a new account
- Provide the information and click on the “Fill my account with 4 sample properties and reservations” check box so you get a pre-filled Apaleo dashboard, helping you to onboard faster.
After you create a new account, you will be redirected to the main Apaleo page.
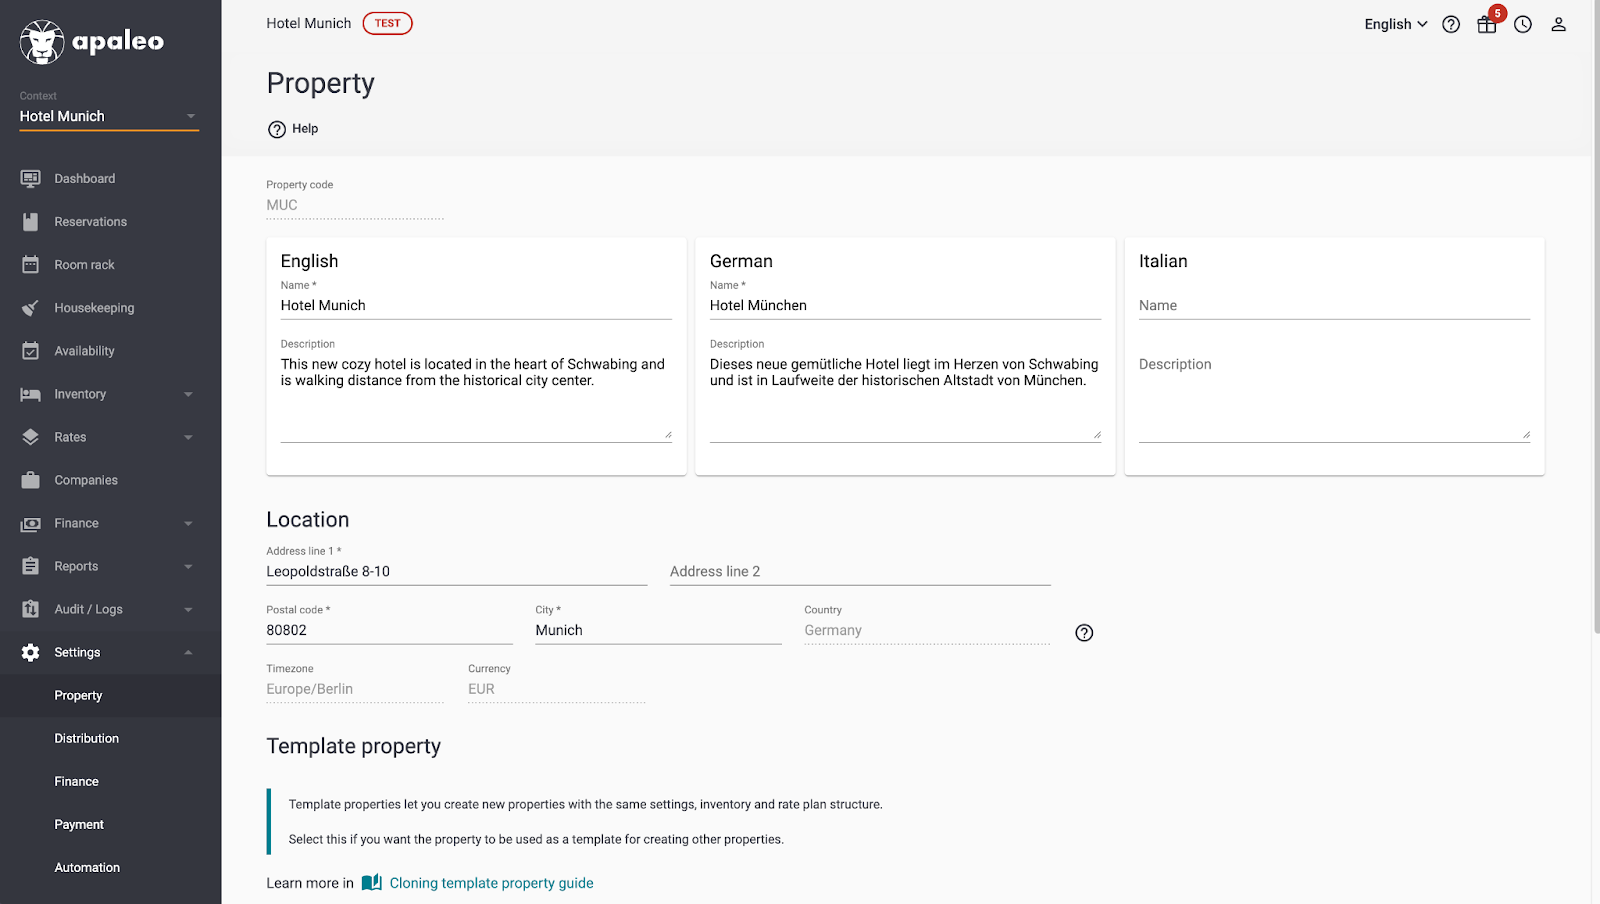
Everything is set up! Now let’s look at our Apaleo properties.
Set up an Apaleo Property
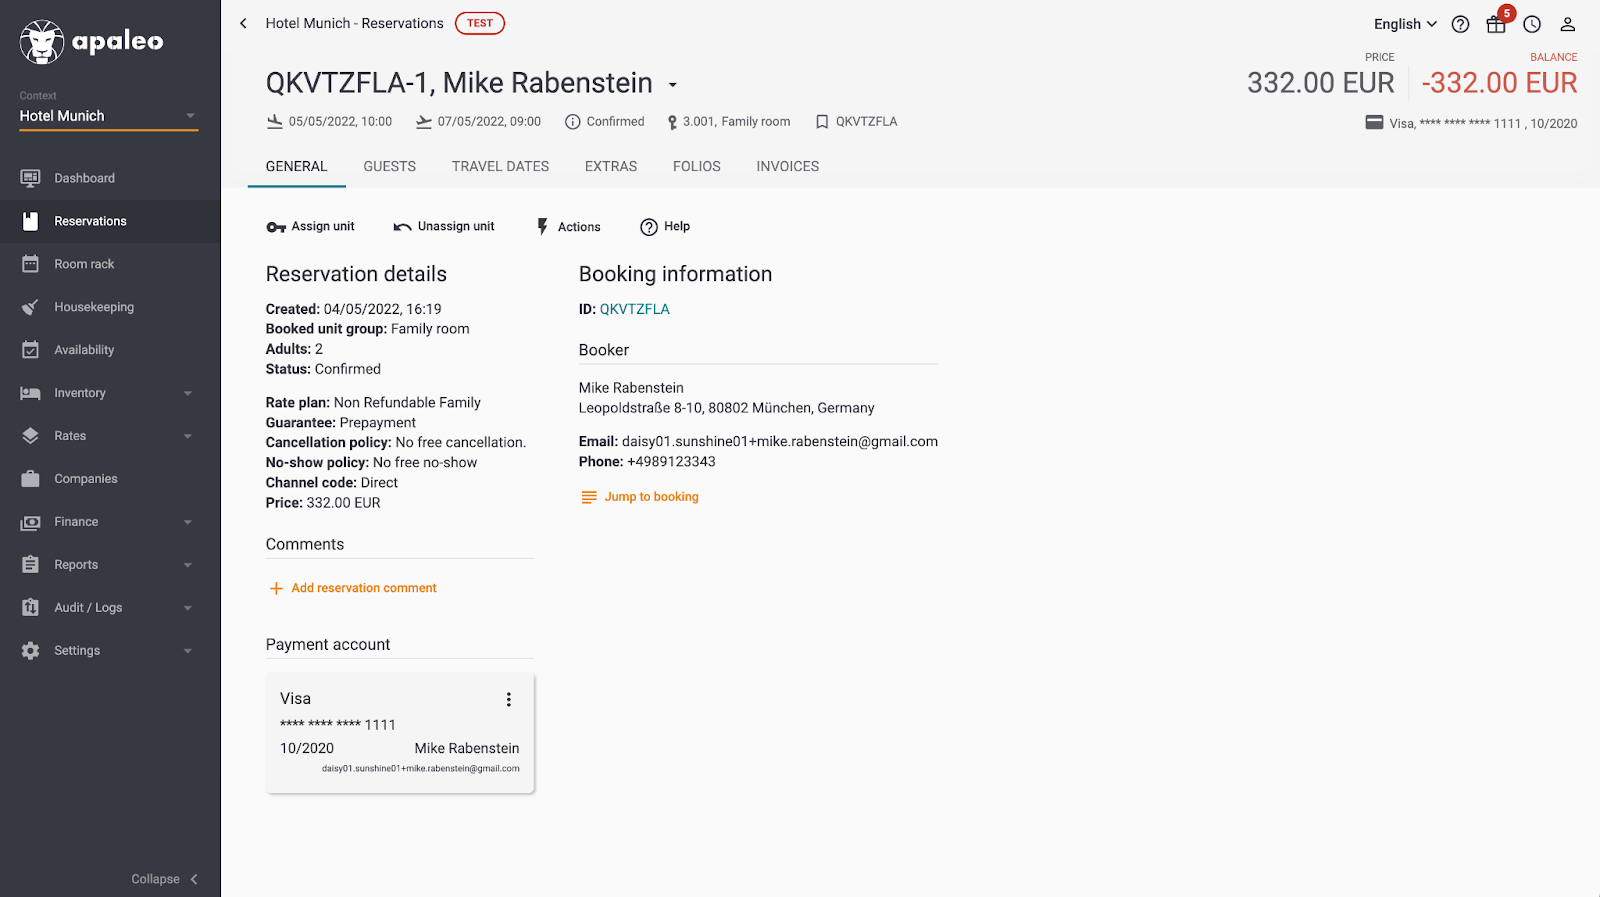
Set up an Apaleo Reservation
- Under the “Reservation” tab, you would see the pre-filled reservation. You are free to edit and also create new ones by clicking on the “New booking” button.
Set up an Apaleo Connected App
- Set the context as “Account” in the dropdown that you see under the logo.
- Under apps you should be able to see the apps that you have created.
- Let’s create a new custom app: click on the “Add a new app” button and select “Add custom app” in the popup.
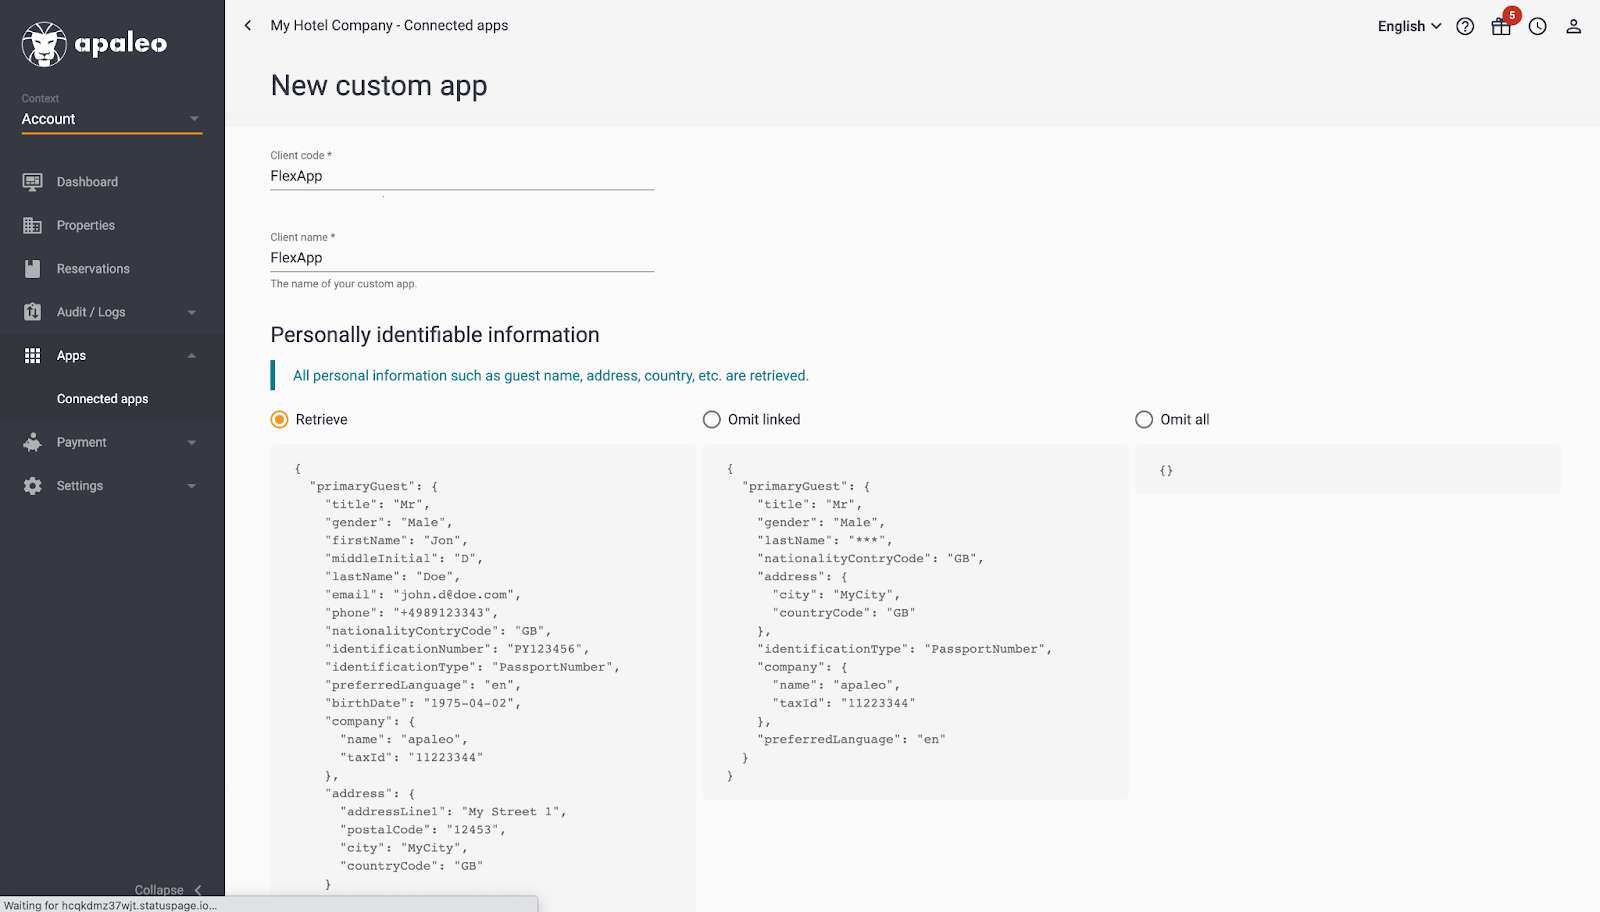
- Make sure to add a secret. For this example, let's give permission to all the scopes. Again, choose judiciously on the relevant APIs that you need for the app that you are building.
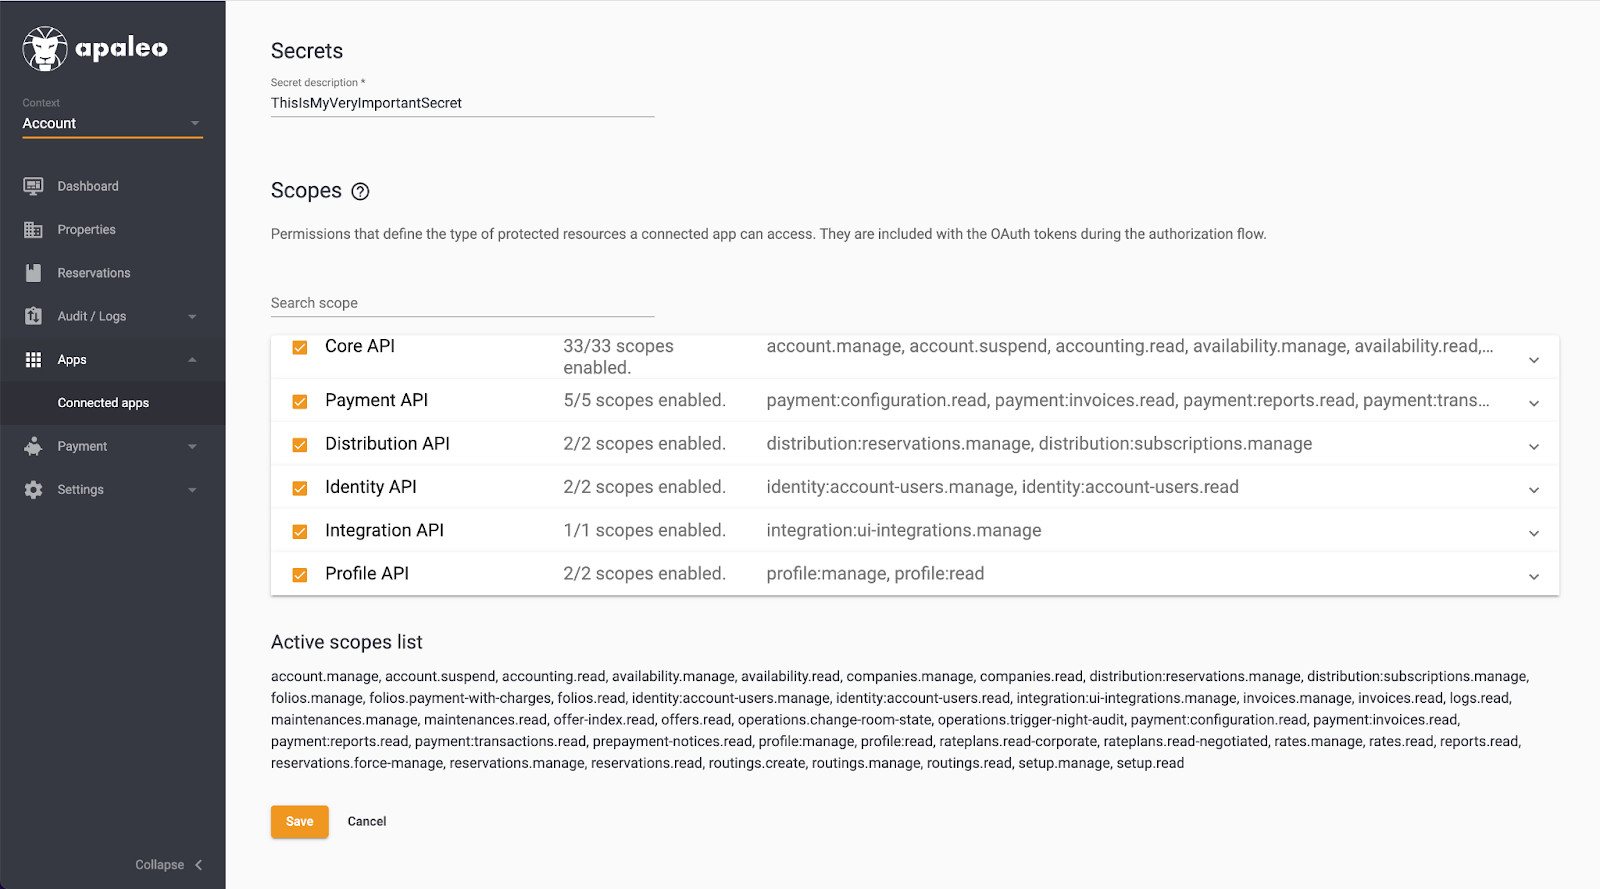
- Hit Save and make sure to keep your secret safe so you can recover your app if you lose access to it later.
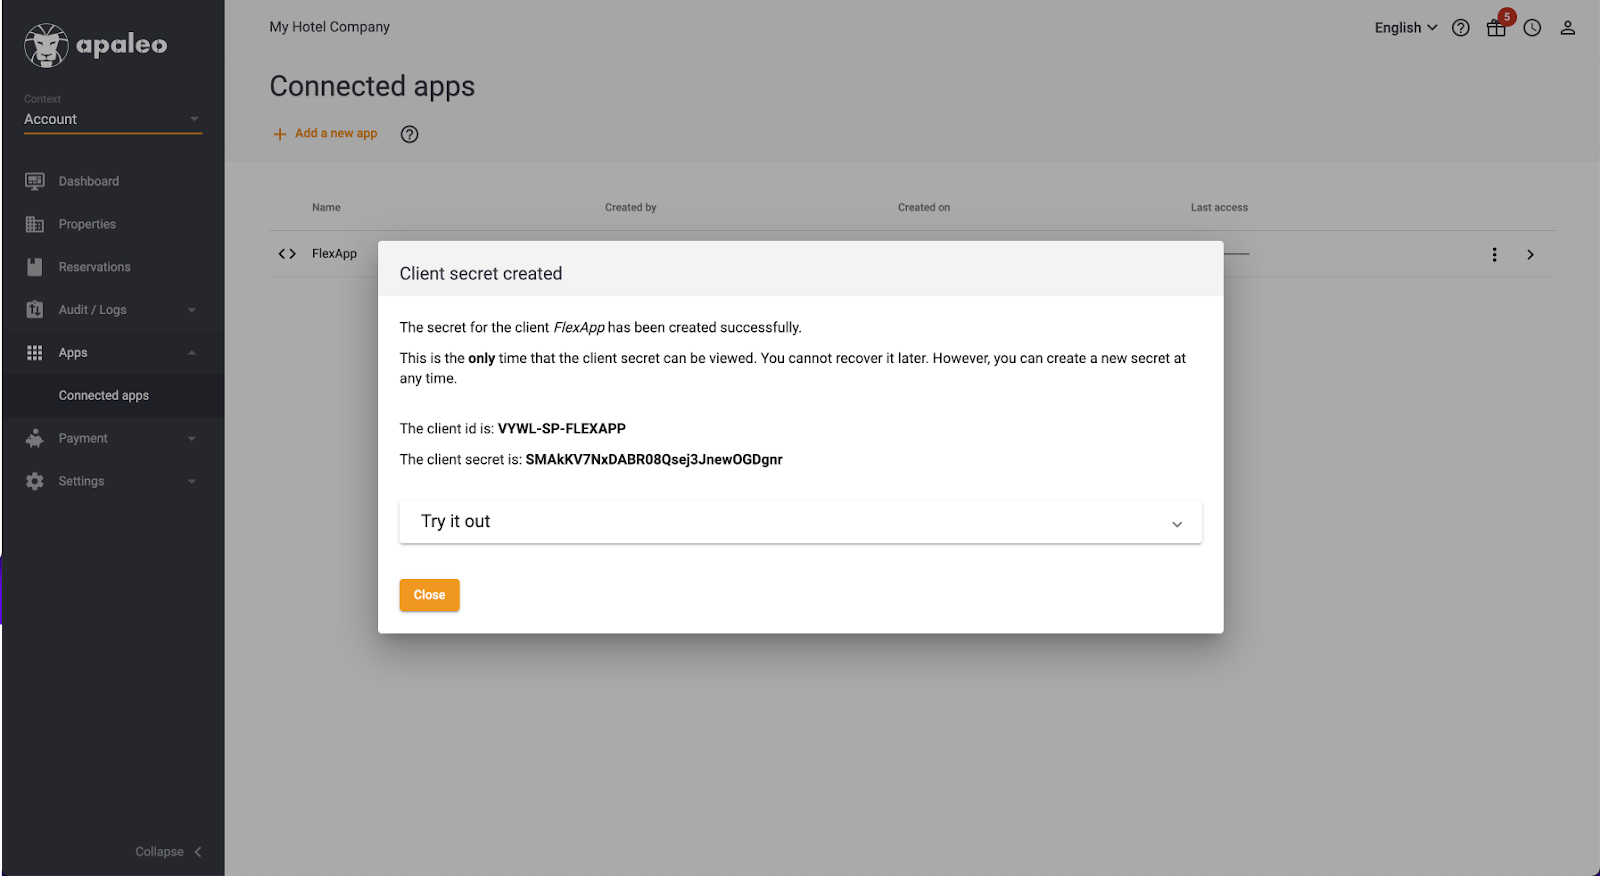
And Voila, you have created your app on Apaleo! Make sure to copy the Apaleo Client ID, Apaleo identity domain, Apaleo client secret, and the Apaleo api domain. We will need these four values to communicate with the API.
Create a new Flex Twilio account
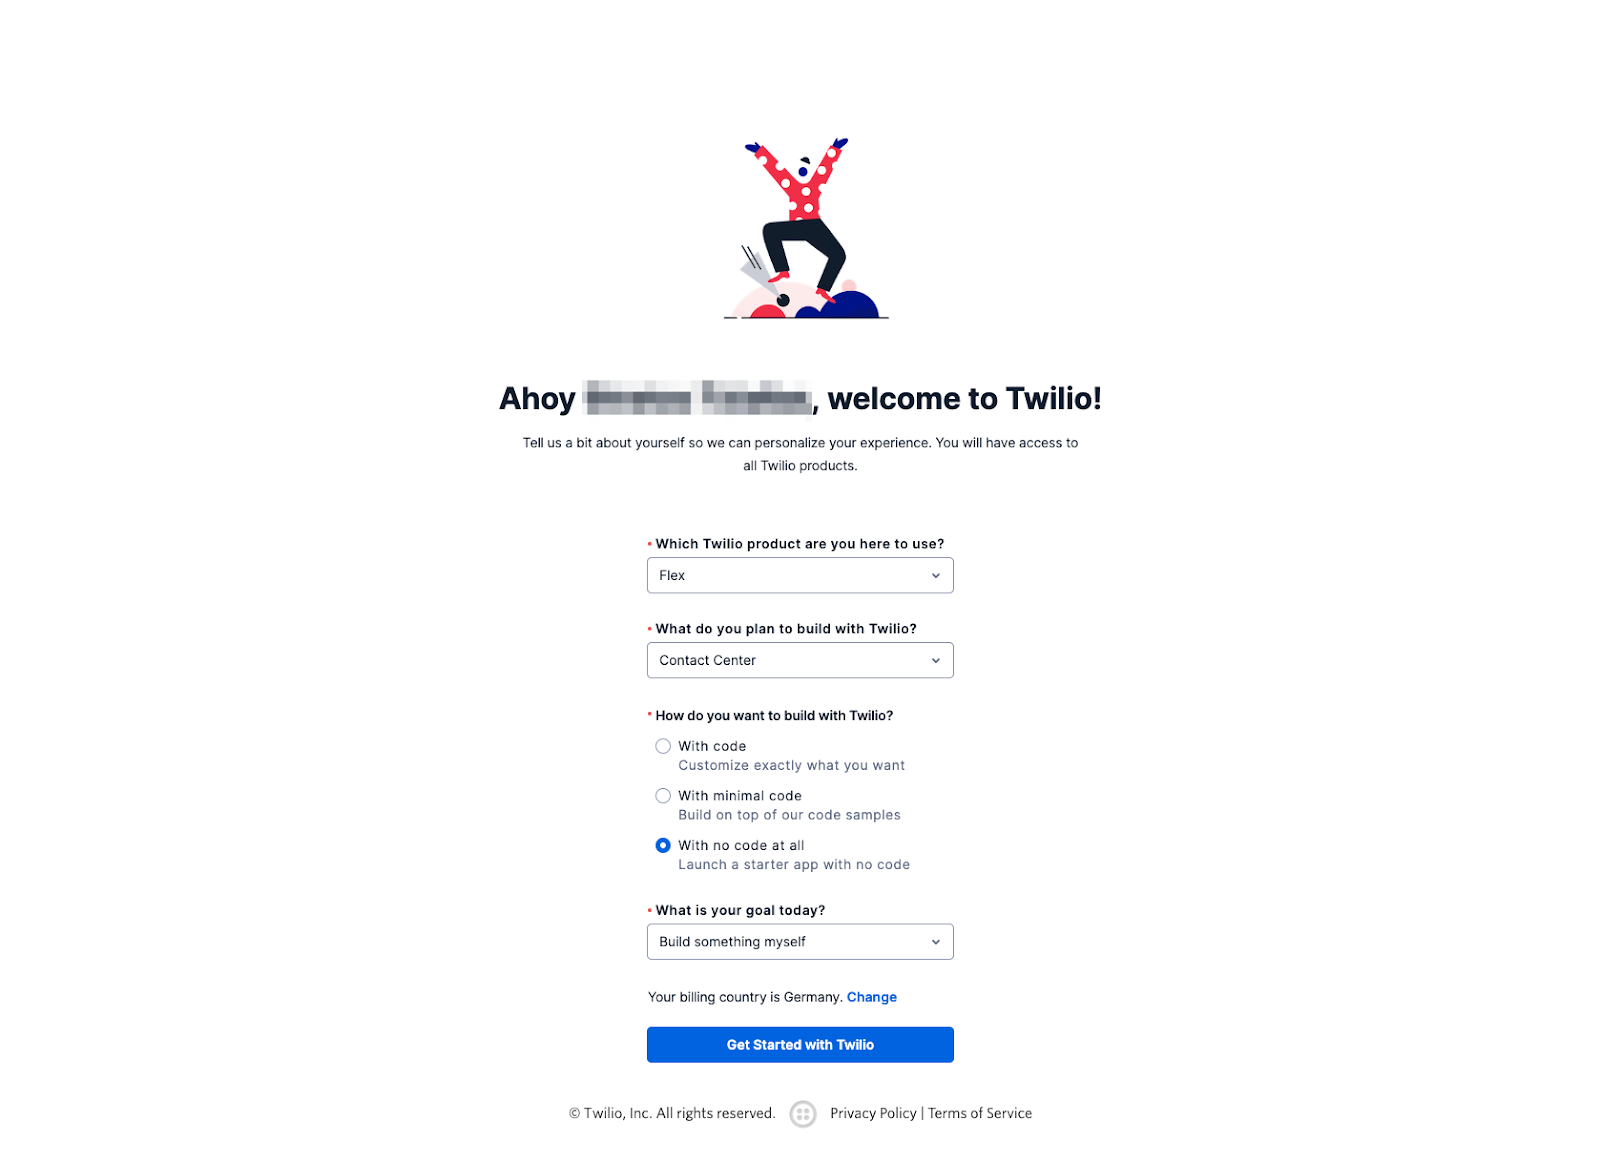
If you don’t get have a Twilio account, go to this link and follow the instructions.
At the page requesting more information, be sure to select Flex as the product you are planning to use. See screenshot below:
As soon as you create a Twilio account you will be assigned with some free credits in order to start building immediately!
Integrate Twilio with Apaleo API
Excellent work, you’re now set with all of the prerequisites. In the next sections, we’ll look at how to integrate Twilio to complete the tutorial.
Create your Twilio Functions
Twilio provides a serverless environment called Functions where you can host your code and connect it to endpoints to make them accessible from the internet in just a few minutes.
In order to do so, you will need to use the Twilio CLI. That will allow you to synchronize your local environment with your Twilio account without having to manually copy your code or anything similar.
- If you didn’t install the CLI during the prerequisites, follow the instructions to set up the Twilio CLI on your local machine.
- Go to HlsRobot's GitHub repository and clone the project to your local machine.
- In the Serverless Folder rename the
.example.envfile and save it as.env - Provide the environmental variables required and save the file:
ACCOUNT_SID-> Your Twilio account Sid that can be found in the console (you need to be logged in)AUTH_TOKEN-> You can find it in the same page as theaccount_sidAPALEO_API_DOMAIN-> the Apaleo main domain copied fromAPALEO_IDENTITY_DOMAIN-> copied above from the Apaleo connected app settingsAPALEO_CLIENT_SECRET-> copied above from the Apaleo connected app settingsAPALEO_CLIENT_ID-> The Api key generated in Apaleo connected app section
- On a terminal go to the functions folder and run the command
twilio serverless:deploy
And you should have similar results to the following screenshot:
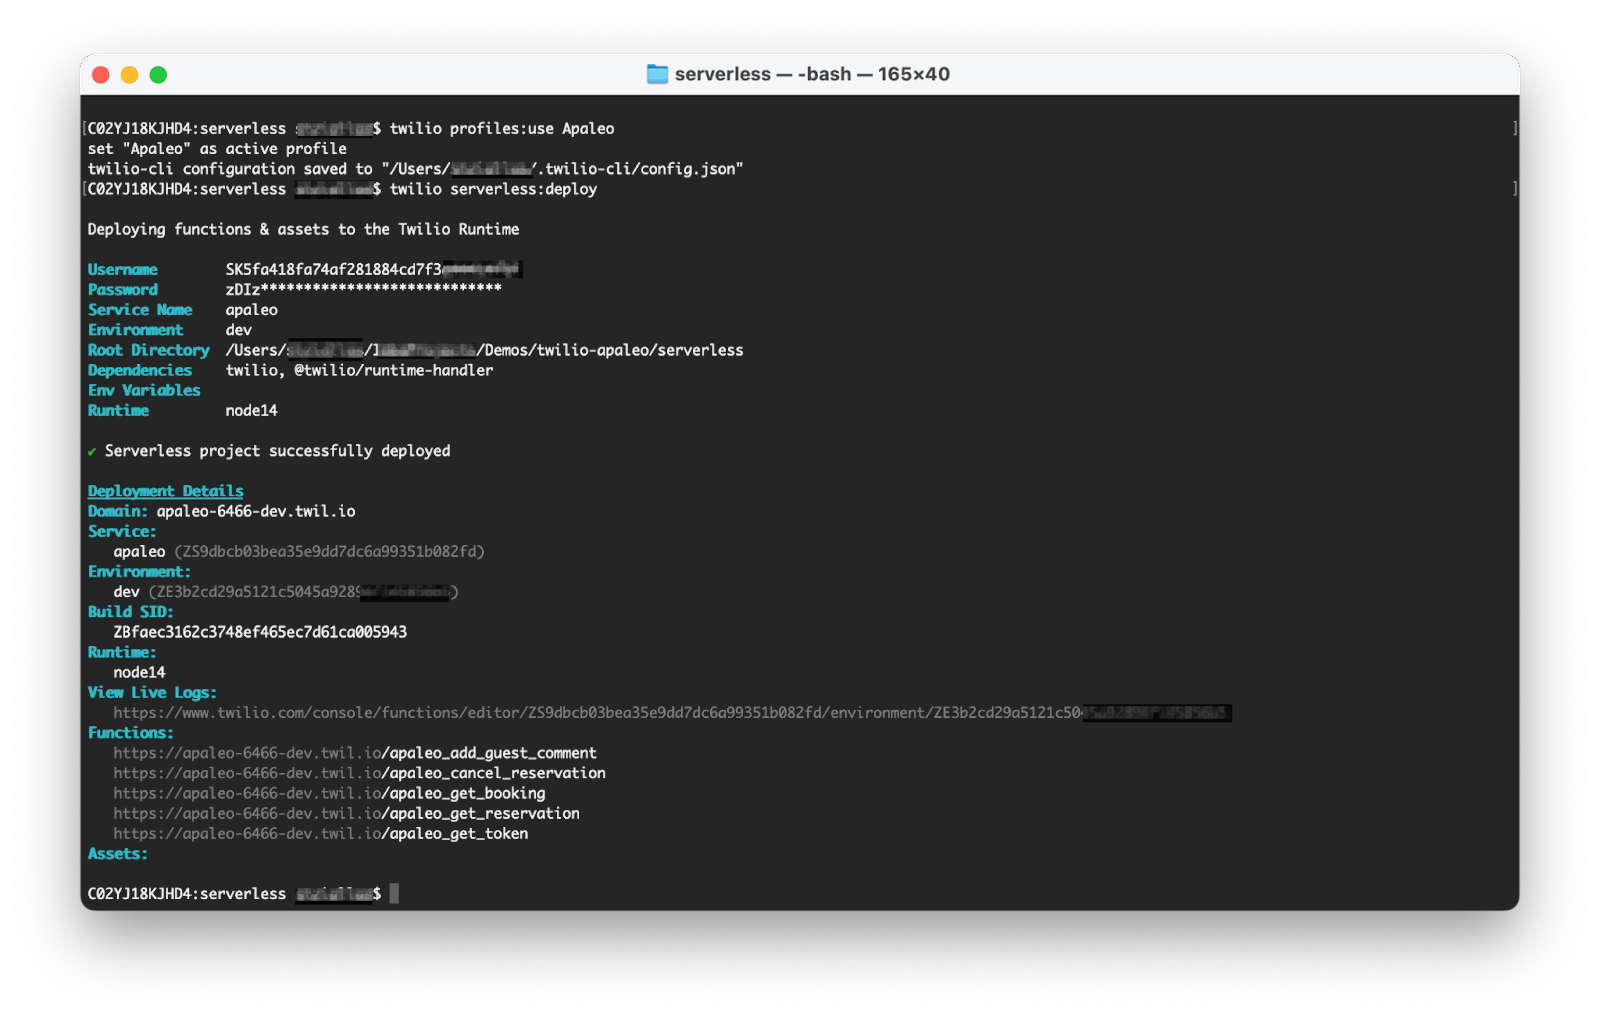
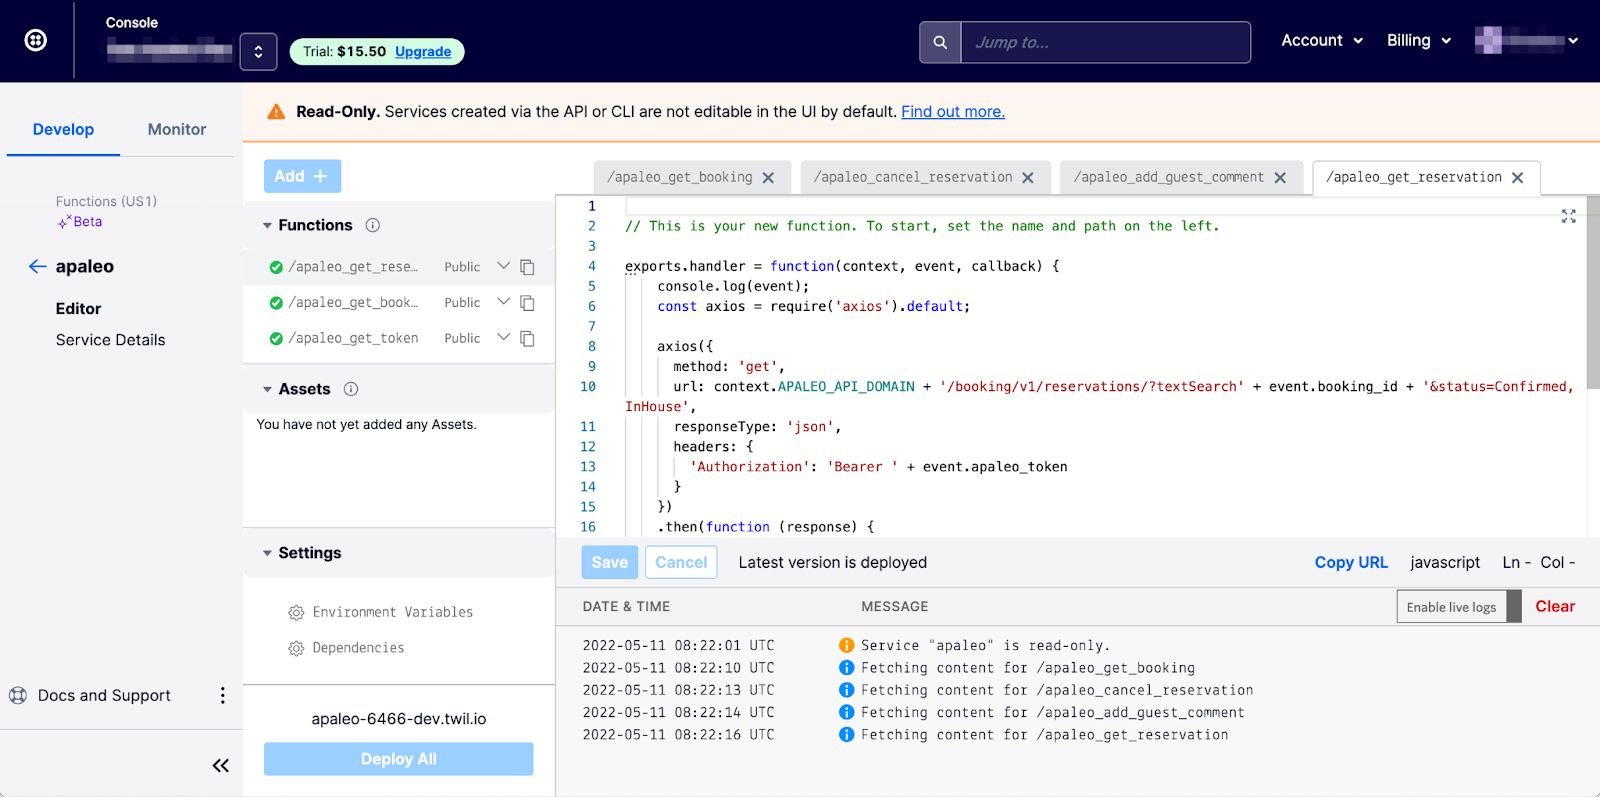
If you now visit https://www.twilio.com/console/functions/overview/services , you should be able to see your service named Apaleo. If you click on the name, you will be able to see the deployed functions and the environment variables that we set earlier.
Additionally, under the settings, you will see the auto generated domain name of our functions:
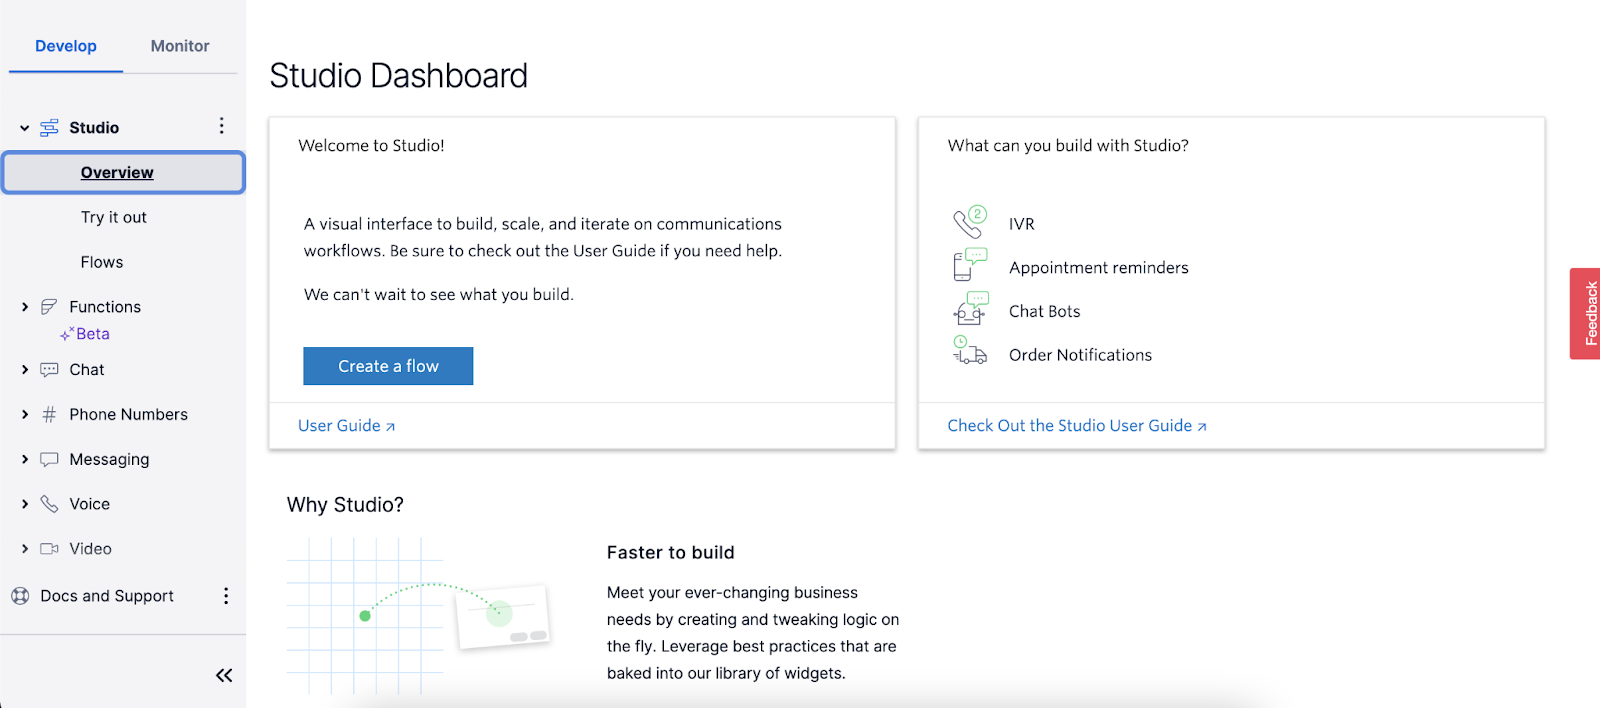
Create your First Studio Flow
You don’t need to be a developer or a telco expert to create a Conversational Flow with Twilio. Visit https://www.twilio.com/console/studio/dashboard and you will be greeted with the following page. From the dashboard, you can jump quickly into a blank flow by clicking on “Create a Flow”.
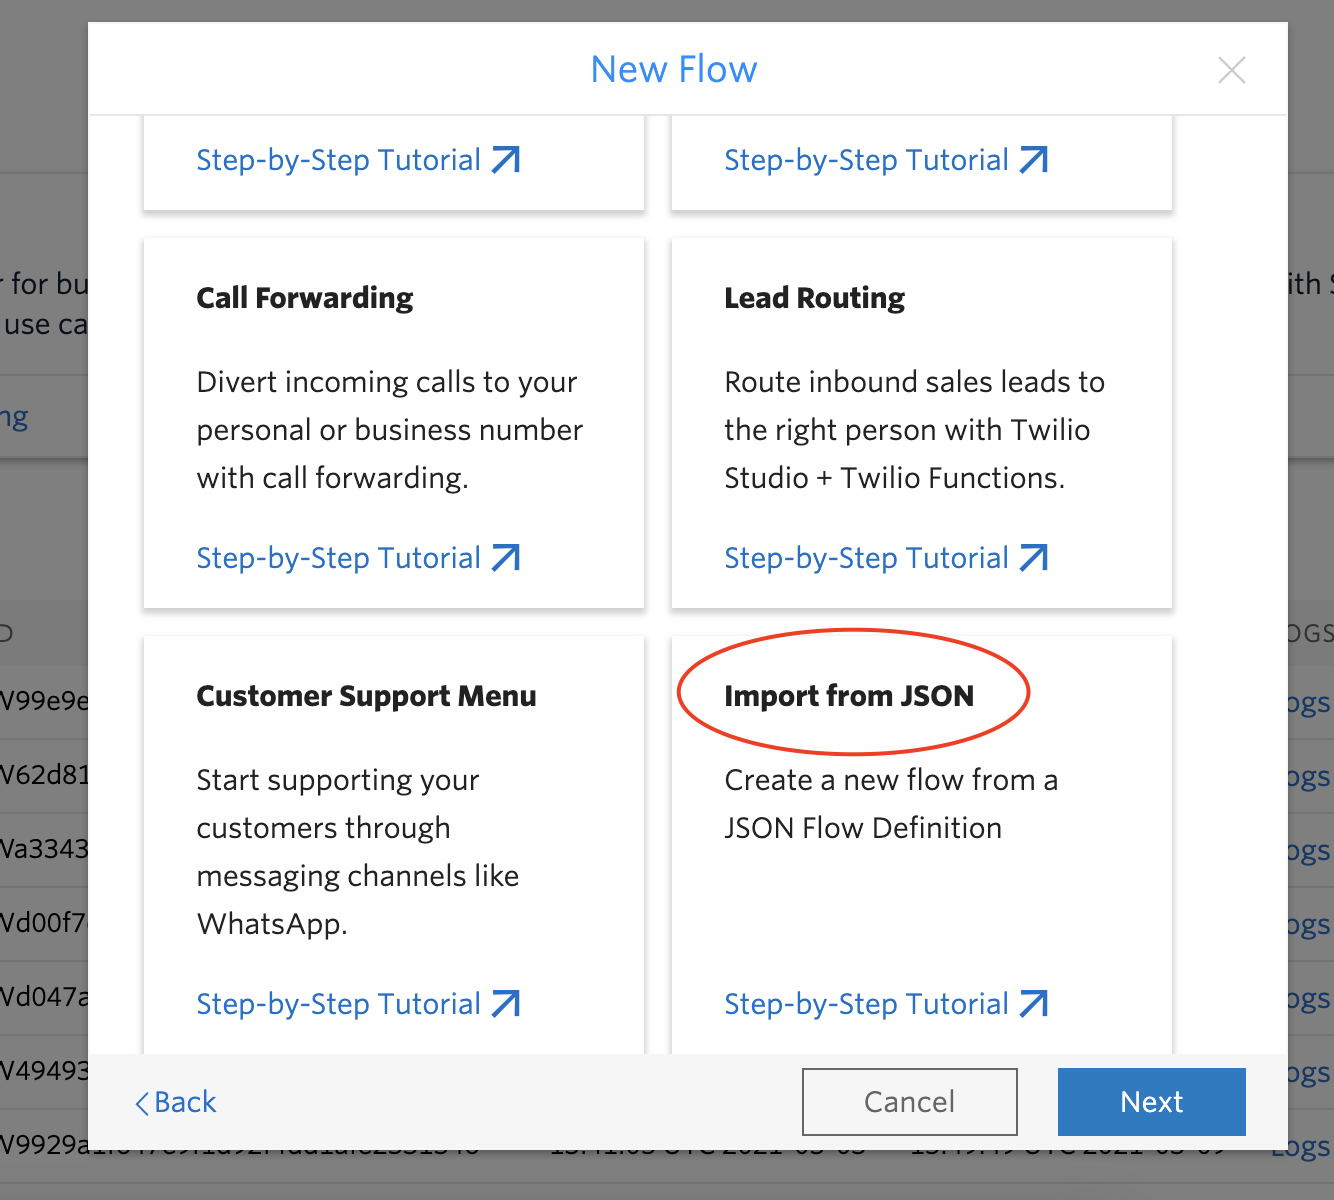
For this app, we have created the Flow needed to connect to the Apaleo API and provide an enhanced experience for the user. In order to import a ready Flow, follow these steps:
- From the Studio Dashboard page click the “Create a flow” button (if you have existing flows then click on the “Plus +” button).
- Select a name and click “Next”.
- At the next page, you are given the option to either start from scratch or choose a template. Scroll down, select the “Import from JSON” option and click Next
- You should see an empty text area where you can provide your own JSON. Go to https://github.com/HlsRobot/twilio-apaleo, copy the JSON provided there (studio_flow.json), and paste it in the above text area. Click “Next”.
- You should be able to see something like the following view.
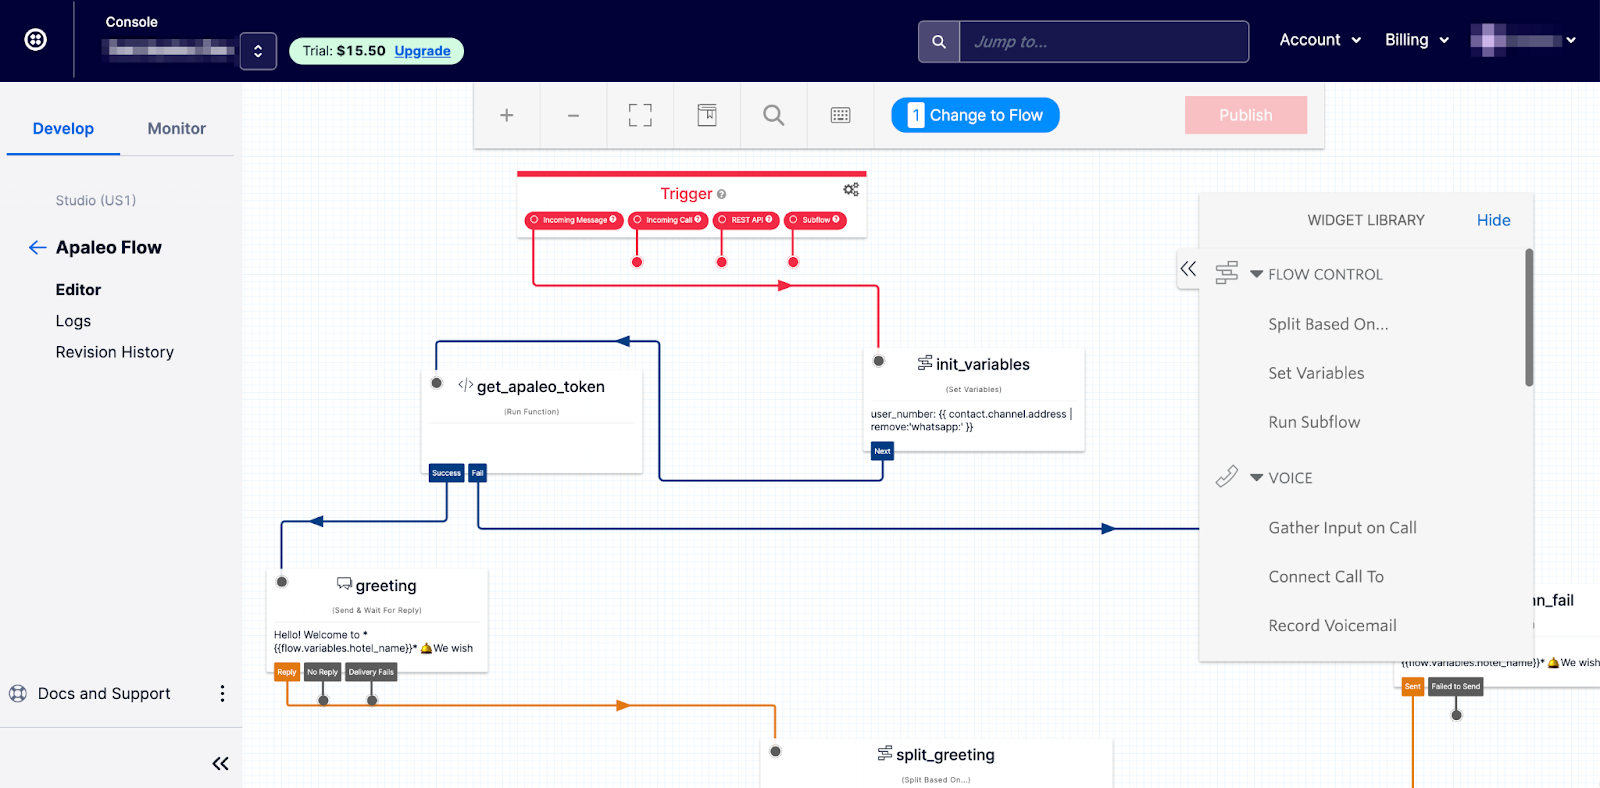
- First, click on the trigger Widget on the top of the flow and copy the Webhook URL (we will need it in a while).
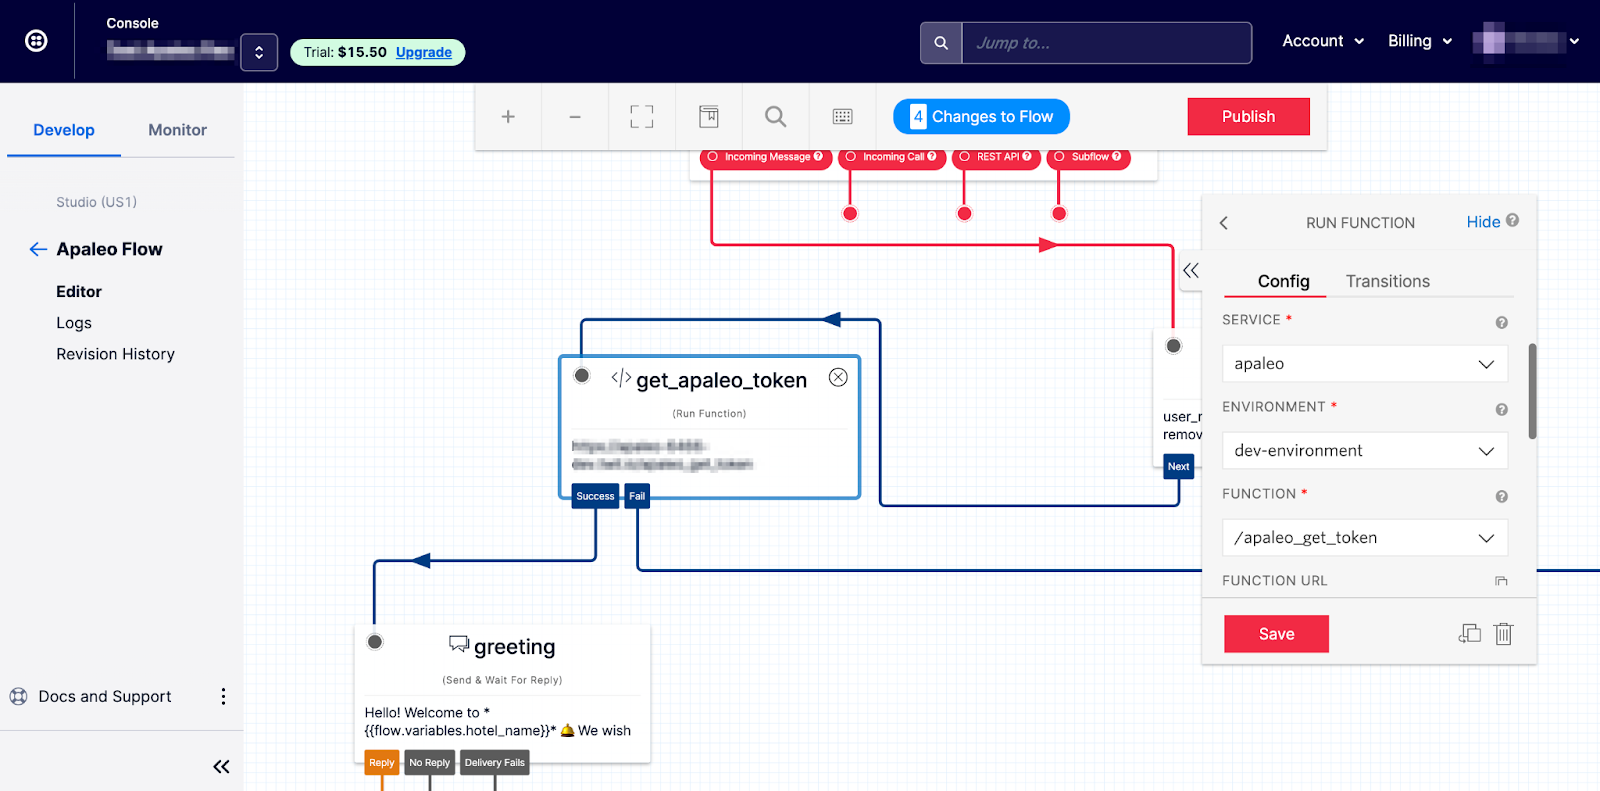
- Then you will need to configure the Run Function Widgets to call the functions that we deployed in the previous step.
- Click on the get_apaleo_token widget, at the service dropdown menu select apaleo, at the environment drop down select dev-environment and at the function dropdown select /apaleo_get_token
- Click on the get_reservation widget, at the service dropdown menu select apaleo, at the environment drop down select dev-environment and at the function dropdown select /apaleo_get_reservation
- Click on the set_comment widget, at the service dropdown menu select apaleo, at the environment drop down select dev-environment and at the function dropdown select /apaleo_add_guest_comment
- Click on the cancel_reservation widget, at the service dropdown menu select apaleo, at the environment drop down select dev-environment and at the function dropdown select /apaleo_cancel_reservation
Finally, “Save” the widgets and press the “Publish” button on the top right corner.
Add WhatsApp as your preferred communication channel
The only thing left for now is to test it.
You do not have to buy an actual WhatsApp number in order to test your flow.
Twilio provides a sandbox number for testing purposes.You can find it in your Twilio console here.
Now, we need to connect your WhatsApp sandbox to the Twilio Studio flow that we created above.
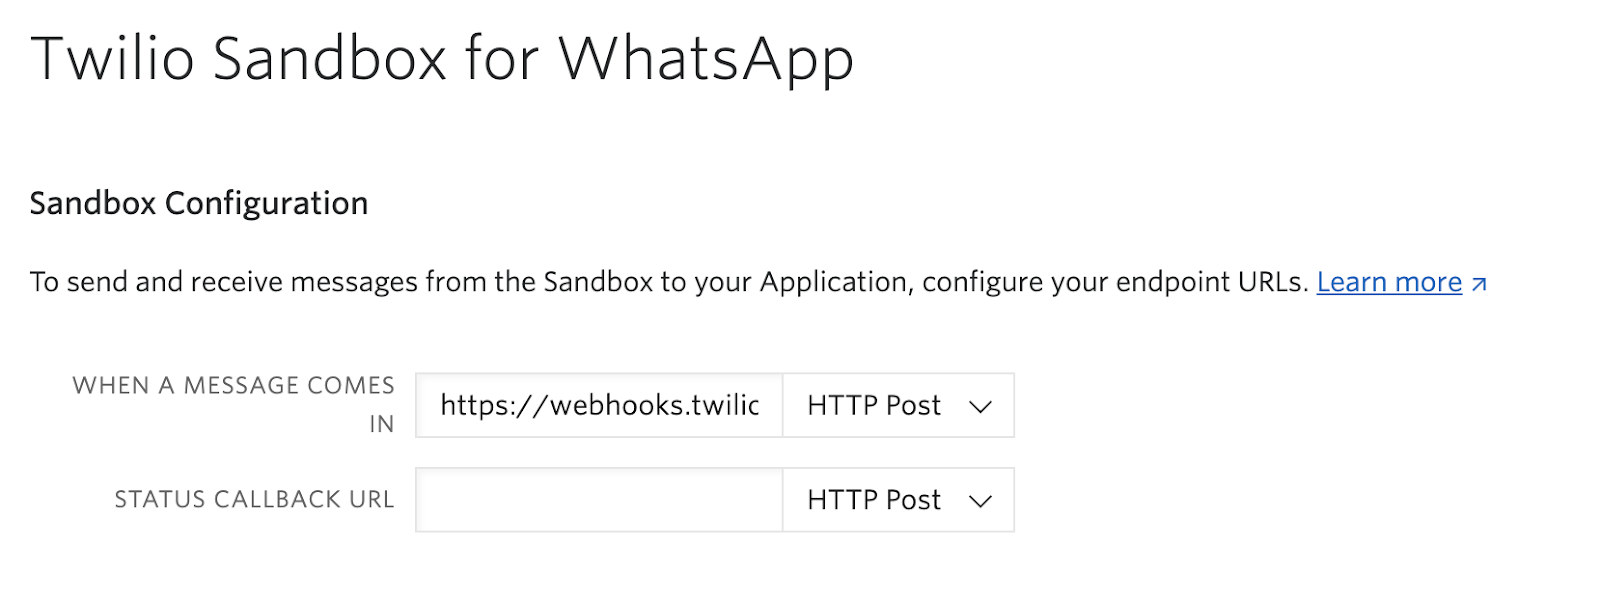
Paste the Webhook URL (that we copied in the previous paragraph from the Studio Flow) at the “WHEN A MESSAGE COMES IN” field, and press the “Save” button at the bottom of the page.
If this is the first time that you are visiting the Twilio console WhatsApp sandbox, then please follow the instructions on the screen to set up the sandbox. The process is also described here.
Perfect, you have the WhatsApp sandbox ready. Now, you have to integrate that into Twilio Flex so you can handover the customer to a human at the end of the WhatsApp bot’s flow if needed. To integrate the WhatsApp Sandbox into Twilio Flex, follow this blog post
Once you are done with that blog post, you should be able to see your sandbox integrated in Flex.
Now you’re all set and ready to test out your new Whatsapp bot! Go ahead and send a message to the number found in the WhatsApp sandbox and let the bot help you satisfy your culinary cravings!
Integrate with Twilio Flex
Twilio Flex is the cloud based contact center application from Twilio. For our use case, we are going to connect the user directly to an agent who can assist the customer. We are also going to connect the Apaleo webapp into Twilio Flex using a Flex plugin.
Flex plugins are – in essence – React components which you can create to customize the UI of Flex to suit your use case. It enables you to provide a UI for an agent presenting the important and most relevant information for a particular interaction with a customer. In our case, this would be automatically bringing up a customer booking when the user contacts us through WhatsApp. All this takes place and the agent never has to leave the screen or click on different tabs.
Get the code
You can find a sample plugin that we have created which integrates Apaleo into Twilio Flex.
The necessary code for this is present in the repository that you already cloned previously. Follow the instructions to get it and deploy it to your Flex instance.
- Navigate to the folder
apaleo-flex-plugin
- Deploy the plugin to a Twilio Flex instance.
- Release the plugin
Or, you can also release the plugin through the admin console in Twilio Flex
Do try this at home
We have everything done and configured. It's time to pull out your phone and test this.
- Join the WhatsApp sandbox environment that you created up above.
- Open Twilio Flex in your browser, and login with your Twilio credentials.
- Send your message to the Sandbox WhatsApp number and follow the bot’s instructions.
- You will get a notification in your Twilio Flex instance for an incoming conversation, if you selected the “Agent” option in the WhatsApp bot.
- Accept the conversation in Twilio Flex by clicking the “Accept” green button.
- You now have a two way conversation with the customer on WhatsApp and Twilio Flex.
The entire flow should look like this:
Epilogue: Integrating Twilio with Apaleo
Congratulations!! You reached the end of the post! This was a detailed one, but as you can see, the possibilities with Twilio are limitless.
We started small by creating a chat that shows some booking data to the guest, but added automated processes like editing, canceling a booking, connecting to an agent, and combining Twilio and Apaleo in one page with all of the required information for the agent. And… it is your turn now. Show us what else you can do, how much further you can go, and how intuitive the guest experience can be.
For more tutorials, guides, and inspiration, check the Twilio Blog.
For example if you want to improve your chatbot behavior, check this tutorial (also written by me) that shows you how you can integrate Twilio with an external NLU engine like IBM Watson.
And as always, we from Twilio can't wait to see what you build!
Stratos Tziallas is a Solutions engineer on the Twilio DACH team. He is dedicated to finding solutions and elevating Twilio customers to the next level of cloud communications. He created this post because he is always undecided with his bookings, and feels bad for the receptionists that have to cater to all of his whims. He can be reached at stziallas [at] twilio.com
Prashanth Swaminathan is a tech enthusiast with a love for solving problems. He helps teams leverage the power of Twilio and build high quality products. He can be reached at pswaminathan [at] twilio.com


Related Resources
Twilio Docs
From APIs to SDKs to sample apps
API reference documentation, SDKs, helper libraries, quickstarts, and tutorials for your language and platform.
Resource Center
The latest ebooks, industry reports, and webinars
Learn from customer engagement experts to improve your own communication.
Ahoy
Twilio's developer community hub
Best practices, code samples, and inspiration to build communications and digital engagement experiences.