Verify Your Users on WhatsApp with JavaScript and Twilio
Time to read:
June 09, 2022
Written by
Reviewed by

Twilio Verify is an easy to use service for user verification. This service now includes support for WhatsApp one-time passcodes. In this tutorial you’ll learn how to implement a WhatsApp user verification flow in a JavaScript application, using Node.js and Express.
Requirements
To work on this tutorial you will need the following items:
- Node.js installed on your machine.
- A Twilio account. If you are new to Twilio click here to create a free account now and receive $10 credit when you upgrade to a paid account. You can review the features and limitations of a free Twilio account.
- An active WhatsApp account, to test the project.
- A WhatsApp Business Account and Sender.
Create a Twilio Verify service
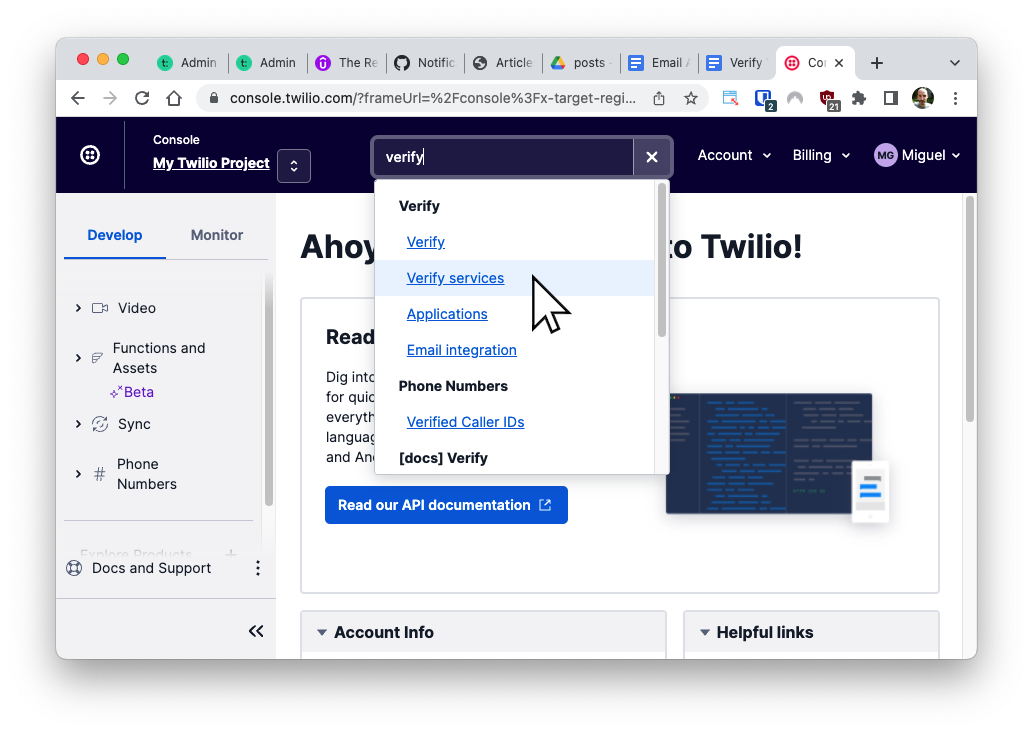
To use Twilio Verify in an application, a Verify service must be created first. Open the Twilio Console in your web browser, type verify in the navigation bar’s search box, and select “Verify services” from the search results.
In the Verify services page, click the “Create Service Now” button.
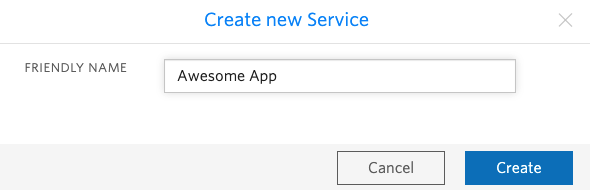
Type the name of your application in the “Friendly Name” field. For this tutorial, I’m going to use the name “Awesome App”. The name that you type in this field will appear in the WhatsApp verification messages that are sent to your users. Once you have entered the name, press “Create”.
Once the service is created, you will be redirected to its settings page. Leave this page open while you continue with the tutorial, as you will later need the “Service SID” that was assigned to your service.
For this tutorial, the default settings for the service are appropriate, but note how you can configure, among other things, how many digits to use in the verification codes that are sent to users.
Project setup
In this section you are going to set up a brand new Express project. To keep things nicely organized, open a terminal or command prompt and find a suitable parent directory where the project you are about to create will live. Type the following commands to create a directory for this project:
This application is going to need a few HTML pages. Create a public directory for them inside the project:
Next install the dependencies required by this project:
The dependencies that this project uses are:
- The Express.js framework, to create the web application.
- The session middleware for Express, to maintain user sessions.
- The dotenv package, to import the application configuration from a .env file.
- The Twilio Node Helper library, to work with the Twilio APIs.
To complete the initial setup of the project, create a file named app.js in your text editor or IDE and copy the skeleton of the Express application shown below to it:
This Express starter application begins by reading configuration variables from a .env file (which you will create in the next section). It then creates an application instance and configures it with support for user sessions, static files served from the public subdirectory with a default .html extension, and form submissions with URL encoded fields.
A Twilio client instance is then created, with credentials imported from the .env file, which the dotenv package adds to the process.env object.
The application does not define any routes yet, but it starts a web server on port 3000.
Define application settings
To send verification messages with Twilio Verify, the Express application will need to authenticate with your Twilio account credentials. The application will also need to know the “Service SID” assigned to the Verify service you created above.
The most secure way to define these configuration values is to set environment variables for them, and the most convenient way to manage your environment variables in an Express application is to use a .env file.
Create a new file named .env (note the leading dot) in your text editor and enter the following contents in it:
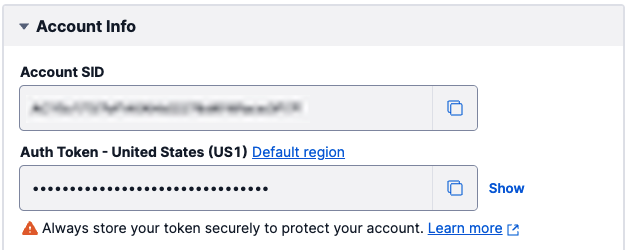
You will need to replace all the xxxxxxxxx placeholders with the correct values that apply to you. The first two variables are your Twilio “Account SID” and your “Auth Token”. You can find them in the “Account Info” section of the Twilio Console main dashboard:
The value of the third configuration variable comes from the “Service SID” field in the Verify service page. This is a long string of characters that starts with the letters VA.
Send a verification code
You are now ready to start coding the Node.js application. When the user connects to the server with a web browser, the Express application needs to render a page that asks the user for their WhatsApp phone number.
Open a new file named index.html, located in the public subdirectory. Copy the following HTML page to this file:
To serve this page to the browser, let’s add the first route to the Express application. Open app.js in your editor, and write the following code right above the listen() call:
This route starts by resetting the verified variable in the user’s session. Then it serves the HTML page you created above to the client.
The HTML page renders a form with a single field, where the user has to enter their WhatsApp phone number. When the user submits the form, the browser will send a POST request to the same root URL of the application. You are now going to code a handler for this POST request.
In app.js, add the following route definition right after the previous route, and still before the listen() call:
The route that handles the form submission is declared with app.post. Here the Twilio client is used to create a verification instance associated with the Twilio Verify service created earlier, which is referenced by the TWILO_VERIFY_SERVICE environment variable. This instance is initialized with the user’s phone number and a channel set to whatsapp. The phone number is retrieved from the req.body object, where Express.js provides the submitted form fields. When the verification instance is created, Twilio will issue a verification code to the user via WhatsApp on the provided number.
The application then checks the reported status on the verification object. If the status is anything other than pending, then it is assumed that an error has occurred and the user is redirected back to the main page to try again.
With a pending verification, the user is redirected to the /verify URL, which is where the verification code will be requested. The phone number provided by the user is saved to the user session before the redirect, so that it is available during verification.
Verify a code
Once the user provided a phone number and a verification code was issued, the /verify URL of the application allows the user to enter the code received via WhatsApp.
Below you can see the HTML for this page. Copy the HTML to a file named verify.html in the public subdirectory.
To serve this page to the client, add a /verify route to app.js. You can add this route right after the previous two.
The form defined in this page requests a code from the user. When the form is submitted, a POST request with the information entered is sent to the same /verify URL.
Below you can see the route that handles the submission of this second form. Add the code to app.js, right after the previous route definition.
The application retrieves the phone argument from the session storage, and the code argument submitted with the form. If either of them are not available, the user is redirected away from this page, since it is not possible to perform a verification without these two values. The information is then sent to Twilio Verify, to create a verification check instance.
The status attribute in the verification check object tells if the verification was successful or not. If the code is correct for the given number, then the status of the verification check is approved. In this case the verified session variable is set to true and the user is redirected to a third and last page at the /success URL. If the status is anything other than approved, then the verification has failed and the user is redirected back to the /verify route to try another code.
The /success route is also supported by an HTML page. Create a file named public/success.html and enter the following code in it:
This page shows a success message and provides a link to the first page in case the user wants to do another verification. To serve this page, add the /success route to app.js:
The logic in this final route checks that the verified session variable is true, and in that case it renders the verify.html file to the client. If for any reason the user arrives at this route without having been verified, they are redirected to the initial page to start the verification process.
Run the application
The application is now complete. Start it by entering the following command in your terminal:
Once the application starts, open your web browser and navigate to http://localhost:3000. Type your phone number in E.164 format to request a verification code. For simplicity this field is implemented as a regular text field. You can see this tutorial if you are interested in implementing a fully featured phone entry field for your web application.
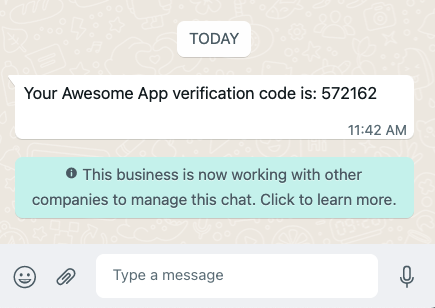
A few seconds later, you should have an incoming message on WhatsApp with your code. Type this code in the verification page of the application to receive a success message. Also feel free to try a wrong code to see how it is rejected and you’re offered another chance.
Conclusion
Congratulations on learning how to verify users on WhatsApp with Twilio Verify! Did you know that Twilio Verify can also send verification codes to users by SMS, voice call, email? It can also verify standard TOTP codes and push notifications to your iOS or Android app!
I’d love to see what you build with Twilio Verify!
Miguel Grinberg is a Principal Software Engineer for Technical Content at Twilio. Reach out to him at mgrinberg [at] twilio [dot] com if you have a cool project you’d like to share on this blog!
Related Posts


Related Resources
Twilio Docs
From APIs to SDKs to sample apps
API reference documentation, SDKs, helper libraries, quickstarts, and tutorials for your language and platform.
Resource Center
The latest ebooks, industry reports, and webinars
Learn from customer engagement experts to improve your own communication.
Ahoy
Twilio's developer community hub
Best practices, code samples, and inspiration to build communications and digital engagement experiences.