Accessing Salesforce CRM Data within Twilio Studio
Time to read:
July 06, 2018
Written by
This post is part of Twilio’s archive and may contain outdated information. We’re always building something new, so be sure to check out our latest posts for the most up-to-date insights.

Access to customer context is key to a great customer experience in voice and messaging flows. As it lets you customize your interactions specific to that customer and address their needs promptly.
In this blog post, we will walk through the steps involved in connecting to Salesforce CRM database with Twilio Studio. This means, that when a customer calls into your contact center, in realtime, we can ask the CRM for more details about the caller based on their phone number. With this additional context, we can present an IVR tailored to their needs or use that information to intelligently route their call.
Before we get started, if you haven’t yet used Studio, I recommend taking a look at this getting started with Studio guide.
Flows in Studio are built with widgets which is a state or transition in our flow. In this post we will mainly use the Functions widget. It allows us to run Node.js code directly on Twilio, without requiring any other hosting environment. This JavaScript code will request call routing data from Salesforce CRM.
We start by setting up the Salesforce API and build our connector to Twilio. To do this you will need all administrative permissions on your Salesforce account. If you don’t have an account yet or you just want to try this tutorial, sign up for a developer account.
Setup Salesforce – Create a Certificate
The Salesforce API supports JSON Web Token (JWT) authentication to request a OAuth 2.0 access token. With this method our token is already authorized and therefore this allows a direct server-to-server communication between Twilio and Salesforce. This is a bit different to the well-known OAuth login on websites where the authentication is requested with a callback. With our pre-authorization this step is skipped and we can directly request data. In case you want to check in depth how the bearer token flow works follow this link.
To get the authentication working we require a X.509 certificate. Make sure you have openssl installed on your computer.
Type the following command into your command line.
Next we create a certificate signing request (CSR). Enter information about your company when prompted, when you are asked to add a challenge password leave it blank and hit enter.
In a last step we create a self signed certificate.
We have now created a private key and a certificate. Later we will use the private key to sign our JWT token we send to Salesforce. The certificate is uploaded to Salesforce and will be used to validate our request.
Setup the Salesforce Connected App
Please note that Salesforce is a multi-tenancy cloud with multiple instances. Your account is hosted on one instance, but links will be different from one account to the other. I suggest using the search box on top of the Salesforce setup page to access the sections we will use from now on. We need to create a Salesforce App which works as a connection to the CRM system. Open the App Manager within the Application section.
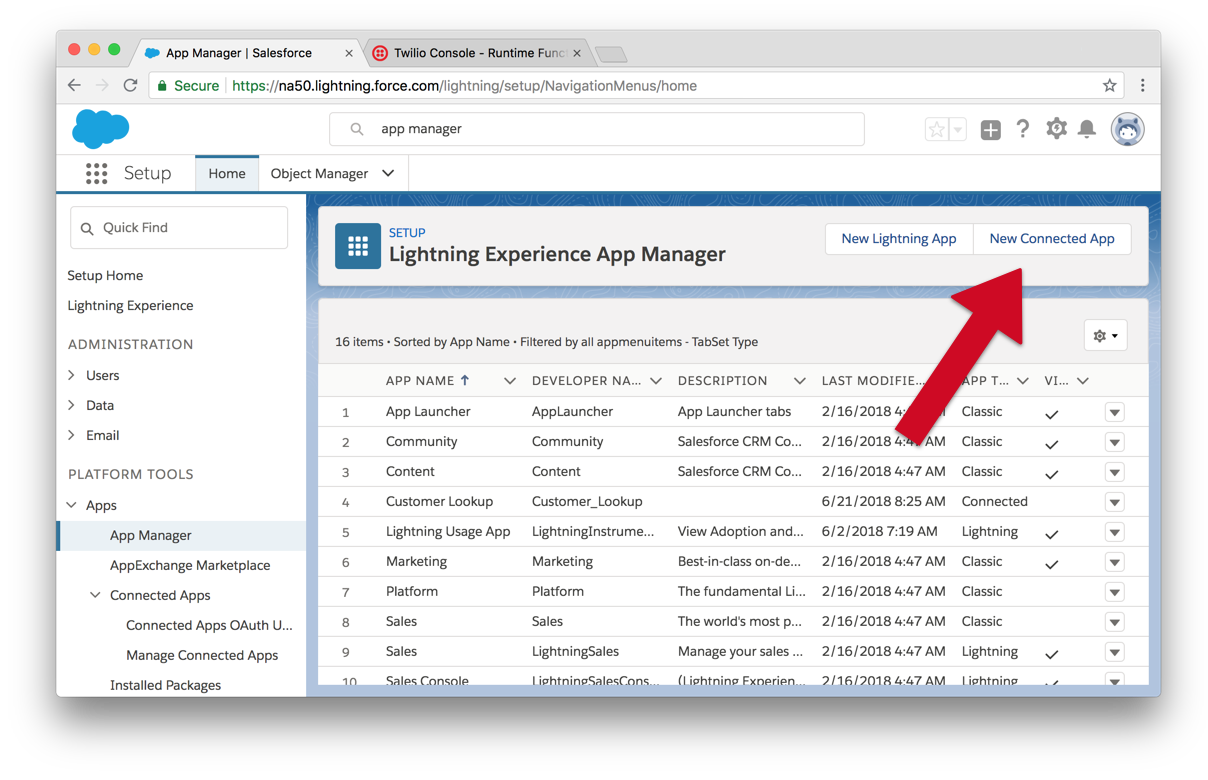
Click on New Connected App, first set the App Name, API Name and Contact Email. Next we activate OAuth access.
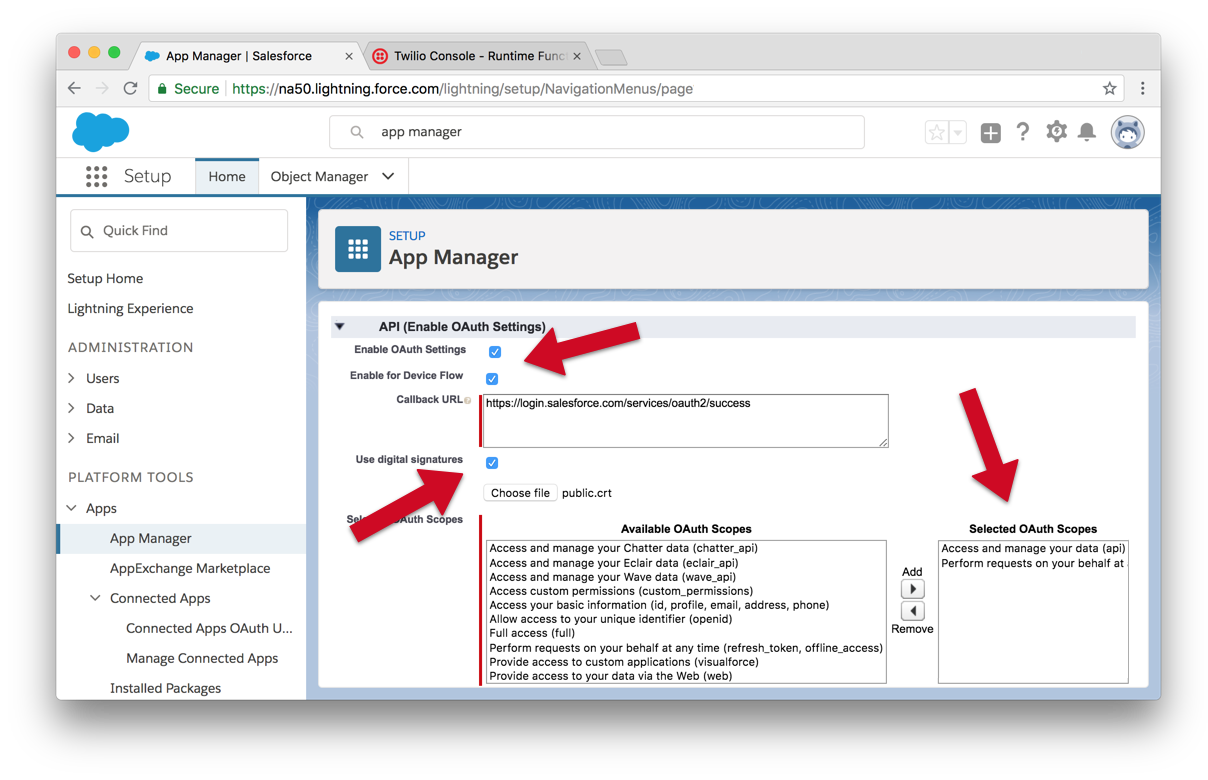
Check Enable OAuth Settings and Enable for Device Flow, a callback URL is automatically filled with a default after we enabled the device flow. Next select check Use digital signatures and choose the certificate public.crt we created earlier as the digital signature.
Don’t forget to set the OAuth Scopes for your app. The scope defines the permissions associated with the tokens that you’re requesting. Add the Perform requests on your behalf at any time and the Access and manage your data scopes.
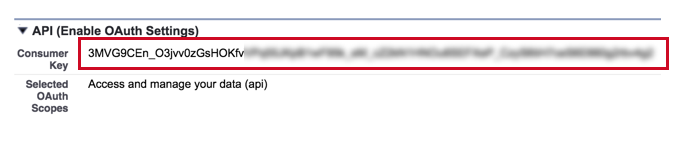
We are almost done. Once we saved our app we get a Consumer Key displayed, copy it to your clipboard or to a file, we have to add it to our serverless function in the next chapter.
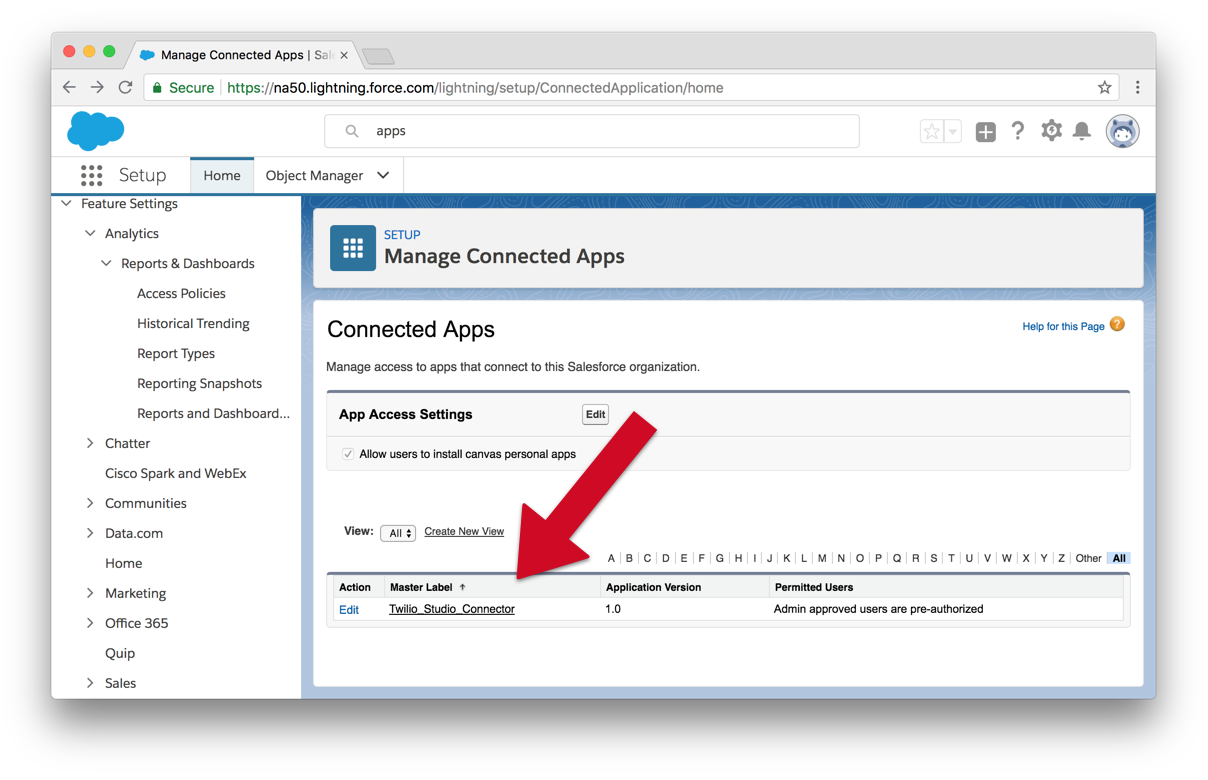
The last task is to configure roles and permissions. Open Manage Connected Apps and then click on your app name.
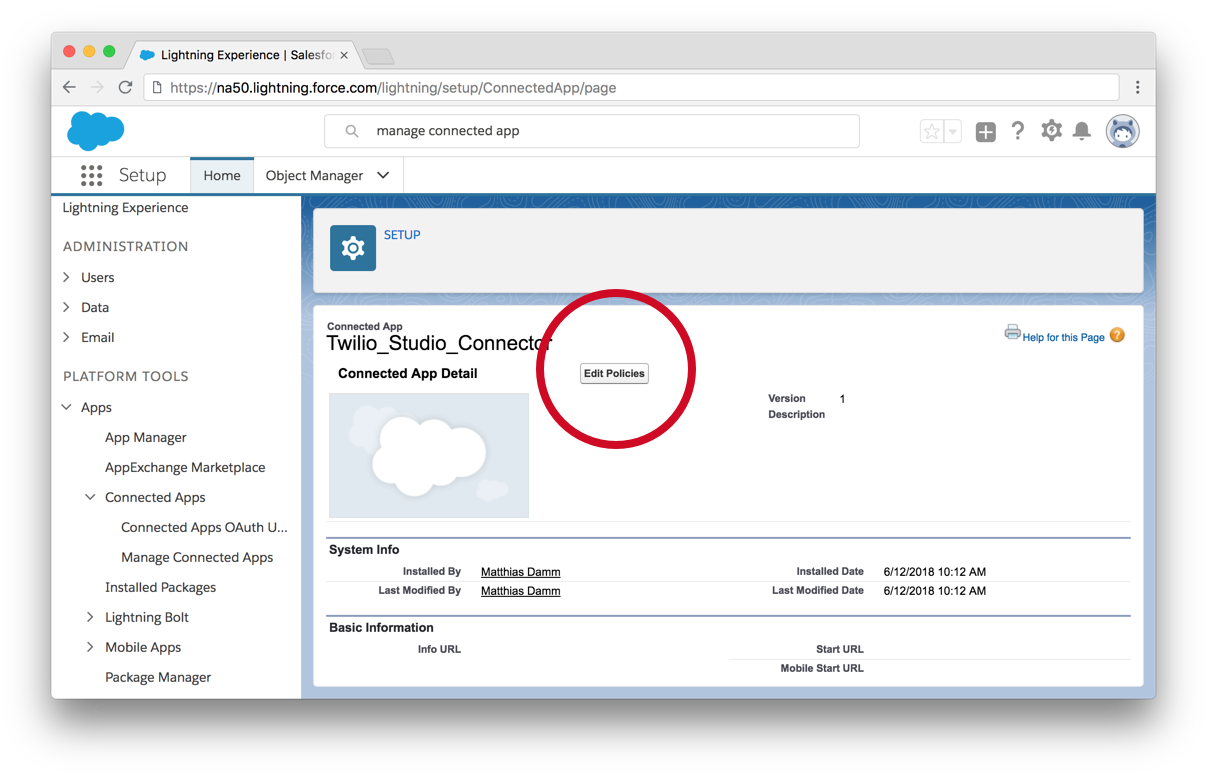
You now need to add a policy to your app in order to define the access rights. Click on Edit Policies.

Now pre-approve users to use this app. Change the permitted users to pre-authorization and press save.
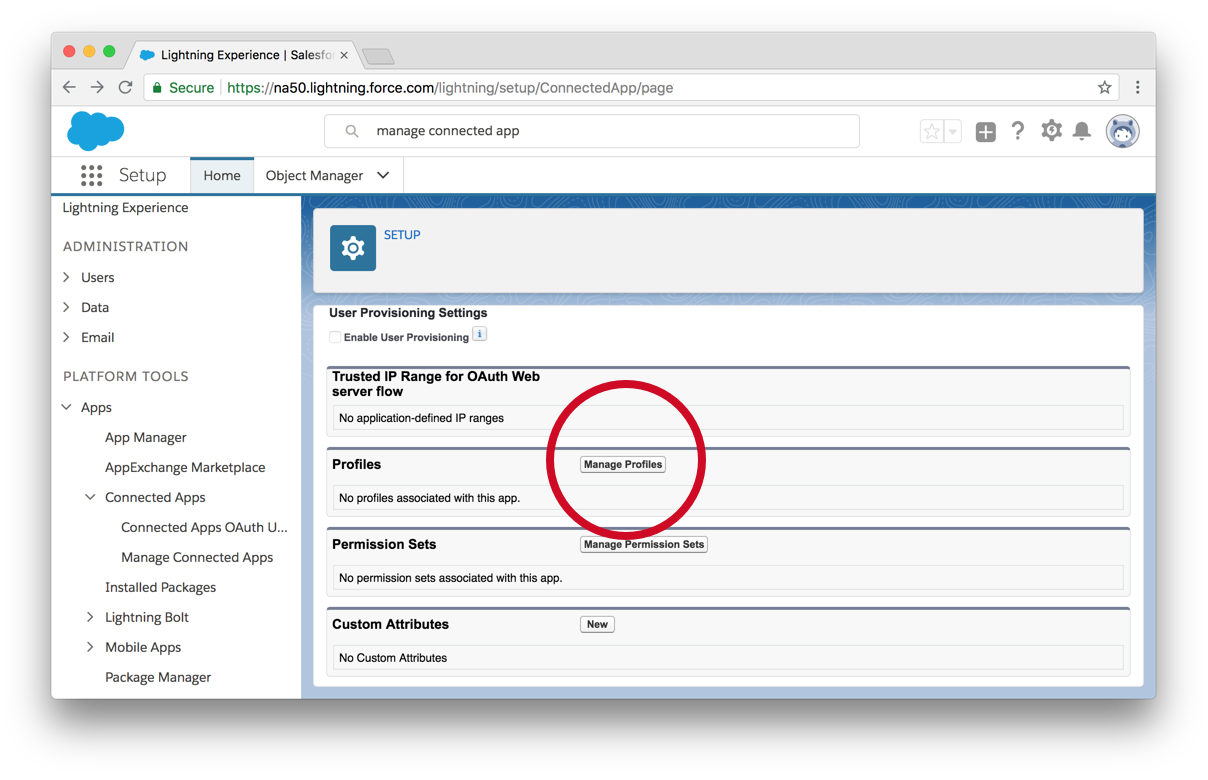
Back on the app configuration page add a profile to our app. The profile controls which users have access to this application. When we later access data from Twilio we request it with a Salesforce user name, make sure the user we use later is in the profile you chose.
Our CRM is configured, we have a Salesforce Connected App with an profile attached, and we issued a certificate for OAuth verification.
Let Twilio talk to Salesforce
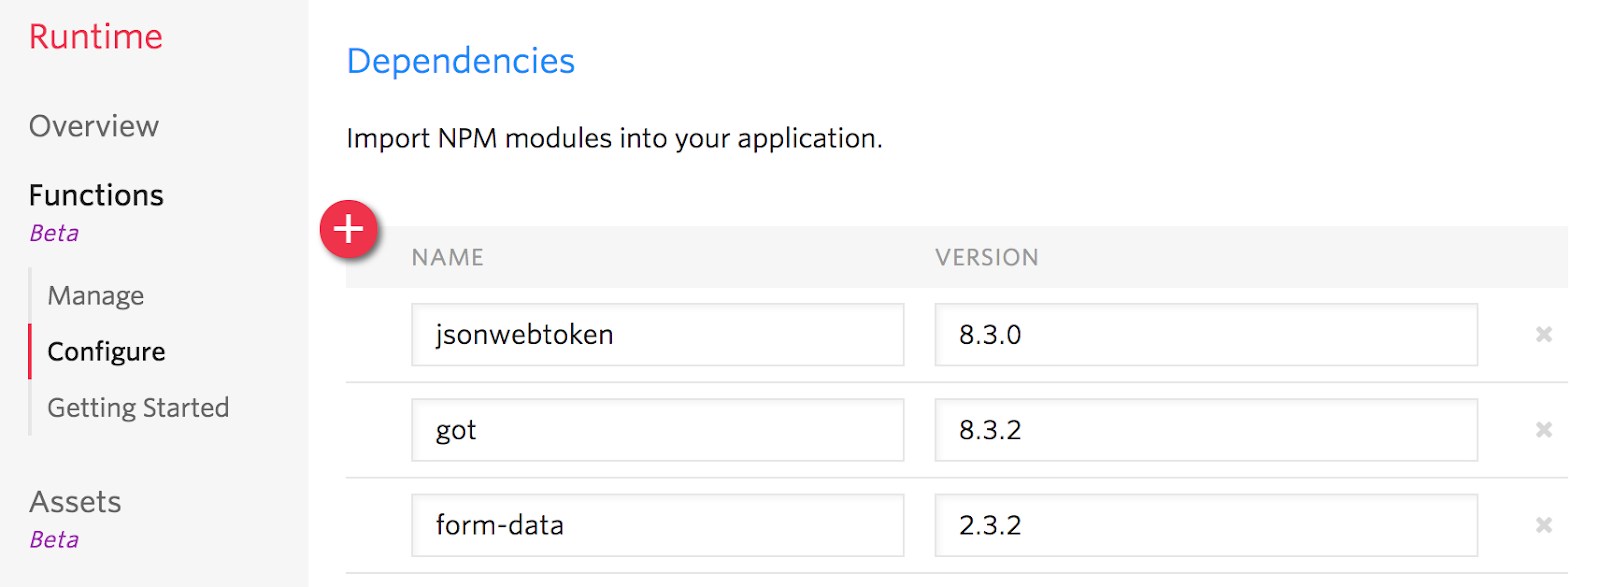
Now that we have configured our Salesforce CRM to expose the information, we need to configure Twilio to be able retrieve the information from our Connected App. We will do this by using a Twilio Function. Twilio Functions let you host Node.js code directly in the Twilio console. In our case we’ll be using three dependencies from npm that we have to install first.
Open the Twilio Functions Configuration, click on the plus button and add three entries to the list. Now, we add got 8.3.1. The package allows you to make HTTP requests and will talk to the Salesforce API. The next two packages are jsonwebtoken in version 8.3.0 and form-data version 2.3.2.
After we added our dependencies to the Functions configuration, create a new Function. Click on the plus button and start with a blank template.
The code for this function is hosted on GitHub, you can clone it from the GitHub repository. Alternatively copy the this code into your Twilio Function:
Replace the following four values with your own. The first one is {{salesforce-consumer-key}}, the app consumer key we got after we created it. Next is the {{private-key}}, this is the private key we generated locally and {{salesforce-user}}, the Salesforce user on which behalf we request the data.
Deconstructing our Query
Within our Function we now create a query to request the customer record from our CRM database. Salesforce supports an SQL-like syntax which is called Salesforce Object Query Language (SOQL), SELECT statements for instance are very similar, however advanced SQL features are not supported.
Studio allows us to access parameters in our call flow at any stage. Our query will be using the customer’s phone number which is part of the event object we get passed to every serverless function. The parameter we pass to Salesforce is event.from
We will request the name of the customer to check if a new customer is calling or we already have this phone number in our CRM.
This is our query on our CRM database, the Salesforce API will return JSON object first we parse the returned data with our function, so first thing our function needs to do is parse the response.
Next we check if the phone number was found by checking if attributes.records[0].Name exists in the response. If the caller was found we return a JSON object with the name to Studio; an example output will look like this:
Assemble the Studio Flow
We completed our connection to Salesforce, now we need to integrate it into a call flow. For this tutorial we will start with a new flow but you can use an existing one. Open Twilio Studio create a new flow and select the option to start from scratch with a blank canvas.
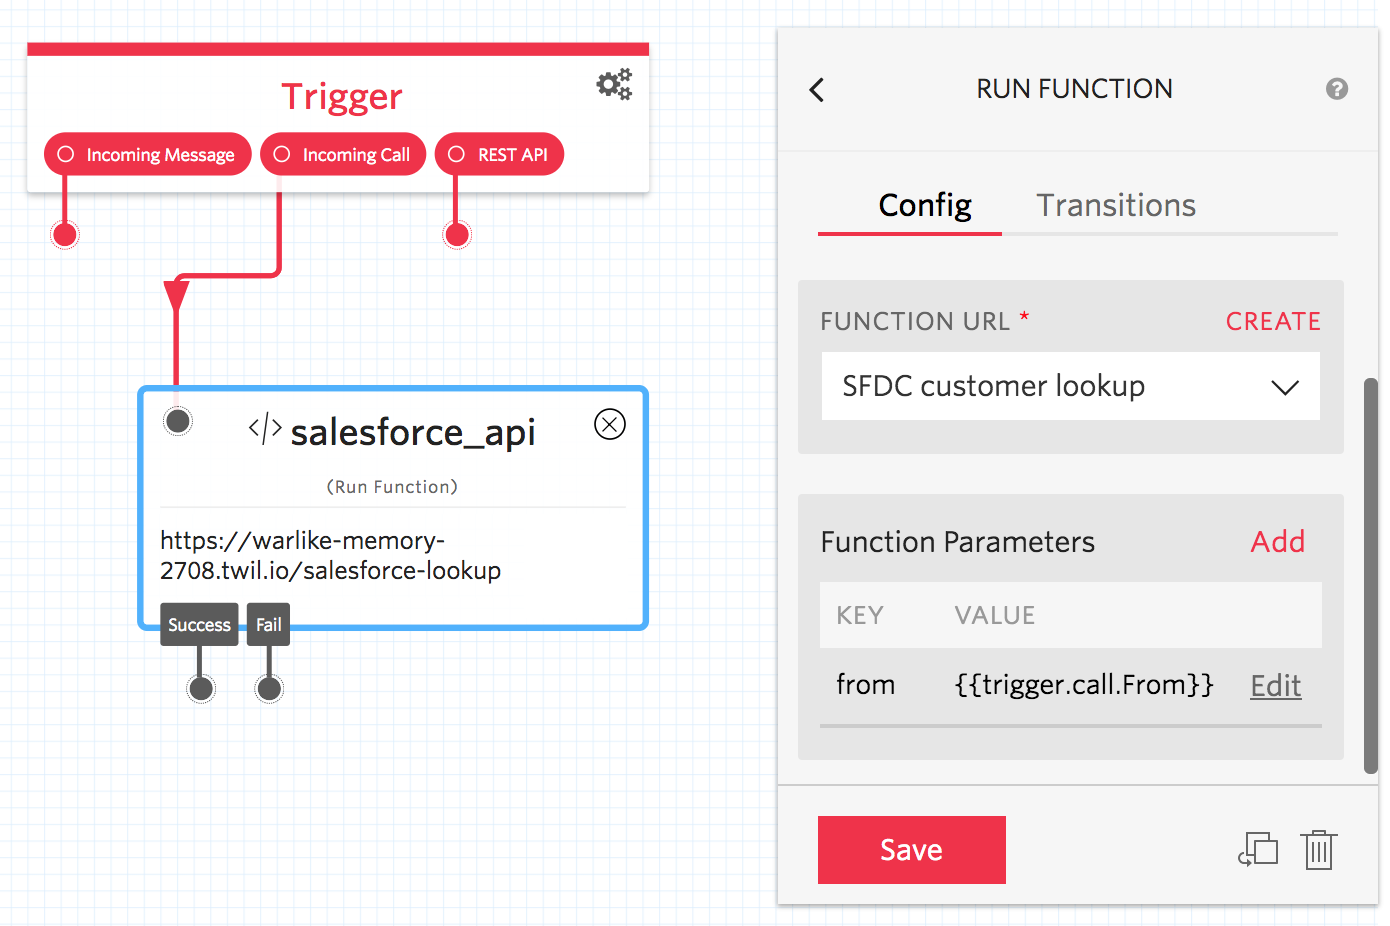
If a call comes in we want to execute our Salesforce API request first. Drag the Run Function widget onto the canvas.
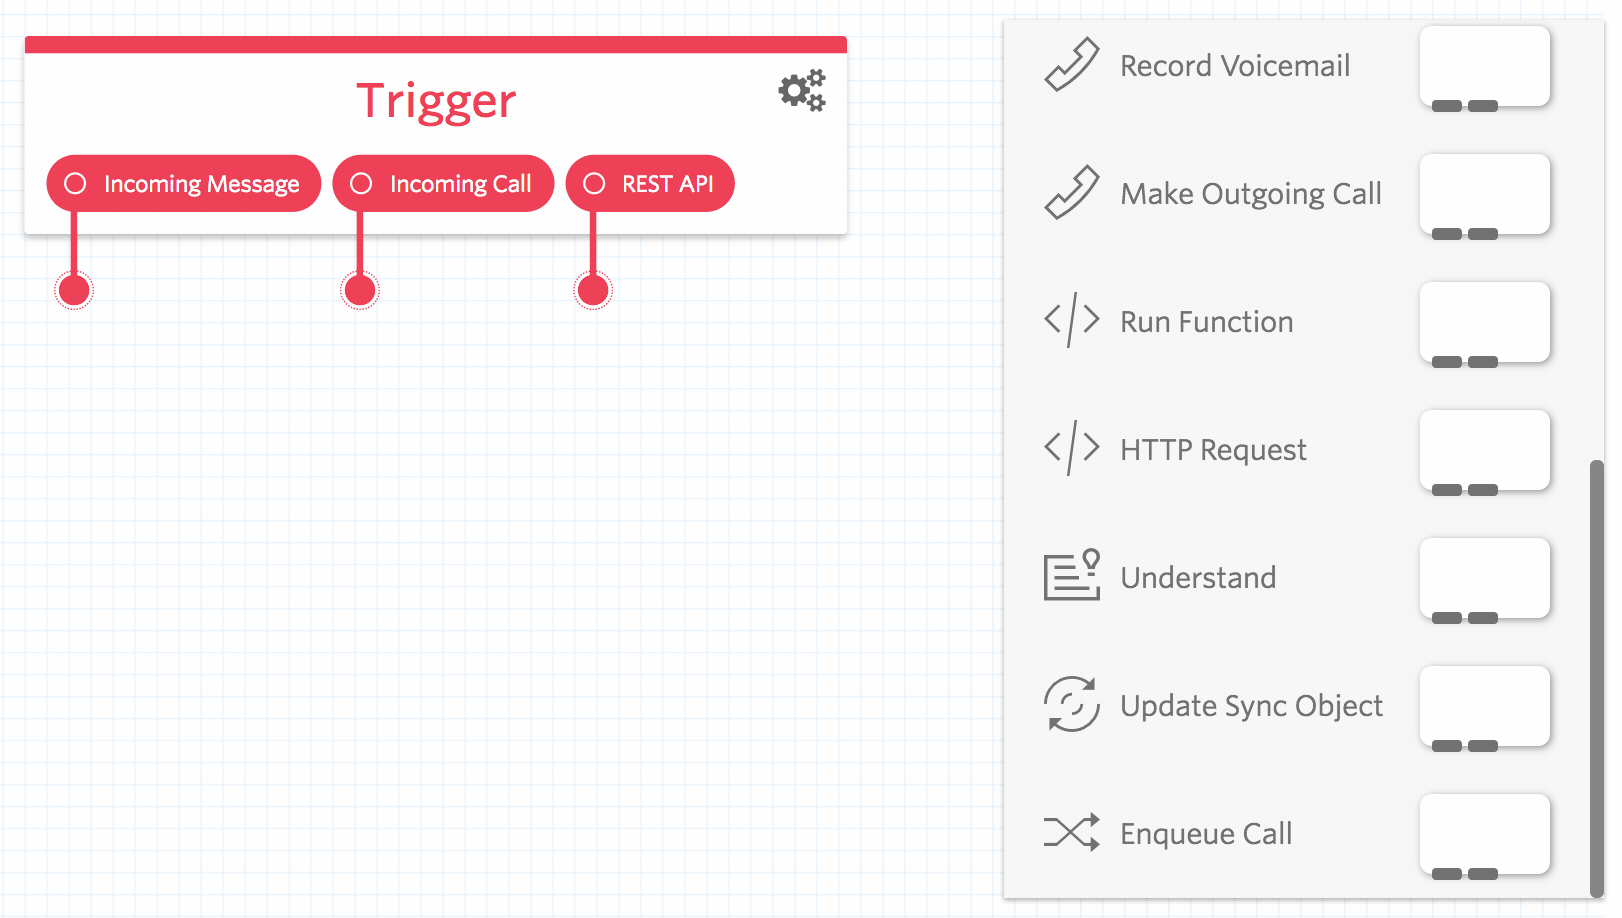
Click on the widget to edit it change the name to salesforce_api, select your function from the dropdown and press save.
Connect the widget with the incoming call trigger in addition we need to pass the caller’s phone number to the function, add a parameter name from to the widget with the value {{trigger.call.From}}. Your flow should now look like this.
Whenever a call comes in, the first thing Studio will do is call our function. This will call the Salesforce API in the background and return a JSON object with the caller’s name. Now we add a decision based on the data record we got from the Function.
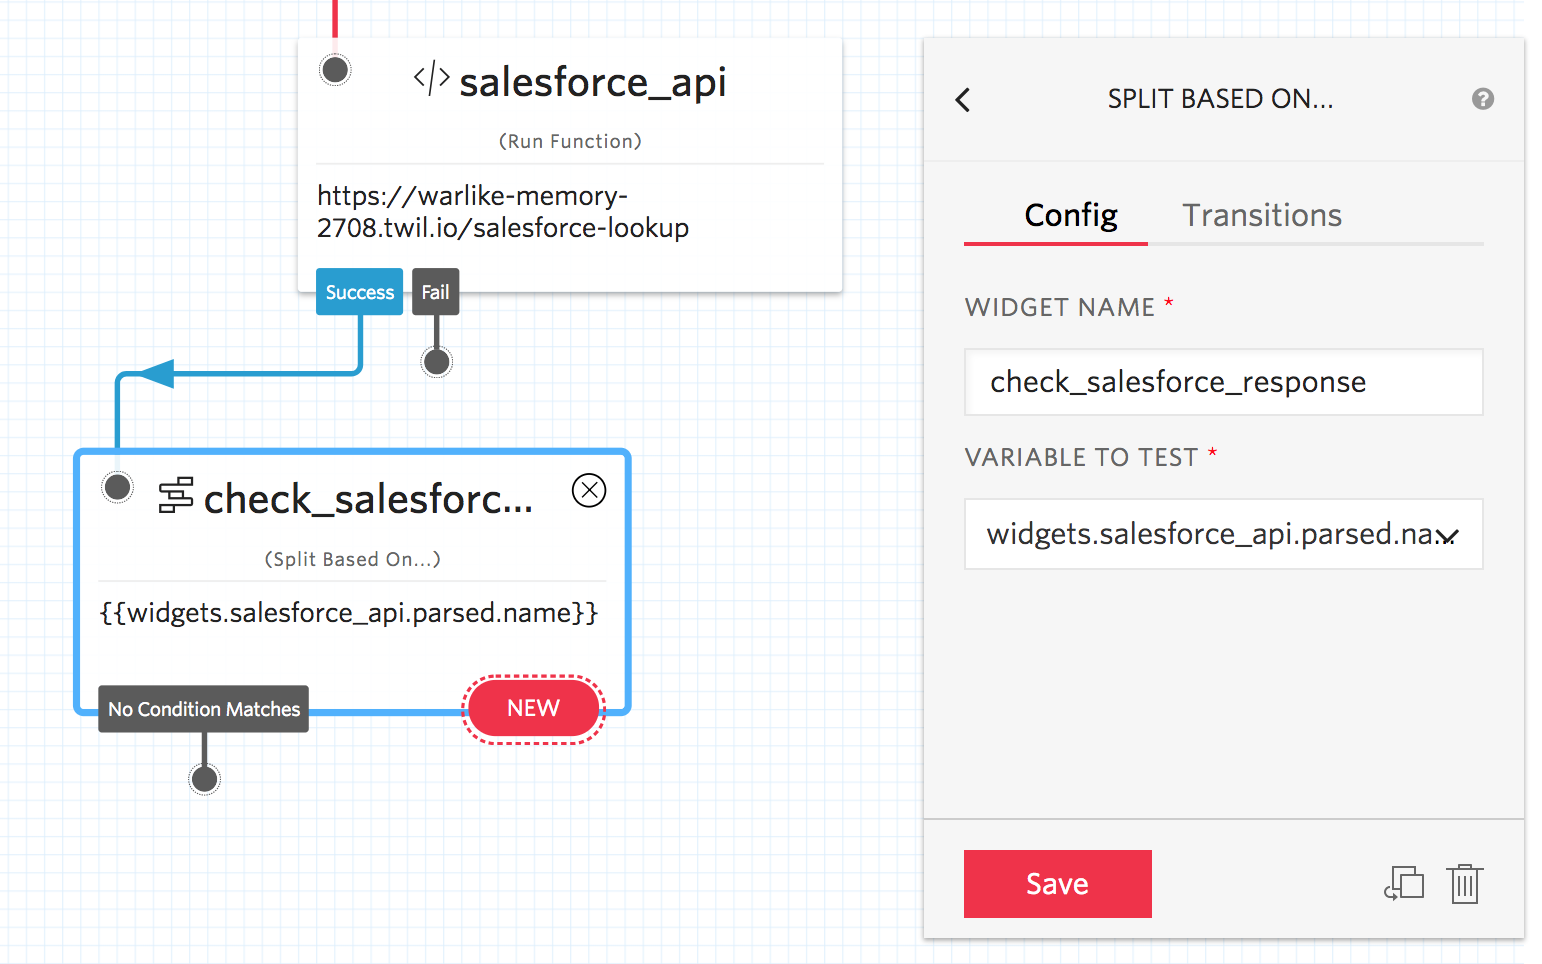
The Split Based On widget lets you specify different paths for a caller depending on a condition. Drag the Split to the canvas and connect it with the Function widget (salesforce_api). On the widget we validate the returned value of the Salesforce connector function. So in the Config section, configure widgets.salesforce_api.parsed.name, as the “variable to test”.
Next add two Say/Play widgets.The first of these is to greet the customer with a welcome message if we knew the customer. If the return from the Salesforce API was empty, we will use the second Say/Play widget to transition to a message telling the caller, that they are unknown to us.
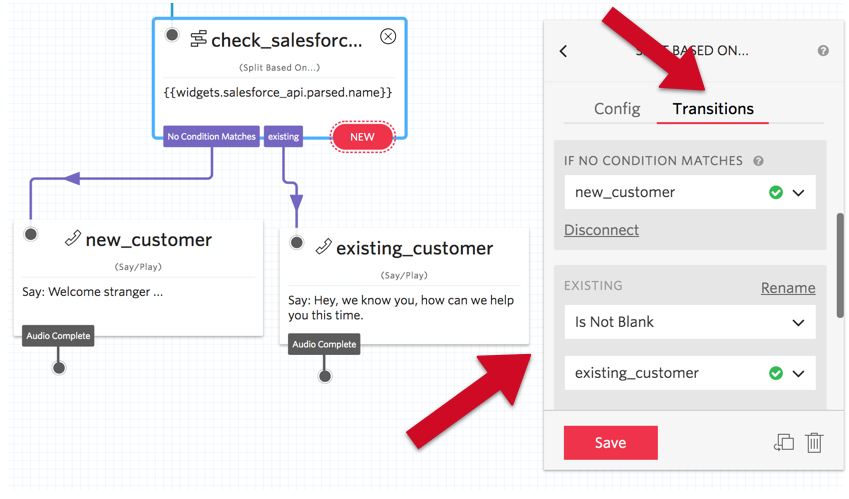
To complete the setup we add one condition to the split. With this condition we validate if the variable we test is not empty, and if that happens we transition to our welcome message for existing customers. If no condition matches we play the message for new customers.
The flow is ready. Now all we need is, to point our Twilio phone number at our Studio Flow by selecting the flow in the phone number’s A call comes in configuration section. If you call the phone number now and your number is in the Salesforce contacts you will hear the message for our existing customers.
What Next?
We currently have a very limited call flow for demonstration purposes, however, we can extend this further. You could consider connecting the caller to the sales person handling the opportunity, or record calls and link them directly to the contacts object in Salesforce, the possibilities are literally endless.
If you have any questions or cool ideas, feel free to reach out and let me know.

Related Resources
Twilio Docs
From APIs to SDKs to sample apps
API reference documentation, SDKs, helper libraries, quickstarts, and tutorials for your language and platform.
Resource Center
The latest ebooks, industry reports, and webinars
Learn from customer engagement experts to improve your own communication.
Ahoy
Twilio's developer community hub
Best practices, code samples, and inspiration to build communications and digital engagement experiences.