Document Converter Bot using Twilio WhatsApp, Adobe and Node.js
Time to read:
September 29, 2023
Written by
Reviewed by
WhatsApp is one of the most widely used platforms in the world and building bots for WhatsApp can provide a powerful way to interact with customers and improve service. This tutorial shows how to create a WhatsApp bot that allows users to convert files to different formats using the Adobe PDF service API.
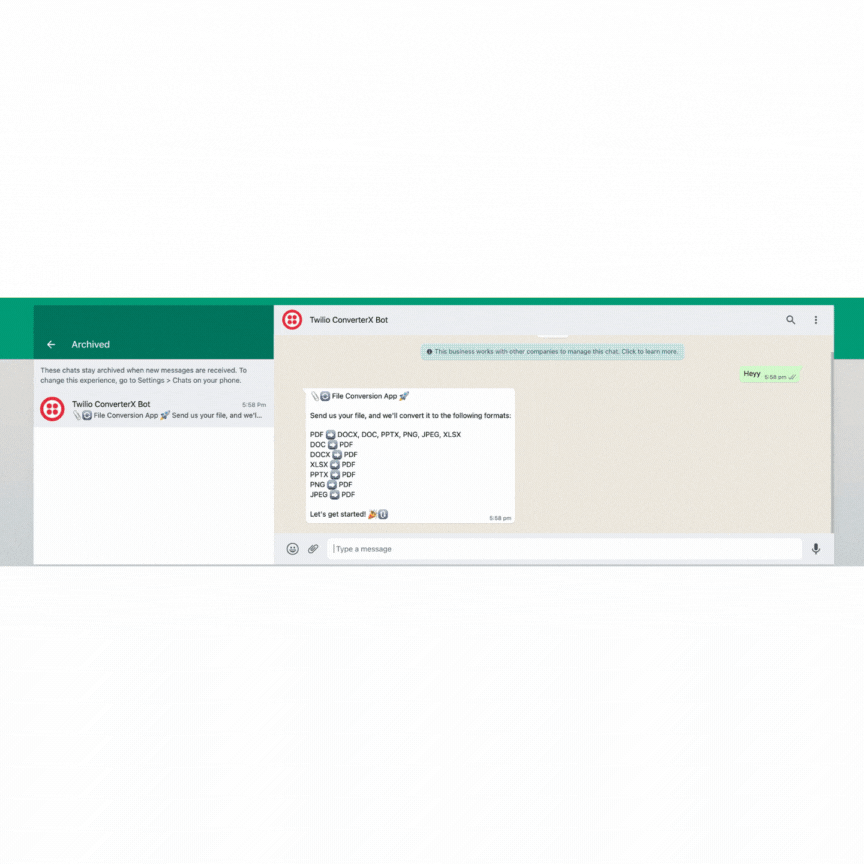
Twilio’s WhatsApp Business API will be used to integrate WhatsApp with a Node.js Express web application and Adobe PDF Services APIs. By the end of this tutorial, you will have a functional WhatsApp bot which accepts a file and converts it to a different format as shown below.
Prerequisites
To proceed with this tutorial, you will need the following:
- Node.js v16+ on your development machine
- Have a Twilio account. If you don’t have one, you can register for a trial account here.
- Install ngrok and make sure it’s authenticated. You can install ngrok from here.
- Have a Adobe developer account. If you don’t have one, you can create a trial account here. Adobe PDF Services free trial that includes up to 1,000 free Document Transactions or runs for 6 months, whichever occurs earlier.
Setting up your development environment
Create the project
Before building the chatbot, you need to set up your development environment. Open up your terminal and execute the following command:
This command creates a twilio-converterx directory and navigates into it. The npm init command will initialize a project and create a package.json file. The -y flag will choose the default settings while creating the project.
Install the dependencies
You will be using the following packages in your application.
- express - Express is a minimal and flexible Node.js web application framework that provides a robust set of features for web and mobile applications
- axios - It is a Promise based HTTP client for the browser and node.js
- ext-name - Get the file extension and MIME type from a file
- twilio - It is a package that allows you to interact with the Twilio API.
- @adobe/pdfservices-node-sdk - It allows you to access RESTful APIs to create, convert, and manipulate PDFs within your applications.
- fs - It is a Node.js file system module that allows you to work with the file system on your computer.
- path - It is a Node.js module that provides a way of working with directories and file paths.
- dotenv - It is a zero-dependency module that loads environment variables from a .env file into process.env
Use the following command to install these packages:
Get the credentials from Adobe
You need to generate credentials from Adobe developer portal to access the Adobe PDF service API. The credentials include a file named pdfservices-api-credentials.json which will be used later in your application. After you log in, click on this link to generate the credentials from Adobe API.
Once downloaded, unzip the file and make a note of client_id and client_secret in the pdfservices-api-credentials.json file. You should set these values as environment variables.
Setup environment variables
You will be using environment variables to store some sensitive data which are required later in your application. Create a file named .env in your project directory and paste the snippet given below:
You can find your Account SID and Auth Token from Twilio Console. The TWILIO_WA_NUMBER number is your WhatsApp sender. The number in the code snippet is the WhatsApp Sandbox number so feel free to leave it if you haven't registered your Twilio number for WhatsApp. The NGROK_URL is the base URL of your server which you’ll add later in the tutorial.
PDF_SERVICES_CLIENT_ID and PDF_SERVICES_CLIENT_SECRET are the credentials present in pdfservices-api-credentials.json file.
Build your Document Converter Bot
Configuring your Twilio Sandbox for WhatsApp
To enable the chatbot to communicate with WhatsApp users using Twilio's Messaging API, you need to configure the Twilio Sandbox for WhatsApp. Here's how to do it:
- Assuming you've already set up a new Twilio account, go to the Twilio Console and choose the Messaging tab on the left panel.
- Under Try it out, click on Send a WhatsApp message. You'll land on the Sandbox tab by default and you'll see a phone number +14155238886 with a code to join next to it on the left and a QR code on the right.
- To enable the Twilio testing environment, send a WhatsApp message with this code's text to the displayed phone number. You can click on the hyperlink to direct you to the WhatsApp chat if you are using the web version. Otherwise, you can scan the QR code on your phone.
Create an Express Server
Now that you have set up your environment, it's time to build the chatbot.
Let’s set up a basic express server. In your project directory (twilio-converterx), create a file called index.js. Inside index.js, paste the code snippet given below:
In the code above, you are importing express with the require keyword and creating an app by calling the express() function provided by the express framework. The port for your local application is set to 3000 which is the default but you can choose any according to the availability of ports.
Now, import all the other required modules. Copy the code snippet given below and paste it at the top of the index.js file.
You’ll be using a folder called /files to temporarily store media files so the app.use(express.static('./files')); line is used to publicly expose the files. Create a folder in your main project directory and name it files.
The express.urlencoded() function is a built-in middleware function in Express. It parses incoming requests with urlencoded payloads and is based on body-parser. This middleware is available in Express v4.16.0 onwards.
To fetch the environment variables and initialize the Twilio client, add this snippet right below where you initialized all of the packages in index.js
You’ll need your Twilio Account SID and Auth Token to initialize the client. Since you already stored these values in the environment variable, you are fetching this data using process.env. You are also fetching the NGROK_URL which is the public URL obtained from ngrok which you will be updating later.
To declare the global constants and variables, add this snippet below where you initialized the Twilio client:
The constant CONVERSIONS stores all the available conversions and conversions will convert the CONVERSIONS JSON into a readable string which is used in the message body to let the users know which file formats are supported for conversion. The state variable is used to hold some data when the user is interacting with the chatbot and the message and twiml variables are used to send the message response.
Create a route for incoming message
Users should be allowed to send the message and media for this chatbot to work. To do this, create a route called /message which will handle the incoming messages. Copy the code given below and paste it into index.js file:
Here, the req object will contain the data passed in the request and you can access the data related to incoming messages as shown.
Implement the application logic
Now, you will be adding your application logic inside the /message route. The user can interact with the WhatsApp bot by sending any random text message or a file so you'll need to handle these messages separately.
Handling Media attachments:
To start off, let’s handle the media attachments. Copy the code given below and paste it inside the /message route you have created.
If the user sends a media file, NumMedia will always be greater than zero. So you can use the NumMedia > 0 condition to handle the media messages.
When the user sends a new media file, you'll need to clear the state variable and delete all the previously stored media files. The deleteFiles() method will delete the files which are already processed. Copy the code given below and paste it into index.js file (outside of the /message route):
The MediaSid from the media url is fetched using the MediaUrl0.split method. extName is used to fetch the input file extension. The code then checks if the input file format is present in CONVERSIONS by using CONVERSIONS.hasOwnProperty(inputExtension). If the format is not present, then it informs the user by sending a message.
If the format is supported, then inputExtension, MediaUrl0, MessageSid and mediaSid are stored into the state array.
Handling Text Messages
Now you need to handle text messages sent by the user. The user will send a text message in two scenarios,
- Sending a random text message
- The extension of the target media file.
If the user is sending a random message, then the state variable will be empty. To handle this case, add an else if block below the code chunk you added in the /message route: .
Since this message from the user does not contain media, the code above sends a greeting message informing the available conversion options.
Next, you’ll need to handle the message sent by the user after sending the media. Here, the body of the message will contain what the media should be converted to (eg. PDF). Copy and paste the code right below where you place the last else if statement in the /message route:
The code above checks if the output media is supported or not by checking in the CONVERSIONS json. If the format is not supported, then it will inform the user and ask them to send the right format.
Finally, if all the validations are successful, you are now going to perform the conversion operation. Copy and paste the code right below where you place the last else if statement in the /message route:
In the config object, you are fetching the media URL from the state variable. The code then initializes two variables named inputFileName and fullPath which will contain the name and location of the downloaded file respectively.
axios is then used to download the file and save it in the location defined in the variable fullPath.
After downloading the media, it will be removed from the Twilio Servers.This is because, once media files are saved locally, keeping redundant copies on the Twilio server becomes unnecessary. Removing them ensures the privacy of user data is maintained. Create a function removeMediaFile and copy the code given below and add it to the index.js file.
The function convertFileFromAdobe(Body.toUpperCase(), From) will perform the document conversion operation which is explained below.
To convert a file, you first need to determine which type of conversion is requested by the user depending on the media file and the target file format provided by the user. To do this, the getOperationType(targetType, inputFileName) function will return the type of operation you are going to perform later.
The function accepts two parameters, targetType and inputFileName. The targetType is the format to which the file needs to be converted and inputFileName is the name of the input file which needs to be converted.
Copy and paste the code snippet given below in the index.js file:
Here you are using two types of operations from Adobe PDF Services API: ExportPDFToImages and ExportPDF.
The code first creates a reference to the input file which is converted using the createFromLocalFile function of PDFServicesSdk.
It then defines the operationType based on the targetType,i.e the output file format. If the targetType is PNG/JPEG, it will set the output type as ZIP_OF_PAGE_IMAGES.This is because the output will contain more than one media and all the media files will be sent as a zip file.
After creating the operationType instance, it sets the local file reference as the input to the object using the setInput method.
Now, you will be creating a function to convert the files from one format to another using Adobe PDF Services API. Create a function called convertFileFromAdobe(targetType, toNumber) and copy the code given below in the index.js file:
The code above starts off by creating a credentials instance using PDFServicesSdk.The servicePrincipalCredentialsBuilder() requires the credentials which are stored in the .env file.
The code then creates an executionContext using the above credential instance. It will then create an operation instance which defines which type of conversion you need to perform. The getOperationType function is then used to get the operation type by passing targetType and inputFileName.
After creating the operation instance, it will define a name for the output file. It will use the current date and time to name the output files uniquely. The function createOutputFileName() will return the filename based on the current timestamp.
Next, the code will execute the operation and store the results in the specified location. For the PDF to Image conversion, there will be multiple image files generated so you will be creating a zip file to store all the files. Since .zip format is not supported by Twilio WhatsApp, you will be sending the file via URL. Hence after saving the file,it will send the converted file to the user.
You can refer to this Quickstart for Adobe PDF Services API (Node.js) for more details about the Document Conversion logic used.
You are done with your coding part and now it is time to test the application!
Setup the Server
Now, start your server so that you can handle the incoming messages. Navigate to the project directory (twilio-converterx) and run the below command to start your express server:
Since you have set the port to 3000, you can access your server using the URL http://localhost:3000. You should see a “Hello World!” message when you open this URL in the browser.
Since Twilio needs to send messages to your backend, you need to host your app on a public server. An easy way to do that is to use ngrok.If you're new to ngrok, you can refer to this blog post and create a new account. Execute this command on your terminal in another tab to start the ngrok tunnel:
The above command sets up a connection between your local server running on port 3000 and a public domain created on the ngrok.io website. You will see the response as shown below.
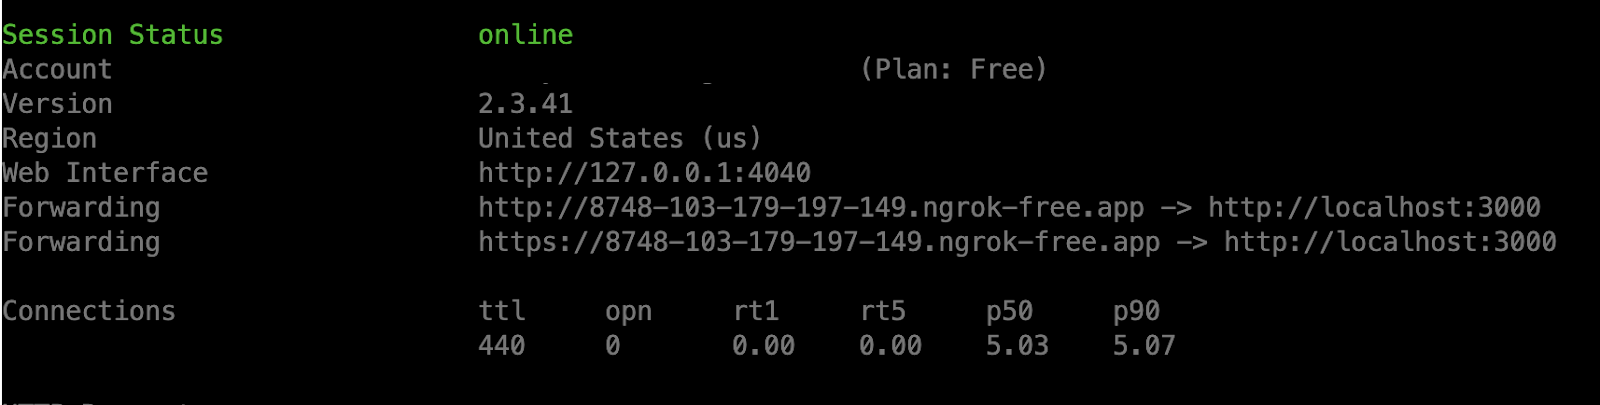
Once you have the ngrok forwarding URL, any requests from a client to that URL will be automatically directed to your application.
Update your .env file with the new ngrok URL as shown below.
NGROK_URL = XXXXXX
Replace the placeholder with your unique forwarding URL and ensure that you add the URL including a backslash(/) at the end since this URL is used to send the media file.
Restart your express server with node index so that the changes are applied.
Configuring the Twilio webhook
You must set up a Twilio-approved webhook to be able to receive a response when you message the Twilio WhatsApp sandbox number.
To do that, head over to the Twilio Console and choose the Messaging tab on the left panel. Under the Try it out tab, choose Send a WhatsApp message. Next to the Sandbox tab, choose the Sandbox settings tab.
Copy your ngrok.io forwarding URL and append /message. Paste it into the box next to WHEN A MESSAGE COMES IN field as shown below.
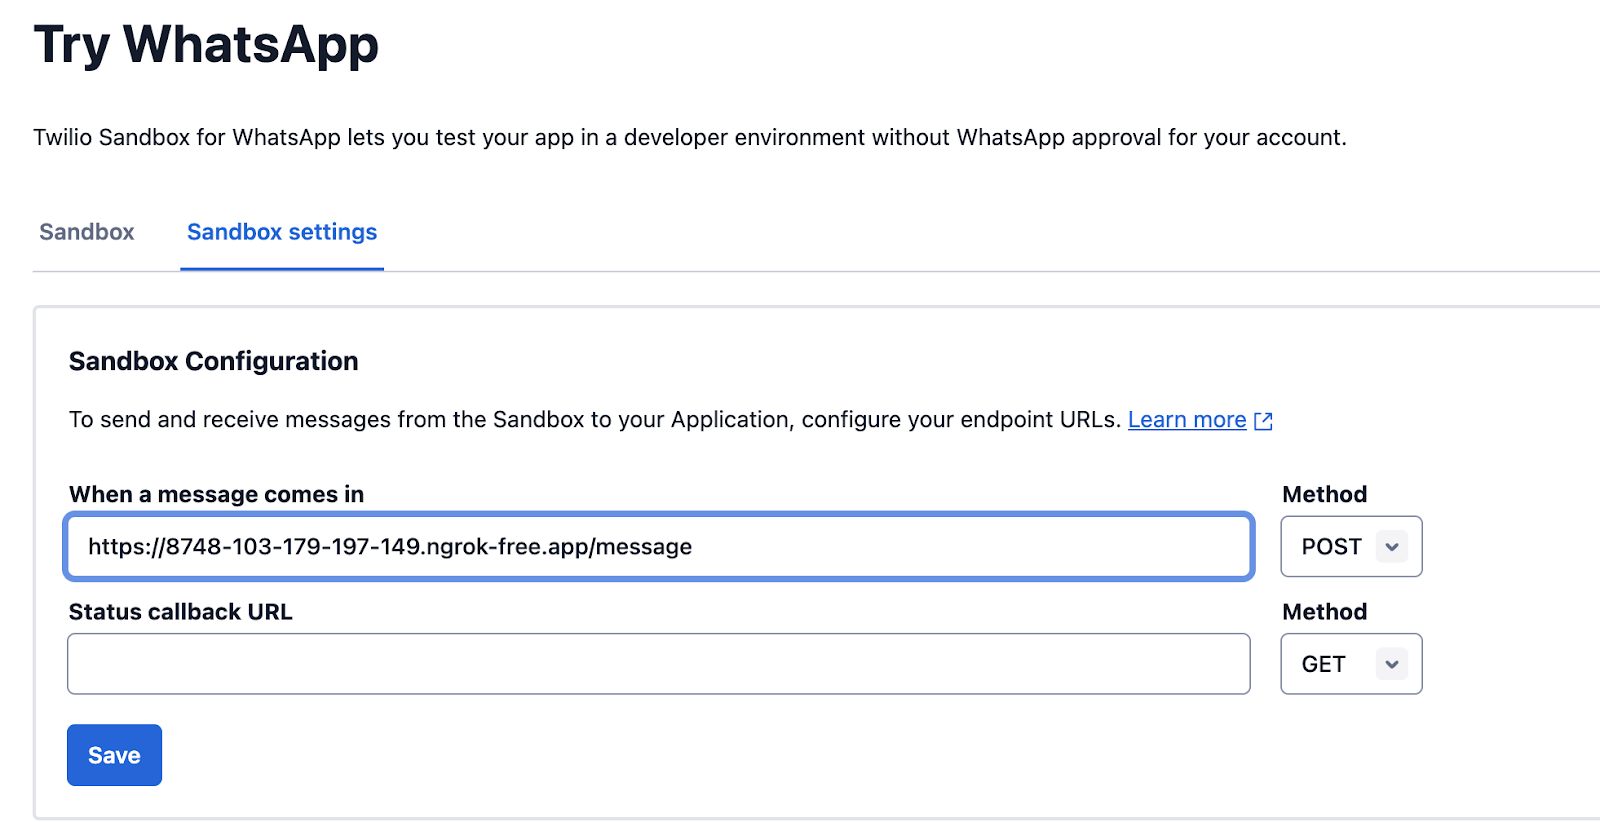
The complete URL should look something like this: https://8748-103-179-197-149.ngrok-free.app/message
Press the Save button.
Testing your Document Converter Bot
Send a message to initiate the conversation or send a media file to start the Conversion job directly.
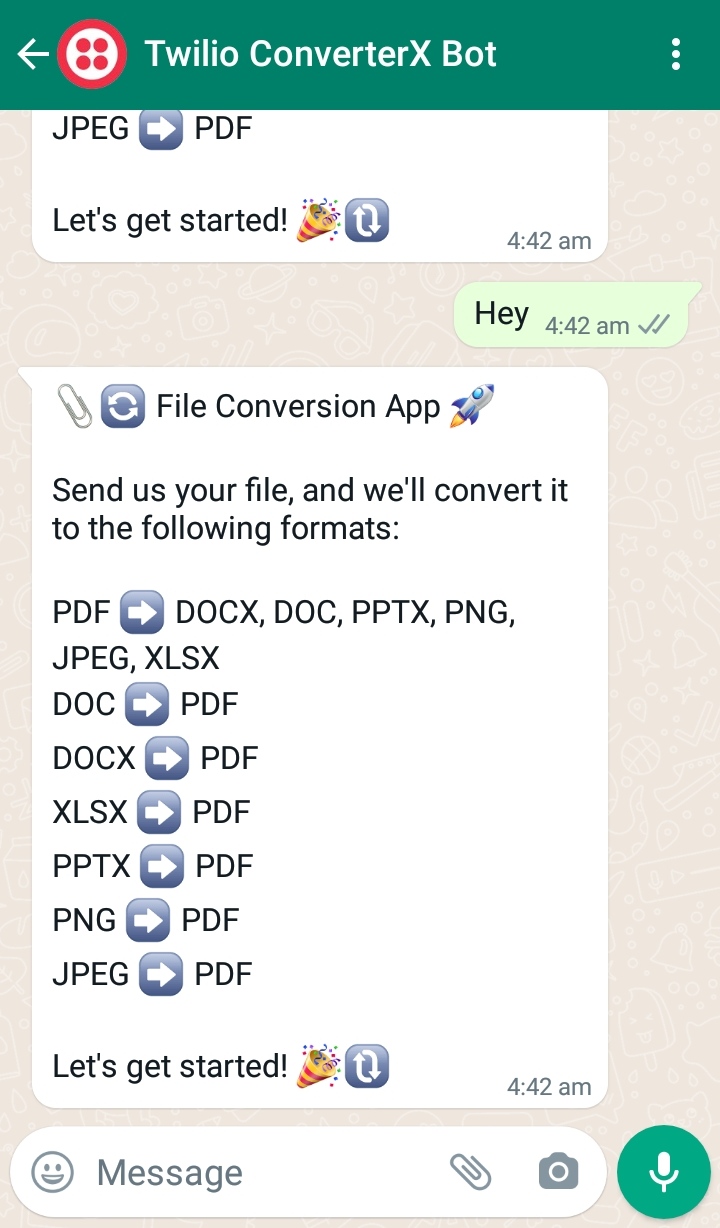
PDF to DOCX Conversion
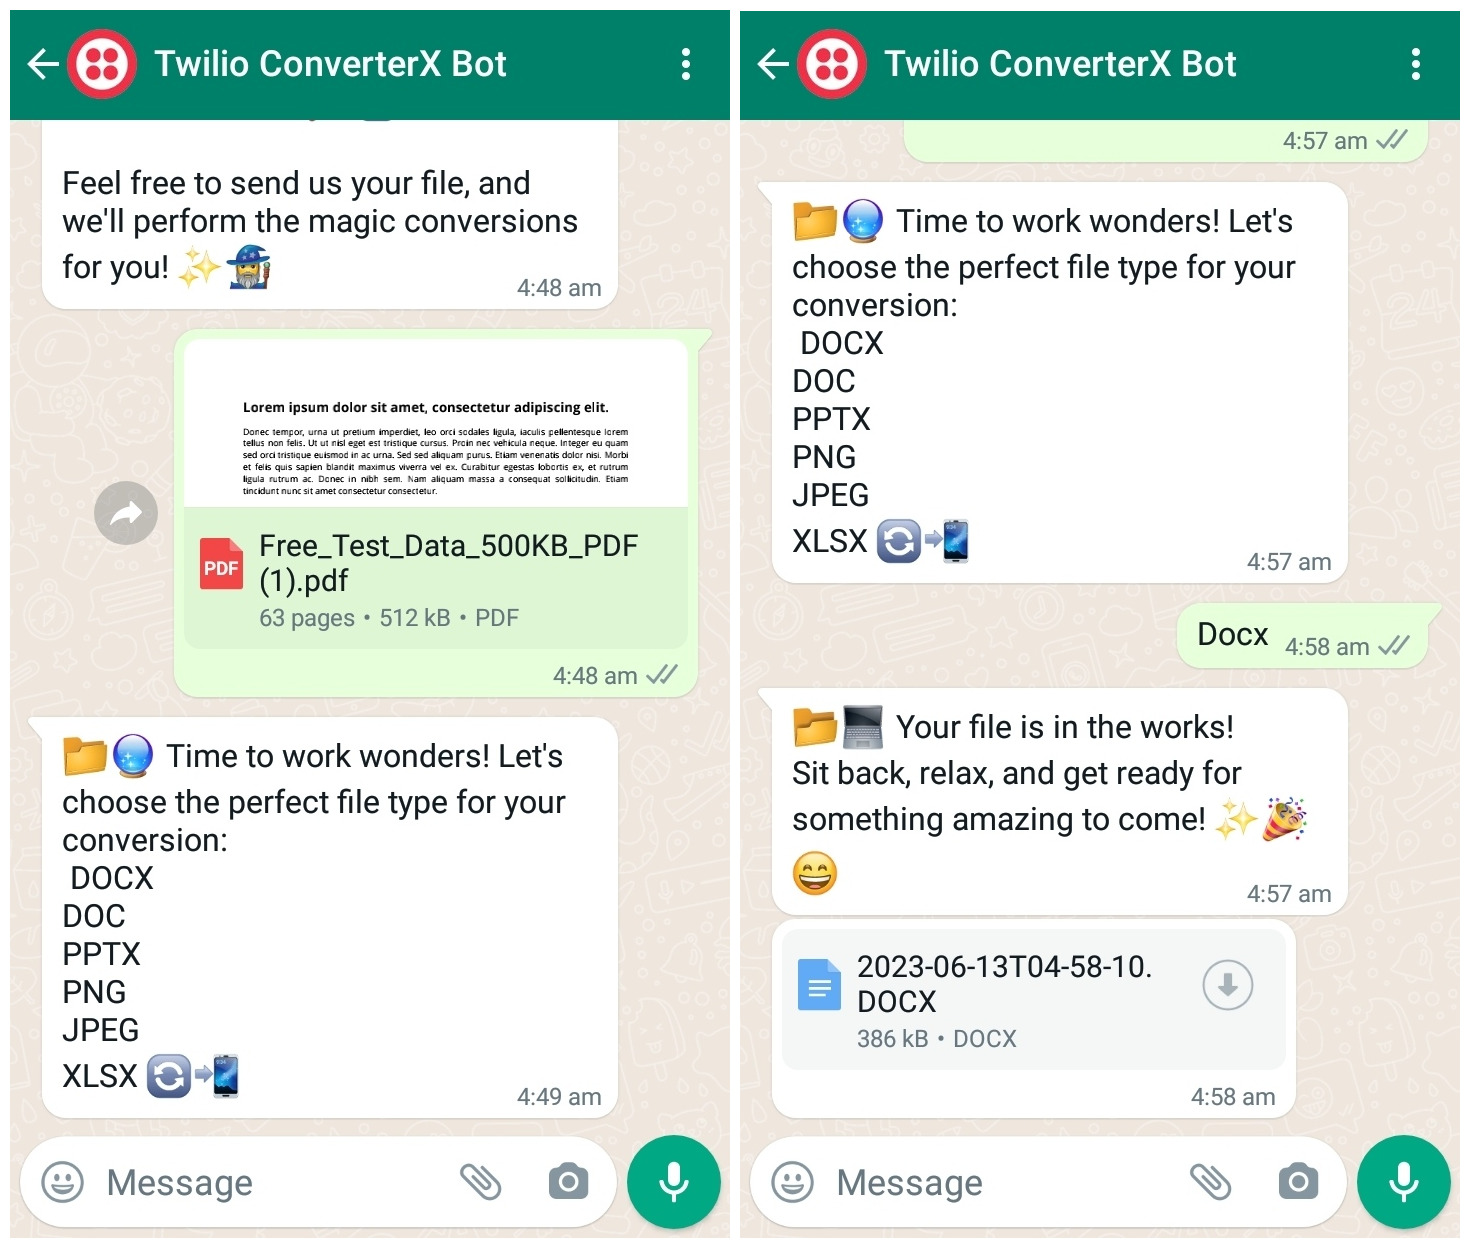
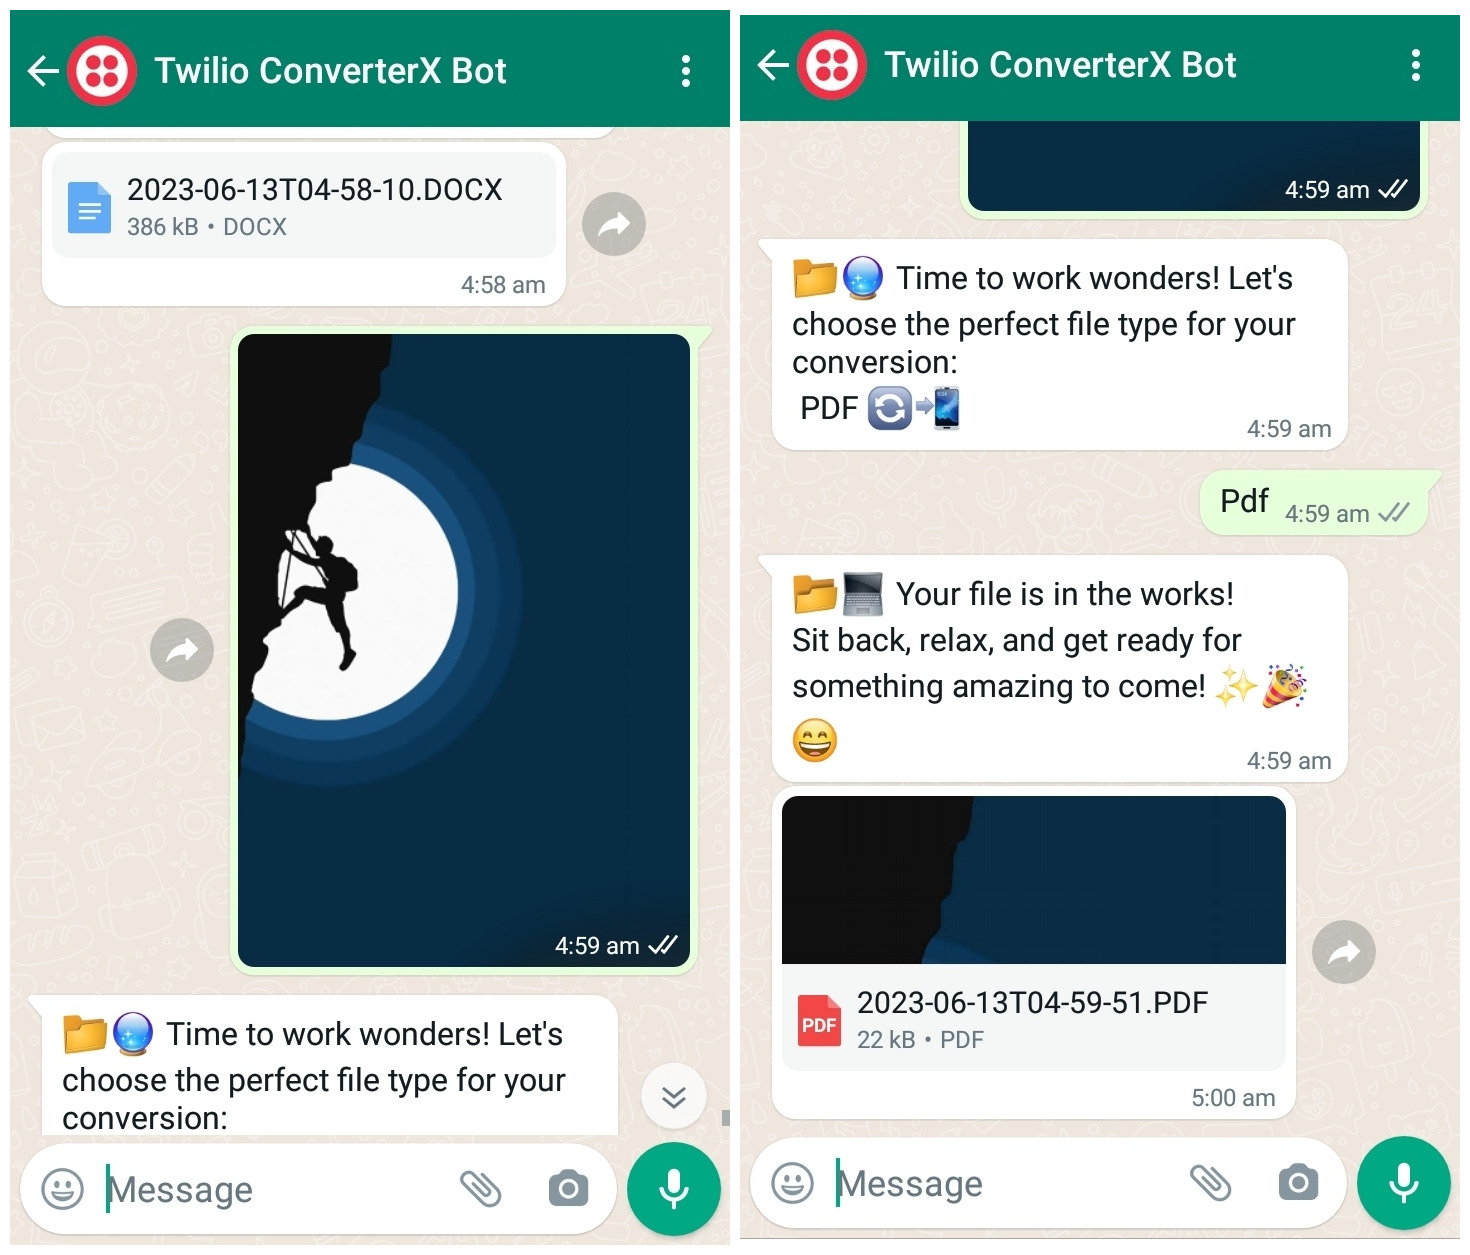
Image to PDF Conversion
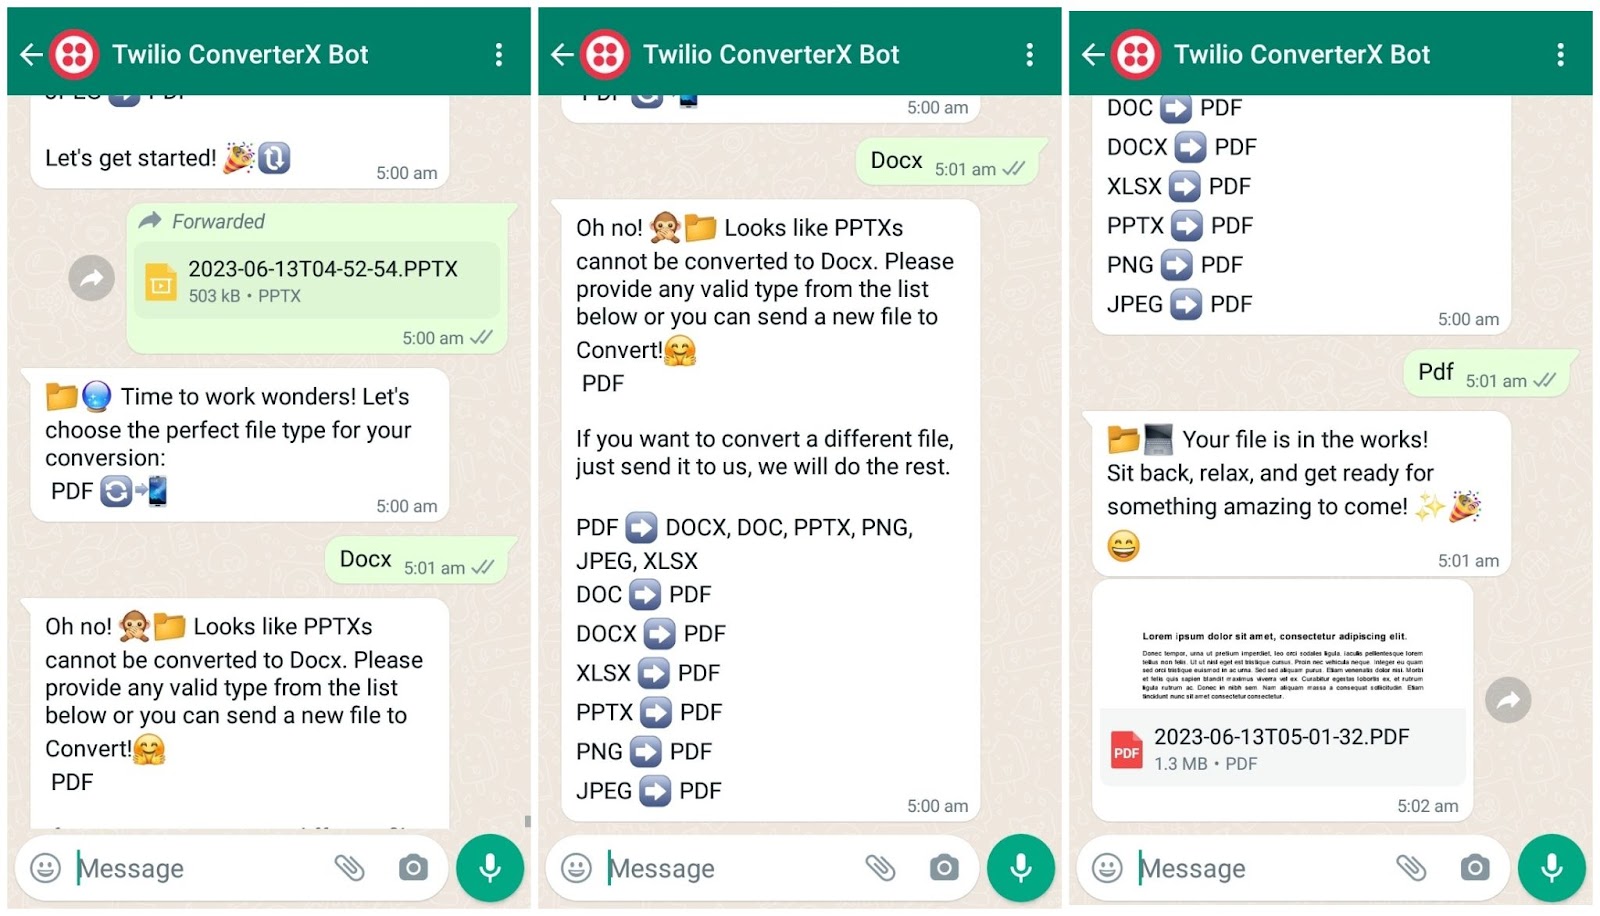
PPT to DOCX - Unsupported
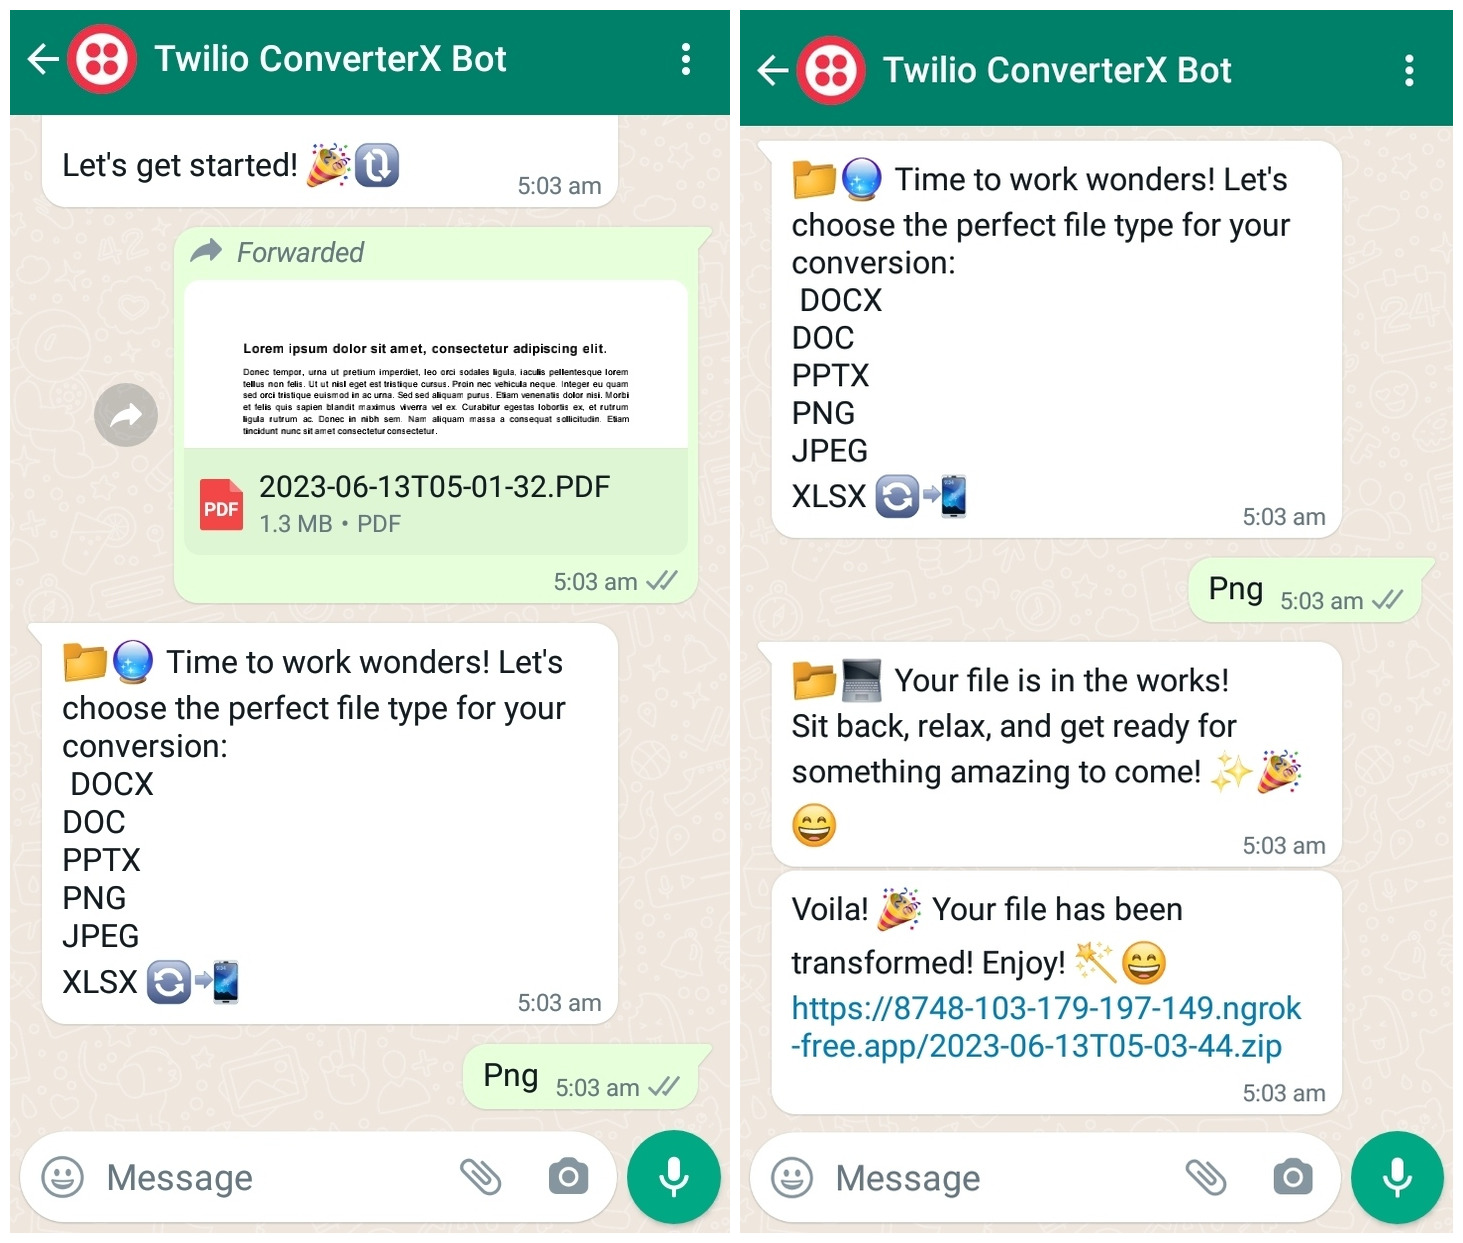
PDF to Image Conversion
Conclusion
You have just built a document converter WhatsApp bot which can convert documents from one format to another. Currently this tutorial is limited to following conversions formats,
PDF to ["DOCX", "DOC", "PPTX", "PNG", "JPEG", "XLSX"] and
["DOCX", "DOC", "PPTX", "PNG", "JPEG", "XLSX"] to PDF
But Adobe Pdf Service API provides other services such as Split PDF, Compress PDF, Secure PDF etc. which can be integrated to this application. To learn more about Adobe Acrobat Service APIs check out their docs page here.
Also note that, WhatsApp media size will be limited by Twilio WhatsApp API to a maximum of 16MB. Please refer to this document for more details about WhatsApp limits - https://www.twilio.com/docs/whatsapp/guidance-whatsapp-media-messages#message-size-limits
Sunil Kumar is a Software Developer from India. He can be reached at blogs.sunilkumar@gmail.com.
Related Resources
Twilio Docs
From APIs to SDKs to sample apps
API reference documentation, SDKs, helper libraries, quickstarts, and tutorials for your language and platform.
Resource Center
The latest ebooks, industry reports, and webinars
Learn from customer engagement experts to improve your own communication.
Ahoy
Twilio's developer community hub
Best practices, code samples, and inspiration to build communications and digital engagement experiences.