How to Build an Emergency Call Button with Raspberry Pi and Twilio Programmable Voice
Time to read:
February 15, 2024
Written by
Reviewed by
How to Build an Emergency Call Button with Raspberry PI and Twilio Programmable Voice
You can quickly lose control when facing a disaster. Even making a simple call to your relative for help can be difficult at this time. What if there was a button that can automate all the processes of calling relatives so you can get help quickly.
In this tutorial, you will learn how to design such a system with Twilio Programmable Voice and a Raspberry Pi.
Prerequisites
In order to build the system, you need:
- A Raspberry Pi connected to the internet. A Raspberry Pi 3 Model B is used in this tutorial, but you can use any board model.
- A push button .
- One 220ohm resistor .
- A Twilio account with phone numbers. Follow this link to create an account if you don’t have one already: Twilio | Try Twilio Free.
- A breadboard : optional.
Understand the logic of the Raspberry Pi button
The idea is to allow you to call for help swiftly when needed. People are quick to pick up their smartphone to call for help. This is an efficient way, as you can express the situation vocally.
However with all the features in the modern smartphone, making a quick phone call requires extra handling before a call can be made. You need to open your phone, tap on the call application, search for your correspondent, then make the call. Of course, an emergency call feature exists in many smartphones, but it only calls an emergency number, not whoever you want to call.
The goal is to build a system that allows you to make a phone call with a push of a button without the extra step of composing any phone number to a relative or recipient of your choice.
Twilio Programmable Voice has a speech-to-text function and allows you to make a phone call programmatically. This means you can use a programming language such as Python to make a voice call. The function includes language as a parameter, and the US English is the default one.
Python programs can run on many platforms and the Raspberry Pi is not an exception. With a Raspberry Pi, you can interact with hardware input like an action with a push button. This all constitutes our final system.
Break down the Raspberry Pi project
First, decide what to say to your relative when calling for help. Once the emergency button is pushed, the Raspberry Pi will call the relative or recipient through Twilio voice.
When the call is answered by your relative, the Twilio Programmable Voice API will use the say function on the text provided from the first step.
The following image shows the interaction between every part of the system:

Assemble the material
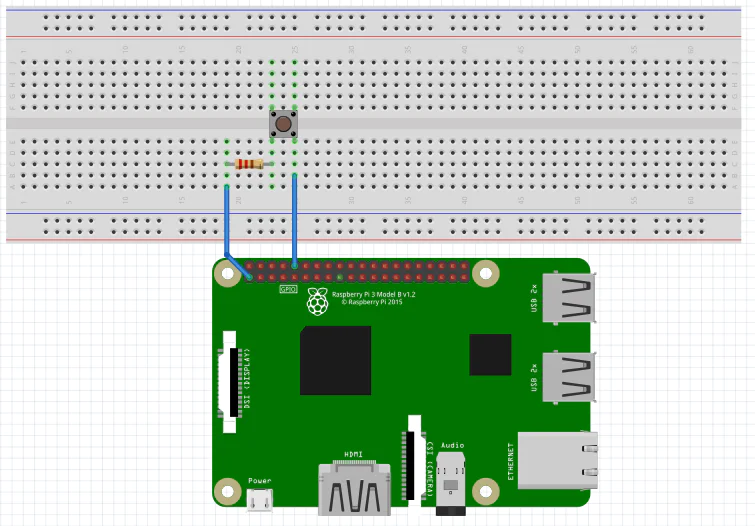
Connect the push button to the Raspberry Pi as shown in the schema below. Note the presence of the resistor between the Raspberry Pi and the push button.
When all pieces of hardware are assembled, you can plug in your Raspberry Pi power adapter. This will switch on your electronic board.
Here is a picture of the assembled hardware:

Write the code
Python is the programming language chosen for this tutorial.
To start, access your Raspberry Pi with ssh. Here is a link to guide you to set up your SSH connection if you haven't done it yet: How to SSH into Raspberry Pi .
You can also take a look at the official documentation to set up your Raspberry Pi if you start with a fresh new board: Raspberry Pi Documentation - Getting Started .
When you get an SSH shell on your Raspberry Pi, create a directory named " panic_button_twilio " with the following command.
Enter the directory and create a file named push_button_call.py .
All the code will be put inside this file. A minimal text editor such as "nano" can do the job as well.
Start by writing a function that will be used to make a call to one of your relatives. This function uses a Twilio REST client and requires a phone number as a parameter.
Add all necessary imports below:
Below is the corresponding code. Add this to the file push_button_call.py :
To call multiple relatives, you can call the above function in a loop. This will bring us to the second function seen here:
The function call_for_help creates a Twilio client and uses it to call each of the relative numbers you set in a list named RELATIVE_NUMBERS.
Now that you have the main function to call your relatives, connect the push button action to the call function.
The push button sends an electrical signal to the Raspberry Pi when pushed. You need to listen to this signal on the Raspberry Pi and do action according to it. For that, you need to set up your Raspberry Pi programmatically as a listener to the push button signal.
The Python library RPi.GPIO allows you to set up a listener on the Raspberry Pi.
According to the above electronic schema, the push button is connected to the GPIO 10. Here is the code to set up the GPIO 10. Add this code into the end of the file:
Now you can bind the action call_for_help to the event GPIO as a callback. The event here is a rising electrical signal, GPIO.RISING: .
Remember to add the necessary import statements at the beginning of your file.
Some constant variables need to be set according to your needs and your Twilio account. Put them after all import statements. Here is the code for the constants:
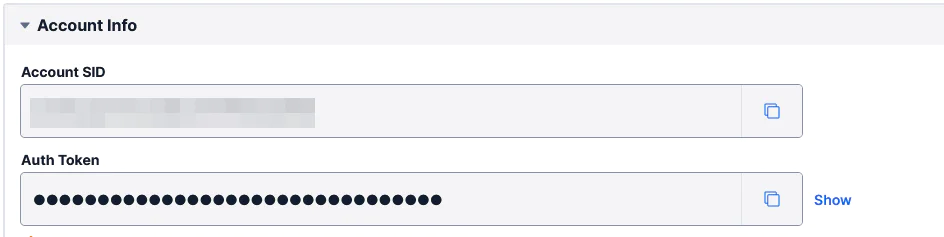
TWILIO_ACCOUNT_SID and TWILIO_AUTH_TOKEN are visible in your Twilio console .
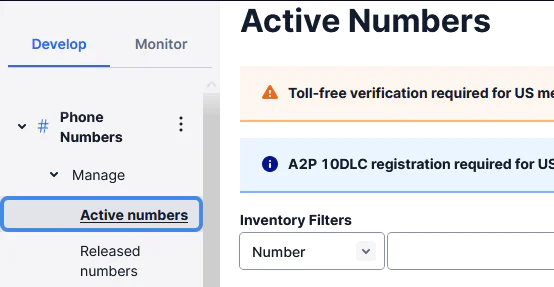
The ORGINATE_NUMBER should be one of your Twilio active phone numbers. You can see it in the Twilio console in the menu Phone Numbers > Manage > Active numbers .
Add the following lines at the end of the file so we can know when the system is running.
The complete code can be downloaded from this GitHub repository .
Set up a virtual environment
Isolate the Python environment of the system in a virtualenv to avoid any version conflict with other projects' requirements.
Inside the folder panic_button_twilio , run the following command to create a virtualenv:
Activate the virtualenv to install packages:
Now, you can install the necessary package for our code with this line:
After the packages are installed, you can run the code.
Run the Python code for the Raspberry Pi call button
Use the following command to run the code. Remember that you need to activate the virtualenv before running the code.
In your terminal, you should see the message as shown below:

To test the system, make sure you put a valid number as the value of the variable `RELATIVE_NUMBERS`.
Go ahead and push the button. A phone call will be made to the corresponding number. If the call is answered, the text you put as the value of HELP_TEXT variable can be heard in the smartphone.
What's next for a Raspberry Pi call button?
In this tutorial, you learned how to make a panic button that automatically calls your relative. This was made possible with Twilio Programmable Voice, a Raspberry Pi, a push button, and Python codes.
Although this system is designed to be put in a house, you can practically put it everywhere you want, for example in a car, or in your pocket. All you need is something to power up your Raspberry Pi, and it should be connected to the internet.
For more tutorials on Raspberry Pi and Twilio products, you can check my other articles on the Twilio blog .
Aina Rakotoson is a lead Python developer, a dad, a handyman, and a vintage mechanic lover. You can find him on Twitter or on GitHub .

Related Resources
Twilio Docs
From APIs to SDKs to sample apps
API reference documentation, SDKs, helper libraries, quickstarts, and tutorials for your language and platform.
Resource Center
The latest ebooks, industry reports, and webinars
Learn from customer engagement experts to improve your own communication.
Ahoy
Twilio's developer community hub
Best practices, code samples, and inspiration to build communications and digital engagement experiences.