Now use Any Payment Processor with Twilio <Pay>
Time to read:
March 30, 2022
Written by

Today, we’re excited to announce the launch of Twilio’s Generic Pay Connector in Public Beta. The Generic Pay Connector unlocks the power of voice payments by capturing payments from your customers using Twilio <Pay> and Agent Assist Pay and passing it to your payment processor of choice. Not only that, even if you’re not looking to become PCI compliant, the Generic Pay Connector enables you to avoid handling sensitive financial data and accept voice payments in a PCI-compliant manner.
If you’ve been using the existing Generic Pay Connector, you’ll be familiar with the existing /charge and /tokenize endpoints. Those are deprecated and you will now be able to use a single / root endpoint. In addition to being able to use any payment processor, with the Generic Pay Connector we’re adding the ability for you to send custom parameters to the payment processor so you can send additional contextual information related to the transaction such as authorization, waive fees, refund, etc.
The Generic Pay Connector acts as a bridge between you and the payment processor. Your payment processor is responsible for processing the transaction and reporting the result back to Twilio.
You should use Twilio's Generic Pay Connector if your payment processor of choice is not included in Twilio's list of branded Pay Connectors (Stripe, CardConnect, Base Commerce, Chase Paymentech, or Braintree).
Generic Pay Connector Architecture
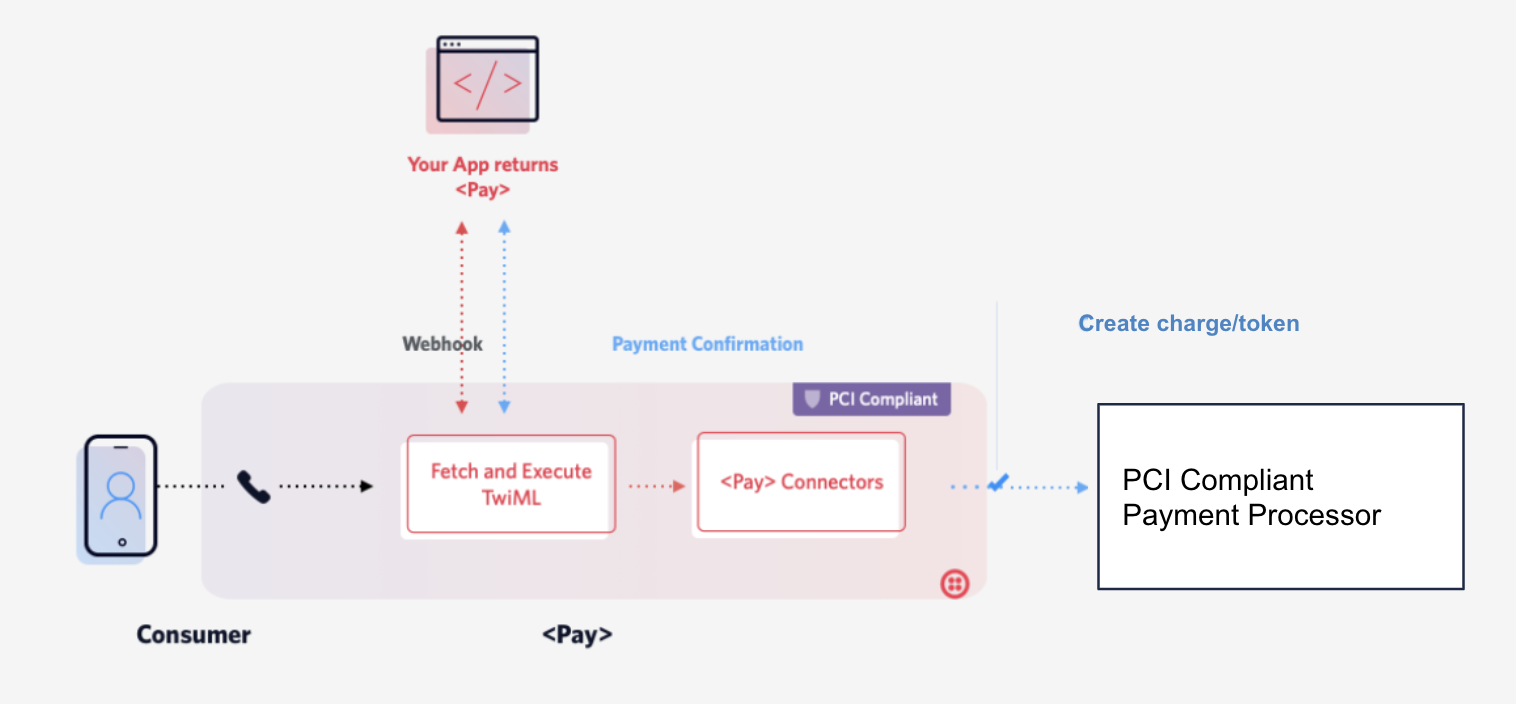
Here are the detailed steps of what this means:
- A call is established with your Twilio phone number and your customer.
- Twilio executes a <Pay> verb. The customer will hear prompts to enter their credit card number, expiration date, zip code, and CVV. (Alternatively, a call center agent could collect payment details using Agent Assist)
- Twilio passes this payment information to your Generic Pay Connector.
- The Generic Pay Connector passes the payment information to your specified payment processor using an HTTPS POST request.
- The payment processor facilitates the actual payment transaction and passes the result of the transaction back to the Generic Pay Connector.
- Twilio sends this information as an HTTP request to the action URL specified in the <Pay> verb (or to the statusCallback URL if using the Payments API)
Here’s how to use the Generic Pay Connector
Prerequisites
- A Twilio Phone Number with Twilio Voice capabilities - Buy a number here.
- Enable a PCI flag to use the connector.
- Install and configure the Generic Pay Connector from Twilio Console.
- Write a TwiML in your application and reference the pay connector.
- Update the endpoint to start consuming from the ‘/’ root endpoint.
Let’s build it!
In this release, we have made the endpoints generic. Instead of using the 2 endpoints /charge and /tokenize, we only send to the root endpoint, / and add a "method" parameter to determine the transaction type. Applications that have been using the legacy endpoints in private beta need to modify and start consuming from the root endpoint /.
In this blog post, we’ll show you how to write TwiML to process charge and tokenize transactions and the nature of request to the payment processor and response object that Twilio expects in return for these two transaction types.
Charge Transaction
A charge transaction means you want to immediately capture funds from the customer's supplied payment method (i.e. credit card) in return for the goods or services you offer.
If you want to process a charge transaction using a Generic Pay Connector, you will need to include a chargeAmount attribute in your <Pay> verb or when starting a Pay session with the Payments API, and the value of the chargeAmount must be greater than 0
<Pay chargeAmount=”10.00”>
Your Generic Pay Connector will send an HTTPS POST request to the configured URL of your payment processor. Below is an example of the body of the POST request that will be sent. Note that there is a "method" property with a value of "charge", which indicates the type of transaction.
Expected Charge Response from the payment processor:
Tokenize Transaction
A tokenize transaction means you want to obtain a token based on the user's supplied payment information (e.g. credit card or ACH-debit information) from the payment processor instead of posting any charge. Tokens are typically stored so that you can charge the user in the future without having to ask for the payment information again. Note that tokens are provided by your payment gateway or processor.
To make a tokenize transaction, you must set the chargeAmount to "0" or omit the chargeAmount attribute from your <Pay> verb or when you start a new Pay session using the Payment API.
<Pay chargeAmount=”0”> or <Pay>
Below is an example of the body of the POST request that will be sent. Note that there is a "method" property with a value of "charge", which indicates the type of transaction.
Custom parameters
If you use the <Pay> verb, you can send custom parameters to your payment processor using the <Parameter> noun. This functionality could be used to send additional contextual information about the transaction. For example, you could inform the payment processor to waive fees, charge fees, process a refund, etc. Your specific use case and your chosen payment processor will determine what these custom parameters should be.
The format of the request will be the same, you can append additional parameter nouns as follows:
<Pay chargeAmount=10.00>
<Parameter name=”foo” value=”bar”>
</Pay>
Below is an example of the body of the POST request that will be sent to your payment processor.
Learn more about the Generic Pay Connector in the API docs.
We can’t wait to see what you build!
Related Posts

Related Resources
Twilio Docs
From APIs to SDKs to sample apps
API reference documentation, SDKs, helper libraries, quickstarts, and tutorials for your language and platform.
Resource Center
The latest ebooks, industry reports, and webinars
Learn from customer engagement experts to improve your own communication.
Ahoy
Twilio's developer community hub
Best practices, code samples, and inspiration to build communications and digital engagement experiences.