Real-Time SMS with Erlang, ChicagoBoss and Twilio
Time to read:
March 10, 2016
Written by
This post is part of Twilio’s archive and may contain outdated information. We’re always building something new, so be sure to check out our latest posts for the most up-to-date insights.
In this blog post we are going to use a functional approach to creating a web application with Erlang and the Chicago Boss framework. Our application will display incoming SMS messages in real-time and allow you to respond to them in your browser using the Twilio API.
If you’re just interested in seeing the finished code for this blog post, it can be found on my Github here.
Why Functional Programming? Why Erlang?
Functional programming can be very intimidating to someone like myself who began learning to program using the object-oriented paradigm. Functional languages like Erlang pride themselves on their “no side effects” and “functions as first-class citizens” properties. This makes them ideal for concurrency and high-volume traffic applications.
Chicago Boss is a great stepping stone for OO developers looking to dive into functional programming. It aims to solve the problem of slow server-side templates and adopts familiar Rails conventions while running more efficiently than Ruby or the JVM.
Getting Started
We’ll start with everyone’s favorite step: setting up a development environment. We need to install the Erlang programming language and the Chicago Boss framework.
Installing Erlang on OSX can be done with Homebrew using
If you run into an issue stating that “/usr/local/bin is not writable”, this StackOverflow post should help you solve that.
Installing Erlang on certain Linux distributions can be more complicated. It’s recommended you follow the Erlang Installation Guide to get properly set up. Windows users can download the source binary from here.
To check if you’ve successfully installed Erlang, run erl on your command line and you should see an Erlang shell similar to this:
Your OTP version might be different than above (18 is the most recent release as of this writing). Keep in mind you’ll need Erlang R16B or later to use Chicago Boss.
Now we need to grab the Chicago Boss source. You can use this link or run the following on your command line:
If the commands above are successful you should see the following in your terminal:
We’ll do just that and run the following:
This command may take a second to run. It’s generating a new project structure that will look like this:
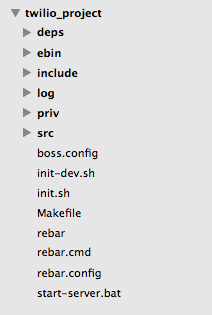
The most important directories here are src/ and priv/. All of our source files and dynamic HTML files will be stored in src/. Static HTML, CSS, and JavaScript files, as well as our init scripts will be stored in priv/.
Once that is finished run the following:
The make command will install and compile all the dependencies ChicagoBoss will need.
Our last setup step is to make sure we have a Twilio account and Twilio phone number.
Hello, Erlang
Let’s get started with our new framework by making a basic “Hello, World” application.
Open an editor and create a new file in src/controller/twilio_project_livefeed_controller.erl.
Now, I know what you’re thinking. “Controller? Does that mean…?” Yes! One of the many great things about the Chicago Boss framework is that is follows the model-view-controller (MVC) architecture that’s so popular these days.
It’s important to follow Chicago Boss’s naming conventions or else your application will not know how to handle incoming requests. Controller names take the form of __controller.erl. This means that requests made to the /livefeed/… URL will be handled by the twilio_project_livefeed_controller.erl file.
Add the following code to this new controller and save it:
In case you are new to Erlang and/or Chicago Boss, we’ll go through this line by line:
- At the top of the file we are declaring a module named twilio_project_livefeed_controller. Erlang code is always separated into modules.
- The next line exports all the functions in our module so that they can be called elsewhere in our application.
- The next line is declaring a function (or action) named hello. Controllers themselves are simply a set of actions and URLs are mapped to a specific action within a controller. For example, a request made to the /livefeed/hello URL will be handled by the hello action in the twilio_project_livefeed controller.
- The last line is the body of our hello action. We are passing raw HTML, as indicated by the output parameter, and the HTML we are passing is Hello, world!.
Let’s test out what we just wrote. Go back to your terminal and start your server by running the following:
Running this will not only start your server but will also give you an Erlang shell in your current directory. This allows you to run Erlang statements directly on your server which can be great for testing and debugging application features. With your server running navigate to http://localhost:8001/livefeed/hello and you should see the coveted “Hello, World”. How easy was that!?

To stop your server you can enter q(). in the Erlang shell.
Expanding Our Application
Let’s start building something a little more interesting. Our first task is to set up an endpoint that can handle incoming SMS messages. There are a number of steps we need to complete to accomplish this:
- Purchase a Twilio phone number from https://www.twilio.com.
- Create an action in our controller to handle incoming requests from Twilio.
- Use ngrok to allow Twilio to reach our local machine.
- Configure our Twilio number to point to our ngrok tunnel.
Buying a Twilio Number
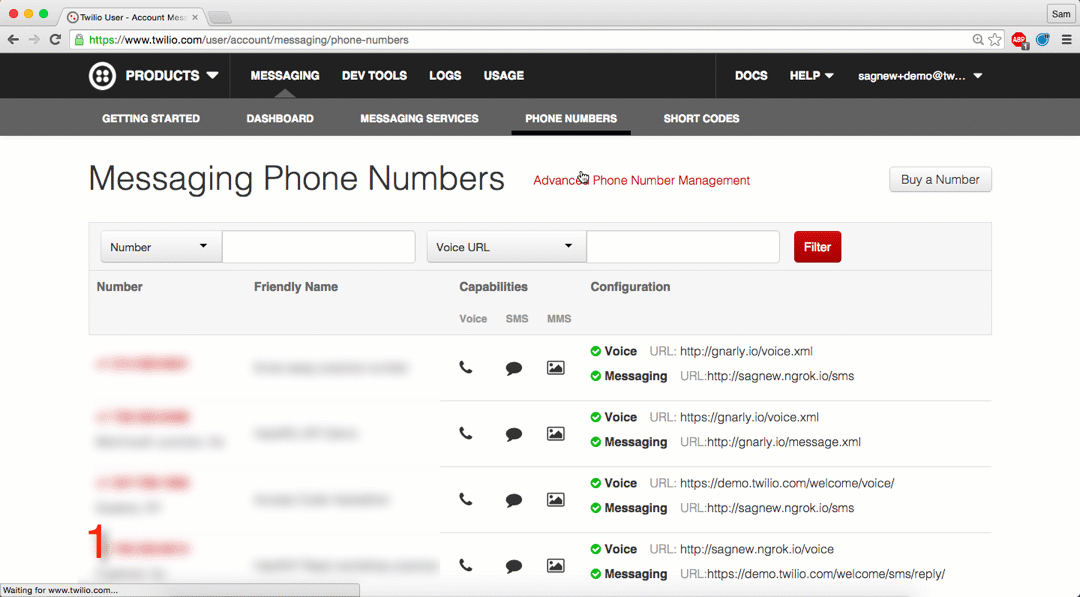
If you haven’t already purchased an SMS-capable Twilio phone number, do so from your Twilio Account dashboard. You can use the following gif as a guide:
We’ll need the number later so keep it handy.
Parsing Incoming HTTP Requests
This section is going to be very Erlang-intensive and may introduce a number of unfamiliar Erlang features and functions. There will be a lot of links to the Erlang documentation included in the code explanations so be sure to reference them if there is a particularly confusing line in our code.
To complete this step we first need to define some type of data structure so that we know what text messages look like and how we need to store them. We’ll do this by creating a new model file to represent a text message. Remember that “model” and “module” are two different things.
Chicago Boss includes a full ORM and querying syntax so that model objects can easily interact with the built-in database, BossDB, which we’ll be using shortly.
We’ll start by creating an object model to represent a text message. Create a new file at src/model/text_message.erl and paste in the following code:
Creating a model is as easy as that. A text_message object is going to store an Id which will be uniquely generated each time a text_message is created as well as a message body and from number.
Open src/controller/twilio_project_livefeed_controller.erl again and let’s add a new action right below the hello action we added earlier:
We’ll go through this line by line because there’s a lot going on in this small block of code:
- The first line is setting up our controller so that GET requests to /livefeed/incoming_sms are handled by this action.
- Next we are using pattern matching to assign a specific part of the incoming request to a new variable called ReqBody.
- We are then converting that variable from binary data to a list using binary_to_list/1 so that it can be more easily processed.
- The next two lines are extracting the message body and from number out of the incoming SMS using the lookup/2 function.
- Then we create a new text_message model object using the variables we just extracted and save it.
- The last line returns a 200 response since we will not need to return any HTML to incoming Twilio requests.
If at any point you want to debug something and print to the terminal you can use the built-in io:fwrite function.
Setting Up ngrok
ngrok is an awesome command line tool that enables you to create a secure tunnel to a specific port on your local machine. This means that you can test your application’s features without the need to configure a server like NGINX or Apache. This blog post by my colleague Phil covers installing ngrok and also discusses some of its awesome features.
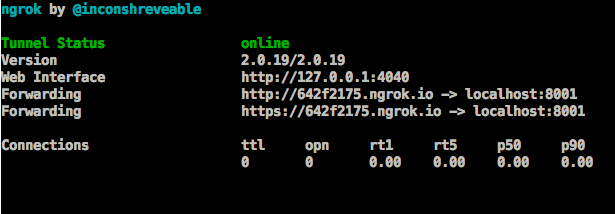
By default, Chicago Boss runs on port 8001. In a separate terminal window, enter the following command to start ngrok:
After you run that command your terminal should look something like this (although the URL that gets generated will be different):
Leave ngrok running, as we will need it to test if our application is working in a minute.
Configuring A Twilio Number
The URL you see above is the one we need to configure our Twilio number to reach out to. In your Twilio Account dashboard, navigate to your phone numbers and select the number you are using for this application. Set the messaging URL to http://{your_ngrok_address}/livefeed/incoming_sms and change the request method to HTTP GET as seen below:
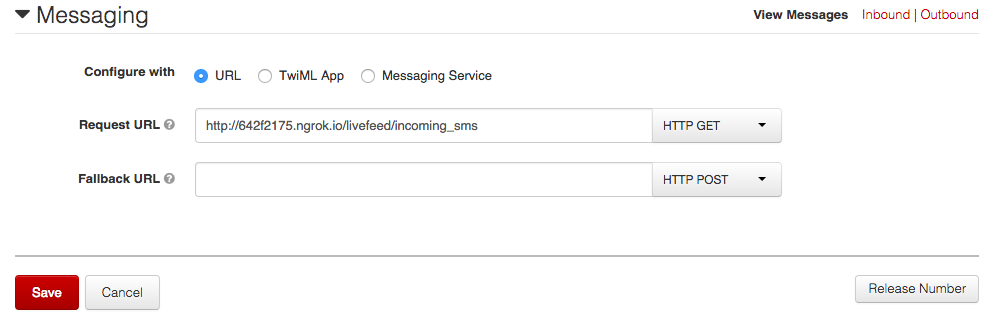
When your Twilio number receives an SMS (or MMS), it makes an HTTP request to the Request URL that you just configured. The controller action we added above will then handle this incoming request.
Adding a View
Now that we’ve created a model and an action in our controller for incoming text messages, we need to create a view to display them. Create a new file at src/view/livefeed/list.html and add the following code:
Although this is just HTML, there’s some important stuff going on here that’s worth going over:
The sections in brackets may look familiar to you if you’ve ever used the Python web framework Django. These are part of Chicago Boss’ template engine, which in fact was borrowed directly from Django. Data sent from the controller is rendered as HTML when a user loads a template.
On line 10 above, you’ll notice an
- element being generated for every message object sent to the page. You’ll also notice a drop-down menu that allows the user to select a message to delete from the list of all messages.
Open src/controller/twilio_project_livefeed_controller.erl and add the following actions, the first of which will return our messages to the list view we added above and the second will allow us to delete messages from within that view:
Make sure your server is still running and navigate to http://{your_ngrok_address}/livefeed/list. You should see a simple page that says ‘No messages!’. That’s because we haven’t sent our Twilio number any texts yet. Send an SMS to your Twilio number and then refresh the page. Bam! The text you just sent should now be displayed. You can also delete any texts from the list using the dropdown.
Receiving Texts in Real-Time
We can now display a list of the text messages we’ve received at our Twilio number, but that’s nothing special. It would be way cooler if we could see our incoming messages in real-time. Let’s build that.
Open /priv/init/twilio_project_01_news.erl and replace its contents with the following:
Here we are using BossNews to watch for the creation of new text_message models. Every time a new model is created a message is pushed onto the message queue, boss_mq, so that they can be retrieved via a timestamp from actions in the controller.
The message queue will make it possible to have a web page that updates itself in real-time while consuming very few server resources.
Open src/controller/twilio_project_livefeed_controller.erl and add the following two actions:
The live action is used to generate an initial list of incoming messages and an initial timestamp. This data is then sent to the client to be rendered.
The pull action is used to grab any new text_message model objects from the “new-messages” queue we created earlier. It does this by comparing the timestamp of any messages on the queue to the timestamp being passed in from the client-side JavaScript. This list is then returned as JSON so it can be easily processed on the client-side.
Next, create a new file at src/view/livefeed/live.html and add the following code:
Unfortunately, we are not able to move this JavaScript code to a separate static file and include it because we need access to the template variables being passed to the page from within the JavaScript code.
This template renders a list of text_message objects just like the list.html page did. It then uses jQuery to poll for new messages by sending requests to the /livefeed/pull/ action we just added. If new messages are returned then they are immediately added to the page using jQuery.
By now you’ve probably realized how boring our application looks because we haven’t added any stylesheets. Styling our app is outside the scope of this blog post but if you wish to add your own styles your CSS files should be placed in /priv/static/css. They can then be included in your dynamic HTML files using a relative URL, such as in this line:
Replying with Outgoing SMS
Now that our server can receive and display incoming text messages in real-time, we can expand our application to reply to any message with our own SMS. To accomplish this we’ll need to complete a few steps again:
- Securely store our Twilio credentials so that we can authenticate with Twilio.
- Start the necessary Erlang services for making HTTP requests.
- Create a new module that uses our Twilio credentials to send outgoing HTTP requests to a Twilio API endpoint.
- Create a new view to allow the user to enter in the outgoing message they want to send and add a new action to the controller.
Let’s get to it!

Storing Twilio Authentication Credentials
Receiving incoming text messages does not require authentication with Twilio, but in order to respond and send outgoing texts we will need to store our Twilio Account SID and Auth Token.
It’s important that these credentials are kept in a secure place on our server and are not included in any source files. The best place to put them is in a configuration file.
Open boss.config in your project’s root directory and scroll all the way to the bottom. You’ll see a line for %% APPLICATION CONFIGURATIONS. Everything below that line are configuration settings specific to our application. These are like environment variables for your app. Add the following lines to this section of code (replacing the values with your Twilio credentials and the Twilio number you purchased earlier):
As you’ll see in a minute these variables can now be accessed using the get_env/2 function.
Starting New Erlang Services
In order to make our outgoing HTTP requests to the Twilio API endpoints we need to first open /priv/init/twilio_project_01_news.erl again and add the following two highlighted lines:
This tells our application to start the ssl and inets services when the application starts, both of which are needed to use the httpc module.
In the next step you’ll restart your server and the new configurations will be loaded and the new services will be started.
Creating a Twilio Module
Open a new file at src/lib/twilio.erl and add the following code:
This is everything we need to make outgoing requests to the Twilio API. Here’s what this code is doing:
- At the top of the file we are naming our twilio module and exporting its only function, create_message.
- create_message takes in two parameters, a To phone number and a message Body.
- The next three lines are pattern matching the environment variables we just added to the local variables AccountSid, AuthToken, and From.
- The request function is part of the httpc module. The parameters we are using in this function call are specifying a POST request to the Twilio Messages API endpoint. We are also including authentication headers using our Account SID and Auth Token, and appending our To, Body, and From parameters as form data in the request.
Since there is no official Twilio helper library for Erlang, writing a small module like this is a good approach. If we wanted to use another part of the Twilio API (Voice, for example), we would simply need to change Messages.json to a different endpoint and change the form data we are sending.
To use this module you’ll need to kill your server and run make compile-app to compile it. Then start your server back up with ./init-dev.sh.
We can test that this module is working without needing the browser. Enter the following function call in your Erlang shell:
Adding a New Controller Action and View
Now that we have the twilio module in place we need to add an action to our controller so that we can call the create_message function. The user will make use of these actions when they click on any of the phone numbers hyperlinked on their /livefeed/list page. This means that the user must have received at least one message in order to send any outgoing messages.
In twilio_project_livefeed_controller.erl add the following two actions:
These actions allow GET requests to /livefeed/send_sms to return the send_sms.html template, which we will create next. POST requests to livefeed/send_sms will include both a post_param (the outgoing message you want to send) and a query_param (the phone number that the message is going to).
In src/view/livefeed/send_sms.html add the following:
This page is a form with a textbox for the user to enter an outgoing message. When the form is submitted, the send_sms('POST', []) action will be called. The message entered in the textbox is then forwarded to the twilio module, which will send it as an SMS to the phone number in the query parameter. Simple enough, no?
Wrapping Up
Whew! That was a lot we accomplished in a small amount of Erlang code. If you’re looking for more to do you could expand your application to send automatic responses based on the phone number of an incoming message. You could also try receiving and displaying picture messages as well!
If this guide was your first exposure to the Erlang programming language then be sure to review the Erlang documentation and the Chicago Boss documentation. We’ve only scratched the surface of what’s possible.
If you are looking for other tutorial/review material on Chicago Boss definitely check out this guide written by the framework’s author. I used it as my introduction to Chicago Boss.
Finally, if you ran into any issues or have feedback on this tutorial, don’t hesitate to leave a comment below or reach out to me via Twitter @brodan_.


Related Resources
Twilio Docs
From APIs to SDKs to sample apps
API reference documentation, SDKs, helper libraries, quickstarts, and tutorials for your language and platform.
Resource Center
The latest ebooks, industry reports, and webinars
Learn from customer engagement experts to improve your own communication.
Ahoy
Twilio's developer community hub
Best practices, code samples, and inspiration to build communications and digital engagement experiences.