Building A Multi Channel Support Desk with TaskRouter
Time to read:
This post is part of Twilio’s archive and may contain outdated information. We’re always building something new, so be sure to check out our latest posts for the most up-to-date insights.

We live in a time where there are more ways than ever for businesses and their customers to connect. As developers, we have the opportunity to build applications that help facilitate these connections. But if you’ve built a support desk before, you know that writing the code that manages agent availability and integrates multiple channels of communication can be complicated. Twilio built TaskRouter to help make building this type of functionality in your applications a bit easier.
In this post, we’ll show you specifically how to use the Twilio TaskRouter to build a support desk application that initially allows customers to contact you via phone. We’ll walk you through enhancing that application to scale to multiple agents and then add SMS as a second communication channel, routing each customer to the best agent for them.
Before we start coding, be sure to pull up the companion GitHub repository with every step pre-built and tagged. You can also deploy our example support desk using this Heroku Deploy button below.

Our Tools
Let’s take a quick look at the collection of tools we’ll be using to build our support desk:
- Python to build and execute our application code which is also available on GitHub
- A Twilio account and at least one active Twilio phone number
- A Flask application that generates a response with the Twilio Python helper library version 3.7.0 or greater
- Ngrok for a secure tunnel to our running Flask application server
Sign up for a Twilio account and we’ll get started coding.
Setting The Stage
As we mentioned, we’ll be building our support desk as a Flask application. This will provide a nimble foundation that we can iterate on throughout this post. Let’s start by getting Flask set up.
A best practice when working with Python is to isolate each application’s dependencies from the other projects using virtualenv. Virtualenv installation depends on your operating system, so here are guides for Windows, Mac OS X and Ubuntu Linux users.
Create a new virtualenv to separate your Python dependencies from other apps you’re working on with the following command. Virtualenv will create a directory for you with an isolated Python interpreter that’s clean of extraneous libraries and dependencies.
virtualenv supportdesk
Be sure to activate the virtualenv before we install the dependencies.
source supportdesk/bin/activate
The dependencies we need for this project are the Twilio helper library and Flask. To install them run the following pip command on the command line. If you need to install pip, here are a few more specific installation guides for Windows, Mac OS X and Linux.
pip install twilio flask
Now your environment is ready to execute Python code that relies on Flask and the Twilio helper library, so let’s write the code to make that work. There is also a tagged GitHub repository available with this code in case you don’t want to type it all in. Let’s get started by creating a new file named app.py. At the top of our new file add the following imports.
In the above code we obtain os to pull in environment variables, Flask library for our web application and the Twilio helper library for TwiML which we’ll use to respond to incoming Twilio HTTP POST webhooks.
After our import code add three new lines to obtain the necessary environment variables. Two of the three variables we need are the Twilio Account SID and Auth Token, which can both be found on the Account Portal. The third environment variable is the support agent number. In this post, you can play the role of the support agent as we’re building the application. As the support agent, you’ll need to fill in your cell phone number for the SUPPORT_AGENT_NUMBER with the “+12025551234” format.
Next we create the Flask application and add a simple route for ‘/’ so we can ensure the app is running properly.
Finally let’s add a main function so the application runs on a port specified in an environment variable or defaults to 5000.
Save the file and we can run the Flask application using the following command.
python app.py
The Flask server should display the following message if it starts up successfully through the above command.
* Running on http://127.0.0.1:5000/
We can now confirm our simple Flask app is running by going to http://127.0.0.1:5000 in a web browser. If the application is running successfully you should see the simple success message, “Support desk up and running!”.
However, we haven’t yet added any support desk functionality. Let’s write some code for that now. Stop the Flask server with CTRL-C and open the app.py file back up.
Initially our support desk is going to be extremely basic. We’ll add a single route ( /call) that Twilio can POST to when a call comes into our application. Whenever anyone calls our number we’ll forward their call (using the verb) to a single agent, Ender. Remember, you’ll be playing the role of Ender, so make sure to put your phone number into the SUPPORT_AGENT_NUMBER environment variable so your phone will ring whenever there’s a support call. In this function we’re using the Twilio Python helper library to generate our TwiML.
Write the /call function as shown below highlighted between our previous app.py code. If you don’t want to have to write all the code, the tutorial-step-2 tag of our Git repo contains all the code up to this point including this new /call function.
In order for Twilio to access our application and the critical /call route, it needs to be exposed someplace publicly. For development purposes we can run app.py locally and use a tool like Ngrok to tunnel our localhost to the outside world.
The reason why a localhost tunnel is necessary is that your development machine is likely behind a router that won’t allow direct inbound connections to your Flask application. We can get around this localhost issue with a localhost tunnel service, one of which is Ngrok. Sign up for Ngrok, download the Ngrok tunnel application and install it on your development machine.
Fire up Ngrok on port 5000 where our Flask application is running with the following command. See this configuring Ngrok post if you’re running Windows. On Linux and Mac OS X Ngrok can be run with the following command when you’re in the directory that Ngrok is located in.
./ngrok 5000
Ngrok will load up a screen like the one in the following screenshot. Take note of the unique https:// forwarding URL as we’ll need that again in a minute to configure our Twilio number’s incoming message handling URL.

The Flask application running on port 5000 can now be accessed through the forwarding URL set up by Ngrok.
We’re now ready to set up the Twilio number. Head back to the Twilio web page and press the “Setup number” button for the number you purchased. A configuration page with default values for voice and messaging will come up and look like the following screen.
Now that the application is working properly we can take the Ngrok URL plus the /call route and paste it into our Twilio Request URL as shown in the following screenshot:
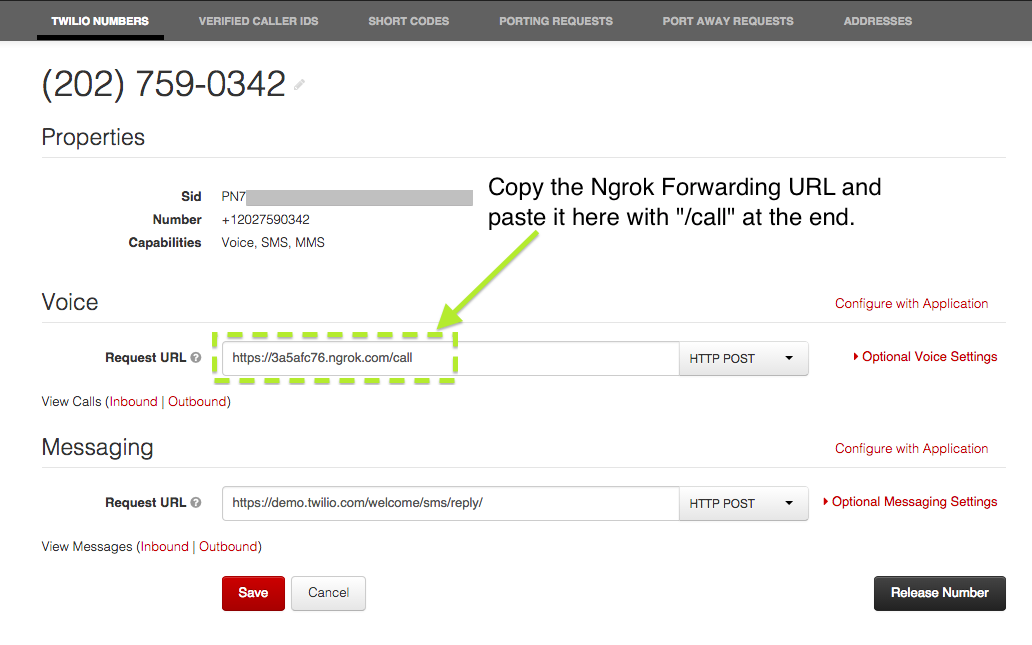
Give your Twilio number a call and you’ll notice that we’re ringing our one support desk agent, Ender (who just happens to be borrowing your cell phone). Wow, I feel sorry for Ender. He’s going to get overloaded almost immediately. Not only is he having to handle every single incoming call but he has to answer them at exact moment they come in. Since Ender can’t control when calls come to him he can’t even step away for lunch without being interrupted. He probably can’t even go to sleep!
We should enhance our application to give Ender a break. It may even be time for us to hire more than one agent. In the rest of this post we’ll show you how to upgrade your support desk using TaskRouter to make life better for both Ender and your customers.
Meet TaskRouter
Ender is really hungry, he hasn’t been able to take a lunch break for days. Don’t worry Ender – once we implement TaskRouter we’ll have the ability to know when you or any other agents are available and only pass along tasks to those who are. If our support desk has multiple agents, TaskRouter can direct each task to the best person or process. But before we get too far ahead of ourselves let’s walk through getting TaskRouter set up.
To access TaskRouter functionality, select “TaskRouter” from the dropdown as shown in the upper left hand corner of the Twilio account portal.

Selecting TaskRouter brings us to the “Getting Started” page with some basic instructions about setting up an application. The functionality for setting up our TaskRouter application is under the “Manage” item within the top menu bar.

Let’s start our TaskRouter application by creating a “Workspace”. A Workspace is the root of a TaskRouter application. It acts as a container for all other TaskRouter elements. We can call our workspace: “My Excellent Support Desk”. Make sure to select “First In, First Out” as the Template. This sets up a default Workflow which we can take advantage of in a few minutes.
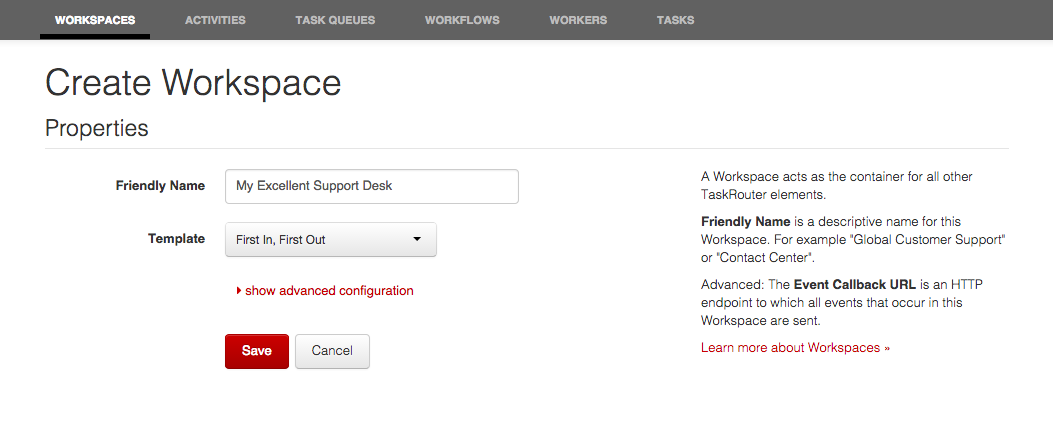
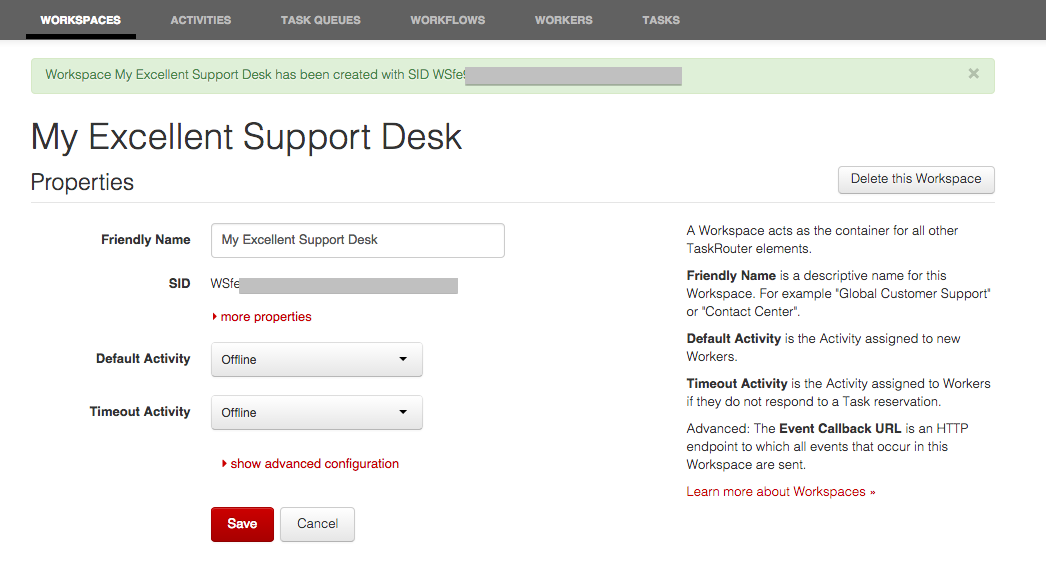
Once we hit the “Save” button our Workspace will be created and further information about it will be displayed like what we see in the following screen. Take note of the Workspace SID as we’ll use that in our code throughout this post to reference the Workspace we’re creating.
Next click the “Workers” tab so we can create a record for our first support desk agent Ender.
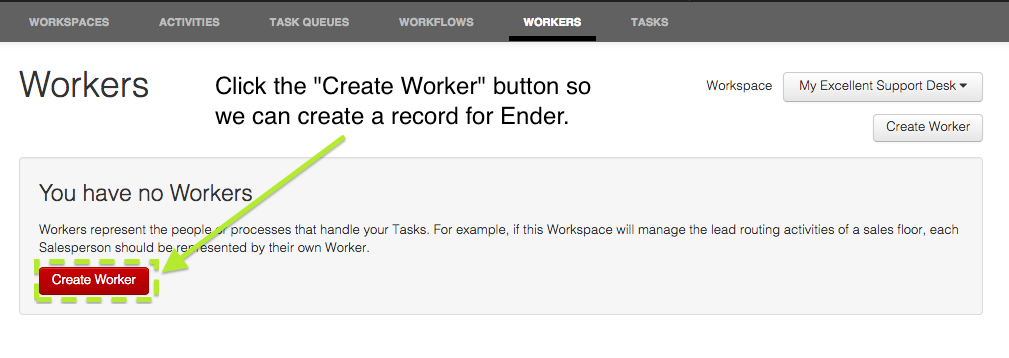
Workers represent people like our wonderful agent Ender or processes that can handle tasks. Let’s define Ender as a TaskRouter Worker because he’s our first support desk agent.
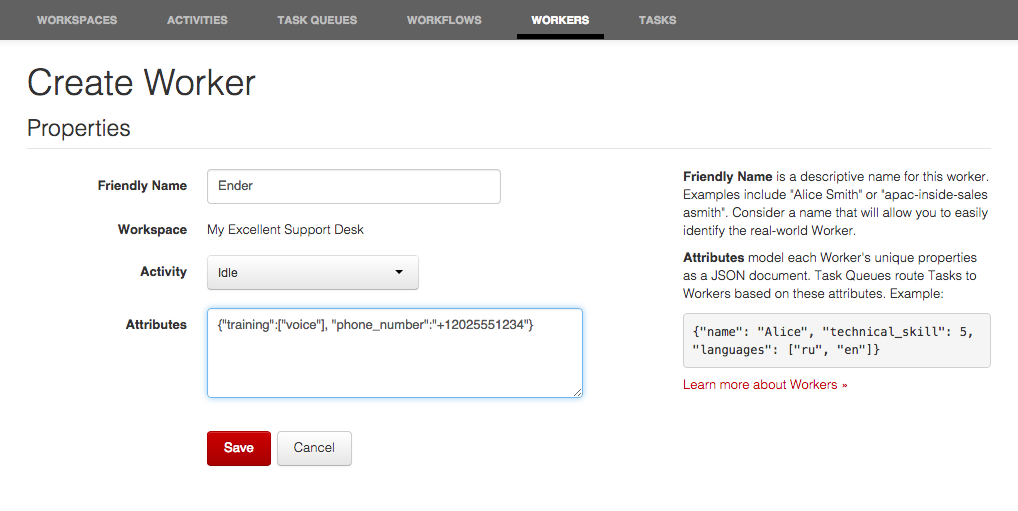
Click the “Create Worker” button. When the page loads up, fill in Ender’s information. The Friendly Name should of course be “Ender”, Activity set to “Idle” and Attributes with the following JSON. Make sure to replace the phone_number with your cell phone number if you want the calls to come to you for testing.
{"training":["voice"], "phone_number":"+12025551234"}
This JSON lets TaskRouter know the skills and attributes of our Worker. Your screen should look like the following and then it’s ready for you to press the “Save” button.
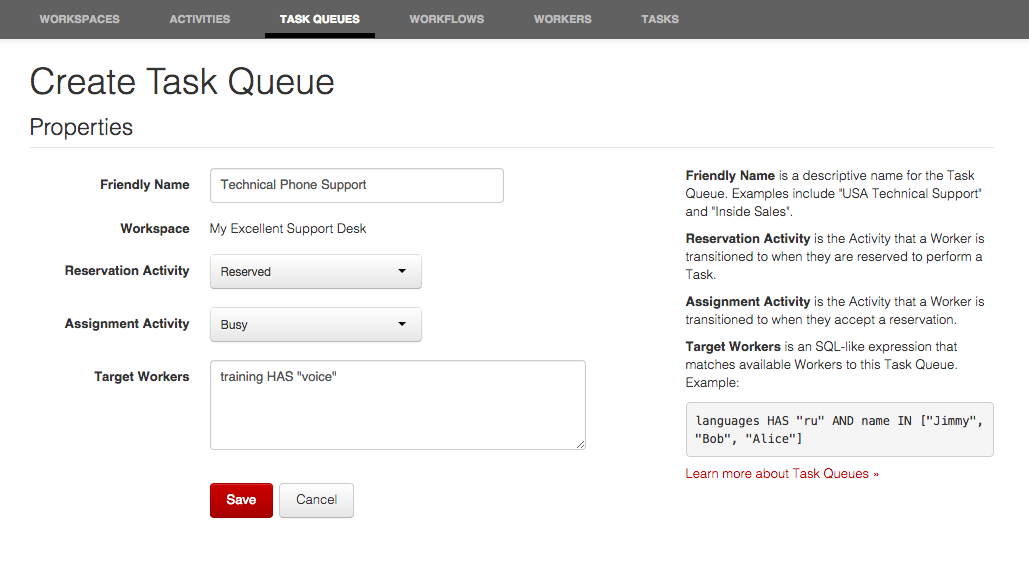
Now that we have Workers, we’ll create a new TaskQueue. I bet you can guess what TaskQueues do… they queue our tasks based on priority and match them to workers with appropriate attributes. Let’s create a new TaskQueue called “Technical Phone Support”. There are few things we set here. The Reservation and Assignment Activity options let you tell TaskRouter which Activity a Worker should enter when they are reserved and assigned. The Target Workers option is a SQL-like query that lets us only assign Tasks in this TaskQueue to workers with certain attributes. For this TaskQueue, we only want to assign to workers that have been trained to handle voice tasks:
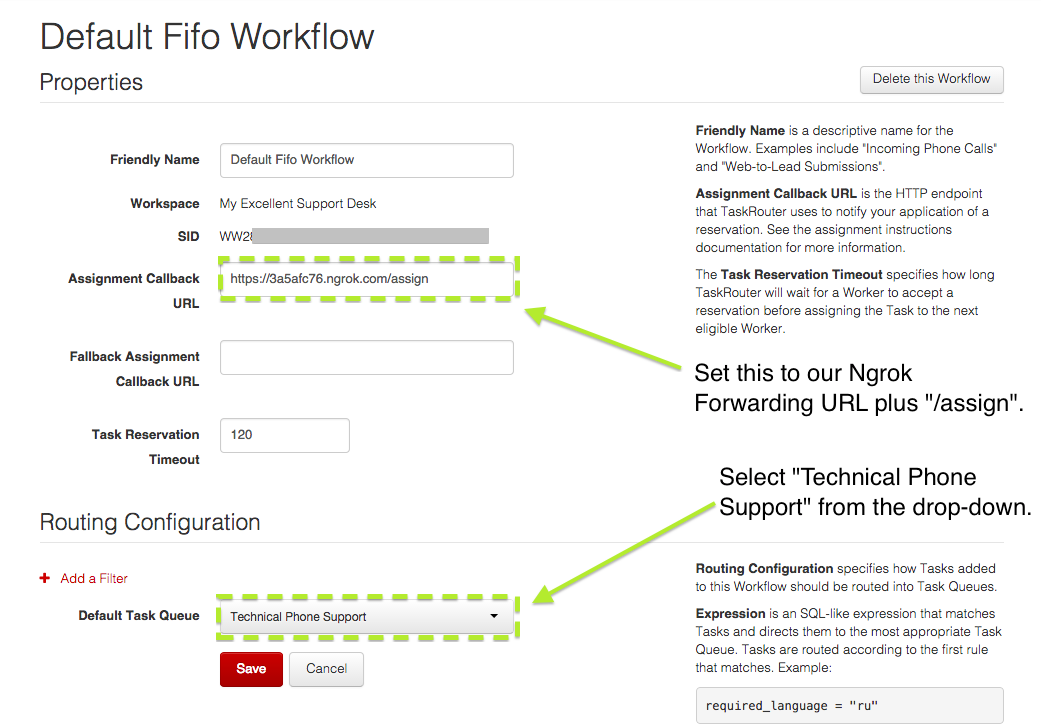
The next part of our TaskRouter app is a Workflow. Workflows examine tasks as they come in and make sure they’re assigned to the appropriate TaskQueues. We’ll update the “Default Fifo Workflow” by clicking over to the Workflows tab and selecting the Workflow that was created as part of our Workspace.

In the Workflow configuration screen set the Assignment Callback URL to [our-ngrok-forwarding-url]/assign. We haven’t written the /assign route yet but don’t worry we’ll write that in the next section of this post:
There are only two parts of our TaskRouter application we haven’t looked at yet – Tasks and Activities. Tasks are unique actions we need our agents to address – which in our case will be phone calls and SMS messages. We’ll be creating Tasks programmatically as phone calls or SMS messages come into our app.
Activities represent the state of a Worker. By default, TaskRouter creates four common default Activities for you: Offline, Idle, Busy and Reserved. These are all we’ll need for our support desk. If Ender decides to grab lunch we can make sure his state is Offline so he doesn’t keep getting calls.
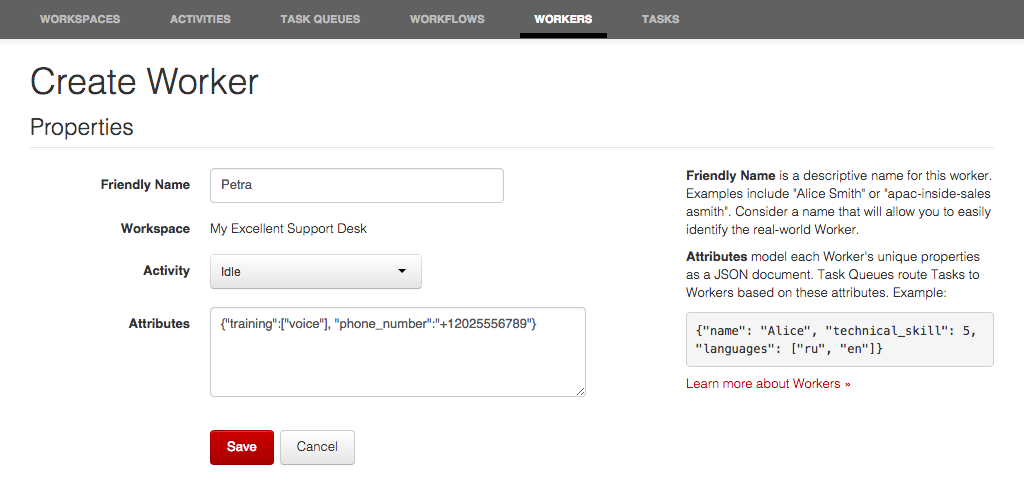
Great news! We’ve just hired our second support desk agent, Petra. If you don’t have a second phone sitting around to test with, you can quickly deploy a new instance of Twilio Client from this github repo. Let’s add Petra as a new Worker in our TaskRouter application. Set Petra’s Attributes to a similar JSON string as Ender but with a different phone number.
{"training":["voice"], "phone_number":"+12025556789"}
Support Desk 2.0
We’re now ready to update our support desk to v2.0. We’ll update our Flask application to not just call Ender whenever a call comes in but instead let TaskRouter intelligently route that call to either Ender or Petra depending on who is available. I can only imagine how excited Ender is.
To get v2.0 up and running we need to update the code in app.py file starting with a couple extra imports.
Our app.py file now needs a new environment variable for the Workspace SID and Workflow SID for our TaskRouter application. We can also replace the SUPPORT_AGENT_NUMBER environment variable with a new SUPPORT_DESK_NUMBER that will be our main support desk call in number instead of using Ender’s phone number. The SUPPORT_DESK_NUMBER will be the Twilio number we use for our support desk:
We also need to make a change to our /call route. Instead of using the verb, we’ll now use the verb. This will allow us to pass the call to a TaskRouter Workflow in order to place the call into the appropriate TaskQueue.
The previous code will handle passing our call to our Workflow. Remember when we created our Workflow we set the Assignment Callback URL to the /assign route? Let’s create that route so our Workflow can function properly:
Whenever a Worker is available for one of our Tasks, Twilio will make a POST request to the Assignment Callback URL. The POST request will include data about the assignment, including the Worker attributes we defined for that worker. We’ll pull the Worker’s phone number so we know who to place the call to.
We respond to the POST request from Twilio and acknowledge the assignment by passing back some JSON instructions of what to do with this Task next. In this case, we’re using the special dequeue instruction which will handle calling the to number and connecting to our agent for us.
We can now test our new application workflow. Let’s give our number a call now and see what happens. You’ll notice a new task has been added to our tasks:

The status of one of our workers has changed as well. Petra is now handling the voice call!

As we hire new workers, TaskRouter will automatically handle making sure calls make it to the appropriate agent (based on skills and availability) at the appropriate time. Speaking of workers, has anyone heard from Ender? He’s been on his lunch break forever!
Adding SMS Request Handling
Business is booming at Our Excellent Support Desk! We just hired another agent! Meet Bean, Bean is 19, hip to all the jive kids are talking these days and a really fast texter. Bean can also handle phone calls so let’s create a new TaskRouter worker for Bean and give him both the “sms” and “voice” training attributes with the following JSON.
{"training":["voice", "sms"], "phone_number":"+14155554567"}
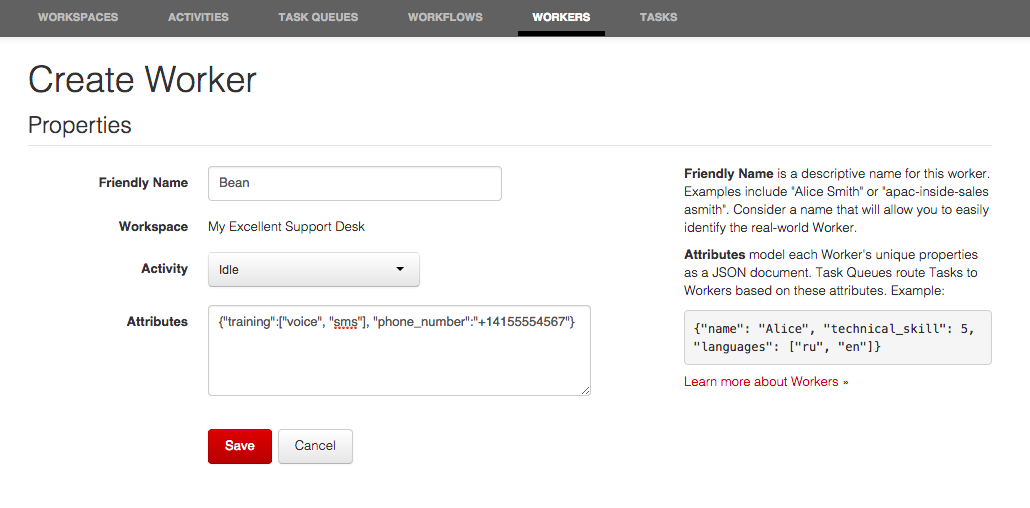
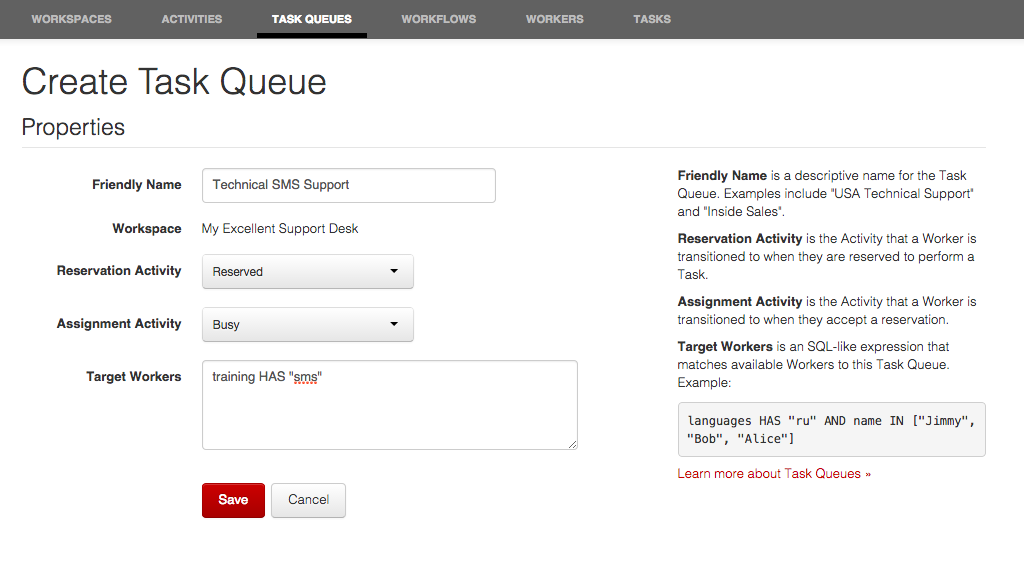
Giving Bean training on “sms” doesn’t mean he’ll automatically get SMS tasks. We still have to create a new TaskQueue for inbound messages and configure our Workflow handle routing those messages:
We also need to update our Workflow to include the new TaskQueue. Open up our “Default Fifo Workflow”, scroll down to Routing Configuration and click “Add Filter”. We need two filters, one named Inbound SMS and the other called Inbound Calls. Inbound SMS will have a higher priority than Inbound Calls so that Bean is assigned to SMS first and will only be assigned calls if there are no inbound SMS to handle at that moment.
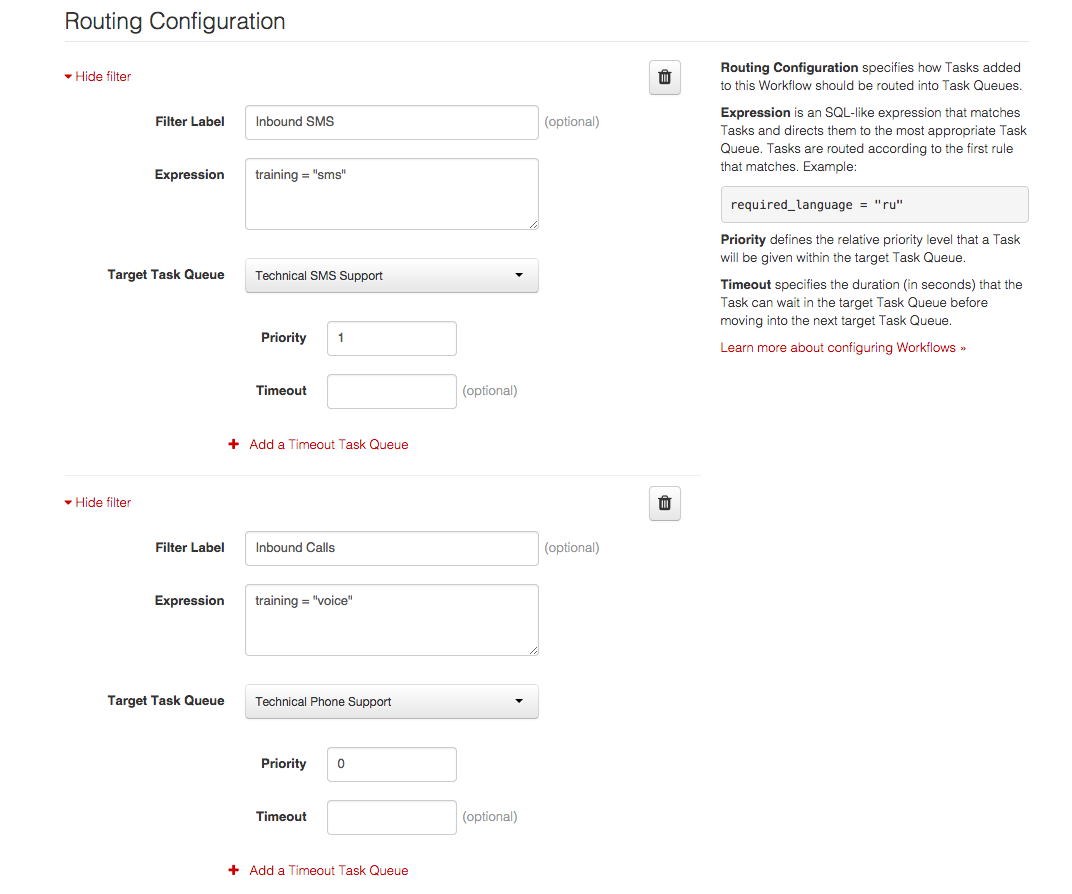
Priority is set to 1 for Inbound SMS and 0 for Inbound Calls. Priority must be either zero or a positive integer. Higher numbers indicate higher priority.
In order to handle text messages, we’ll need to add another route to our Flask app up to handle incoming messages, let’s call it /message:
Let’s make sure our support desk number is configured for incoming messages by copying the Ngrok Forwarding URL plus /message into the Messaging Request URL.
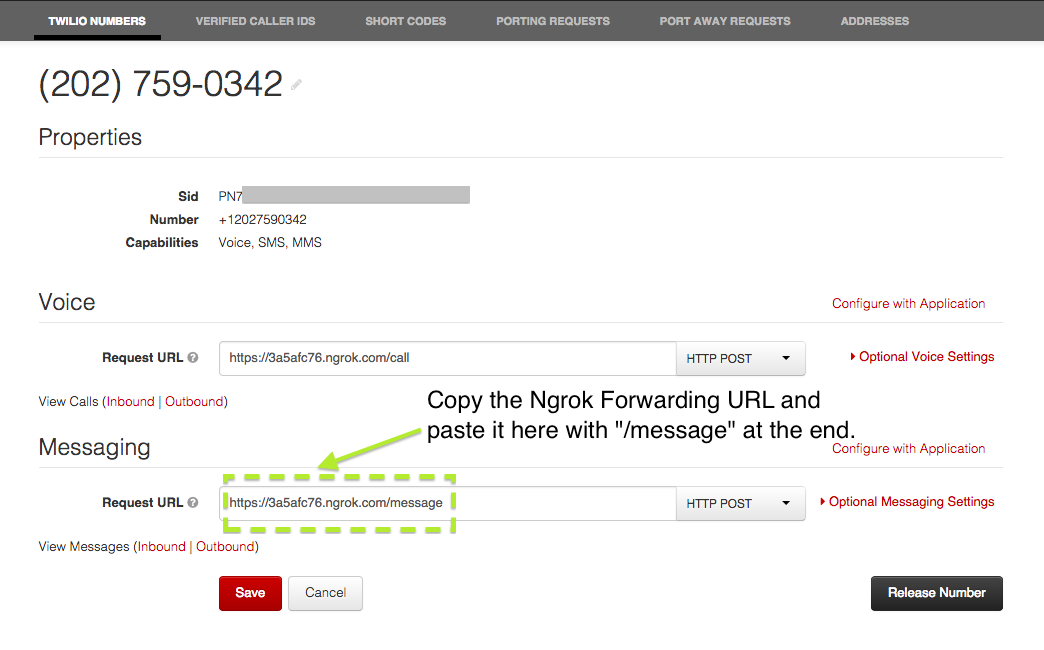
Right now we’re just responding to an incoming message but we need to add the code that creates a task when this message comes in. With voice calls, we added tasks using TwiML. For SMS, let’s add tasks using the TaskRouter REST API via the Python helper library. First we need to import the TwilioTaskRouterClient, the new client for working with TaskRouter.
Now we can use our TaskRouterClient to create a new task programmatically. We want to make sure our task has all the attributes it needs to be able to be addressed by Bean. These attributes are a phone number (so he knows who to contact) and the body of the message (so he knows what the person is asking about):
We need to update our /assign route to make sure our Workflow properly supports SMS. We’ll look at the training attribute we set when we created our tasks to see if it’s an SMS message. If it is, we’ll use Twilio to forward the question to whatever agent is assigned with the task:

When a Worker is supporting customers on a phone call, we know that they’re available again after the phone call ends. For an SMS, we need a mechanism to let Bean (or any other agent) tell us that they’ve completed a task. If we were going super low-fi the agent could update their status directly in the TaskRouter dashboard but that’s not how we roll at our excellent support desk. Let’s add code to our /message endpoint that detects when one of our worker texts in the word ‘DONE’ and closes out the tasks for us:
Try giving your support desk number one more call or text message and see everything in action.
Wrapping It Up
A lot has changed for our support desk in just a day. This morning Ender looked like this. But look around at all our agents now. Bean’s desk is covered in empty bags of Doritos as he’s excitedly responding to these new fangled text messages from customers. Petra and Ender are exchanging a high five as Ender finally returns from lunch. Most importantly, our customers are happy. With TaskRouter we’ve created an intelligent application that allows us to segment inbound customer communication and connect customers with the right agent at the right time.
What’s next? You can add every inbound channel your customers want to communicate with you on using the blueprint we created today: Email, Facebook, Google Forms, Slack, HipChat. How are you going to use TaskRouter to make your code and business more efficient? Let us know in the comments or holler at us on twitter (@mattmakai or @rickyrobinett).
Related Posts
Related Resources
Twilio Docs
From APIs to SDKs to sample apps
API reference documentation, SDKs, helper libraries, quickstarts, and tutorials for your language and platform.
Resource Center
The latest ebooks, industry reports, and webinars
Learn from customer engagement experts to improve your own communication.
Ahoy
Twilio's developer community hub
Best practices, code samples, and inspiration to build communications and digital engagement experiences.


