The Ultimate Guide to Sending Bulk SMS with Twilio and Node.js
Time to read:
December 18, 2017
Written by

Sending a single SMS with Twilio is a relatively straightforward affair, but what if you had to send 10 messages? Or 10,000?
Imagine you’re an ice cream seller. You want to improve business by sending SMS alerts when you’re in your van so that your customers will know you’re on your way to deliver some sweet refreshment.

Look, I know what you’re thinking: “It’s December, hardly time for ice cream!” But, I’m in Melbourne right now enjoying a toasty 31°C Summer day so icy cold things are on my mind right now.
In this post we’ll look at how to work up from sending the first message to subscriber number 1 to up to 10,000 messages with Node.js.
Getting prepared
To follow along with this post and code the same features you’re going to need a couple of things:
- Node.js and npm (I’m using the latest LTS version of Node.js, 8.9.1)
- A Twilio account and a Twilio number that can send SMS messages
Once you’ve got those bits sorted create a new directory to work with and initialise it with npm and install the modules we’ll need:
In this case I’m using dotenv to store the credentials that we need to interact with the API. For loading them even easier I’ve included Dominik’s node-env-run too. Let’s add those credentials now. Create a file called .env and enter the following, replacing the placeholders with your account credentials and Twilio number:
Got all that? Good, let’s send some messages!
The first scoop
It all starts with a single message to your first subscriber. This is your alpha test for your ice cream delivery alerts subscription. You only need to send one message, let’s write that code.
Create a file called firstscoop.js open it up and add the following:
This code imports the Twilio Node.js module and initialises a new API client using your Account Sid and Auth Token. We also setup the message that we are going to send.
We need a number to send the message to. This is the alpha test, so maybe just add your own number for now. Make sure your number here, and throughout this post, is in E.164 format.
Now, use the API client we created above to send the message from your Twilio number to your number.
This creates the message and sends it. If the request is successful the message Sid is logged, otherwise the error message will be logged.
To make this easy to run add the following to your package.json file:
Test the code by running npm run firstscoop. You should see the message Sid on the command line and receive your first ice cream alert. It’s working, go get yourself an ice cream in celebration!

Multi pack
News of your ice cream alerts service has spread amongst your friends. You now have a small group of willing volunteers to act as your beta testing group. They think they’re getting free ice creams too, but you can decide on that later.
You could just run the existing file once for each of them, changing the number each time, but that’s not very scalable. Let’s look at how to update it to send messages to multiple numbers.
Create a new file, multipack.js, and open it up in your editor. The code then starts the same:
This time, we’ll use an array of subscribers. If you only have one number to test with still, turning it an array will allow us to approximate a group.
Now we need to loop over these numbers and send the messages. Before we do, it’s worth considering that this is a growing enterprise. You might have 5 or 10 subscribers now, but hopefully more will be coming in the future. A regular Twilio number can only send 1 message per second. If we get up to 60 subscribers this is going to take a whole minute to send the messages and it gets worse from there. Carriers in some countries implement filtering on your numbers and sending messages to more than 200 subscribers from a single number can trigger this filtering.
We can prepare for this with a messaging service. Messaging services can pool numbers and scale sending out over the whole pool. As our subscriber base grows we can add numbers to keep up with demand and avoid having our messages filtered.
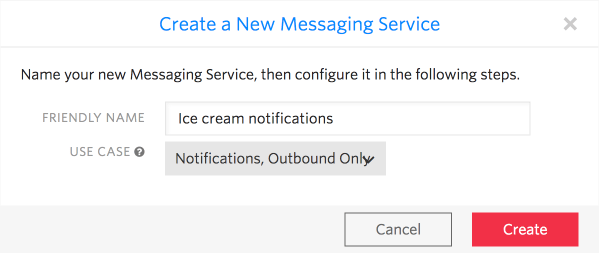
Jump into the Twilio console and create a new Messaging Service, enter a friendly name “Ice cream notifications” and select “Notifications, outbound only” from the use case drop down.
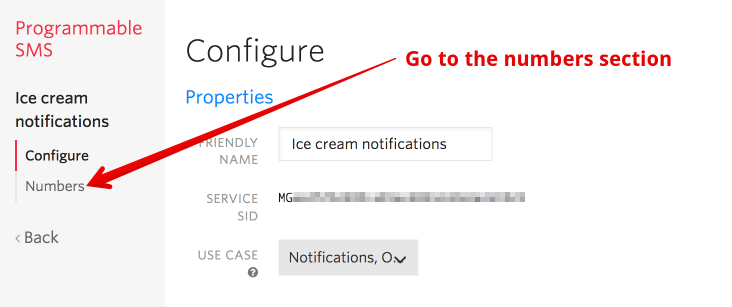
Now go to the numbers section for this service and add the number you have been using to send SMS messages.
Instead of using a “From” number to send messages, we can now use this messaging service’s Sid. Grab hold of the Sid and add it to your .env file.
Back in multipack.js we can loop over the array of numbers and send them each an alert using the messaging service.
In this code we actually map over the numbers and send a message for each of them. This returns a promise each time, so we collect the results of all the promises using Promise.all and when they are all complete, print out a success message. If one of the promises fails, we’ll print out the error.
Let’s add another line to package.json to make it easy to run this file.
Now run the code with npm run multipack and we’re sending multiple messages using our new messaging service.

99 problems but a flake ain’t one
You’re public with your alerts subscription and your friends have all been telling their friends about it. As your numbers start to grow you’re sending more and more notifications about impending ice cream delivery. If you’re really successful you might break the 100 subscriber mark quickly, but success can breed problems. Due to the asynchronous nature of Node.js and the Twilio API’s concurrency limits, you might find errors.
We could write the code to queue the messages to be sent creating greater complexity in our application or we could reach into the bag of Twilio tricks and pull out one that is going to save us a lot of time and effort.
The trick in this case is Twilio Notify. Using Notify you can send hundreds, even thousands of messages in just one API request. Let’s see how.
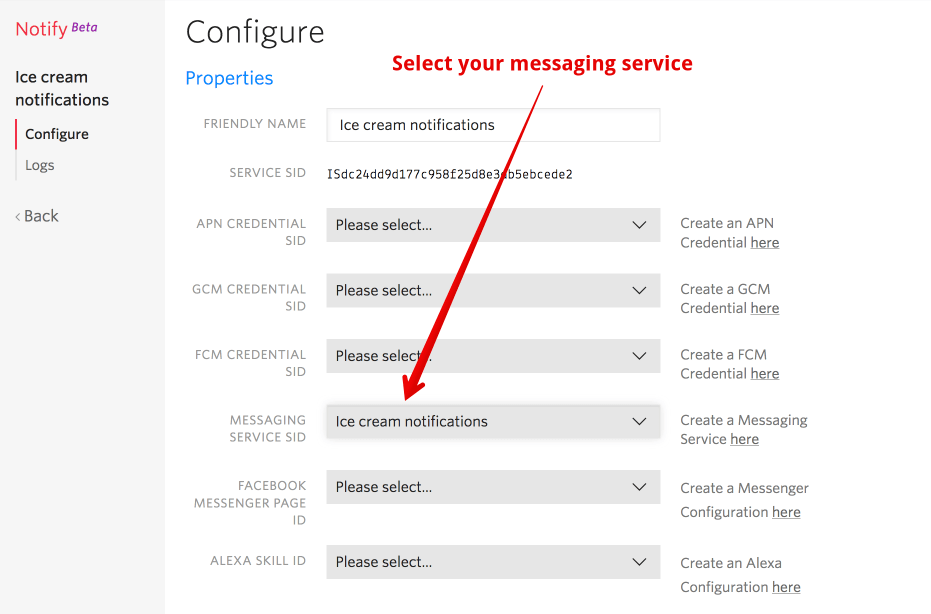
First up you need to create yourself a new Notify service in the Twilio console. Once it’s created, you need to configure it with the messaging service that you created in the last step.
Grab the Notify service Sid and add it to your .env file.
Time to write the code. Create a file called 99flake.js and open it up. Start with the same 3 lines from multipack.js.
This time we’ll get a handle to our Notify service:
We need to turn our numbers into Notify’s binding format. Bindings are normally created once and used as part of segments when sending notifications via SMS, iOS, Android and other channels. But if we just want to send messages straight away, we can create the bindings on the fly.
To do so, we turn each number into a JSON object of the type: {"binding_type":"sms", "address": NUMBER}. The code to do this looks like:
Twilio limits the size of an API request to 1MB total, which is typically sufficient to send to about 10,000 numbers. If you have more messages to send, then you’ll want to split up the requests.
Note: if you are sending to this many numbers at a time, you may want to add many more numbers or a short code to your number pool. Check out the guidance on carrier filtering to learn more.
Use the service to create a notification that will be sent to each of the bindings:
Save the file and add this line to package.json:
Run npm run 99flake and you will send out all of your notifications using the combined power of Twilio Notify and your messaging service. Notify handles sending the messages after your one API call and the messaging service can fan it out over the numbers in your number pool.

Ice cream for everyone
Now you know the different options you have for sending, one, a few or a lot of messages. If you need to send one at a time then the regular API is all you need. Once you need to send a few messages, then a messaging service can help to scale that sending and if you have hundreds or thousands of messages to send then Notify has got you covered. You can check out the code from this post on GitHub.
Do you have any other questions about sending bulk SMS messages with Node.js? Just let me know in the comments, on Twitter or by email at philnash@twilio.com.
Stay frosty.


Related Resources
Twilio Docs
From APIs to SDKs to sample apps
API reference documentation, SDKs, helper libraries, quickstarts, and tutorials for your language and platform.
Resource Center
The latest ebooks, industry reports, and webinars
Learn from customer engagement experts to improve your own communication.
Ahoy
Twilio's developer community hub
Best practices, code samples, and inspiration to build communications and digital engagement experiences.