Add Dominant Speaker Detection to your Twilio Programmable Video Application
Time to read:
January 29, 2021
Written by
Making a feature rich video conferencing solution has never been so easy. Thanks to Twilio Programmable Video API you can now make a robust video chat application without any hassle. You can check out a basic Video Chat Tutorial to see the power of Twilio APIs yourself.
In this article we will look at dominant speaker detection, which is an interesting feature for calls with multiple participants. For instance, you can think about a typical classroom scenario where multiple students are trying to speak simultaneously. By highlighting the loudest participant, focusing attention on the current speaker becomes easier.
Fortunately, this can be easily achieved using Twilio Dominant Speaker Detection API as we will see in this tutorial.
Tutorial requirements
This article is an extension of the Video Chat Application tutorial, so we will be reusing the code of that base video application. The application uses vanilla JavaScript, HTML, CSS and Flask (Python Framework) as back end.
Below are the requirements to run the application on your system:
- Python 3.6 or newer. If your operating system does not provide a Python interpreter, you can go to python.org to download an installer.
- A free or paid Twilio account. If you are new to Twilio, get your free account.
- A web browser that is compatible with the Twilio Programmable Video JavaScript library (see below for a list of them). Note that this requirement also applies to the users of the application.
Supported web browsers
Since the core video and audio functionality of this project is provided by Twilio Programmable Video, we'll need to use one of the supported web browsers listed below:
- Android: Chrome and Firefox
- iOS: Safari
- Linux: Chrome and Firefox
- macOS: Chrome, Firefox, Safari and Edge
- Windows: Chrome, Firefox and Edge
Please check the Programmable Video documentation for the latest supported web browser list.
Installing and running the base application
This tutorial will add the dominant speaker feature over the base Twilio Video Call Application. To follow along, clone the base application to your system. You can find the basic video chat application here: https://github.com/miguelgrinberg/flask-twilio-video/tree/only-video-sharing. To clone this application with git use the following commands:
However if you are interested in downloading the complete project instead of building it step by step, you can get the entire application here: https://github.com/abhimanyu-bitsgoa/twilio-videocall-dominant-speaker.
Setting up your Twilio account
Before starting with the coding portion of this tutorial, let’s set up your Twilio account. This application needs to authenticate against the Twilio service using your Twilio Account SID, an API Key SID and its corresponding API Key Secret. Please review “Setting up your Twilio account” section of the video calling tutorial for more information about obtaining these credentials. If you have followed the base tutorial already, then you can continue using the same credentials.
The base application code includes a file named .env.template which includes the three configuration variables needed. Make a copy of this file, change the name to .env (dot env), and edit it as follows:
Creating a Python virtual environment
Once you have downloaded the code, create a virtual environment where the Python dependencies can be installed.
You can navigate to your project directory and issue the following commands depending upon your operating system:
On Linux, macOS, or *BSD, open a terminal session and enter:
On Windows, open Command Prompt and enter:
The last command uses pip, the Python package installer, to install the Python packages (dependencies) used by this application. These packages are:
- The Twilio Python Helper library, to work with the Twilio APIs
- The Flask framework, to create the web application
- Python-dotenv, to import the contents of our .env file as environment variables
- Pyngrok, a Python wrapper for ngrok, which will let us expose the development version of our application temporarily on the Internet
Running the application
We are almost ready to run the base application. But before doing that, we must specify environment variables for our Flask web application.
A clean way of doing that is to leverage the Flask’s dotenv support that reads the environment variables directly from a .flaskenv file. Hence simply create a file named .flaskenv in your project directory and add the following:
This will automatically set the environment variables to the values specified whenever you run your Flask Application.
We are now ready to run the application. Let’s bring up the web server:
Your application is now up and accepting any incoming local connections on the http://localhost:5000/ URL. Keep this terminal open to keep the web server running. Open your browser and go to this web address to confirm that the application is up.
However, we will like this local server to be accessible via a public IP so that we can invite remote participants to a video call. One easy way to do that is to use ngrok, which will furnish a temporary public URL for our application so that people over the Internet can access it. Hence, open a second terminal window and after activating your Python virtual environment, run the following:
Ngrok will assign a public URL to your local server, which you can see in the lines that start with “Forwarding”. Since many browsers don’t allow microphone and camera access on unencrypted connections we will use the URL with https://. Make sure that you can access the application when you enter this URL in the address bar of your browser.
If you’d like to understand this setup in a more detail you can head over to the base Video calling tutorial.
Page layout updates
Since this tutorial builds upon the base Video Chat Application, we will update the existing index.html and styles.css files to reflect our changes. The lines that have been added or changed from the base project are highlighted.
Below is the updated templates/index.html file for the current tutorial, with the lines that have changed highlighted:
Next let’s have a look at the updated static/styles.css file, which just adds the nameLabel class:
Once done, you can refresh the page in your browser to load these changes and try it out. The result will look something like this:
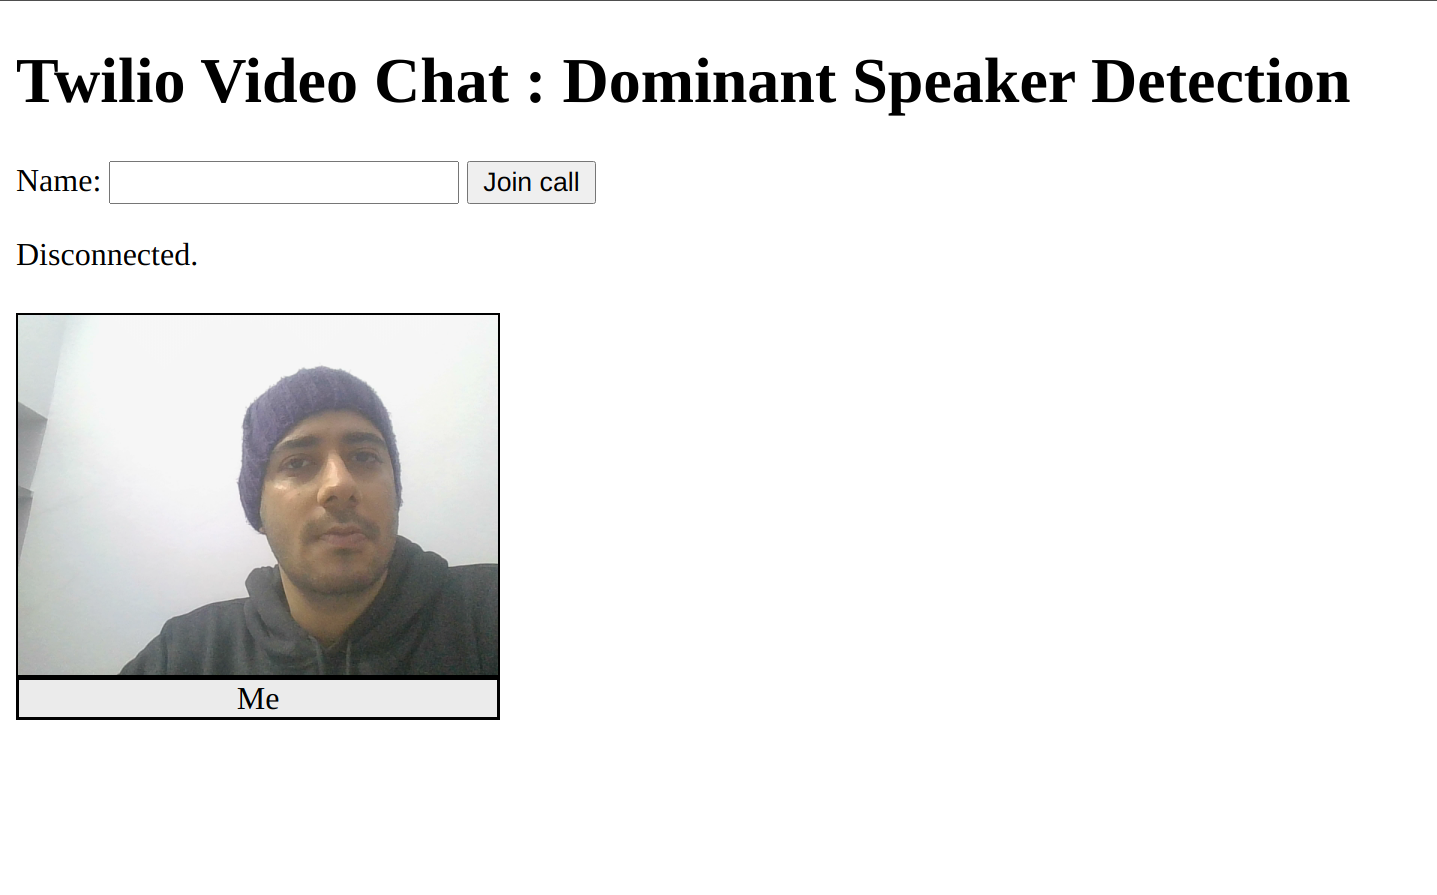
As compared to the base application we have made minor style changes and added the new class called nameLabel for styling the name tag of the participant. We have also set a default background-color attribute to it. Moving forward we will be using this background-color property to highlight the dominant speaker.
Detecting the dominant speaker
In a multi-party video application, the dominant speaker is the participant sharing the loudest audio track in the room. The Dominant Speaker Detection API sends events to your application every time the dominant speaker changes.
We will use these events to capture the dominant speaker and alter the background-color attribute of their name tag to highlight them. But before that, we want a way to uniquely identify the name tags of all the remote participants in our video call.
Note that the dominant speaker feature is not available for rooms that use peer-to-peer connections, since in that case the media streams are exchanged between the participants directly without passing through Twilio’s servers. You can review information about the four different types of rooms in the documentation, but as a summary, these are the four room types and which of them support dominant speaker detection:
- Go rooms: up to 2 participants (no dominant speaker detection)
- P2P rooms: up to 10 participants (no dominant speaker detection)
- Small Group rooms: up to 4 participants (dominant speaker detection supported)
- Group rooms: up to 50 participants (dominant speaker detection supported)
By default rooms are created as Group rooms, so unless you have intentionally changed the default room type in your Twilio account your room should be able to detect dominant speakers without any additional configuration. You can view in the Programmable Video dashboard of the Twilio Console.
Associating name tags with remote participants
This can be done inside the participantConnected(...) function from the app.js file in the static directory, where we already have the reference to the remote participant who is joining the video call. Let’s have a look at the updated participantConnected(...) function. Changes and additions are highlighted.
Here we have dynamically added the nameLabel class to the participant’s name tag for a consistent styling across all the participants. Further, each name tag is uniquely identified with the help of the id attribute that holds the remote participant’s SID.
This mapping is crucial to identify the name tag of the dominant speaker so that we can highlight it.
Handling dominant speaker change
Whenever the dominant speaker changes inside Twilio Group Rooms with 2 or more participants, dominantSpeakerChanged event is emitted. The remote participant with the loudest RemoteAudioTrack is considered a dominant speaker.
We will be modifying the connect(...) function from the base application to capture and handle this event. Below is the updated connect(...) function with all the additions and modifications highlighted.
As shown above, to enable the Dominant Speaker API and to start receiving dominantSpeakerChanged events we need to set the property dominantSpeaker to true inside the Twilio.Video.connect() call.
Further, we are calling an event handler function handleSpeakerChange(...) every time we receive the dominantSpeakerChanged events from the room. Let’s add the code for this event handler in app.js:
Whenever a dominantSpeakerChanged event is received, we need to remove the highlight from the previous speaker and add it to the current dominant speaker. We are using a removeDominantSpeaker() auxiliary function to remove the name tag highlight from the last dominant speaker and assignDominantSpeaker() to highlight the new one.
Additionally, we will also use a simple auxiliary function setLabelColor(...) to set the background-color of a label element. Below are the implementations of these auxiliary functions:
In the removeDominantSpeaker() function we are using the lastSpeakerSID to reference the name tag of the last speaker to set its background-color to default.
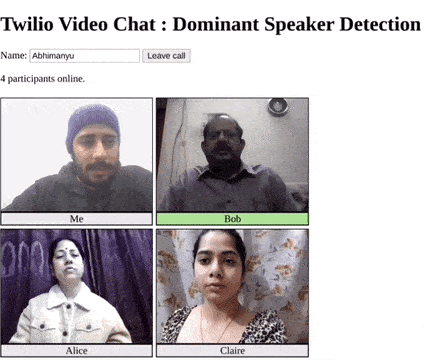
While in the assignDominantSpeaker() function we fetch the name tag of the participant and set its background-color to green to indicate that the participant is currently the dominant speaker.
After the following changes, you can refresh the page in your browser to see the final application. It will work something like this:

Congratulations! You can now communicate more effectively with Twilio Dominant Speaker Detection API.
Have fun expressing yourself!

Conclusion
I hope that you found this tutorial interesting and useful in enhancing the quality of your video interactions. The code for this application is available in the twilio-videocall-dominant-speaker repository on Github.
I will love to see what you are building! Feel free to connect with me on Twitter at @abshekha

Related Resources
Twilio Docs
From APIs to SDKs to sample apps
API reference documentation, SDKs, helper libraries, quickstarts, and tutorials for your language and platform.
Resource Center
The latest ebooks, industry reports, and webinars
Learn from customer engagement experts to improve your own communication.
Ahoy
Twilio's developer community hub
Best practices, code samples, and inspiration to build communications and digital engagement experiences.