Passing Context from Google Dialogflow to Twilio Studio (Or, There and Back Again)
Time to read:
December 22, 2021
Written by

While building an IVR in Twilio Studio, you may run into a scenario in the flow logic that could be better handled or enhanced by incorporating conversational AI. For example, a sick patient calls a medical office and selects the IVR option to get medical advice, but still needs to describe their symptoms to get detailed help. Or, a cyclist calls their local shop, gets routed to the mechanical department, then needs to schedule a time to get their bike fixed. The caller is routed to the correct department, then describes their unique intent to the voice agent, and a natural language processing (NLP) platform picks out key words and phrases from the conversation to determine exactly what they need.
Blending a static decision tree with a conversational bot can solve a wide range of customer needs, from common requests to detailed problem solving. Callers will appreciate getting detailed medical advice without the wait for a beyond-busy physician, or the ability to book a bike repair time slot while the mechanic is out to lunch. These use cases and more can be handled by linking your Studio flow via the Connect Virtual Agent widget to Google’s natural language understanding platform, Dialogflow. In this post, I'll show you how to integrate your Twilio Studio IVR with Google Dialogflow to pass call context back and forth.
What is Google Dialogflow?
But wait…hold the phone, what exactly is Google Dialogflow? This platform analyzes and determines the caller’s intent, and can be trained to respond accurately. There are two options for Dialogflow services: CX and ES. Great! Letters! But, what’s the difference? Simply put, ES (Essentials) is the standard agent type, and CX (Customer Experience) is the enterprise solution for highly complex use cases. In this article, we will only cover ES.
Twilio offers a native one-click integration to hook up your Studio flow to a Dialogflow ES agent, which renders the addition of conversational AI a breeze. This post builds on the integration quickstart and goes one step further. We will cover how to pass your IVR caller off to a Dialogflow agent, then direct the caller back into the Studio flow along with data from the virtual agent interaction (such as the speech-to-text gathered intents).
It will look something like this:
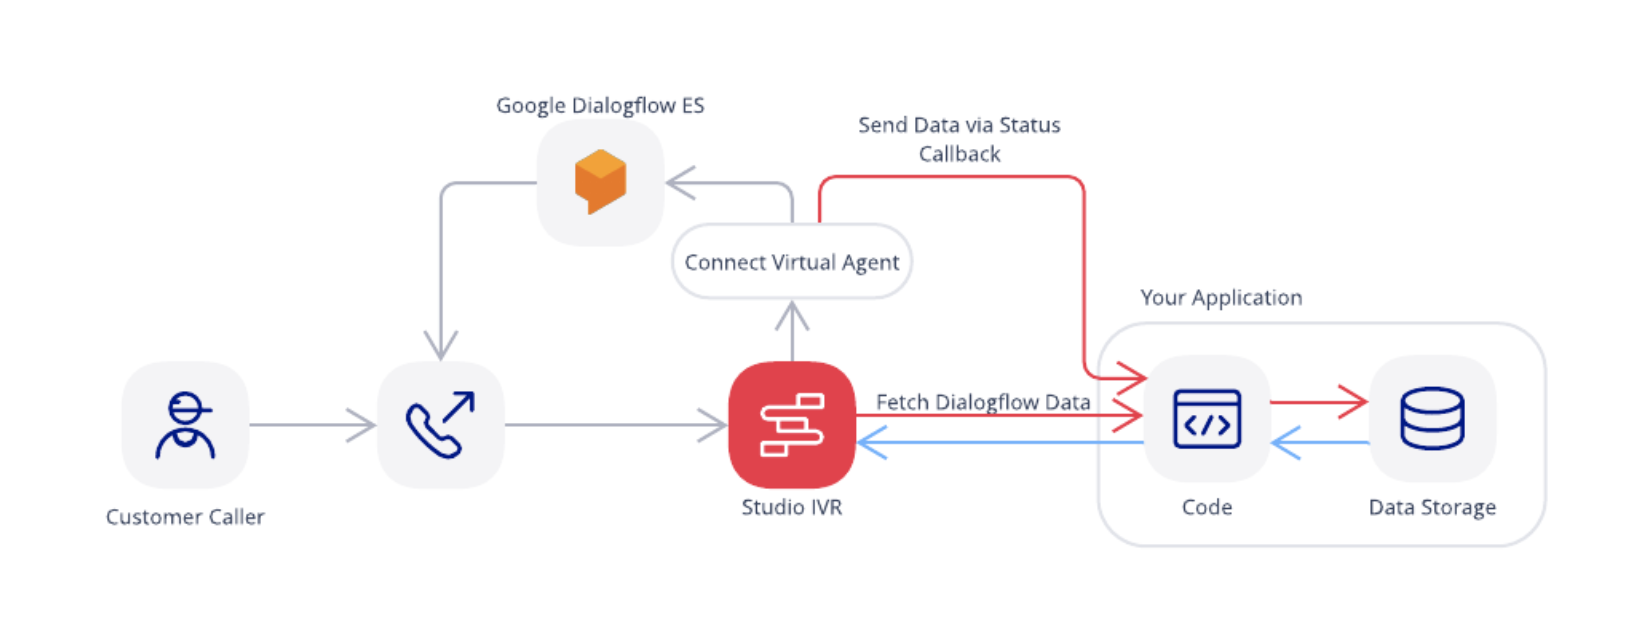
The above diagram details a Studio roundtrip ticket to and from Dialogflow, and you want to claim your souvenir agent chat data on arrival back home.
With these step-by-step instructions, we will create an IVR that incorporates a voice chat bot.
This post will cover
- Blending interactive IVR decision trees with a virtual agent
- Storing speech-to-text caller intent data
- Ending the bot agent interaction without a hangup
- Directing the caller back into Studio
- Passing stored data into Studio
- API endpoints required to handle interactions
- Bonus solutions
Prerequisites
To get started you’ll need:
- Completion of one-click Virtual Agent integration
- Basic understanding of either Node.js & Express or Python & Flask
- Installed Ngrok
- A burning desire to continue reading this riveting article
Solution overview
Returning to the initial bike shop example, the rest of the article will use a fictional bike company called Owl Bikes to illustrate the IVR to Dialogflow round-trip solution. Owl Bikes offers retail and repair options on site. For efficiency (and the staff’s peace of mind) they need to set up an IVR and small application to handle call routing and common customer requests. The scope includes:
- Customer calls Owl Bikes, selects schedule bike repair from menu
- Direct call to Dialogflow via Connect Virtual Agent widget
- Within the application, agent speech-to-text interaction is recorded in a data store on each callback
- End interaction & return to Studio
- Studio fetches contextual appointment data from the application using the HTTP Request widget
- Caller confirms appointment
Tutorial time
Configure initial Studio Flow
Assuming you’ve completed the one-click virtual agent integration, you should have a Twilio phone number assigned to the Studio flow that is set up to interact with your Dialogflow agent. Now, let’s modify the flow to give the Owl Bikes customer an option for sales or repair. Add a main menu by using the Gather Input on Call widget. Next, direct the caller appropriately using the Split Based On widget:
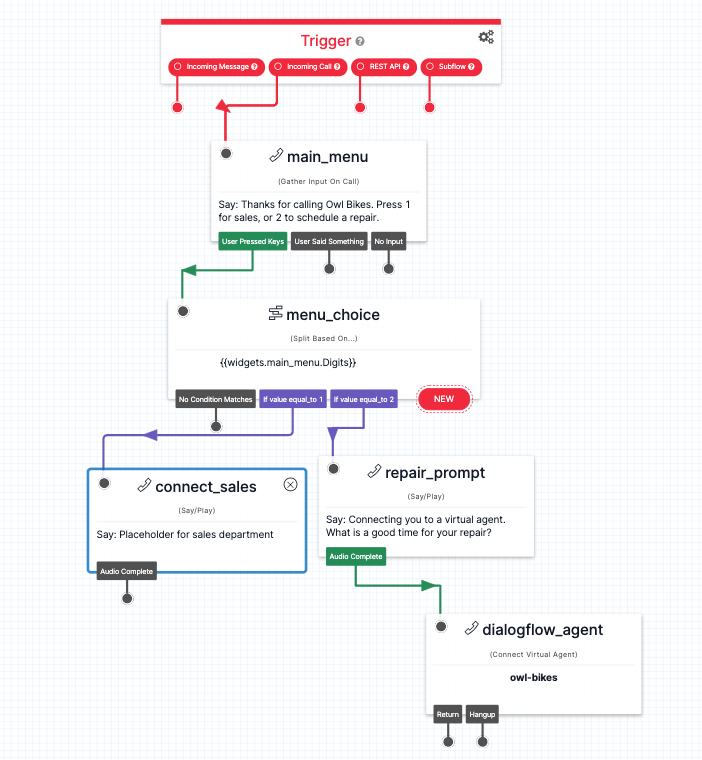
The sales department option is a placeholder Say widget, since the repair agent logic is the focus of this tutorial.
You will need to prompt the caller to speak initially from Studio, since the default Dialogflow welcome intent will not trigger after connection. The repair_prompt Say widget handles this to make it a smooth transition. It is followed by Connect Virtual Agent, which directs the caller to the Dialogflow repair scheduler agent.
Create repair scheduler agent
Within Google’s Dialogflow interface, let’s create an agent named bike_shop_agent. Yes, it’s not the most creative...but if you want to add a personal touch you could perhaps name it Steve or Eleanor, but the caller won’t be aware. But you’ll know, secretly. Anyways.
Every agent has two default intents:
- Default Fallback Intent - If the caller says something the agent cannot decipher, it will respond with one of these phrases
- Default Welcome Intent - If the caller says a detectable greeting - “hello” for example - the agent responds with one of the default welcome phrases
Without getting too in the weeds regarding the details on setting up a Dialogflow agent, add a new intent called schedule repair and give it some training phrases and actions as follows:
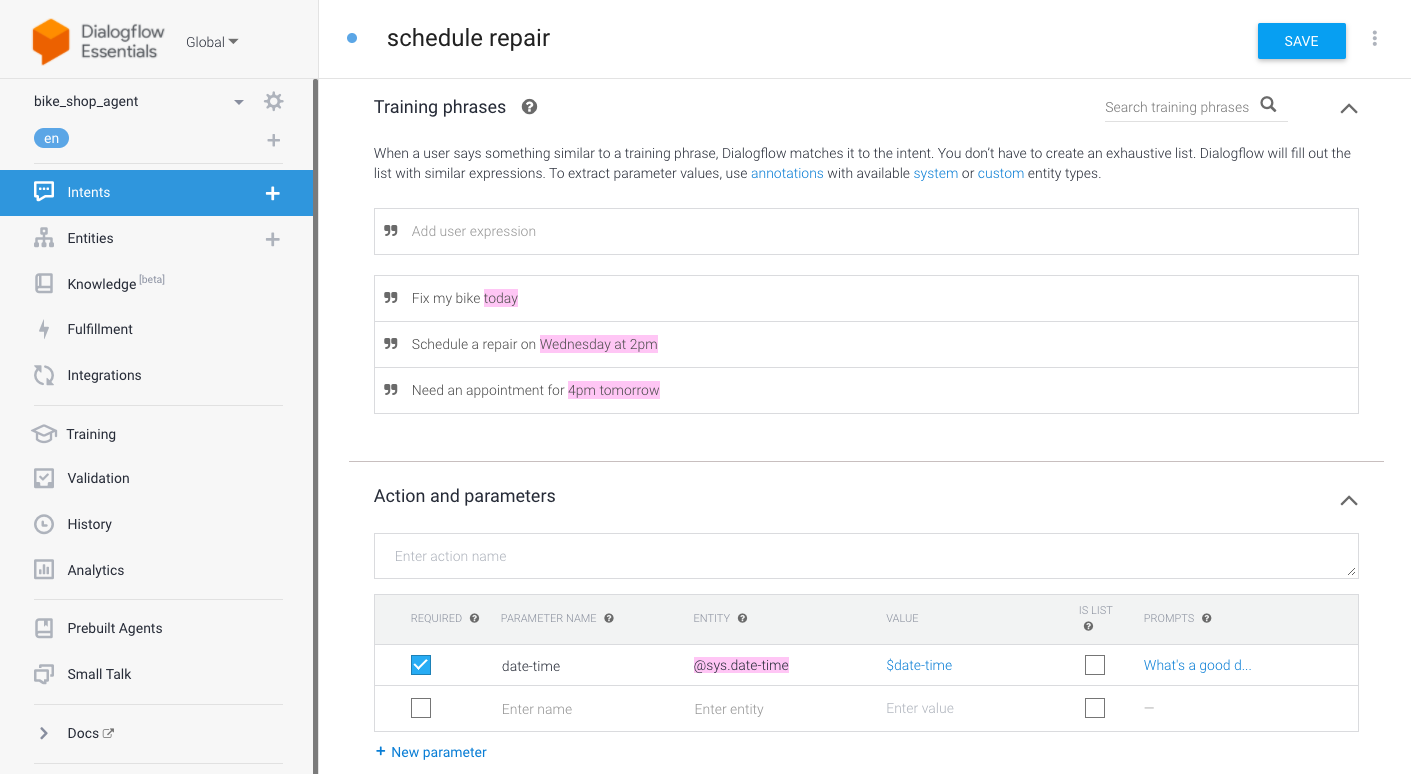
Our agent does a great job of picking out dates and times from natural language. You can assign these a value, preceded by the $ dollar sign. Note date-time is flagged as required. The caller has to provide this information if they want to get an appointment!
Now, we need the agent to respond appropriately to this intent. Add the following response, and make sure “Set this intent as end of conversation” is NOT toggled on:
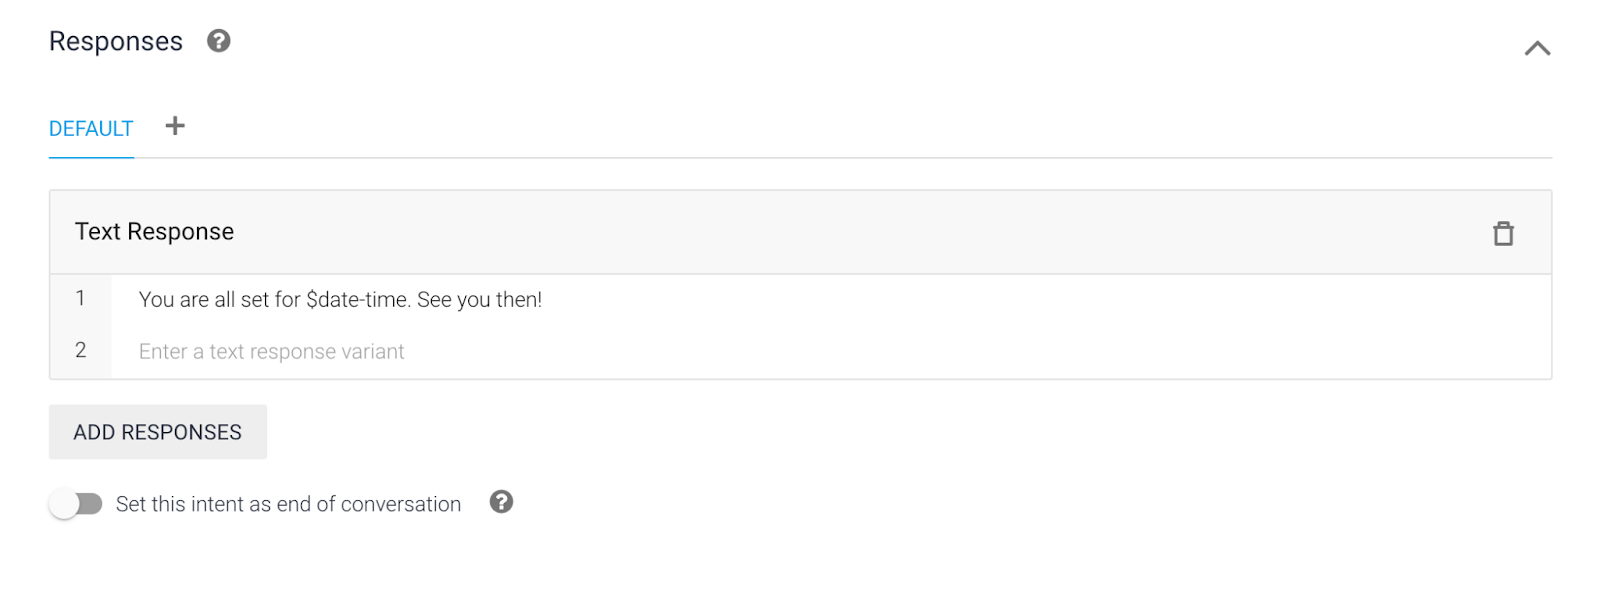
If this intent is the end of the conversation, Dialogflow will hang up and the user cannot be redirected back to the Studio flow. We will manually end the conversation in our program in an upcoming step.
Set up the local server
Alright people, it’s coding time. Well, the code is already complete – nice. But you still have to run it locally. Clone this Github Repository and follow the README directions for the coding language of your choice - either Node or Python. Now you have a local server running on port 8081.
This app contains three endpoints you’ll need to complete the tutorial:
- Virtual Agent Callback Endpoint
- Google Dialogflow Callback Endpoint
- Data fetch Endpoint
Next, run ngrok on top of the local server’s port 8081 to get a secure HTTPS connection. Twilio products will only work with secure connections, so we need to create a tunnel to our localhost port and securely expose it to the internet. Run the following command in your terminal:
ngrok http 8081And your terminal will look like this:
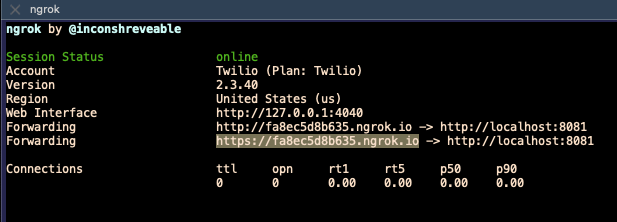
You can see the ngrok domain is forwarding to our local server. The highlighted https domain is the address you will copy for the next step.
Store conversation data via virtual agent callback
Back into our Studio flow, click on the Connect Virtual Agent widget. Paste your ngrok https domain into the STATUS CALLBACK URL input, and make sure it includes our application’s endpoint URI: /virtual-agent-callback.
The whole thing will look something like this:
https://yourSuperCoolDomain.ngrok.io/virtual-agent-callback
Save and publish the flow. Great! What does it do? Every time the caller speaks to the virtual agent, this callback will send the speech-to-text data to our /virtual-agent-callback endpoint. Try calling the Twilio phone number assigned to your published Studio flow, select bike repair to speak with the agent, and watch the console log output in your terminal after requesting a fix. After speaking, you will see a data response with your transcripted words like:

This data is being stored in a local variable in the application for demonstrative purposes. In a production-level scenario this could be stored in a database, Redis instance, JSON file - it’s up to you! In addition to temporary or longer term data storage, this is also helpful for custom data logging, or displaying a live transcription of the interaction.
End agent conversation (Without hanging up)
Once Dialogflow has fulfilled the caller’s intent, and we’ve stored the transcription data locally, we need to terminate the agent interaction and return to the Studio flow. Redirecting the caller back into the Studio flow was not as straightforward as one would hope. If the aforementioned “Set this intent as the end of conversation” option within Intent was toggled on, Dialogflow would hang up. If not, the call continued but with no logical path to continue… meaning awkward dead air for the caller, although the bot agent most likely doesn’t mind extended purposeless silence.
Luckily (for the caller), we can manually end the conversation with a combination of the Dialogflow fulfillment webhook and our Google Dialogflow Callback Endpoint in the application under the URI: /dialogflow-fulfillment-webhook.
Back in Dialogflow, navigate the the Fulfillment page, enable the webhook, and add your ngrok URL with our custom fulfillment URI like so:
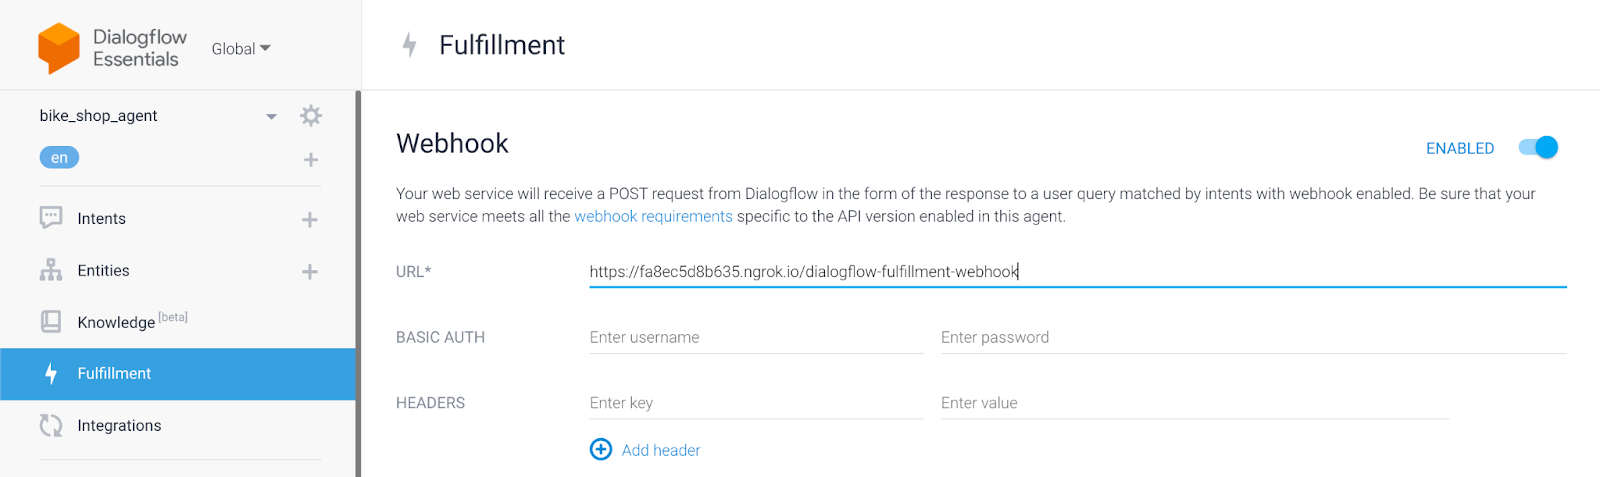
Be sure to scroll down and save.
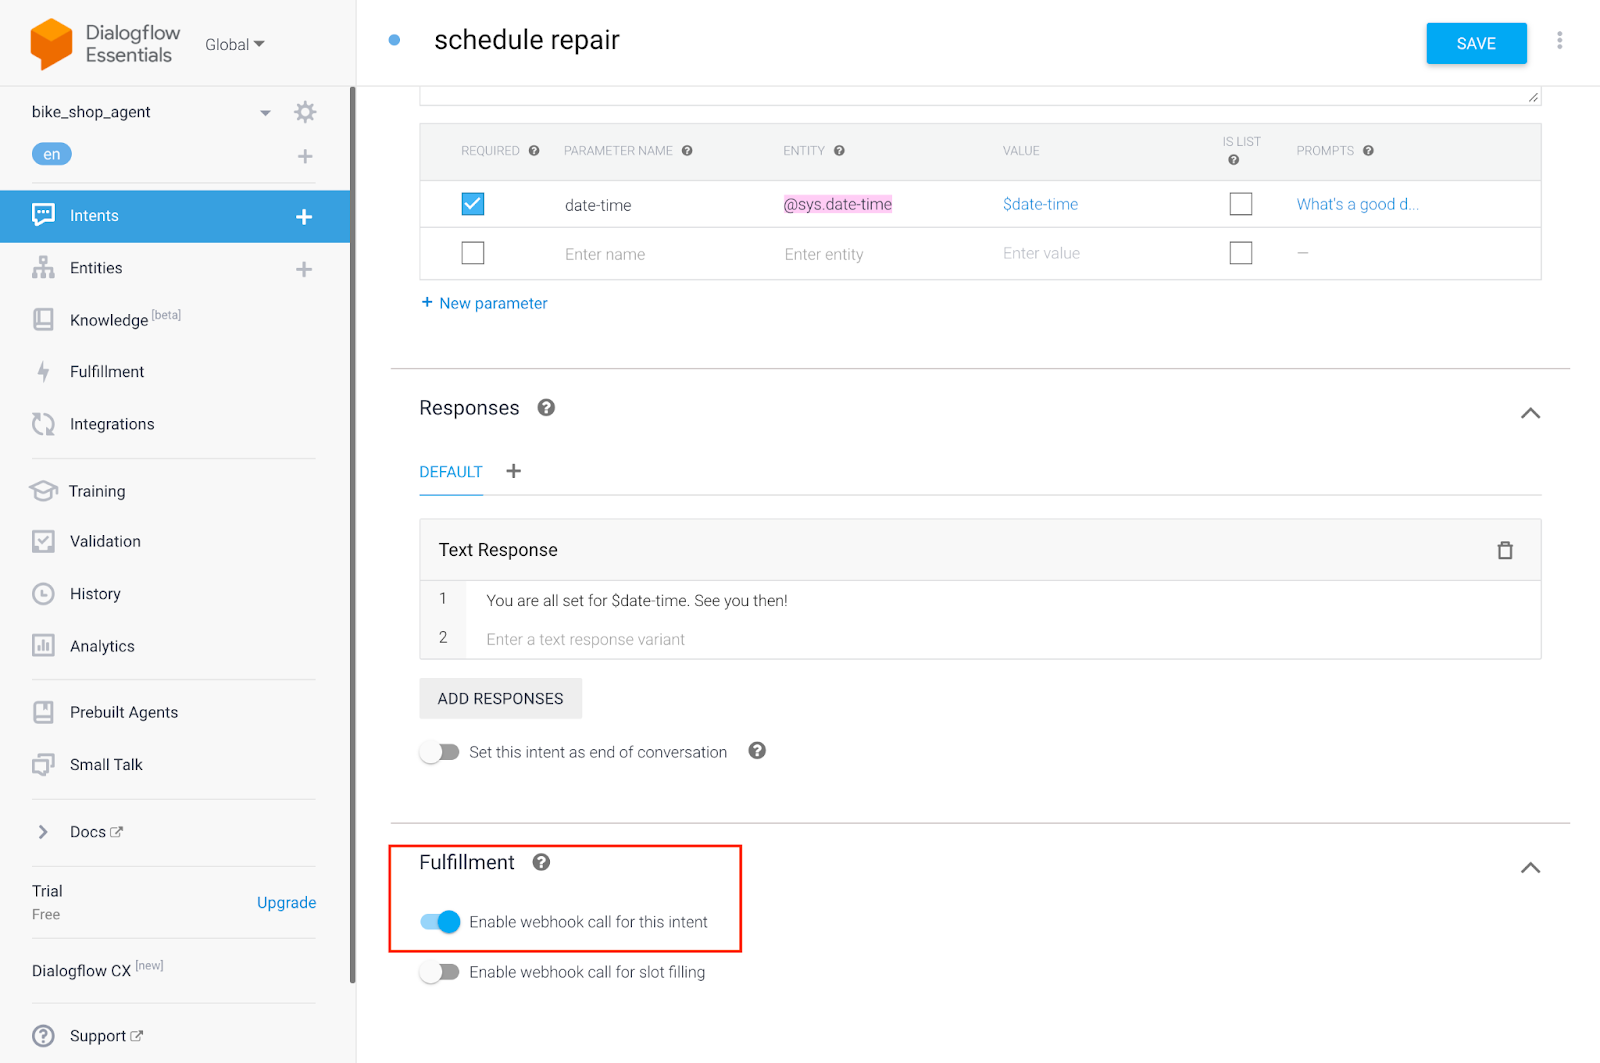
Now, we must go back to the schedule repair intent, scroll down to Fulfillment, and toggle the Enable webhook call for this intent on.
Now, when the scheduling intent is fulfilled the Dialogflow webhook will hit our application’s endpoint /dialogflow-fulfillment-webhook. If we take a look at our code, this endpoint responds with some JSON to both indicate to the caller the intent has been received, and ends the interaction.

The Dialogflow webhook is extremely similar to the Connect Virtual Agent widget status callback. You’ll notice our application’s endpoint is nearly identical. If you call into the IVR and proceed as before to test it out, you’ll notice the console output from the /dialogflow-fulfillment-webhook is the response from Dialogflow. It contains lots of useful data such as the fulfillmentText, intent, and - hey! - even the speech-to-text QueryText.

It’s possible to use this webhook in lieu of the Studio status callback, but this article demonstrates the potential of both options working in tandem.
Fetch conversation data in Studio Flow
Alright, so far the caller can select the repair shop option in our IVR, speak to a virtual agent, we record their speech-to-text in our app, and manually complete the agent interaction.
The final leg of this journey involves directing the caller back into the Studio flow to confirm their interaction, and give them the option to return to the main menu.
Back in Studio, we will add two more widgets following Connect Virtual Agent - the Make HTTP Request widget, and Say widget.
Our flow should now look like this:
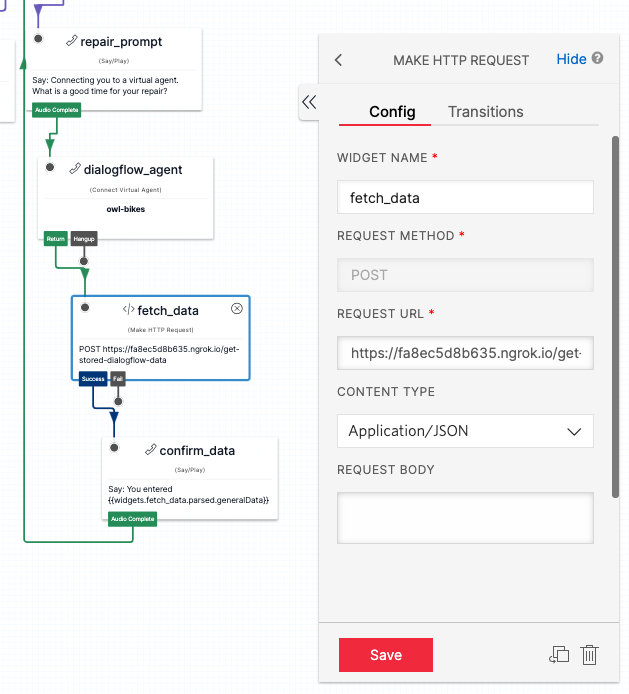
Connect Virtual Agent leads to the HTTP Request widget, which is hooked up to our third and final endpoint for this tutorial. Copy in the ngrok url followed by the /get-stored-dialogflow-data URI from our application. Ensure the request method is a POST, and the content type is Application/JSON. This grabs the stored agent conversation data from our application and makes it available as a liquid variable to use in Studio, via {{widgets.fetch_data.parsed.generalData}}.
Attach a Say widget to the HTTP Request widget, and use this variable in the confirmation message as shown above. Once the audio is complete, you can direct the caller back to the main menu. Be sure to save and publish your flow.
Et voila!, you’ve completed your round trip from Studio, to Dialogflow. Or, there and back again. Feel free to call into this IVR to test out the journey and watch the data in real time flow through your program by watching the console logs in the terminal.
Twilio Studio and Dialogflow and call context – plus Bonus Solutions
Congratulations, you now have an integration which lets you pass call context back and forth between Twilio Studio and Google Dialogflow. You probably want to enhance your flow next – here are some ideas on which features to add:
- Connect Virtual Agent currently does not support a DTMF option by default. You can circumvent this by adding a DTMF as an alternate option in Studio flow.
- If multiple agent options are needed in the flow, simply use a query string in the status callback + API endpoint to identify which widget or step the caller is on. Thus, you can store the data in separate variables based on which agent the caller has interacted with.
- If you're integrating with Flex, see our post on connecting digital channels in Flex to DialogFlow CX.
Hopefully, this tutorial was a straightforward way to integrate the two. We can't wait to call what you've built!
Krista Goralczyk is an Austin-based Solutions Engineer at Twilio. She’s dedicated making people's lives easier through the use of technology by automating one common use case at a time. She can be reached at kgoralczyk [at] twilio.com.


Related Resources
Twilio Docs
From APIs to SDKs to sample apps
API reference documentation, SDKs, helper libraries, quickstarts, and tutorials for your language and platform.
Resource Center
The latest ebooks, industry reports, and webinars
Learn from customer engagement experts to improve your own communication.
Ahoy
Twilio's developer community hub
Best practices, code samples, and inspiration to build communications and digital engagement experiences.