Answering Health Questions via SMS with IBM Watson and Twilio
Time to read:
February 10, 2015
Written by
This post is part of Twilio’s archive and may contain outdated information. We’re always building something new, so be sure to check out our latest posts for the most up-to-date insights.

Q: “Combining these two APIs can let you quickly query a complex health data set via SMS.”
A: “What are IBM Watson and Twilio?”
You probably remember IBM Watson battling humans in Jeopardy. Now developers can access this same power via the Watson Question and Answer API. Currently IBM has exposed the health and travel data sets via the API. I wanted to build an app that lets me send a question about health in an SMS and get a response from the Watson. This app will allow me to trick my friends into being impressed by my expansive knowledge of healthy living. Today I’m going to show you how I did it using IBM Bluemix, the Watson Question and Answer API, Node.js and Twilio. You can try out the finished product by texting a health related question to: (929) 242-6747
What’s In Our Fannypack
We’ll be using the following technologies to build our app:
- IBM Bluemix – We’ll be using Bluemix to host our application, if you don’t have an account you can sign up for free.
- Cloud Foundry CLI – We’ll use the Cloud Foundry CLI (cf) to interact with Bluemix from the command line.
- Node.js
- Hapi.js – A HTTP server framework for Node.js.
- Twilio – Sign up for free.
Cause I’m Hapi
One of my favorite things to do when I’m building an application like this is to treat it as an opportunity to try new technologies I’ve been hearing about. I thought this application would be a fun excuse to use Hapi.js. Hapi.js is a Node.js HTTP server framework, in a similar vein to Express. If you’re wondering a bit more about Hapi and Node.js I’d highly recommend Matt Harrison’s great post “Express to Hapi.js”.
In order to interact with the Watson Question and Answer API we need to deploy this application to IBM Bluemix. To start, let’s just build the Hapi.js “hello world” application and deploy it to Bluemix to make sure we have everything set up correctly. After that we’ll integrate Watson and Twilio.
We can create a new directory on our location machine called twilio-watson and then initialize a new Node.js project in that directory:
Now we can install the Hapi module:
Next, we’ll use the excellent hello world from the Hapi homepage as the foundation for our application:
We need to make a couple of small changes to be able to deploy this app to Bluemix. On Bluemix, our application won’t be running on port 3000 of localhost. Fortunately, Bluemix provides the host and port that our app is running on in environment variables. Let’s update our code to use these variables if they’re available:
We need to do one last thing before we deploy – we’re going to create a manifest.yml. We use this file to make sure Bluemix knows how to start our application:
Make sure to replace [app-name] with an unique name for your application. Now let’s connect the Cloud Foundry CLI tool with Bluemix:
Now we can push our application to Bluemix:
Confirm we’re seeing “hello world” at [app-name].mybluemix.net/hello
Ask and You Shall Receive
Now that we have deployed our first app to Bluemix, we can start integrating Watson. In order to use the Watson API we need to sign up for the service using Cloud Foundry. We can see all our optional services:
There are a lot of optional services in the Bluemix marketplace. If you scroll through the list you’ll see the question_and_answer service. This is the one we want to add. We can add it like this:
We’ll also update our manifest.yml file to include the fact that we’re using the qa-service:
We can get responses from the Watson API by making a simple POST request. We’ll use the Node.js request module to make this request. Let’s install it and make sure it’s saved to our package.json file:
Now we can require it in our index.js:
Like our port and host values, Bluemix will pass us our Watson API credentials in environment variables. We can retrieve them will the following code after we get set our port and host variables:
Next we’ll create a new route called /question:
Within this route we will make a request to Watson and output response. Let’s start by retrieving our question from the POST data and building out the options for our request:
Let’s breakdown this code a bit. First we define that we’re making a request to the Watson healthcare question API and that that request will be a POST request. We also are passing the auth credentials we pulled from Bluemix. We’re then passing JSON indicating that we want to receive 1 piece of evidence (which will be an answer) to our question.
Now that we have our options defined we can use the request library to make the request and output our response to the browser:
Let’s deploy the new version of our application so we can test it:
This is a great time to make sure our code is working correctly. Let’s quickly test this using curl:
“Mr. Watson – Come here – I want to see you”
In order to respond to an SMS we need to send back the answer with TwiML. TwiML is a simple XML format that allows us to give Twilio basic instructions of what to do when an incoming phone call or text message comes into our Twilio phone number. We’ll be using the Twilio Node.js module to help generate our TwiML. Let’s install it:
Now let’s switch out the code in the callback of our request to respond with TwiML instead of just the answer text:
That’s it! We can now push our application one last time to Bluemix:
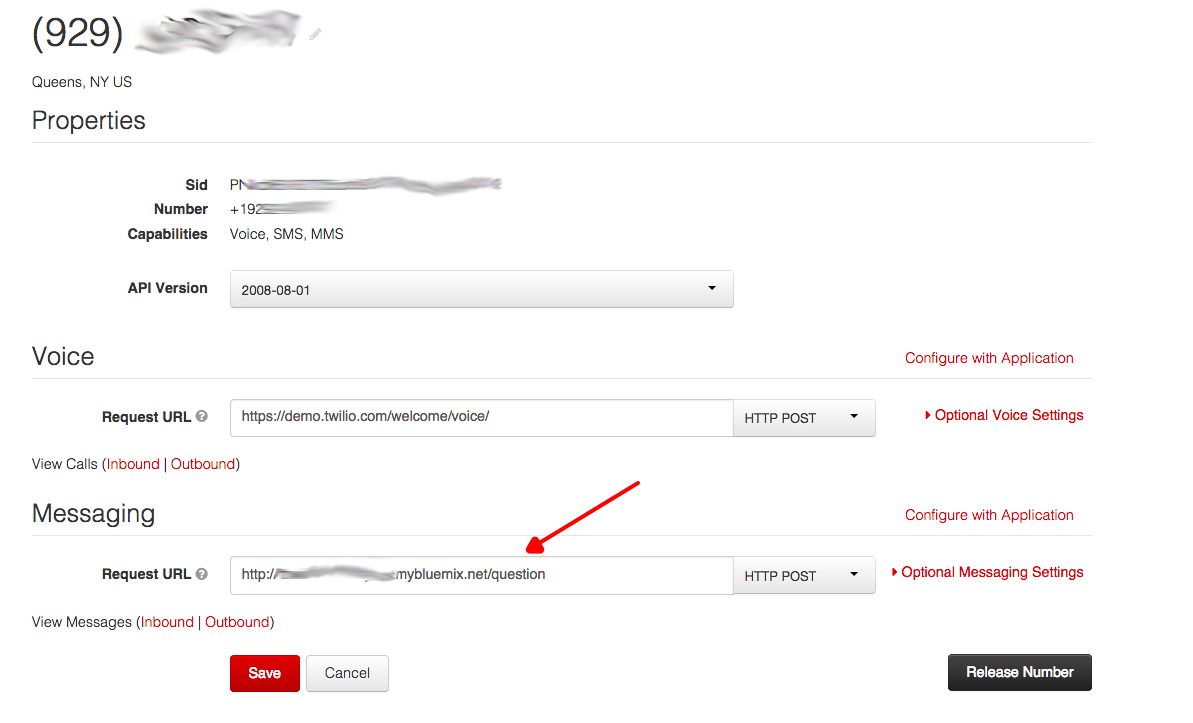
In order for Twilio to know to POST to our URL we need to add it as the Messaging Request URL for our Twilio phone number:
Now the moment of truth. Text a question to your number. Not sure what to ask? Try the question – “How often should I wash my hands?”. Victory!
If you’re not getting a response as expected, then this blog post on debugging your Twilio applications may help. And you can always use the cf logs command to view the logs from your Bluemix application. You can view the final code on github.
What’s Next?
Thanks to Watson and Twilio we can now trick our friends into thinking we have a wealth of health information. If they ask why you keep checking your phone just say you’re getting text messages from a friend. This app just scratches the surface on what you can do with the Watson APIs. Looking to make an improvement? See if you can get the app to work in more languages. Have any questions or want to show off your sick Twilio + Watson hack? You can find me @rickyrobinett or ricky@twilio.com


Related Resources
Twilio Docs
From APIs to SDKs to sample apps
API reference documentation, SDKs, helper libraries, quickstarts, and tutorials for your language and platform.
Resource Center
The latest ebooks, industry reports, and webinars
Learn from customer engagement experts to improve your own communication.
Ahoy
Twilio's developer community hub
Best practices, code samples, and inspiration to build communications and digital engagement experiences.