Build a Secret Santa App with Airtable, Twilio Programmable Voice, Twilio Functions, and JavaScript
Time to read:
December 07, 2023
Written by
Reviewed by
Introduction
As the holiday season arrives, you might be thinking about how you can use your JavaScript skills to bring the gift of giving to your friends and family. Secret Santa events, where each person draws a name and acts as that person’s “Secret Santa” by giving them an anonymous gift, are a time honored tradition. In this article you’ll learn how to build an app with Twilio Programmable Voice and Airtable that facilitates managing participants and drawing names.
App overview
When a participant calls in to your Twilio phone number they will hear an automated message that prompts them to either add their name to the participant list, or to learn whose name they’ve drawn, depending on whether or not the organizer has already instructed the app to draw names. The exact prompts that the caller will hear are dependent on whether or not names have already been drawn and whether or not they are the organizer.
Prerequisites
To get started with this project you’ll need:
- A free Twilio account and Twilio phone number
- An Airtable account and basic familiarity with the interface
- A foundational understanding of JavaScript and Node.js
Set up your Airtable base
Create your base and tables
In your browser, navigate to Airtable and create a new base called Secret Santa.
Change the name of the default table from Table-1 to Participants. Erase all the provided columns except for Name, and add two more:
- Phone, of type Phone Number
- Match, of type Single Line Text
Create a second table inside your new base called Events. Likewise, delete all the provided columns except Name and then add three more:
- Organizer, of type Single Line Text
- Phone, of type Phone Number
- NamesDrawn, of type Checkbox
Add preliminary data
In the Events table, add the information for your Secret Santa event. Give it a name, like Secret Santa 2023. Under Organizer, add your name.
Under Phone, add your phone number and be sure to include the + sign at the beginning and your country code. This is called E.164 format, and any time you type a phone number throughout this article it must be in this format. Here’s an example for a US based phone number: +15551234567.
Leave NamesDrawn unchecked.
Get your personal access token and base ID
With your Airtable base open, look at the URL in your browser’s navigation bar. It should look something like this:
https://airtable.com/appcTWmtcq5otMvnP/tblxxxxxxx/xxxxxxxxxx
Your base ID is the part of that URL that begins with app and includes everything up until the next URL segment. In the above example it’s: appcTWmtcq5otMvnP. Copy your base ID and save it to a note or other document for safekeeping, you’ll need it in a subsequent step.
Next, because this project involves using the Airtable API, you’ll need to get a personal access token to authenticate your app. Give your access token a generic name; something like Secret Santa is fine.
Under the Scopes heading, click the + Add a Scope button and select both data.records:read and data.records:write.
Under Access, select your Secret Santa base.
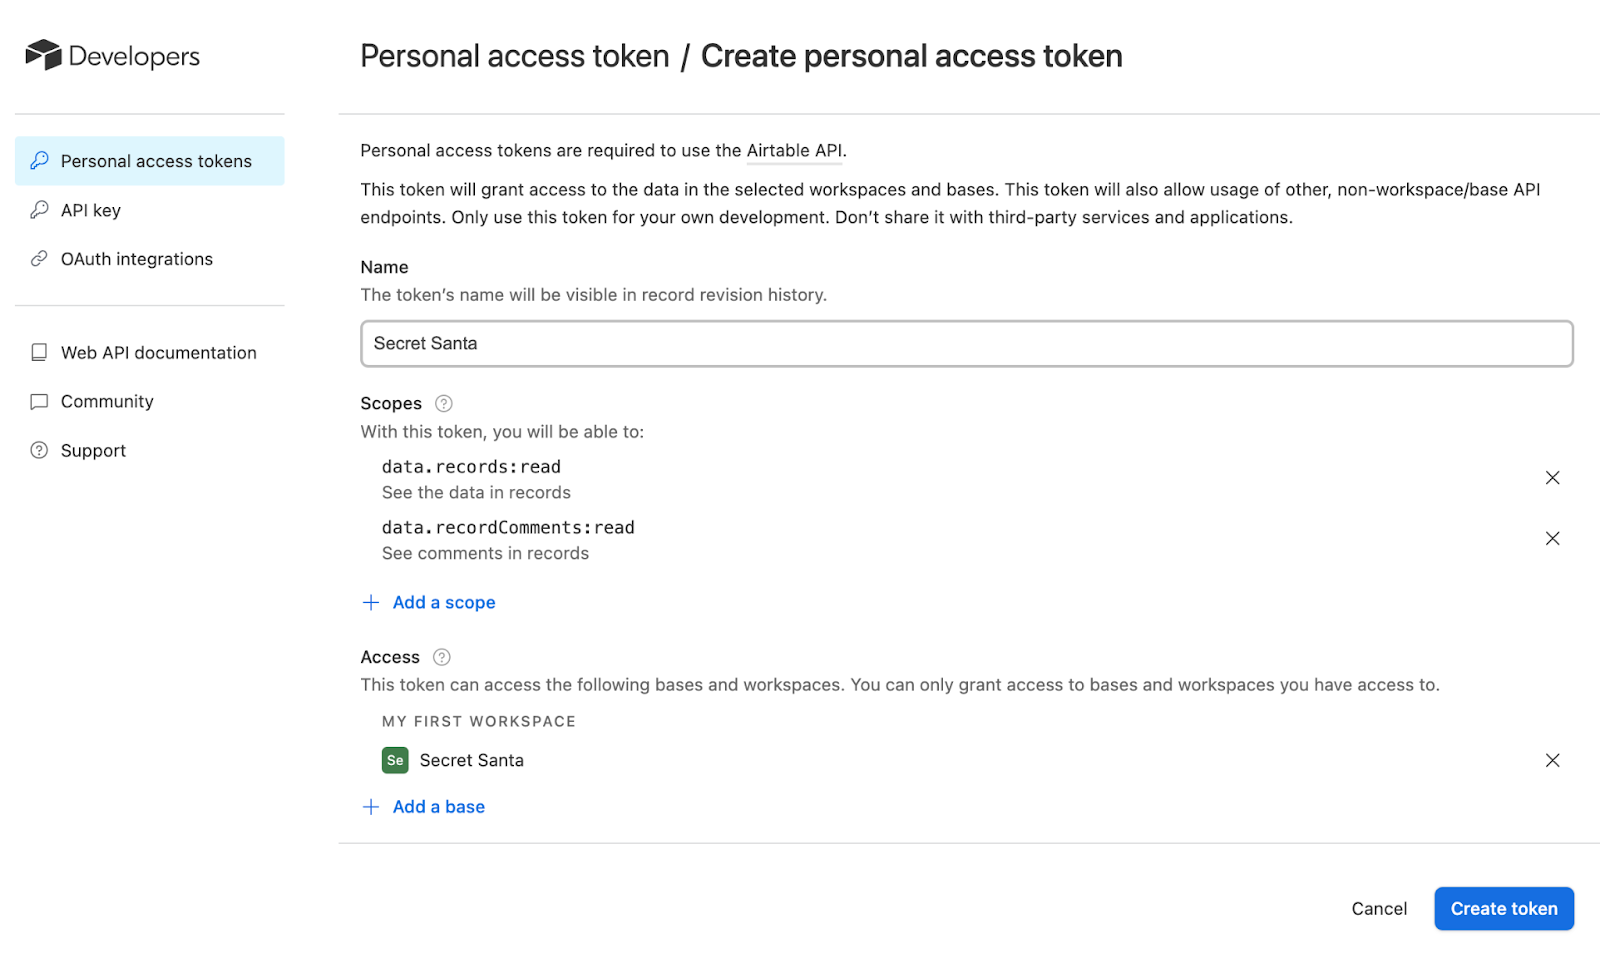
Click the Create token button and a modal will pop up with your access token. Copy it and paste it somewhere safe immediately.
Set up your Twilio Functions Service
Create your two functions
Your app’s code will be hosted on Twilio Functions, which is a serverless environment running Node.js. In your browser, navigate to the Services page inside the Twilio Functions segment of the Twilio Console. Click the Create Service button and when prompted, enter a name for your service. This name should be short and clear, “secret-santa” for example.
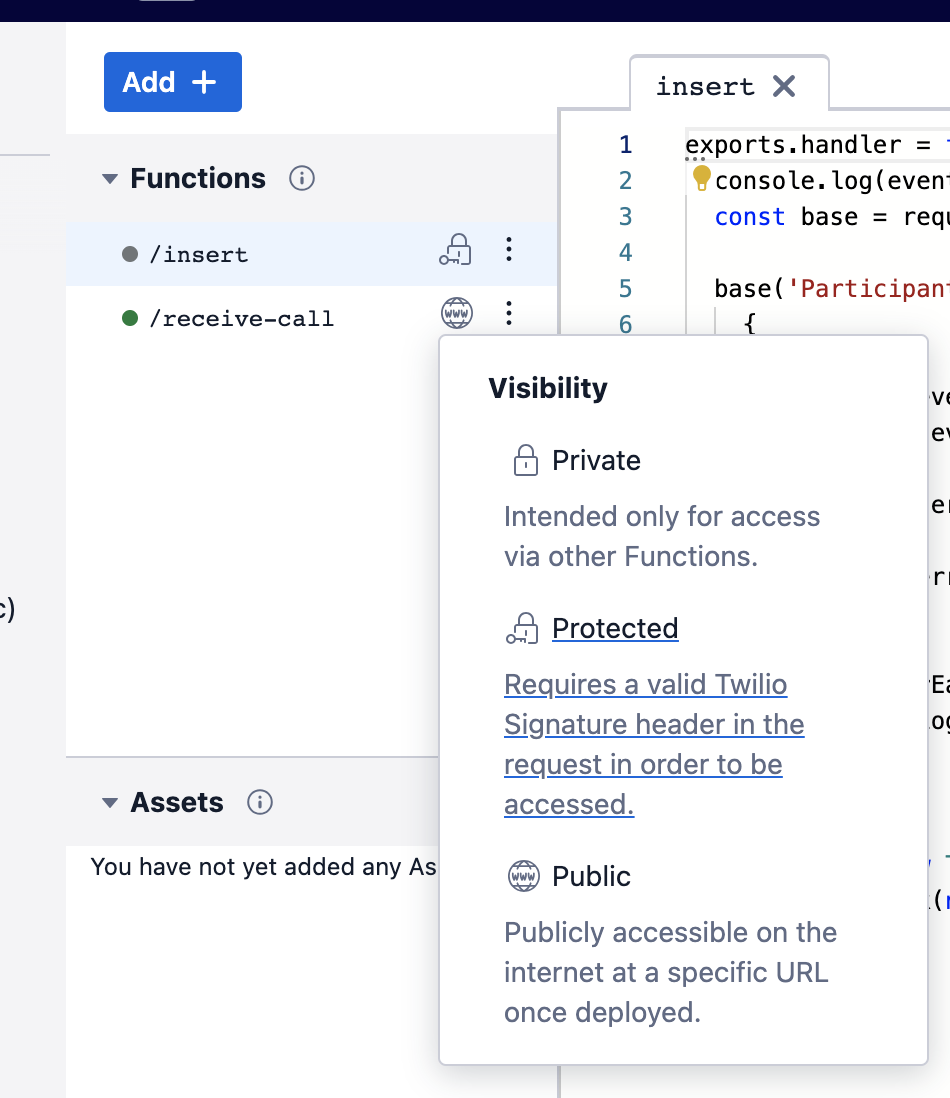
Toward the top left of the page, click the Add + button and then select Add function to add two new functions to your service. Name the first function /receive-call and the second function /insert. Next to each function name, click on the Visibility icon to set the visibility of /receive-call to Public and leave the visibility of /insert to Protected.
Add your environment variables
In the sidebar on the left, toward the bottom under the Settings & More heading, there is an option for Environment Variables. Click on this and add two environment variables. Take care to match the case and underscores that you see here:
- For the first, add key
AIRTABLE_BASE_IDand paste your Airtable Base ID that you collected earlier in for the value, then click Add. - For the second, add key
AIRTABLE_API_KEYand paste your Airtable Personal Access Token that you created for the value, then click Add.

Install the Airtable dependency
Also under the Settings & More heading in the left sidebar, there is an option for Dependencies. Click on this. In the form field for Module, type airtable, and leave the field for Version blank. Click Add. This will install Airtable’s npm package for use when your function is deployed.
Manage the call flow and handle user input
Now that Airtable and your Functions service are set up, it’s time to start coding. To edit each function, click on its name in the left sidebar and the file will open in the code editor to the right of the sidebar. Delete all the provided default/boilerplate code in both of your new functions.
Receive call scaffolding
In /receive-call, paste in the following code:
This code is scaffolding for your /receive-call function. It imports the Airtable package, creates the function, and returns the required callback from the function.
Collecting and managing input from participants
Immediately above the /* HELPER FUNCTIONS */ comment line, add the following highlighted code:
This code uses the Airtable API to pull information about your Secret Santa event into your app, including the name of the event, the phone number of the organizer, and whether or not names have been drawn.
Two variables are created using this information: namesDrawn and isOrganizer, both of which are boolean variables reflecting the state of the name drawing and whether the caller is the organizer, respectively.
These variables will be used to manage the prompts that the caller hears.
Next, under the /* HELPER FUNCTIONS */ comment but above the /* MAIN */ comment, paste in the following helper function:
This is the gather() helper function. It’s used to prompt a caller and collect a response from them, which is what Twilio calls gathering. Gathering is initiated by the twiml <Gather> command, demonstrated on the highlighted lines above.
When the <Gather> command is run, the user is prompted to press a digit(s) on their phone, and those digits are captured. To process the captured digits, you can either provide a callback URL or, by default, the current function will be called again with the collected digits now available on the event.Digits property. Digits is a built-in Twilio property that contains the actual gathered digits.
In the code above, a prompt string is created based on the values of the namesDrawn and isOrganizer variables. By way of the twiml.gather() command, this message is then spoken to the caller by an automated voice using the nested <Say> verb. When the caller enters a digit in response, the entire /receive-call function will run again and the code can process the user supplied digit.
To add the code for this processing, under the /* MAIN */ comment but above the callback, paste the following:
The if-statement shown checks for the Digits property. If it doesn’t exist, then digits still need to be gathered, and so the gather() helper function will be called. If there is a Digits property, then the collected digits need to be evaluated. The switch-statement inside the if-statement does this evaluating, and branches the code based on the entered digit.
Add the helper functions
The switch-statement above references three additional helper functions: recordName(), drawNames(), and revealName(). In this step, you’ll add the code for each of these helper functions.
Directly below the gather() helper function, add the following code:
This code creates the helper function recordName(). It’s run when a caller selects the prompt to add their name to the participant list stored in Airtable.
It also uses the twiml.gather() command to collect input from the caller. This time, however, the input is in the form of speech not a pressed digit, and the input will be processed at the provided action URL, /insert (the other function you created earlier). You’ll deal with that function in a later step.
Next, below the new recordName() function, add the following code:
This code is what manages the drawing of the names/assigning of the Secret Santas. It pulls the participant list from Airtable and then randomly assigns each participant a match that is not themselves and not already a match to someone else. After assigning a match, it uploads the match’s name to the participant’s record in Airtable. When all the Secret Santas have been paired with a giftee, the code changes the value of the Names Drawn field in the Events table to checked (or true).
Next, below the drawNames() function, add the following code:
After the names have been drawn, participants can call in and find out who they are a Secret Santa to. This is handled by the revealNames() function above.
That’s all for the /receive-call function. Click the Save button below the code editor, and then open your /insert function.
Insert recorded speech to the Airtable base
In the /insert function, add the following code:
This code is called when a caller has elected to add their name to the participant list. When prompted, they will say their name aloud. The twiml.gather() command will record this speech and transcribe it. When the transcription is complete, this function will be called.
The SpeechResult property will be available on the function’s event object and it will contain the transcription string. It is this string that will be added to the Name field in the Participants table in Airtable.
Before the call ends, the caller will hear a confirmation message that they are signed up, or alternatively, hear an error if their name was not properly inserted in the Airtable table.
Click the Save button at the bottom of the code editor. You’re now done with the coding aspect of this project! At the bottom of the page, click Deploy All to deploy your app and set it live.
Set up the webhook
The final step is connect your phone number to your Functions service. Navigate to the Active Phone Numbers section of the Twilio Console and click on your Twilio phone number to configure it.
Scroll down to the heading Voice Configuration. Under A call comes in, select Function. Under Service, select your Functions service. Under Environment, select ui, and finally under Function Path, select your function /receive-call.
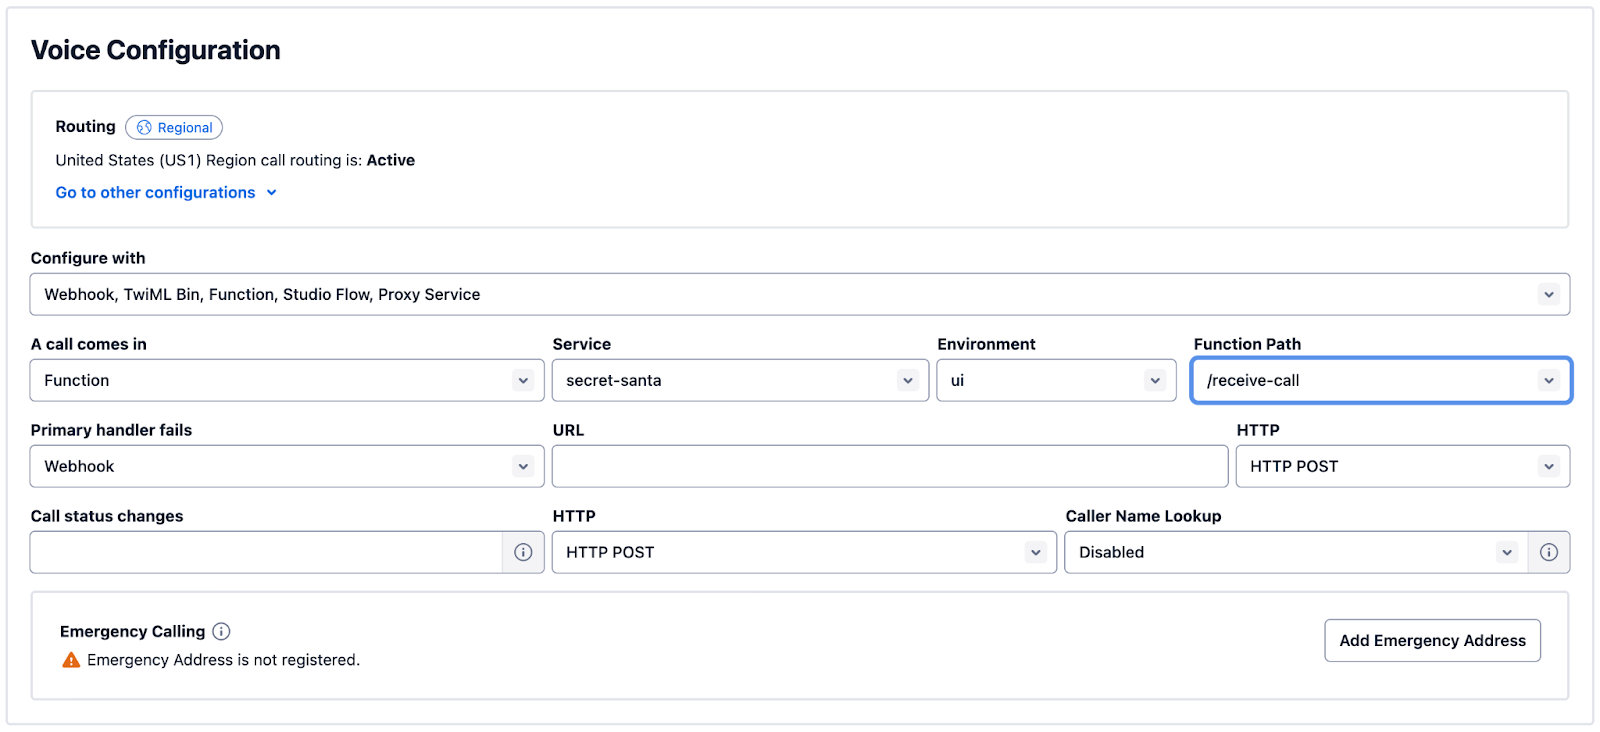
Scroll down to the bottom of the page and click Save Configuration.
Test your Secret Santa app
It’s time to test it out! Call your Twilio number and follow the prompts to add a name to your participants list. You can also add some names and numbers directly to your Airtable. Once you have a few names, call back and follow the prompts to draw names. Look in Airtable and you’ll see the matches! You can call back once again to hear your match’s name revealed as well.
I hope you had a great time using Twilio Programmable Voice and Twilio Functions to build this Secret Santa app. Experiment with it by expanding its functionality through wishlists, multiple events, or other fun ideas! I can’t wait to see what you build.
Ashley is a JavaScript Editor for the Twilio blog. To work with her and bring your technical stories to Twilio, email her at aboucher @ twilio.com. If you can’t find her there, she’s probably on a patio somewhere having a cup of coffee (or glass of wine, depending on the time).

Related Resources
Twilio Docs
From APIs to SDKs to sample apps
API reference documentation, SDKs, helper libraries, quickstarts, and tutorials for your language and platform.
Resource Center
The latest ebooks, industry reports, and webinars
Learn from customer engagement experts to improve your own communication.
Ahoy
Twilio's developer community hub
Best practices, code samples, and inspiration to build communications and digital engagement experiences.