Creating a CI/CD Pipeline for Twilio Flex Plugins with Azure DevOps
Time to read:
June 15, 2023
Written by
Reviewed by
Working with Twilio Flex is a fun experience, especially when you have made all the feature customizations you want and are ready to deploy your solution. While Twilio Flex Plugins CLI provides an easy way to deploy and release your changes, it can become challenging to manage when there are multiple developers in the team all deploying various versions of your plugin from their local machines.
In this blog post, I will provide a step-by-step guide on how to configure your Twilio Flex plugin deployment pipeline with the help of Azure DevOps.
Prerequisites
- Single or multiple Twilio accounts, depending on the environment strategy (You can sign up for an account here)
- An Azure DevOps account
- A Twilio Flex plugin
- Twilio Serverless functions to support the Twilio Flex plugin functionality
The rest of this blog post will assume you have all of the prerequisites up and running.
Twilio Flex Plugin
For the Azure DevOps configuration, it is important to have a Flex Plugin to deploy to your Twilio account via a deployment pipeline. For this blog post, I’ll use a simple Flex Plugin for the outbound dialer. The reason I’m using this example is because it has both frontend (React) and backend (Twilio serverless functions) that need to be deployed.
Azure DevOps configuration
Before we jump into Azure DevOps configuration, let’s briefly talk about Azure DevOps itself. The official documentation can be found here. In a nutshell, Azure DevOps is a Microsoft product that offers various services to bring together developers, project managers, and contributors to develop software and, notably, source control and deployment pipelines. These services are crucial to configure our CI/CD deployment pipeline for Twilio Flex plugins.
Step 1: Source control (Azure Git)
The first step is to configure the code source control in Azure DevOps, which uses Git. This means you have to migrate code from GitHub over to Azure DevOps. Let’s walk through this process together.
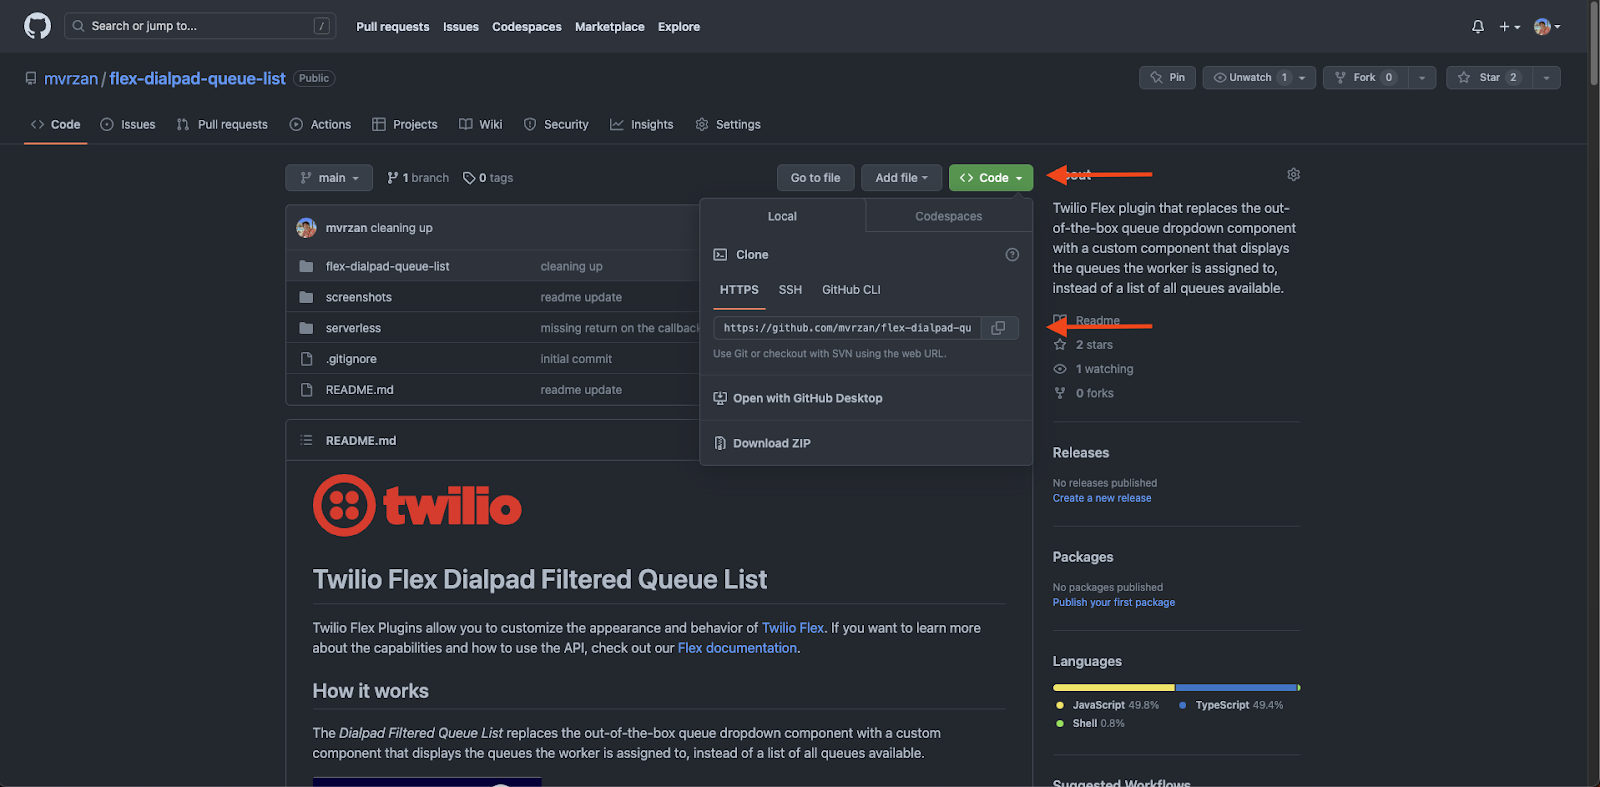
In your GitHub, navigate to your repository, and click on Code and then copy the HTTPS URL:
In your Azure DevOps, navigate to Repos, select the current active repo, and then click on the Import Repository option.

A new side pane will appear where you can define the Repository type, Clone URL, and the Name of the new repository. For the Clone URL, use the URL from GitHub you just copied:
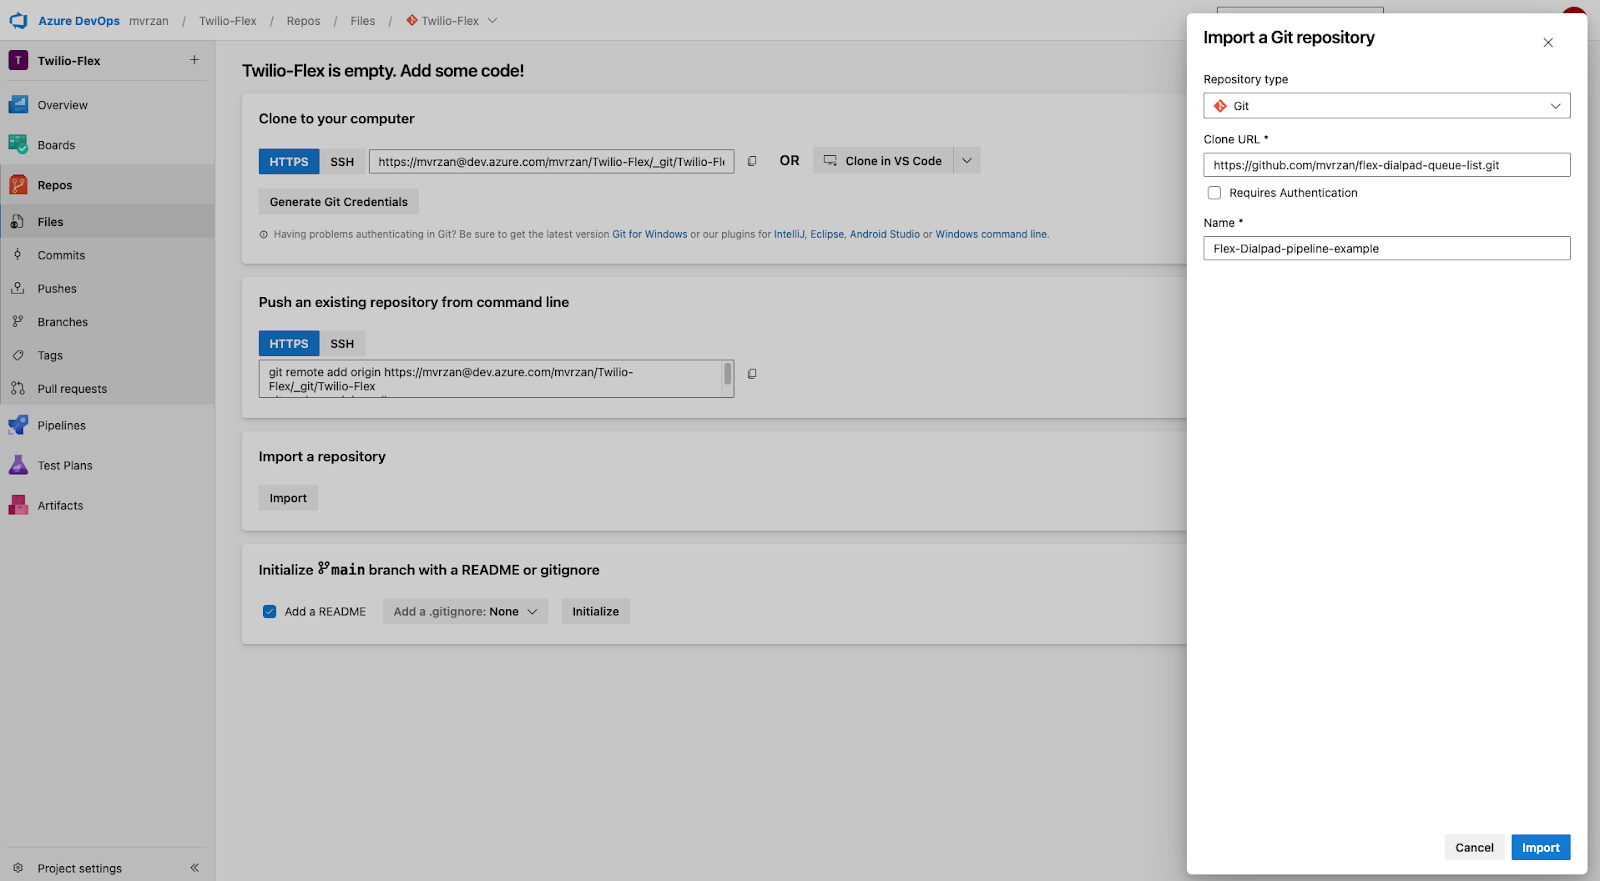
Once all the information has been entered, click on Import. After a few minutes, your GitHub repository should be successfully imported into Azure DevOps.
Step 2: Twilio account access
As a security best practice, I recommended that you create a custom API key for your CI/CD operations. All examples in this guide will use an API key for authentication.
Step 3: Deployment pipeline
The next step in the process is to configure a deployment pipeline. It is worth noting that Azure DevOps has multiple ways of configuring a pipeline. If you are using the Classic UI editor, you need to define a build and release part of your pipeline separately. In this example, I will leverage a YAML file to create the build, release, and environment configuration all in a single YAML file.
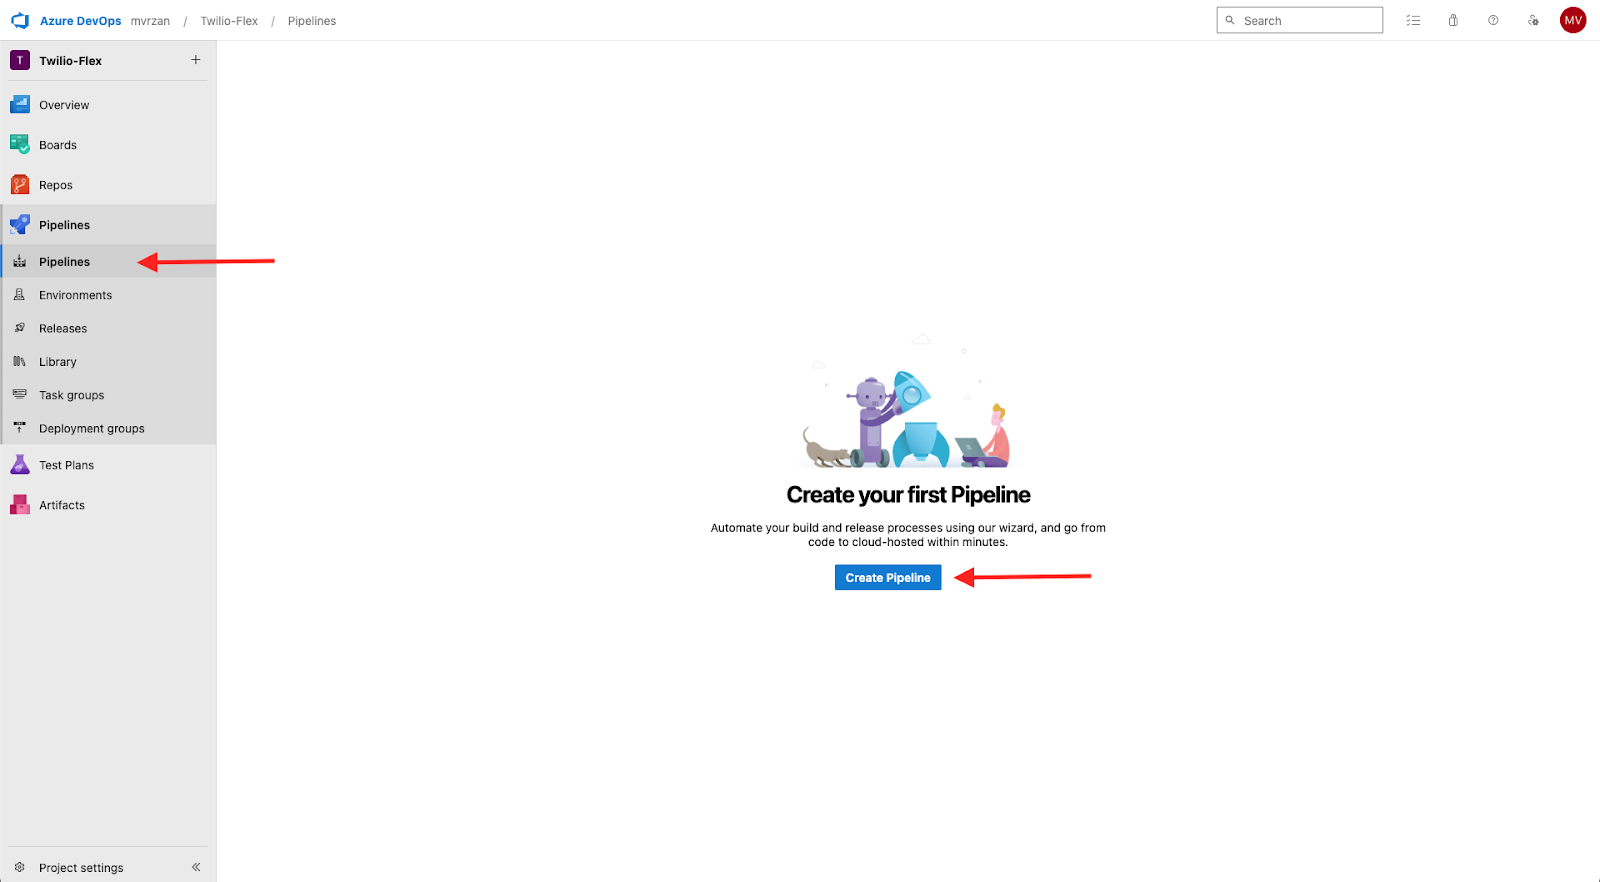
You begin this step by navigating to the Pipelines section and then clicking on the Create Pipeline button:
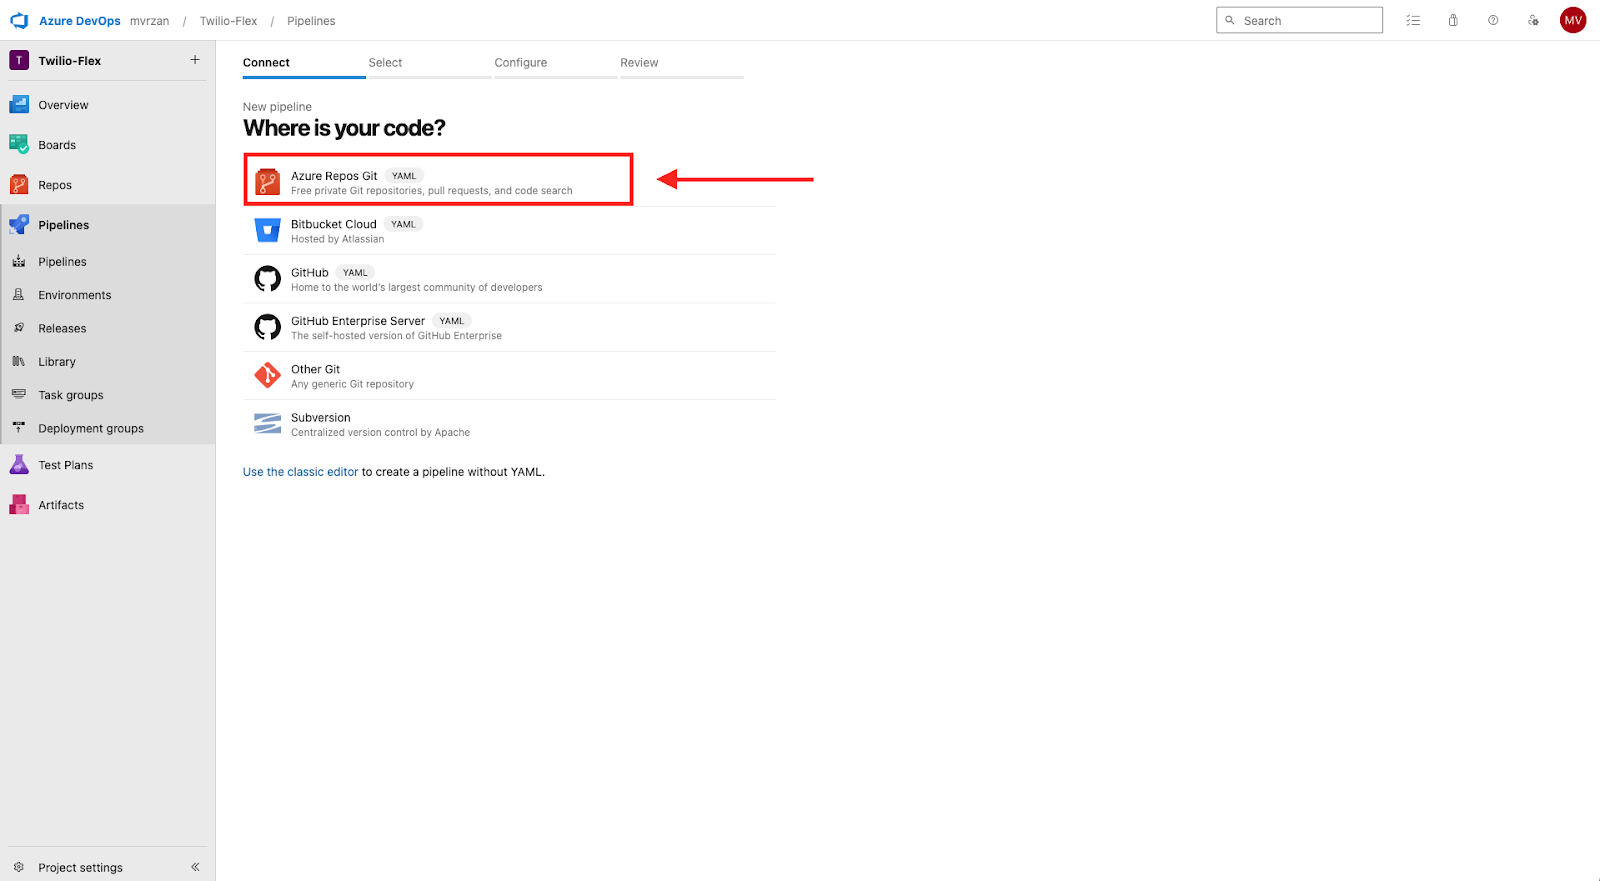
Once you have clicked on the Create Pipeline button, a new view will appear. On that view, select where the code is located. For this scenario, select Azure Repos Git:
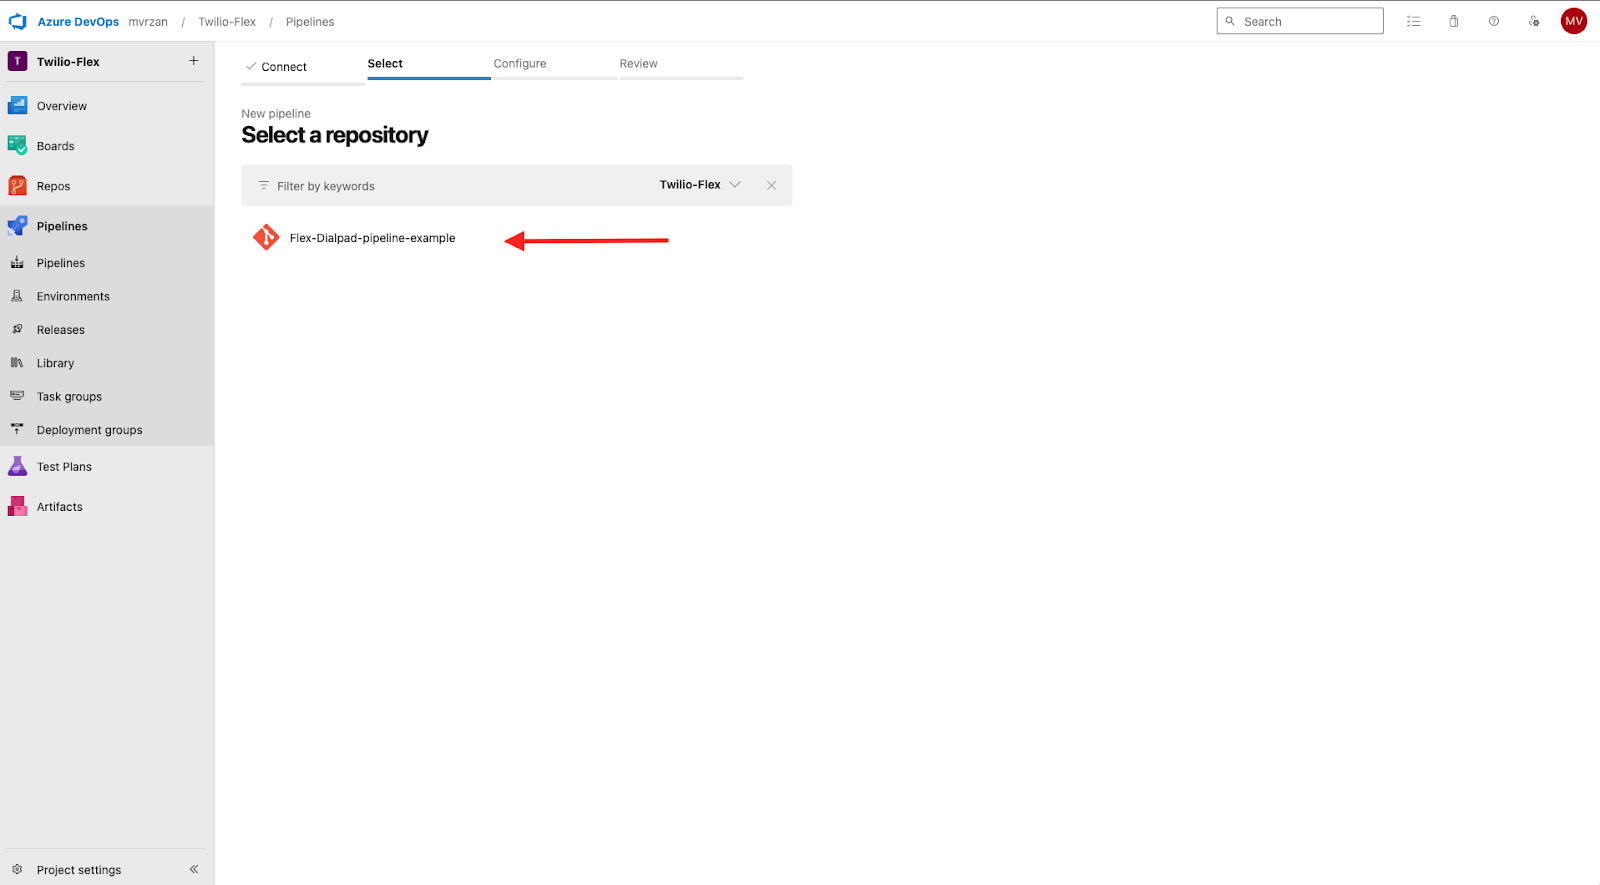
In the next view, select the proper repository for the Flex Plugin code you want to deploy. For this use case, that is the Flex-Dialpad-pipeline-example repository:
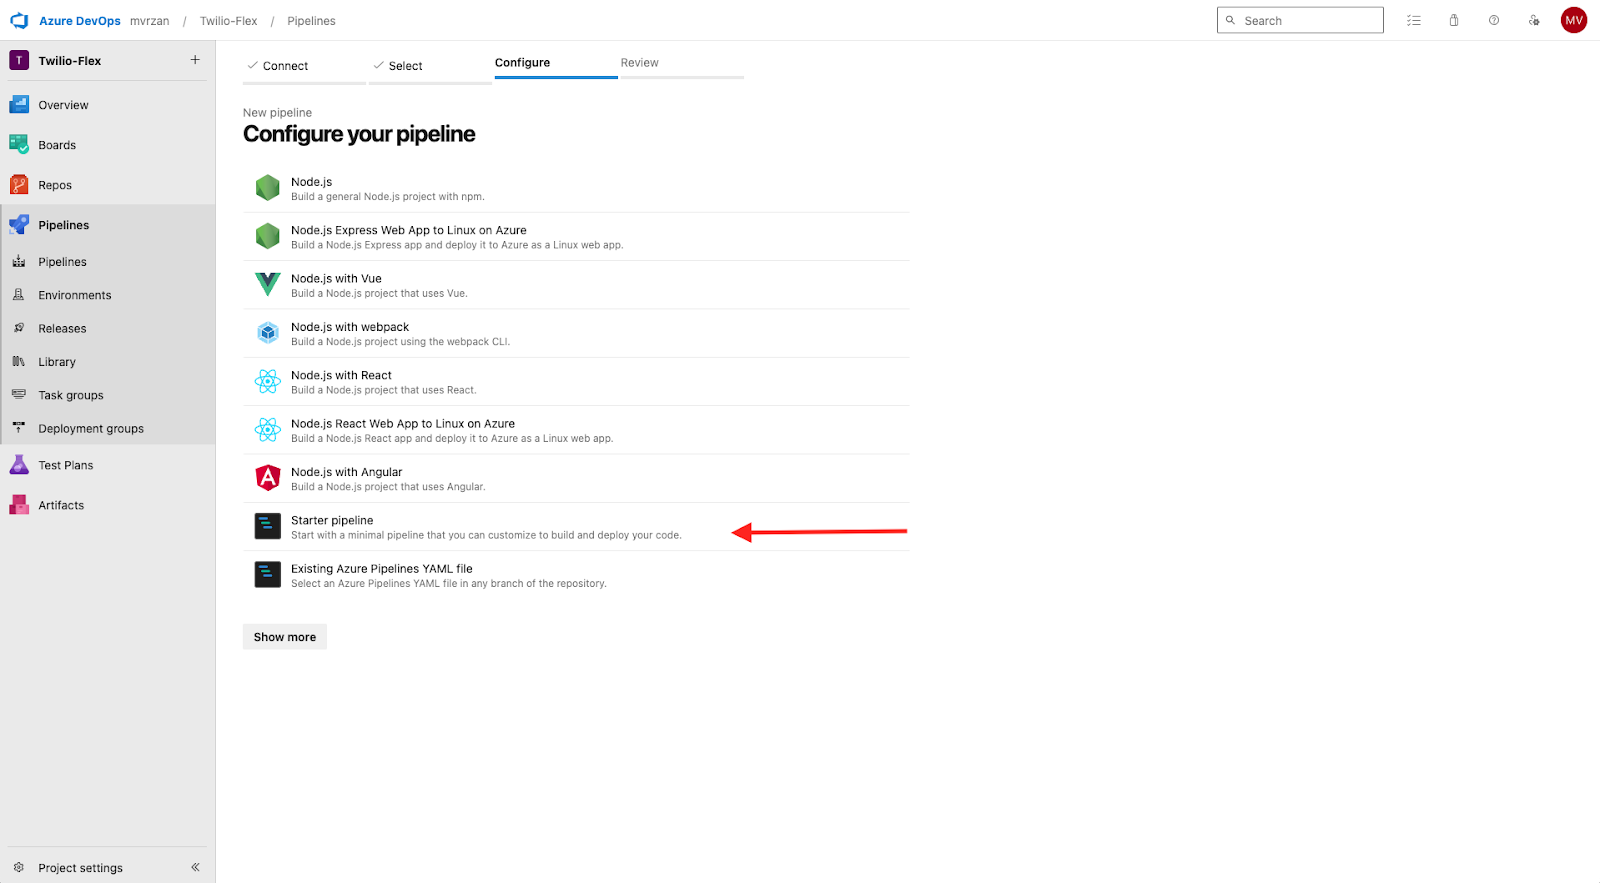
Next, you will configure the pipeline by selecting the appropriate template. Since there are no official Twilio Flex templates, select the Starter pipeline and you will define everything yourself:
Now, this is where things get interesting. The next screen will allow you to edit the YAML file directly in the browser. The final YAML version needed for this Flex plugin can be found here:
Once you’ve copied the contents, paste it into the browser editor, and click Save:
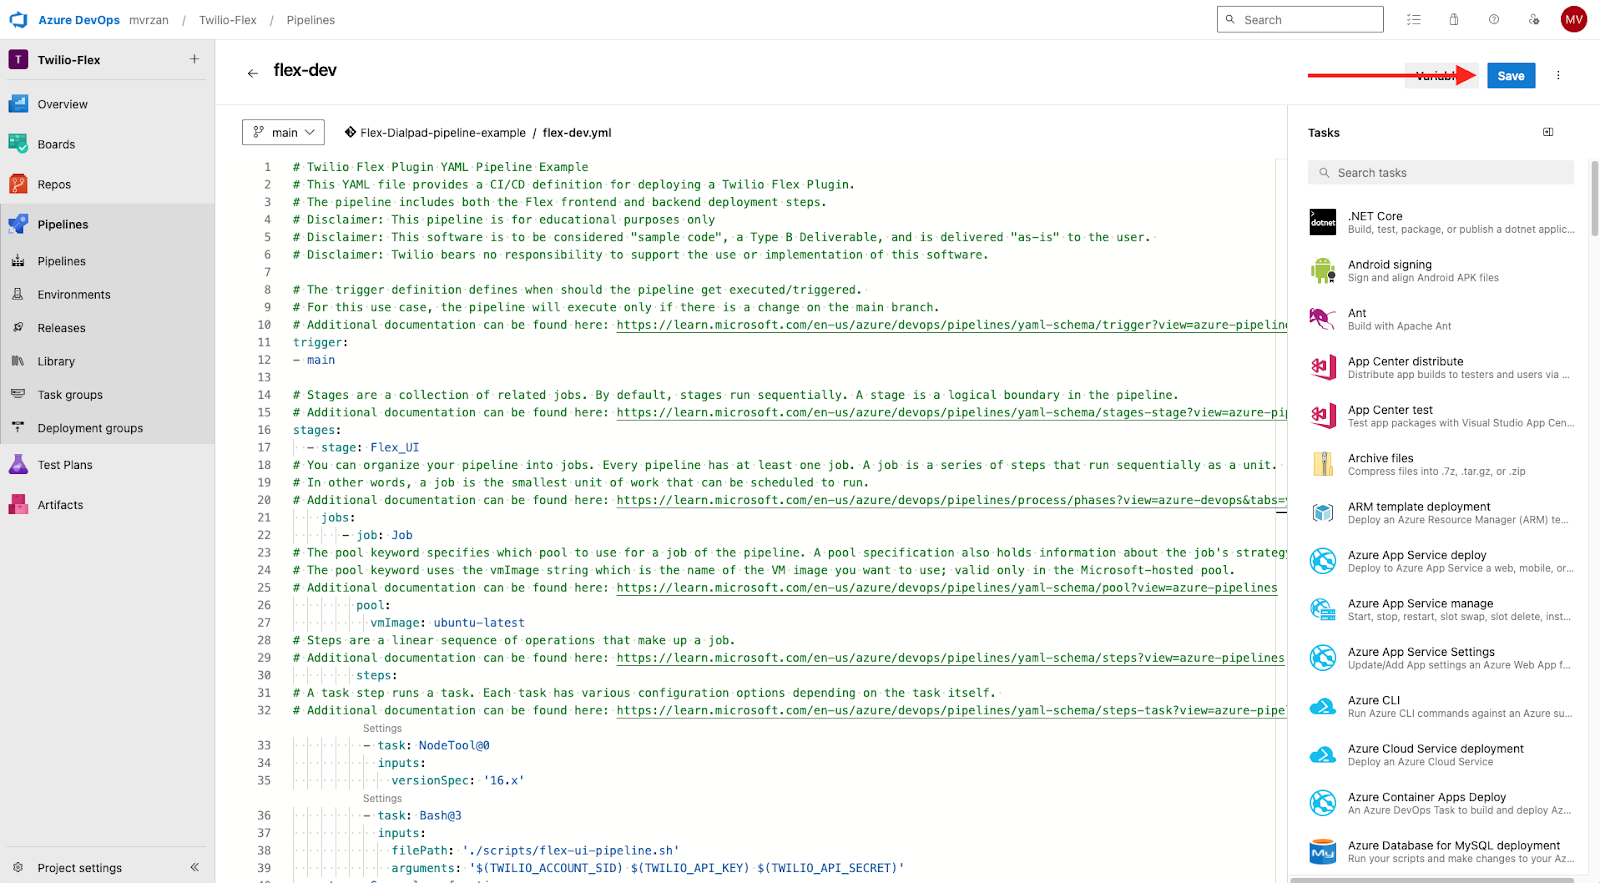
The YAML file itself is heavily commented on and it provides detailed information on every step of the deployment process. Also keep in mind that this pipeline will run every time there are changes on the main branch.
Step 4: Pipeline variables
There are several ways to define variables inside of Azure DevOps. For this example, I’ve decided to use the single-scoped pipeline variables because I prefer to have a simplistic, self-contained pipeline.
To add custom variables, open your newly created YAML pipeline and click on Variables:

A side panel will present itself with an option to add or modify environment variables:
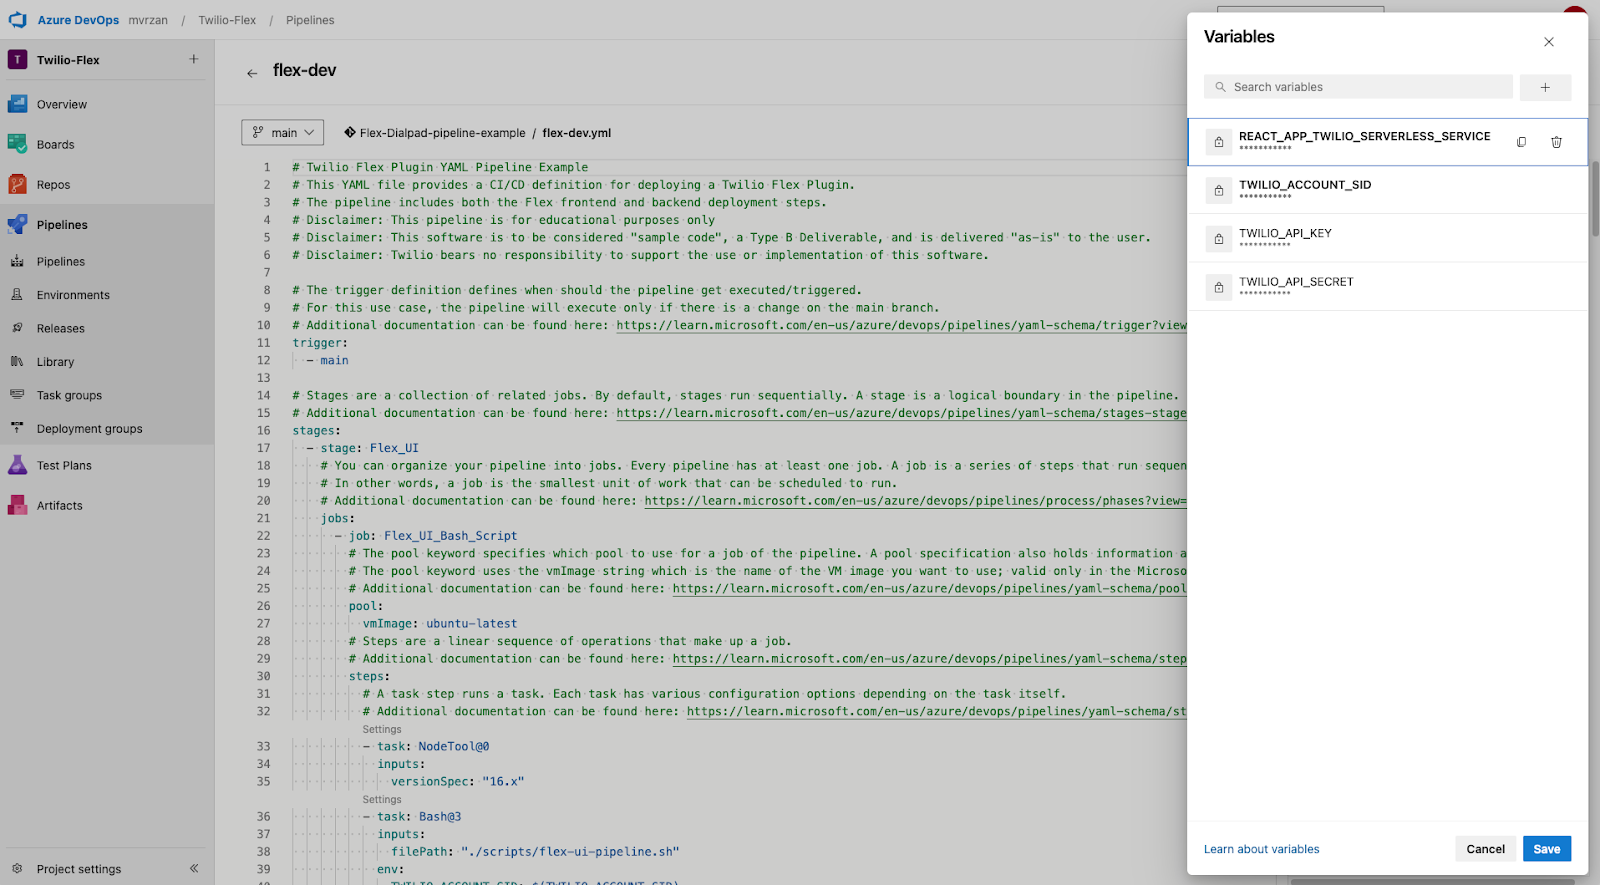
For this pipeline, you will need the following variables which you can get from the Twilio Console:
TWILIO_ACCOUNT_SIDTWILIO_API_KEYTWILIO_API_SECRETREACT_APP_TWILIO_SERVERLESS_SERVICE(this is the URL of your Twilio Serverless Service which gets created after deploying your Functions)
Step 5: Bash scripts
For people familiar with YAML configuration, you will notice this is a straight forward deployment file. It basically installs the necessary Node.js version and runs a bash script. The bash scripts for this deployment can be found below. Similar to the YAML file, it is heavily commented on to provide step-by-step instructions and explanations. There are two Bash scripts here: one for the Flex UI plugin deployment and one for the Twilio Serverless Function deployment.
Flex UI Plugin deployment script: flex-ui-pipeline.sh
Twilio Serverless Functions deployment script: flex-serverless-pipeline.sh
Summary of how the deployment pipeline works
Alright, we had a lot of configuration steps. Let's do an overview of the CI/CD setup we have here.
- The code is hosted in the Azure DevOps Git alongside our YAML deployment definition and the bash script.
- Once there is a change in the main branch, the pipeline will execute and deploy the latest version of the code to Twilio.
- This deployment process is executed by the bash scripts.
- One script deploys the Flex Plugin UI and the other deploys the serverless backend.
- The bash scripts are taking Azure DevOps pipeline variables that identify the proper Twilio account used for the Flex deployment.
Achieve greater control over your Flex environments
Congratulations, you have successfully created an Azure DevOps deployment pipeline for your Twilio Flex implementation. This process will empower your development team with greater control over different environments. They will be able to easily ship new versions of Flex plugins, keep track of deployments in a single place, and move faster without worrying who deployed what, when, and where.
Please keep in mind that this is just one of the many ways a deployment pipeline can be configured, so make sure you modify the process according to your business needs and engineering best practices.
If your team would like assistance with any aspect of your solution, Twilio Professional Services is here to help. Reach out to learn more about our offerings.
I can’t wait to see what you build!
Matija Vrzan is a Senior Solutions Architect at Twilio’s NAMER Professional Services Team, changing the world one contact center at a time. He can be reached at mvrzan [at] twilio.com.
Related Posts
-
 Integrating Twilio Agent Connect with Twilio Flex for Human HandoffSimran Aishwarya
 -
Script Adherence Using Real-time Conversation Intelligence with Twilio FlexCurtis Swartzentruber Ruma Nair
-
Orchestrate an AI-to-Human Agent Handoff with Twilio Agent Connect, Conversations Orchestrator, Studio, and FlexKinshuk Kar Sarang Shah
Related Resources
Twilio Docs
From APIs to SDKs to sample apps
API reference documentation, SDKs, helper libraries, quickstarts, and tutorials for your language and platform.
Resource Center
The latest ebooks, industry reports, and webinars
Learn from customer engagement experts to improve your own communication.
Ahoy
Twilio's developer community hub
Best practices, code samples, and inspiration to build communications and digital engagement experiences.