Get Started with Content API
Time to read:
July 11, 2023
Written by
Reviewed by

As mentioned in a previous blog post, we’re excited to announce that the Twilio Content Template Builder (previously called Content Editor) is now in Public Beta!
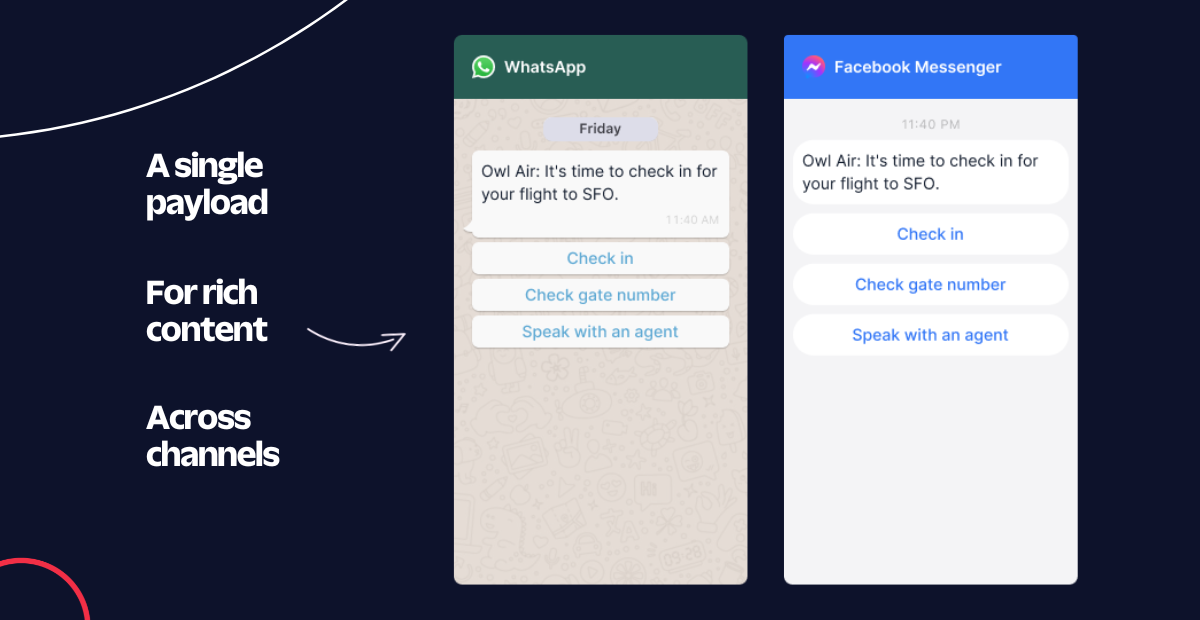
The Twilio Content Template Builder allows you to send “rich content”, or “rich messaging”, enabling you to add additional visual or interactive elements like buttons or selectable lists across Twilio-supported messaging channels such as WhatsApp, Facebook Messenger, SMS, and MMS. This might come in handy if you want to include media in marketing messages or call-to-action buttons in customer support conversations.
The Content Template Builder is a graphical user interface within the Twilio Console that enables developers and non-technical users to build without writing a line of code. On the other hand, the Content API is a developer interface that allows you to send rich content with code.
In this blog post, you’ll learn how to get started with the Content API by exploring a practical use case of creating a quick reply rich content template and sending it across WhatsApp and Facebook Messenger, and SMS as a fallback.
This blog post will be structured as followed (feel free to jump ahead):
##Prerequisites {#prerequisites}
Complete the following prerequisites by following Steps 1 and 2. Otherwise, skip to Step 3.
- To use Content API with any channel, you need to use a Messaging Service with a sender added to the Messaging Service’s sender pool.
- At least one valid sender from one of the following:
- For WhatsApp, you must have an approved WhatsApp sender.
- For Facebook Messenger, you need to have a Facebook page and a Facebook sender.
- For SMS/MMS, you need a phone number with SMS/MMS capabilities.
##Step 1: Configure your Messaging Service {#configure-messaging-service}
Create and configure a Messaging Service by choosing between two approaches:
- Create a Messaging Service using the Twilio Console
- Visit the Twilio Console and navigate to the Messaging Services section.
- Then follow the instructions outlined in Create a Messaging Service.
- Create a Messaging Service programmatically
- Utilize a server-side client library to programmatically create and configure a Messaging Service.
Take note of the Messaging Service SID in the format MGXXXXXXXXXXXXXXXXXX, as it will be used later.
##Step 2: Configure your sender {#configure-sender}
Depending on the sender channel you’ve selected, do the following:
- For WhatsApp, choose between one of the following:
- Register a WhatsApp sender using the Twilio WhatsApp Self Sign-Up.
- Or if you’re an Independent Software Vendor (ISV) or Systems Integrator (SI), register using the Guided Signup.
- For Facebook Messenger,
- Using Channels within the Twilio Console, enable Facebook Messenger and connect your Facebook page.
- For SMS/MMS,
- Purchase a Twilio phone number or use an existing Twilio number from the Twilio Console.
##Step 3: Create a content type template {#create-content-type-template}
Next, you’ll want to create a content type template based on your messaging use case. In this example, we will create a quick reply, which makes it easy to respond to messages in WhatsApp or Facebook Messenger when a user initiates a message. As a fallback, if the end user’s channel doesn’t support quick replies, an SMS will be sent instead.
Make a POST request using the following curl command, while also replacing the $TWILIO_ACCOUNT_SID with your Twilio Account SID and $TWILIO_AUTH_TOKEN with your Twilio Auth Token (this also applies to all subsequent usages).
Here, language and types are all the required parameters, while friendly_name and variablesare optional. For content types, twilio/quick-reply contains a message body as well as 3 separate quick reply options. And if the recipient is not using a quick reply supported channel, they will instead receive a text message with a message body from twilio/text. Refer to the table below for further details:
| Parameter | Required | Description |
| ----------- | ----------- | ----------- |
| `language` | Yes | Two-letter language code. In this example, the language is `en` for English. |
| `types ` | Yes | Possible content types. In this example, the type `twilio/quick-reply` is used to quickly respond to a message. `twilio/text` is used as a fallback text message. |
| `friendly_name` | No | A string used to describe the content. In this example, `flight_replies` is used. |
| `variables` | No | Declared variables and placeholder values. In this example, `1` is the variable with a default value of `name`. |
After you receive a response, a Content SID will be returned in the format HXXXXXXXXXXXXXXXXXXX. Take note of this SID, as it will be used throughout this blog post.
##Step 4: Send a message using the content type template {#send-message-template}
Now that you have successfully created a content type template, you can send it through messaging channels such as WhatsApp or Facebook Messenger.
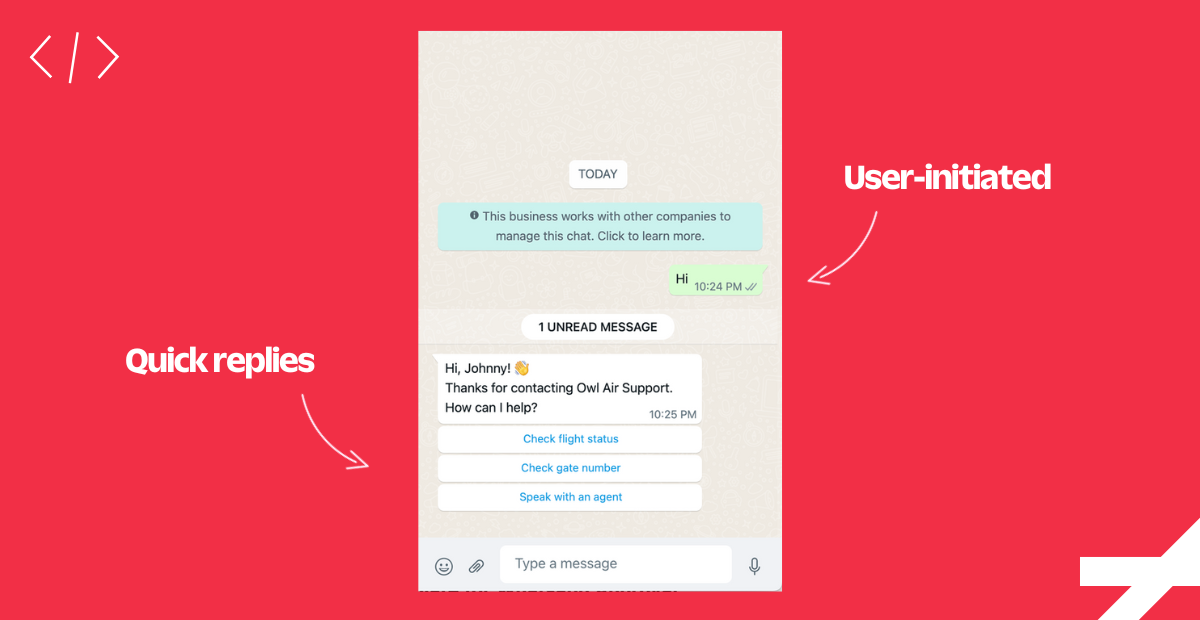
Starting with WhatsApp, it’s first important to understand that there are two types of sessions, user-initiated and business-initiated sessions.
- User-initiated sessions are initiated when a user is the first party to send a message. In this scenario, most content types do not require WhatsApp approval.
- Business-initiated sessions are initiated when a company is the first party to send a message. In this scenario, most content types require WhatsApp approval.
This guide will follow a user-initiated session, so initiate a session by sending any message from the number you wish to reach to the sender in your WhatsApp sender (the one in your Messaging Services sender pool).
Then, make a POST request using the following curl command, while also replacing the ContentSid with your HXXXXXXXXXXXXXXXXXXX from Step 3, From with your Messaging Service SID from Step 1, and To with your WhatsApp number.
Here, ContentSid, From, and To are the required parameters, while ContentVariables is optional. Refer to the table below for further details:
| Parameter | Required | Description |
| ----------- | ----------- | ----------- |
| `ContentSid` | Yes | The identifier for the Content Template. In this example, `HX...XXX` refers to the ContentSid from Step 3. |
| `From` | Yes | The phone number you send the message from. In this example, `MG...XXX` refers to the Messaging Service SID from Step 1. |
| `To` | Yes | The location you send the message to. In this example, `whatsapp:number` is the format used for sending to a WhatsApp number. |
| `ContentVariables` | No | Key-value pairs of variables. In this example, `$CONTENTVARIABLES` references key-value pairs, where `1` is the key and `Name` is the value. |
You should receive a message back from your WhatsApp sender, with 3 quick reply buttons. And if you changed the To parameter to an SMS-capable phone number, you’ll receive a fallback SMS instead (without quick replies).
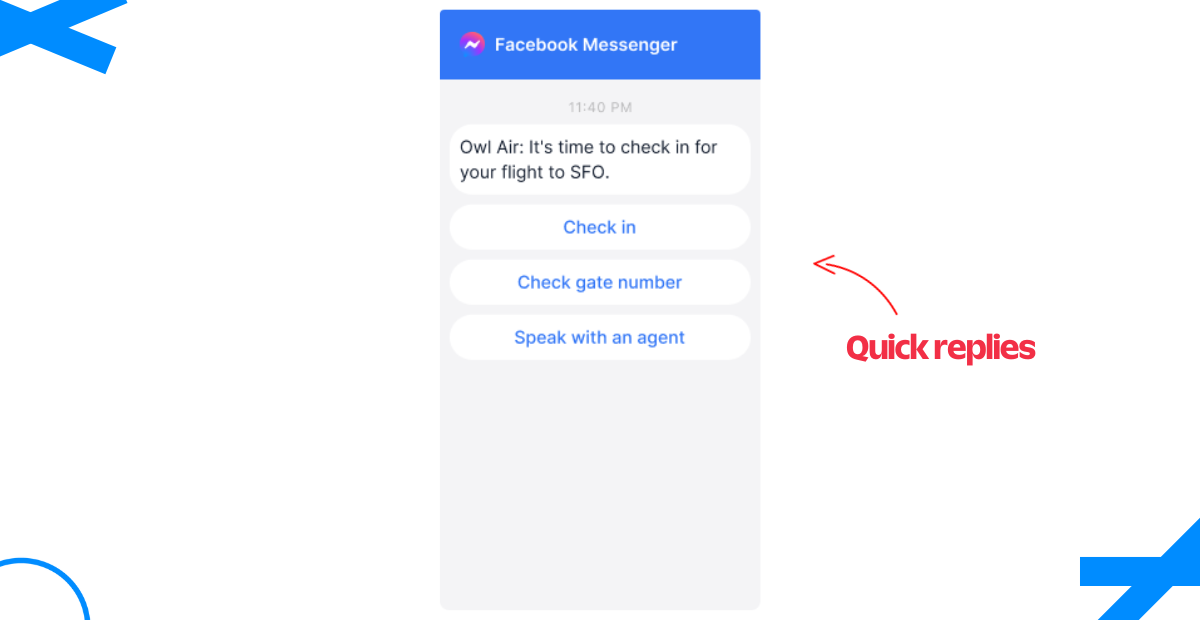
Facebook Messenger
Facebook Messenger requires that users must first initiate a message before you are able to contact them (similar to the user-initiated session for WhatsApp). Therefore, you must send any message from the number you wish to reach to the sender in your Facebook Messenger sender (the one in your Messaging Services sender pool).
Then, use the same POST request as mentioned in the earlier WhatsApp example but change the To parameter to take a Facebook Messenger ID. See the highlighted line below:
Here you’ll notice that the To parameter has changed from whatsapp:number to messenger:$FBM_ID. Replace $FBM_ID with your Facebook Messenger ID.
This Facebook Messenger ID can be determined by using a webhook to retrieve the ID from an inbound message. Additional information can be found in the Using Facebook Messenger with Content API guide.
You should receive a message back from your Facebook Messenger sender, with 3 quick reply buttons.
##What’s Next? {whats-next}
Using a single payload, Twilio Content API helps you send rich content over all messaging channels so you can maintain a consistent user experience, without sweating the implementation details.
As an alternative, check out the Content Template Builder for an easy-to-use graphical user interface built on top of the Content API. With the Content Template Builder, you can create, approve, and manage templates from the Twilio Console.
Thanks for reading and please reach out if you have further questions.


Related Resources
Twilio Docs
From APIs to SDKs to sample apps
API reference documentation, SDKs, helper libraries, quickstarts, and tutorials for your language and platform.
Resource Center
The latest ebooks, industry reports, and webinars
Learn from customer engagement experts to improve your own communication.
Ahoy
Twilio's developer community hub
Best practices, code samples, and inspiration to build communications and digital engagement experiences.