How to build a Conference line with Twilio and Java
Time to read:
March 25, 2020
Written by

Another conference call, another app, another PIN, another log-in. Joining conference calls should be as easy as dialing a phone number, without the hassle of so many extra digits. This post will show how you can build a conference line that anyone and everyone can join, using Twilio with Java and Spring Boot.
Java Development Environment Setup
Start by making sure you have the right software installed that you'll need to use for the rest of this post. You will need:
- Java - You’ll need at least Java 8. My preferred way to install it is using SDKMAN!
- A free Twilio account and a Twilio phone number
Starting out with Spring Boot
You can use SDKMAN! to install the Spring Boot cli tool with sdk install springboot. Use this to create a new project in an empty directory with:
This command sets up a new Spring Boot project in your current directory. Feel free to choose your own groupId and artifactId using the Maven naming conventions. If you don’t want to use the CLI tool, you can enter the same details at start.spring.io then download and unzip the project which is generated.
Whichever way you created it, you can now import the project into your IDE and start coding. My favourite is IntelliJ IDEA but Eclipse and NetBeans are also popular.
Add the Twilio Helper Library
Your project has a Maven build file called pom.xml. Open this file in your IDE and find the <dependencies> section. In here you should add a new dependency so that you can use the Twilio Helper Library. The latest version at the time of writing is 7.48.0 but you can always check if you’re up to date here, so add the following to your pom:
Handling webhooks for incoming calls
Create a new class called IncomingCallWebhook in the same package as the Application class from your project template. For me this is in src/main/java/lol/gilliard/conferencecalls - it will depend on your choice of groupId and artifactId above:
(full source, including import statements)
There are a few annotations in this class which are used to control how Spring Web responds to requests:
@Controlleron the class, so that Spring knows to scan it for methods that handle incoming web requests.@PostMappingon the method specifies the method, path and the content-type.@ResponseBodyon the method tells Spring to pass the returned String from this method straight back to the caller.
The body of the method uses the Twilio Java Helper Library to produce a VoiceResponse containing:
- a
Sayverb which reads out a welcome message, - a
Dialverb which connects the caller to a conference namedmy-conference-room.
In your terminal, run the application with ./mvnw spring-boot:run. Leave that running then in a new terminal check the output on the command line by running curl -XPOST localhost:8080/call. The output should be similar to this:
Note that I’ve added some newlines to help make it readable - your output will be all on a single line.
For Twilio’s webhook to be able to call into your app, localhost isn’t good enough - you need a URL which can be accessed from the internet. You could deploy this app to the cloud, but it’s simpler to use a tool like ngrok which can create temporary public URLs for your localhost apps.
In a new terminal window run ngrok http 8080 and look for the Forwarding line which creates an https URL:
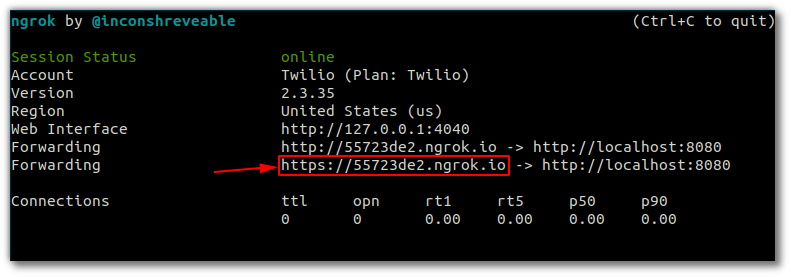
In my example the webhook URL that Twilio can use would be https://55723de2.ngrok.io/call - yours will be similar.
Setting up your Twilio Phone Number
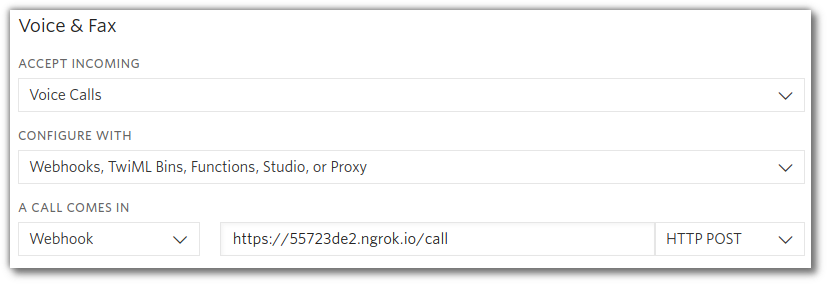
Before you are able to receive phone calls, you’ll need a Twilio phone number. You can buy a phone number here, then on the configuration page put your ngrok URL with a path of /call for “When a call comes in”:
Save this configuration then you’re ready to test it out. Call your number and you will hear the message then some music plays while you’re waiting for other people to join. Have some friends join you and start chatting.
By the way, if you want to change the music you can do that using the waitUrl attribute.
Give your friends and colleagues a call
Now that you know how to create a basic conference call, try building off of it with other features from our Conference TwiML docs such as joining a Conference on mute, silently bridging calls, or making a conference call moderated. If you want to explore more of what Twilio has to offer, definitely check out TwilioQuest where you can learn to unlock the power of communications with code.
I can’t wait to see what you build. Feel free to reach out and share your experiences or ask any questions.


Related Resources
Twilio Docs
From APIs to SDKs to sample apps
API reference documentation, SDKs, helper libraries, quickstarts, and tutorials for your language and platform.
Resource Center
The latest ebooks, industry reports, and webinars
Learn from customer engagement experts to improve your own communication.
Ahoy
Twilio's developer community hub
Best practices, code samples, and inspiration to build communications and digital engagement experiences.