Integrate Claude, Anthropic’s AI Assistant, with Twilio Voice Using ConversationRelay
Time to read:
Integrate Claude, Anthropic’s AI Assistant, with Twilio Voice Using ConversationRelay
Twilio’s ConversationRelay allows you to build real-time, human-like voice applications with AI Large Language Models (LLMs) that you can call using Twilio Voice. ConversationRelay connects to a WebSocket you control, allowing you to integrate the LLM provider of your choice over a fast two-way connection.
This tutorial demonstrates a basic integration of Claude, Anthropic's AI model, with Twilio Voice using ConversationRelay. By the end of this guide, you'll have a functioning Claude voice assistant powered by a Node.js server that lets you call a Twilio phone number and engage in conversation with an Anthropic model!
Prerequisites
To deploy this tutorial, you'll need:
- Node.js 23+ (I used 23.9.0 to build this tutorial)
- A Twilio account (you can sign up for free, here) and a phone number with voice capabilities
- An Anthropic account and API Key
- Ngrok or another tunneling solution to expose your local server to the internet for testing
- A phone to place your outgoing call to Twilio
- Your code editor or IDE of choice
Great! Let’s get started.
Set up your project
These next steps will cover project setup and the dependencies you’ll need to install. Then, you'll create the server code (and I’ll explain the more interesting parts).
Create the project directory
First, set up a new project folder:
Initialize the Node.js Project
Next, initialize a new Node.js project and install the necessary packages:
You'll be using Fastify to create a server that handles both the WebSocket needed for ConversationRelay and the endpoint for Twilio instructions required by Twilio Voice. You’ll use Anthropic’s Typescript library to manage the conversation with Claude.
Configure Environment Variables
Create an .env file to store your Anthropic API key. Add the following line:
Write the code
Awesome, you’re really cooking now. Let’s move on to the server code.
Create a file named server.js and add the following imports and constants:
Here, you’ll notice we define our WELCOME_GREETING. This is the first thing someone will hear when they dial into your assistant.
You’ll also notice a SYSTEM_PROMPT, which controls the behavior of the voice assistant. There, we let the LLM know some of our preferences for the conversation. This prompt asks the LLM to avoid special characters and asks it to write out numbers to make it easier for the Text-to-Speech step to work.
Implement the AI response function
In this next step, you will define how your app connects to the Anthropic API and handle responses. Paste this code below the above:
Here, you add what we need to connect to Anthropic. process.env.ANTHROPIC_API_KEY will get our API key from the .env file to authenticate our usage of Anthropic, then the aiResponse function is what is used to control the behavior of each LLM response.
For this demo, you will use claude-sonnet-4-20250514 to test the build. You can find Anthropic’s supported Claude models in their documentation.
Configure Fastify, and set up routes
Now that you've defined your interactions with Claude, it's time to move on to Twilio. You're going to set up two endpoints in this step:
/twiml- to control Twilio’s behavior when we make an incoming call to our purchased number. This uses Twilio Markup Language , or TwiML, to instruct Twilio further./ws- for a WebSocket connection that ConversationRelay will use to communicate with your application. Here you will receive messages from Twilio, but you will also need to pass messages from your LLM back to Twilio to trigger the Text-to-Speech step (the relay, if you will).
Below the code from the above step, paste the following:
And that’s all the code you need for a basic integration – now, let’s get everything running and connect it to Twilio!
Start ngrok and the server
Open a terminal (or a new terminal tab) and start ngrok with ngrok http 8080.
There, copy the ngrok URL without the scheme (that is, leave out the “https://” or “http://”) and update your .env file by adding a new line:
This screenshot shows the URL I chose for my environment variable:


Finally, start your server. In the original terminal (not the one running ngrok), run:
Configure Twilio
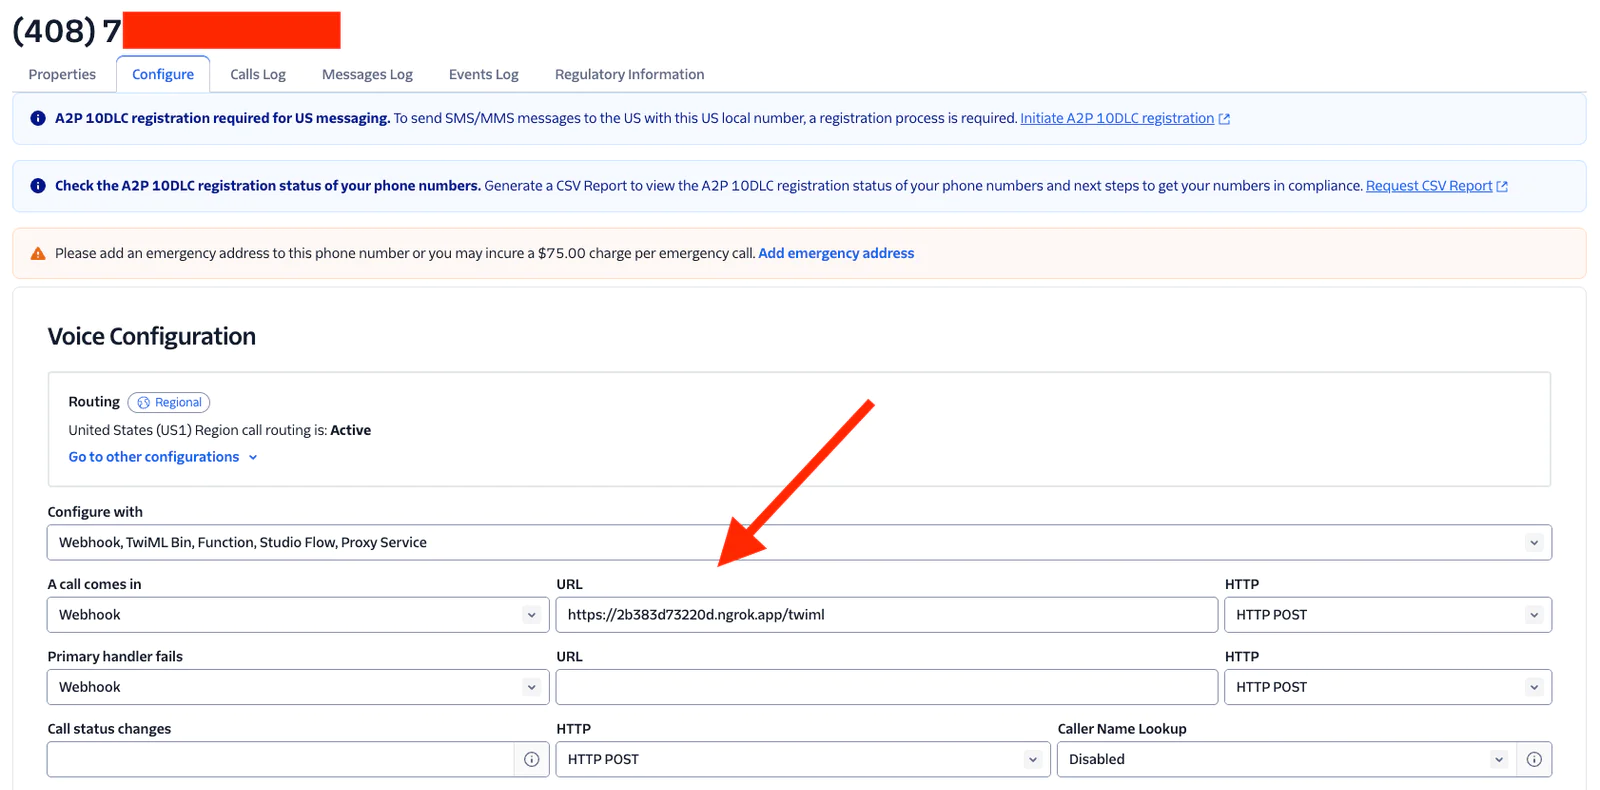
In the Twilio Console, configure your phone number with the Voice Configuration Webhook for A call comes in set to https://[your-ngrok-subdomain].ngrok.app/twiml.
Here’s an example from my Console:


Save your changes, you’re now ready to test.
Test your integration
Are you giddy with anticipation? It’s time!
Call your Twilio number. The AI should greet you with the WELCOME_MESSAGE and be ready for a conversation – be sure to ask it for owl jokes!
Next steps with Twilio and Claude
I hope you enjoyed this basic integration of Twilio Voice with Anthropic’s Claude using ConversationRelay – dial-a-voice-LLM in under 100 lines of code!
You’ll probably want to add more advanced features next. Our follow-up article shows you how to stream tokens from Anthropic to ConversationRelay to reduce latency, as well as how to better handle interruptions by tracking your conversation locally. And after that, I’ll show you the basics of how to call tools or functions with Claude using ConversationRelay (coming soon).
But until then, have fun with the scaffolding… check out Twilio’s ConversationRelay docs, Anthropic’s API documentation, and Anthropic’s TypeScript SDK to learn more.
Paul Kamp is the Technical Editor-in-Chief of the Twilio Blog. He was excited to talk to the LLM about recipes… but a bit disappointed he only found time to cook a few suggestions (when will agents make food?). Reach Paul at pkamp [at] twilio.com.
Related Posts
Related Resources
Twilio Docs
From APIs to SDKs to sample apps
API reference documentation, SDKs, helper libraries, quickstarts, and tutorials for your language and platform.
Resource Center
The latest ebooks, industry reports, and webinars
Learn from customer engagement experts to improve your own communication.
Ahoy
Twilio's developer community hub
Best practices, code samples, and inspiration to build communications and digital engagement experiences.


