Protecting JavaScript Microservices on Node.js with JSON Web Tokens and Twilio Authy
Time to read:
May 24, 2019
Written by

Building a JavaScript application on Node.js with a microservices architecture gives you the ability to scale your app: you can respond to varying load levels by adding and removing instances of a service. When multiple instances of a service access the same data, your application can use a common persistence layer, a database, to share information between instances and maintain consistency between them.
In many applications you'll also want to limit access to some data and functions to particular users. While you could do this directly in your service APIs, there's a better way.
This post will show you how to add two-factor authentication (2FA) with Twilio Authy and an authorization web service using JSON Web Tokens (JWTs), a standard for securely storing and transmitting sensitive data.
Authentication with Twilio Authy
Twilio Authy uses push authentications to verify a user's identity. Push authentications are better than passwords because they require the user to have access to a second-factor device known to be associated with the user. Authy can also be configured to use soft tokens and one-time passcodes transmitted by SMS or voice.
Authorization with JSON Web Tokens (JWTs)
JWTs enable your services to transmit information about users and other data objects using public/private key encryption to provide data security, and token signing to insure data integrity. Because JWTs can carry information about users and their authorization claims, they can improve your application's performance by enabling its services to avoid making repeated calls to the authorization service. The authorization service can store a user's authorization claims in the payload of a JWT. The token can be evaluated by a service receiving an API call bearing the token, enabling it to determine if the caller has access to the service's data or methods.
In this post you'll learn how to use a signed JWT, which consists of three parts structured as JSON objects:
- Header – identification of the algorithm used to encrypt the token
- Payload – information stored in the token
- Signature – encrypted signature of header and payload
The three parts are Base64Url encoded and separated by a dot delimiter (.), which enables the token to be easily exchanged with other systems and applications as a string value, like the following:
Other systems can easily decode the token and read its contents if they have access to the token's public key. If a service or application has access to the public key (generated from the private key used to sign the token) it can verify that the contents were not modified by checking to see if the signature matches.
The entity in possession of the public key can’t sign the token, so it can’t change the token contents; if the payload contents are changed the signature won't match. The signature certifies that only the party holding the private key signed the token. A full description of the JWT specification can be found in the RFC 7519 document.
The code in this post uses the cryptography library in OpenSSL to generate keys for the encryption and decryption, but it doesn’t require you to know much about the library or cryptography to use it. You also won’t need to perform a complicated install or build process to use cryptography.
Prerequisites
To accomplish the tasks in this post you will need the following:
- Node.js and npm (The Node.js installation will also install npm.)
- Git (For Windows users, the Git installation will also install an OpenSSL executable.)
- Java SE Runtime Environment
- MongoDB Atlas account (Chose a free-tier cluster.)
- A Twilio account (There's a free developer account.)
- A Twilio Authy API Key and one registered user (Also free, see instructions below.)
To learn most effectively from this post you should have the following:
- Working knowledge of JavaScript, Node.js, and databases
- Some exposure to the HTTP protocol
- Basic knowledge of the microservices architecture
This post is built on the code and concepts from the three previous posts in this series on building production-ready applications with Node.js microservices:
Building JavaScript Microservices with Node.js – introduces the concept of microservices and shows you how to build microservices applications with JavaScript on Node.js.
Implementing Eureka and Zuul for Service Discovery and Dynamic Routing in JavaScript Microservices Running on Node.js – demonstrates how to integrate the Netflix Eureka service registry and Netflix Zuul's dynamic routing and load balancing into a microservices application.
Scaling Node.js JavaScript Microservices Sharing a MongoDB Atlas Cloud Persistence Layer – shows how to share data across multiple service instances for consistency and synchronization.
If you've read the previous posts and followed along building the project, you can continue with your existing code or start fresh from the companion repository on GitHub.
If you are new to the concepts identified in the titles of those posts, you may want to read them and build the project step-by-step.
If you're familiar with microservices and want to focus on learning to implement an authorization service and JSON Web Tokens, the companion repository has the code you need to begin this post. The instructions below will show you how to get the code written in the first three posts in this series.
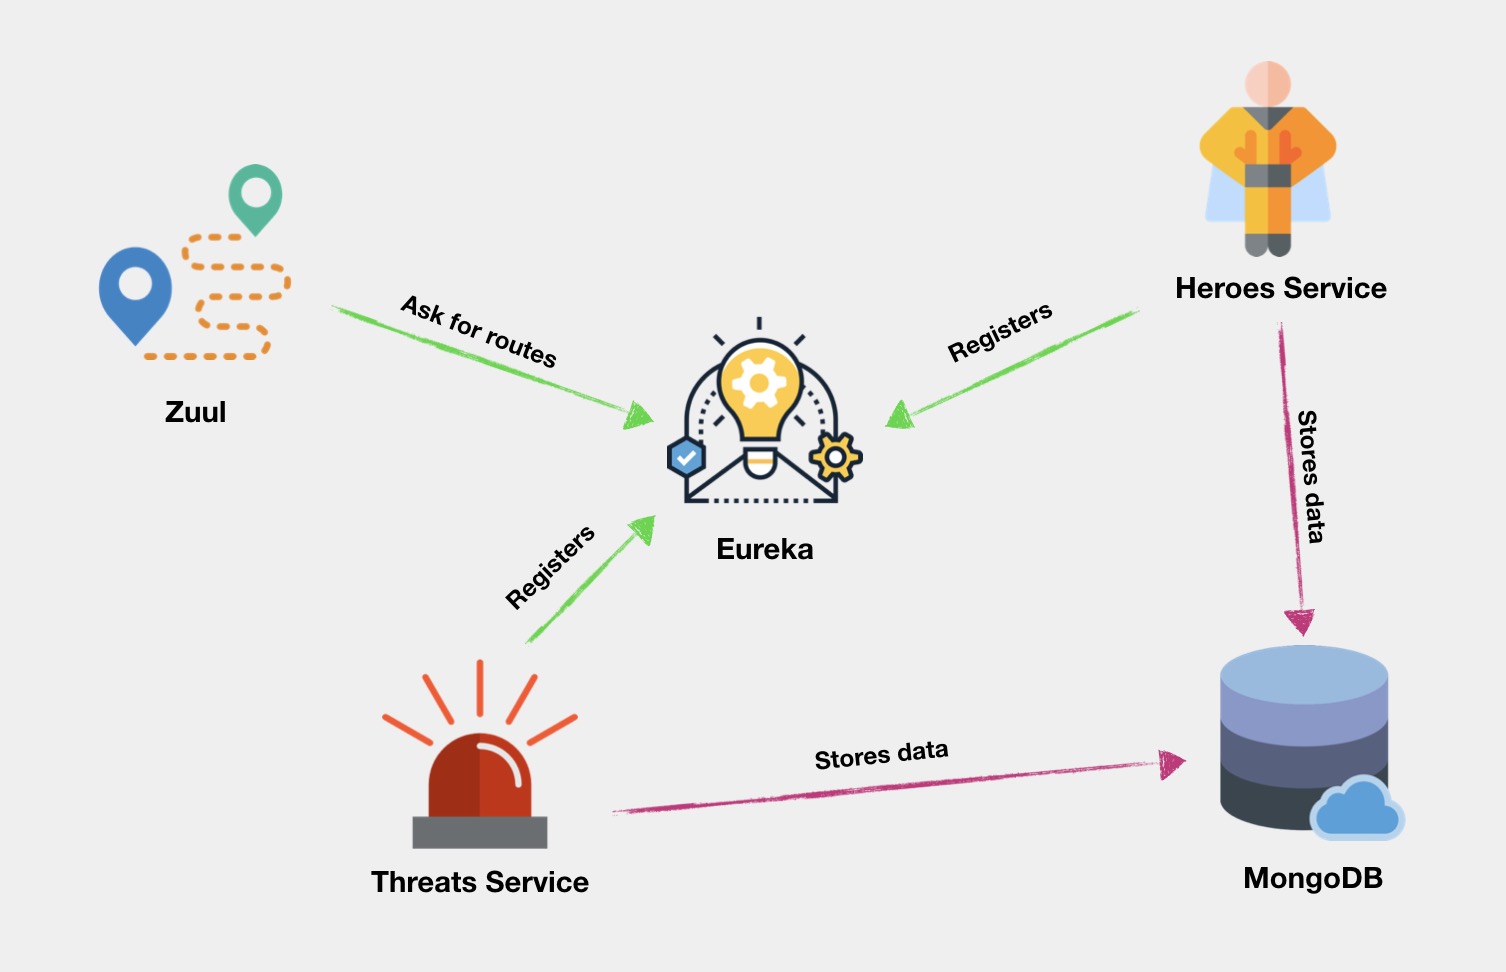
Architecture of the microservices project
The case study project consists of four services and a MongoDB database as a persistence layer. There are two JavaScript services running on Node.js:
heroes-service – maintains a list of super heroes, their attributes, and their busy/free status.
threats-service – maintains a list of dangerous situations and the hero assigned to responding to each threat.
These services use a helper function, registerWithEureka, that enables them to conveniently connect to the service discovery system. Together, these components comprise the functional aspects of the application.
There are also two Java services that provide infrastructure support for the Node.js services:
Netflix Eureka – is a service registry and discovery tool that enables services to find other services without needing to know where they're running.
Netflix Zuul – is a load balancer and dynamic routing service that gets a list of available instances of each service from Eureka, routes requests between services, and balances the load among server instances.
These Java services are provided in Java Archive (.jar) files: all you need to do is run them once you have installed the Java SE Runtime Environment. They're packaged so you can use them in your own projects without modification.
The architecture of the project looks like this:
Setting up the microservices project
Clone the code from the companion repository by executing the following commands in the directory where you would like to create the project directory:
Note that these steps include installing the required npm packages in the appropriate directories.
If you did not build the project by following the steps in the previous article you need to create the MongoDB database instance and insert data into it. If you have been following along—and good on you for doing so—you can skip the following section.
Setting up the MongoDB persistence layer database
Navigate to https://cloud.mongodb.com/user and sign in to your account. To register new cluster, click on Build a New Cluster, then choose the most appropriate region and cloud infrastructure provider. (You can choose a "free tier available" region to avoid operating fees.)
When your cluster is ready, click the Connect button and follow the prompts on the Connect to Cluster() panel to: 1) allow your IP address to connect and 2) create a MongoDB user.
Tips: When creating your password, avoid using characters that will have to be URL-encoded when entered on your system's command line. Be sure to save your MongoDB username and password in a safe place.
In the Choose a connection method step, select Connect with the Mongo Shell. Follow appropriate directions for downloading, installing, and configuring the MongoDB Shell to run on your system.
When you've configured the MongoDB Shell to run on your system, copy the supplied command-line instruction to a safe place. Leave this tab open with the Connect to Cluster() dialog box open; you'll be returning to it shortly.
Execute the command-line instruction in a console window to start the shell. You'll need to enter the user password you just created.
Tip for Windows users: Execute the MongoDB command-line instructions below in a PowerShell window; this will enable you to paste and execute the entire block of instructions in a single step.
When you have successfully connected to your MongoDB instance, add data to it by executing the following MongoDB command-line instructions:
Leave this MongoDB console window open, you'll be using it later.
Return to your MongoDB Atlas account console and click the Connect button next to your cluster. In the Choose a connection method step, select Connect Your Application. Under Choose your driver version the selected values should be:
DRIVER: Node.js
VERSION: 3.0 or higher
Select Connection String Only and click the Copy button. Save the connection string; you'll be using it later to connect the Node.js services to the MongoDB Atlas database.
The connection string should look something like this, depending on the cloud service you selected:
Open the /introduction-to-microservices directory in your code editor. Find the threats-v2/threats.js and heroes-v2/heroes.js files and look for the following line of code in each file:
Replace the placeholder text for the dbUrl assignment with the URL portion of the connection string you obtained from the MongoDB Atlas Connect to Cluster dialog box.
Replace the <password> placeholder with the password that corresponds with the user name you created in the MongoDB Atlas control panel (https://cloud.mongodb.com). Note that you shouldn't hard-code passwords. It's being done here for the sake of simplicity and to make your debugging easier.
The best practice is to store passwords as environment variables. Using that technique your MongoDB connection URL would look similar to:
Starting the microservices application
Launch Eureka by executing the following command-line instruction in the root directory of your application. This will be the introduction-to-microservices directory, unless you changed the target directory when you cloned the repository.
Windows users should execute the following instruction, and all subsequent instructions, except where noted, in a Windows Command Prompt (cmd.exe) window, not a PowerShell window.
Open a second console window in the root directory of your application and start the Zuul service by executing the following command-line instruction. This will be the second console window you'll have open:
Notice the parameter used while launching Zuul. It decreases the interval at which Zuul retrieves information about services from Eureka. This is useful in the development environment, but in production you should stick to the default settings. The Spring documentation provides background on why the process is relatively slow to register a service.
Open a third console window in the project root directory and executing the following command-line instruction:
Open a fourth console window in the project root directory and execute the following command-line instruction:
Check to see if everything works as expected by executing the following curl command from the project root directory in a new console window (number five):
If the services are working correctly you should see results similar to the following console output from curl:
Implementing the JWT-based authorization service
The authorization portion of the application determines if an authenticated user has rights to access an API's endpoint.
To implement the authorization service in this application you will need to add a couple administrators to the database. You will retrieve information about them in the authentication and authorization process you'll learn about in forthcoming sections.
Using the MongoDB CLI console window you opened earlier, execute following command:
Leave this console window open, you'll be using it later.
The password data element for the first record, id: 1, is a SHA-3 hash of the string abc1234!, which is the password for the admin1 user and the password data element for the second record is a hash of the password 1234!abc`. Never store passwords in plain text in databases or anywhere else. Instead, store passwords as hashed values. You can use the SHA-3 Hash Generator to generate hashes.
Return to your code editor (or, if you're a modern person, your IDE).
Under the root directory of the project, /introduction-to-microservices, create a new directory auth, and a new file inside it, auth.js.
Open a console window in the /auth directory and initialize the npm project and install the necessary dependencies by executing the following command-line instructions:
Because you are going to use JSON Web Tokens to exchange data about authorized users between services, you need a pair of private and public keys. To generate them with OpenSSL, execute the following commands in the project root directory.
Note to Windows users: If you have installed Git, you can find the openssl.exe executable in the C:\Program Files\Git\usr\bin directory. Note that this directory may not be included in your path, so you'll need to add it to the command-line instruction.
You placed private.key in the /auth directory because it will be used only by auth-service to sign tokens. The public.key file is stored in the root directory because it will be used by all other services which need to check token signatures with this public key.
Implement the authorization service by inserting the following JavaScript code into the auth.js file:
There are a few aspects of auth-service of particular note. There's also one line you'll need to change.
At the top of the file, just after importing the required modules, the constant port is assigned to the port number on which this service is going to run, which is set on the command line when the service is started.
Next, the app constant initializes the Express application.
The auth-service uses the persistence layer to get information about users in the administrators group, so it needs to access the cloud database. The MongoDB connection is initialized the same way as with the other services.
Replace the placeholder in the line of code below with the connection string you used in the same place in the code for the other services and replace the <password> placeholder with the password you established for the user you created in the MongoDB Atlas control panel:
The connection string is used to create a new instance of the MongoDB client and throws an error if there's a connection problem, as shown below:
The essence of auth-service is the /auth endpoint:
The constant privateKey is set to the value in the file you created with OpenSSL. It's used to sign tokens.
The code looks for the user in the database using the userId and password submitted by the user and passed in the HTTP POST request. If the values do not match, the service returns HTTP response code 403 Unauthorized. Otherwise, the service builds a JSON Web Token with three claims:
exp (expiration) – this is a registered claim indicating how long the token should be valid (The code above sets it to be valid for 10 minutes.)
privileges – this is a private claim, with an array of strings indicating what privileges are given to the user
iat(issued at) – this is registered claim generated automatically by the library to identify what time the token was generated.
You can get a brief overview of the difference between types of claims on the jwt.io Introduction page or learn more about the exact definition of registered and public claims in Section 4 of RFC 7519.
There are two final steps performed in the auth-service code: 1) registration of the service with the Eureka service registry by calling the eureka-helper service, which is part of the baseline code for the project, and 2) launching the Express application on the port specified on the command line when launching the service:
At this point you should still have heroes-service and threats-service running. You started them earlier in separate console windows.
Open a new console window and launch auth-service by executing following command-line instruction in the project root directory:
Test the /auth endpoint by sending it the following negative test (the test will cause authorization to fail):
The curl output should be similar to:
The HTTP 401 response code indicates userId:admin2 and password:bad_pass failed validation against the database. If the test produced the expected results the service is alive and checking credentials.
Perform a positive test with the values you stored in the MongoDB database:
The curl output should be similar to:
The HTTP 200 response code indicates the user's credentials were successfully found in the database. The endpoint returned a JWT containing claims providing information about the user along with two standard claims.
You can decode the token and examine its contents with the jwt.io Debugger. Paste the contents of the jwtToken payload (everything between, but not including the double-quotation marks in the value section of the JSON data element) into the Encoded textbox. You should see the contents of the token in the Decoded section, as shown in the following screenshot:
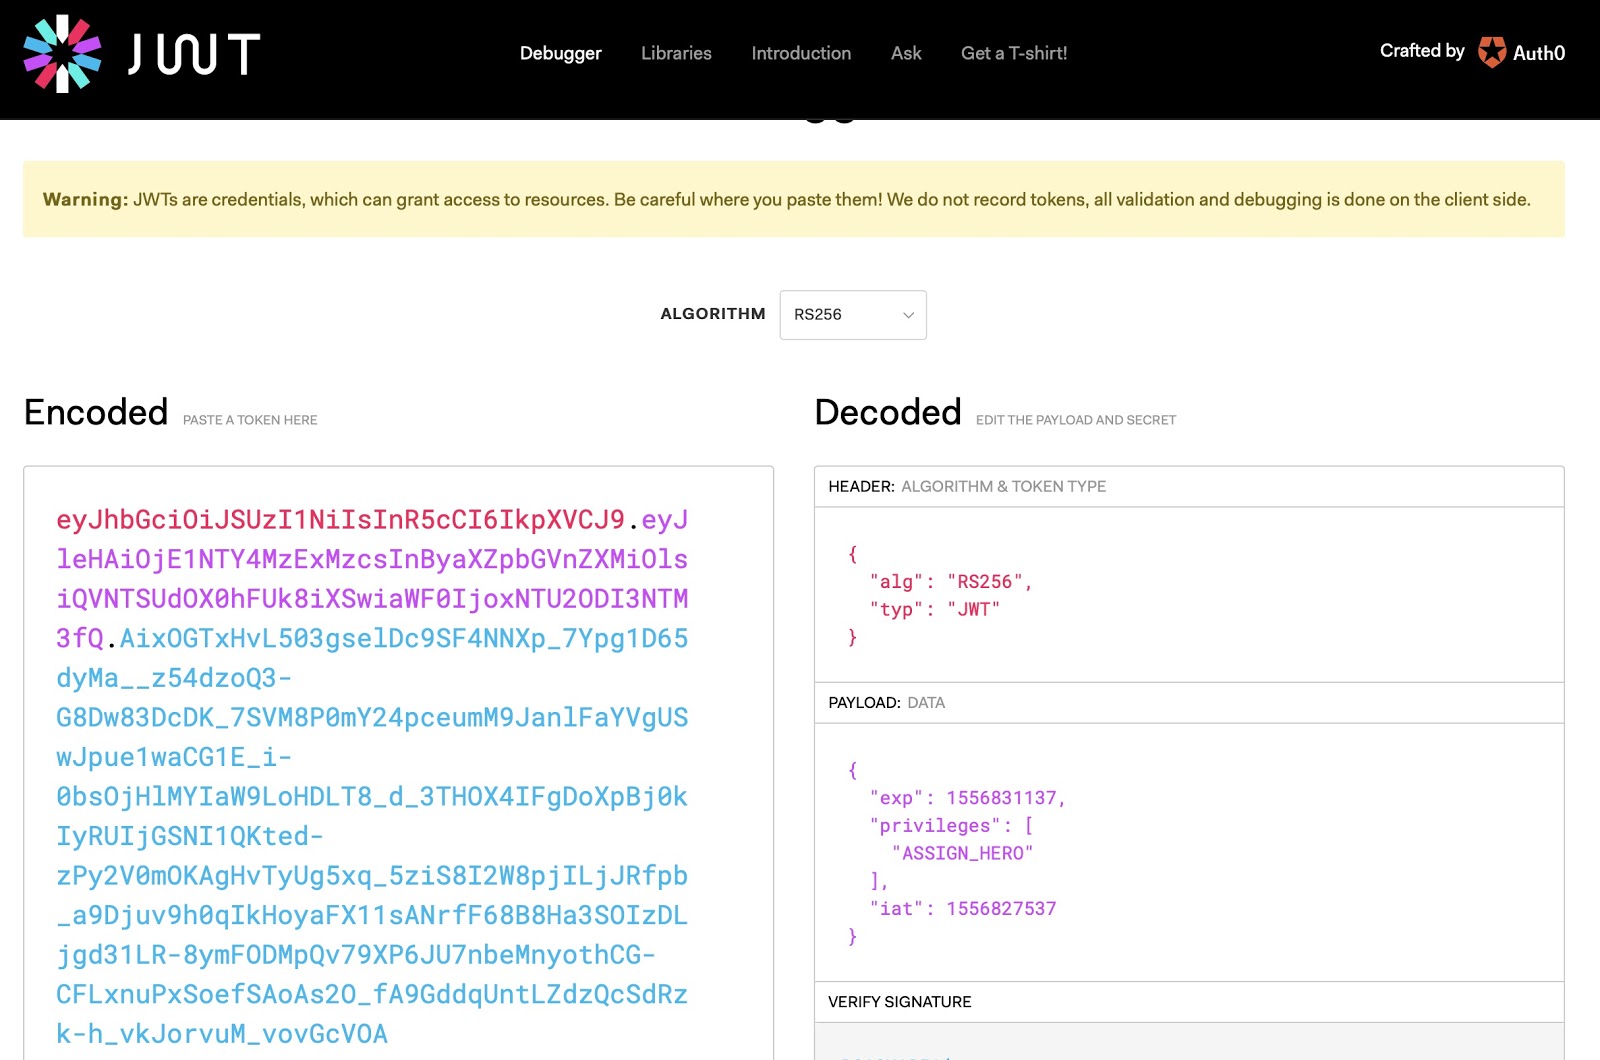
You can verify the token's signature by pasting the entire contents of the public.key file in the project root directory, introduction-to-microservices in the first text box under VERIFY SIGNATURE. The user interface should update automatically to display "Signature Verified".
If you want to catch up your code to this step using the companion repository on GitHub, execute the following commands in the directory where you’d like to create the project directory:
Note that you'll still need to set up the MongoDB database and add data to it according to the instructions above, including each data manipulation command, for the application to work correctly. If you replace the code for the and of the running services you'll need to stop and restart that service.
Protecting API endpoints with JWTs
Now that you've successfully implemented an authorization service utilizing JSON web tokens, you can use it to protect the application's other services. With auth-service you'll be able to protect heroes-service and threats-service from unauthorized access, helping superheroes vanquish the forces of darkness.
Start by adding authorization to heroes service. In an available console window, change to the heroes-v2 directory and install the required dependency:
You can now import the new dependency and the public key into the /heroes-v2/heroes.js file.
Add the following JavaScript code immediately below the existing const declarations at the top of the heroes-v2/heroes.js file:
Implement new a new endpoint, /hero, which will listen for POST requests with a payload containing the description of a new hero.
Add the following JavaScript code to the heroes-v2/heroes.js file above the app.post method for the /hero/** endpoint. Note that the following code implements a different endpoint and does not replace the code for the /hero/id (hero/**) endpoint:
Modify the /hero/:id endpoint (/hero/**), which updates existing heroes, to use the JWT authorization token.In the heroes-v2/heroes.js file, add the following code at the beginning of the method:
The hero/:id (/hero/**) endpoint is used by threats-service to assign a hero to a threat, so you need to modify the threats-v2/threats.js file as well.
Find the existing code for the app.post method shown below:
Replace the headers: argument with the following line:
Processing the assignment is based on the response from heroes-service, so there is no need to add JWT validation to threats-service; checking for authorization is done by heroes-service If authorization fails, the last line of the method will return an error.
Testing the modified endpoints
You can test the modifications to the endpoints by adding new hero.
Create a new-hero-payload.json file in the project root directory and insert the following JSON code:
In the console windows where you have the /threats-v2/threats.js and /heroes-v2/heroes.js Node.js applications running, stop and restart the applications from the project root directory. The commands are the same as you used previously and you can re-execute them in the same console windows:
Your JSON Web Token has probably expired, so obtain a new one by executing the following curl command in an available console window:
Copy and paste the result into a text editor. You'll be using it in forthcoming steps.
Copy the following curl command to your text editor:
Replace the token-obtained-from-auth-service with the data from the jwtToken element you previously copied to your text editor. It's the value of "jwtToken" in the example below (your actual data will be different):
The resulting curl command will look like the following (your actual JWT data will be different):
Execute this HTTP POST request in the project root directory, introduction-to-microservices (or wherever you've located the new-hero-payload.json file). You can also perform this request with Postman or PowerShell Invoke-WebRequest by constructing an appropriate query in those tools using the data from the example curl command.
The output from this command should be similar to:
You received an HTTP 403 response because user admin2 doesn’t have the authorization to create a new hero. You can verify that in the output of heroes-service in the console window where you are running heroes-v2/heroes.js. The output should look like the following:
Try to assign a hero to threat with an HTTP POST request to the /assignment endpoint. As above, replace the token placeholder in the following curl command with the JWT token you obtained previously:
The output from this command should be similar to the following snippet:
Verify JSON Web Token validation
You can verify that the authorization service protects the application against malformed JWTs. You can do this by changing the part of the JWT that bears the authorization data, replacing it with a different value that gives the admin1 user an elevated privilege, and resubmitting the request.
Perform the following steps to test the protection against an elevated privilege exploit:
Copy the payload portion of the JWT you've been using, which you've previously saved to a text editor window. The payload is the string after the first dot (.) and before the second dot in the example below (your actual data will be different):
Navigate to the Encode/Decode tool from Google page with your browser, paste the string in the text box, select Base64 Decode and click Submit. You should see text similar to the following:
Replace the encoded string in the textbox with the decoded string and replace "ASSIGN_HERO" with "ASSIGN_HERO","CREATE_HERO". Select Base64 Encode and click Submit.
Copy the result to a text editor window.
If you've taken close to 10 minutes to get to this point you may want to generate a new token before continuing. Use the same procedure as above and place the contents in a text window. If you've been speedy you can use the token you already have stored in a text window.
Replace the payload portion of your valid token, the section after the first dot (.), with the text you retrieved from the Base64 encoder. Now you have a malformed JWT.
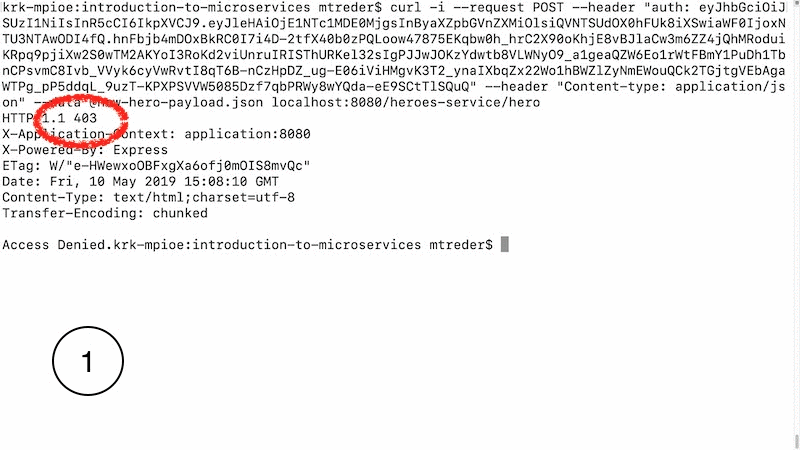
Use your new malformed JWT to attempt to create a new hero with the admin1 user ID, which doesn't have the right to create a user. In the curl command below, replace the placeholder with your malformed JWT:
You should receive an HTTP 401 Unauthorized response because auth-service detected a malformed token. Take a close look at the heroes-service console output: you should see that the application detected the malformed JWT and rejected it, as shown in the last line of the output in the heroes-v2/heroes.js console window:
Your application is safe from bad actors manipulating your JSON Web Tokens because the /auth service detected that the JWT payload section, which contains claims that include user rights, did not match the signature.
If you want to catch your code up to this step using the code from companion repository on GitHub, you can execute the following commands in the directory where you’d like to create the project directory:
You'll need to build the database and add data to it for the project to be fully functional, if you haven't followed along with the instructions for creating and populating the database. If you replace any of the code for the running services you'll have to stop and restart them.
Implementing two-factor authentication (2FA)
The application now has a secure authorization system. But it relies on a single authentication factor, the user ID and password in possession of a user. This is a factor that the user knows. It’s widely acknowledged these credentials are vulnerable to being compromised and misused in a variety of ways, so how can the application be more secure?
One of the best ways is to implement a second authentication factor.
In addition to something the user knows, two-factor authentication also requires something the user has (possession) or is (inheritance).
You can use Twilio Authy to provide a second factor through possession, through something nearly every user has: a mobile phone (or other device). If you'd like to learn more about implementing 2FA with Twilio Authy you can refer to the previous post in this series: Build Two-factor Authentication in Angular with Twilio Authy.
This portion of the project will show you how you can quickly add 2FA to an Angular app with Authy. You’ll need a Twilio account to complete these steps. You can sign up for a free trial account in a few minutes.
Once you have a Twilio account, sign in and navigate to the Authy section of the Twilio Console and complete the following steps. (You’ll be done in a few minutes.)
- In the Authy section of the Twilio console, create a new application
- Copy the Production API Key for the application to a safe place. (You can find the key in the Settings for the application if you misplace it.)
- In the application you created, register yourself as a new user using your preferred email address and mobile phone number.
- Copy the Authy ID for the user you just created to a safe place.
- Install the Authy app on your mobile phone. You should have received a text notification with a link to get the codes to complete the installation.
When you’ve successfully completed the preceding steps you can implement two-factor authentication.
Add the Authy ID to the database record for user admin1.
Return to the MongoDB CLI console window you opened previously and execute following instruction, replacing the AUTH_ID placeholder with the Authy ID you just obtained:
The MongoDB console should return the following result if you update action was successful:
The auth-service code needs to be updated to use two-factor authentication factor.
Replace the contents of the /auth/auth.js file with the following JavaScript code:
Replace the placeholders for the dbUrl and API_KEY constants with your MongoDB connection string and your Twilio Authy API Key, respectively.
The new code includes three new functions:
authenticateWithAuthy(authyId) – sends authentication requests to the Twilio Authy API using the given Authy ID from the database and returns an authyToken.
checkAuthyStatus(authyToken) – checks the status of an authentication request for a specific authyToken and returns null or the Authy ID associated with the value of authyToken if the request is successfully authenticated.
retrieveUserByAuthyId(authyId) – retrieves a user from the database using an Authy ID.
The new code also modifies the /auth endpoint. If the user has the flag enabledSecondFactor set to true, based on the value in the database, the endpoint responds with an Authy token instead of a JSON Web Token. The Authy token is then used with the new endpoint, /auth/status, which returns a JSON Web Token if the authentication request is validated by the user with the Authy app on their second-factor device.
To run the modified code for auth-service you'll need to stop and restart the service. You can use the same console window to start the revised service with the same command-line instruction you used previously in the application root directory, introduction-to-microservices:
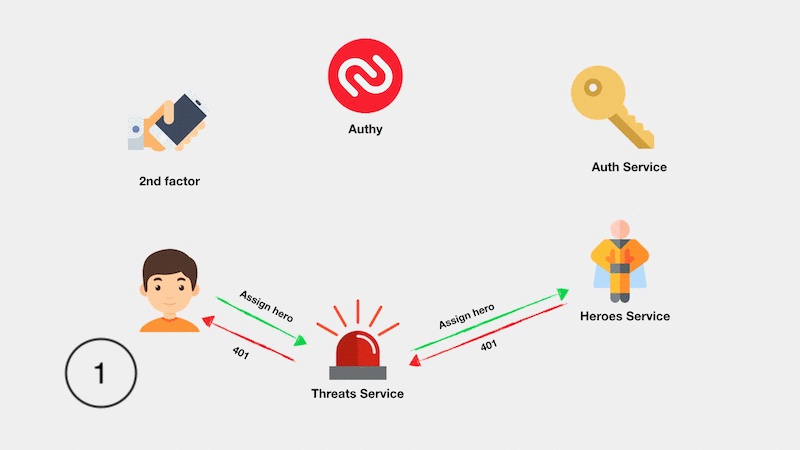
The implementation of the entire application is illustrated in the following diagram:
Testing two-factor authentication
You can verify that 2FA is working correctly by trying to authenticate admin1.
Execute the following curl command in a console window:
The output should look similar to the following:
The successful request shown above returned an Authy token. If you encounter errors, check the console output for auth-service and check the values you're using for the Authy Production API Key (API_KEY) and your user's Authy ID, which can be found in the Twilio Authy Console.
Use the value for authyToken to make a request to the /auth/status endpoint by executing the following curl command, replacing the value for the authyToken-goes-here placeholder with the actual authyToken value returned when you executed the previous command:
The response should be an HTTP 401 Unauthorized response like the one shown below:
You should also receive an Authy authentication request on the device on which you installed the Authy app.
Accept the authentication request.
Note: Depending on your device and its notification settings, you may not receive a notification message; check the app if you don't receive a device notification. To check for authentication requests, open the app, select the name of the Authy application you created in the Authy console, select the bell icon, and select the Pending tab. Any unanswered authentication requests will appear there.
Repeat the request to /auth-service/auth/status using the same authyToken value you used in the previous API request. This time the API should return an HTTP 200 OK response along with the JSON Web Token, similar to the following:
Attempt to add a new hero by executing the following curl command, replacing the token-obtained-from-auth-service placeholder with the value for jwtToken returned above:
The API should return an HTTP 201 Created response similar to the one shown below:
The response includes a new assignment for hero 6, indicating that you successfully used Authy to authenticate a user, used the user's Authy authentication token to obtain a JWT containing user's security claims, and used the JWT to access microservice APIs to make a change in the persistence layer.
That's a fine bit of work for one tutorial. Congratulations on completing the project successfully.
If you'd like to experiment more you can revert the database changes you made while testing two-factor authentication by executing the following command in the MongoDB CLI:
If you want to catch up your code to this step, you can clone the code from the GitHub repository by executing the following commands in the directory where you’d like to create the project directory:
Note that you’ll also need to setup the database and Twilio Authy according to the directions above for the project to be fully functional.
Summary
In this post you learned how to protect your Node.js microservices with an authorization service to control which authenticated and authorized users have access to specific resources. You learned how to reduce traffic to the authorization service with JSON Web Tokens, a standard way of sending information in an encoded string which is easy to decode and read, but protected with an encrypted signature. A public key owner can verify the signature, but only the private key owner can change the token value and sign it again. When the token payload doesn't match the signature originally generated from the payload, the token is invalid.
You also learned how to implement two-factor authentication with Twilio Authy. You saw how Authy and JWTs can be combined to form a robust system for authenticating and authorizing your JavaScript APIs.
Additional Resources
Architectural Styles and the Design of Network-based Software Architectures, Roy Thomas Fielding, 2000 – Fielding’s doctoral dissertation describes Representational State Transfer (chapter 5) and other architectural styles.
Microservices – Although flawed, the Wikipedia article is a good starting place for finding more information about microservices architecture and implementation.
Node.js – provides the reference documentation for the application server.
RFC 7519 – JSON Web Token documentation.
Maciej Treder is a Senior Software Development Engineer at Akamai Technologies. He is also an international conference speaker and the author of @ng-toolkit, an open source toolkit for building Angular progressive web apps (PWAs), serverless apps, and Angular Universal apps. Check out the repo to learn more about the toolkit, contribute, and support the project. You can learn more about the author at https://www.maciejtreder.com. You can also contact him at: contact@maciejtreder.com or @maciejtreder on GitHub, Twitter, StackOverflow, and LinkedIn.


Related Resources
Twilio Docs
From APIs to SDKs to sample apps
API reference documentation, SDKs, helper libraries, quickstarts, and tutorials for your language and platform.
Resource Center
The latest ebooks, industry reports, and webinars
Learn from customer engagement experts to improve your own communication.
Ahoy
Twilio's developer community hub
Best practices, code samples, and inspiration to build communications and digital engagement experiences.