Build an Automated Vaccine Appointment System with Twilio Studio and Serverless
Time to read:
February 13, 2021
Written by

Photo courtesy of AAP and self.com (CC BY 2.0)
Scheduling appointments for the COVID-19 vaccine is at the top of everyone’s mind, but setting up appointments at scale is a challenge. In this post, you will learn how to build a prototype of an interactive appointment management system using Twilio Programmable Voice and Programmable Messaging. Patients will be able to reply back to confirm, cancel, or reschedule their appointments and make outgoing calls to the number provided. With this in place, you also optimize the physician’s unused time slots due to 11th hour cancellations.
What about connecting with an EHR?
If you work in healthcare, you’re probably already familiar with the interoperability problem that exists when accessing and sending data to electronic health records (EHR) systems. HIMSS defines interoperability as “the ability of different information systems, devices and applications (systems) to access, exchange, integrate and cooperatively use data in a coordinated manner, within and across organizational, regional and national boundaries.”
Since each health system has their own data format and data access mechanism, you need another layer of technology to make them talk to each other seamlessly. Whether you use an integration engine for middleware, such as Redox Engine or ELLKAY, or you’ve built a custom in-house solution, you can use the following tutorial to build out the logic for sending and receiving messages from patients.
For building this prototype, we will use Airtable (a cloud spreadsheet-like database) to simulate the EHR. If you are using Salesforce as a CRM for patient data, you’ll want to check out this post on how to send COVID-19 vaccine appointment reminders with Salesforce Flow and Twilio.
Use Cases for SMS
You will build three workflows when an appointment reminder is sent to a patient via SMS:
Patient responds back with “Yes” to confirm:
- Send back an SMS to the patient with a confirmation
- Update Airtable with the confirmation of this appointment
Patient responds back with “No” to cancel the appointment:
- Send a cancellation confirmation to the patient
- Update in the Airtable that the appointment is cancelled
- Find the patient that is on the waiting list for this physician and send SMS to see if they want to take this earlier appointment slot that just opened up
Patient responds back with “RSCH” to reschedule appointment
- Pull the next available appointments from your EHR (this information will be hardcoded in this prototype — in production, you’d need to integrate with your EHR)
- Send these options to the patient to select one of them or option to automatically connect with their doctor’s office “CALL”
- Update Airtable if patient chooses one of the provided dates or create a conference call with patient and their doctor’s office if they choose “CALL”
Prerequisites
- A Twilio account. If you sign up for a new account through this link, you’ll get an extra $10 in credit when you upgrade.
- A Twilio phone number. Instructions on how to get one are here.
- An Airtable account.
Send the appointment reminder and handle the patient response
First, you will build a workflow to send SMS appointment reminders and handle the patient responses using Twilio Studio, a stateful visual workflow builder. Twilio Studio is hosted by Twilio, so you don’t need to set up your own server or deploy anything separately. It uses Twilio Programmable SMS to send messages, and maintains the state when the patient sends an SMS response back.
To make a new Twilio Studio flow, log in to your Twilio account and go to the Studio Dashboard. Then, click the blue plus sign and give your flow the name “Vaccine Appointment Reminders.” In the next part of the setup, you will want to scroll down and choose “Import from JSON” from the provided templates.
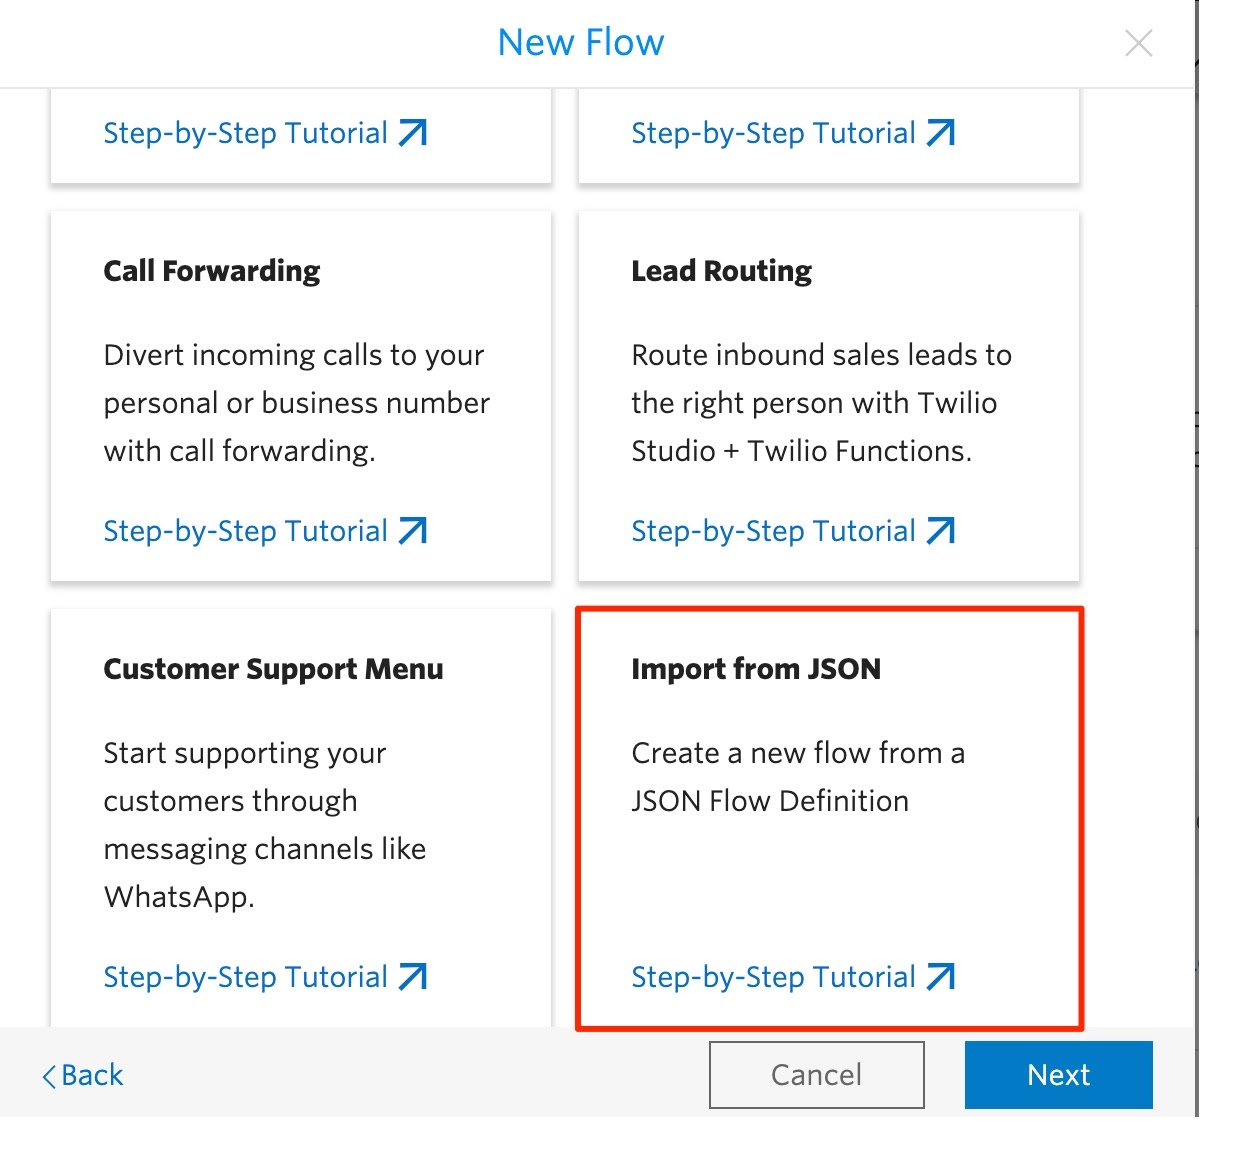
Open up this gist and copy the JSON. Back in the Twilio Studio setup window, delete the empty placeholder brackets, and paste in the JSON copied from the gist. Once you finish the setup, you should see a flowchart like the one below. Hit the "Publish" button at the top of the flow.
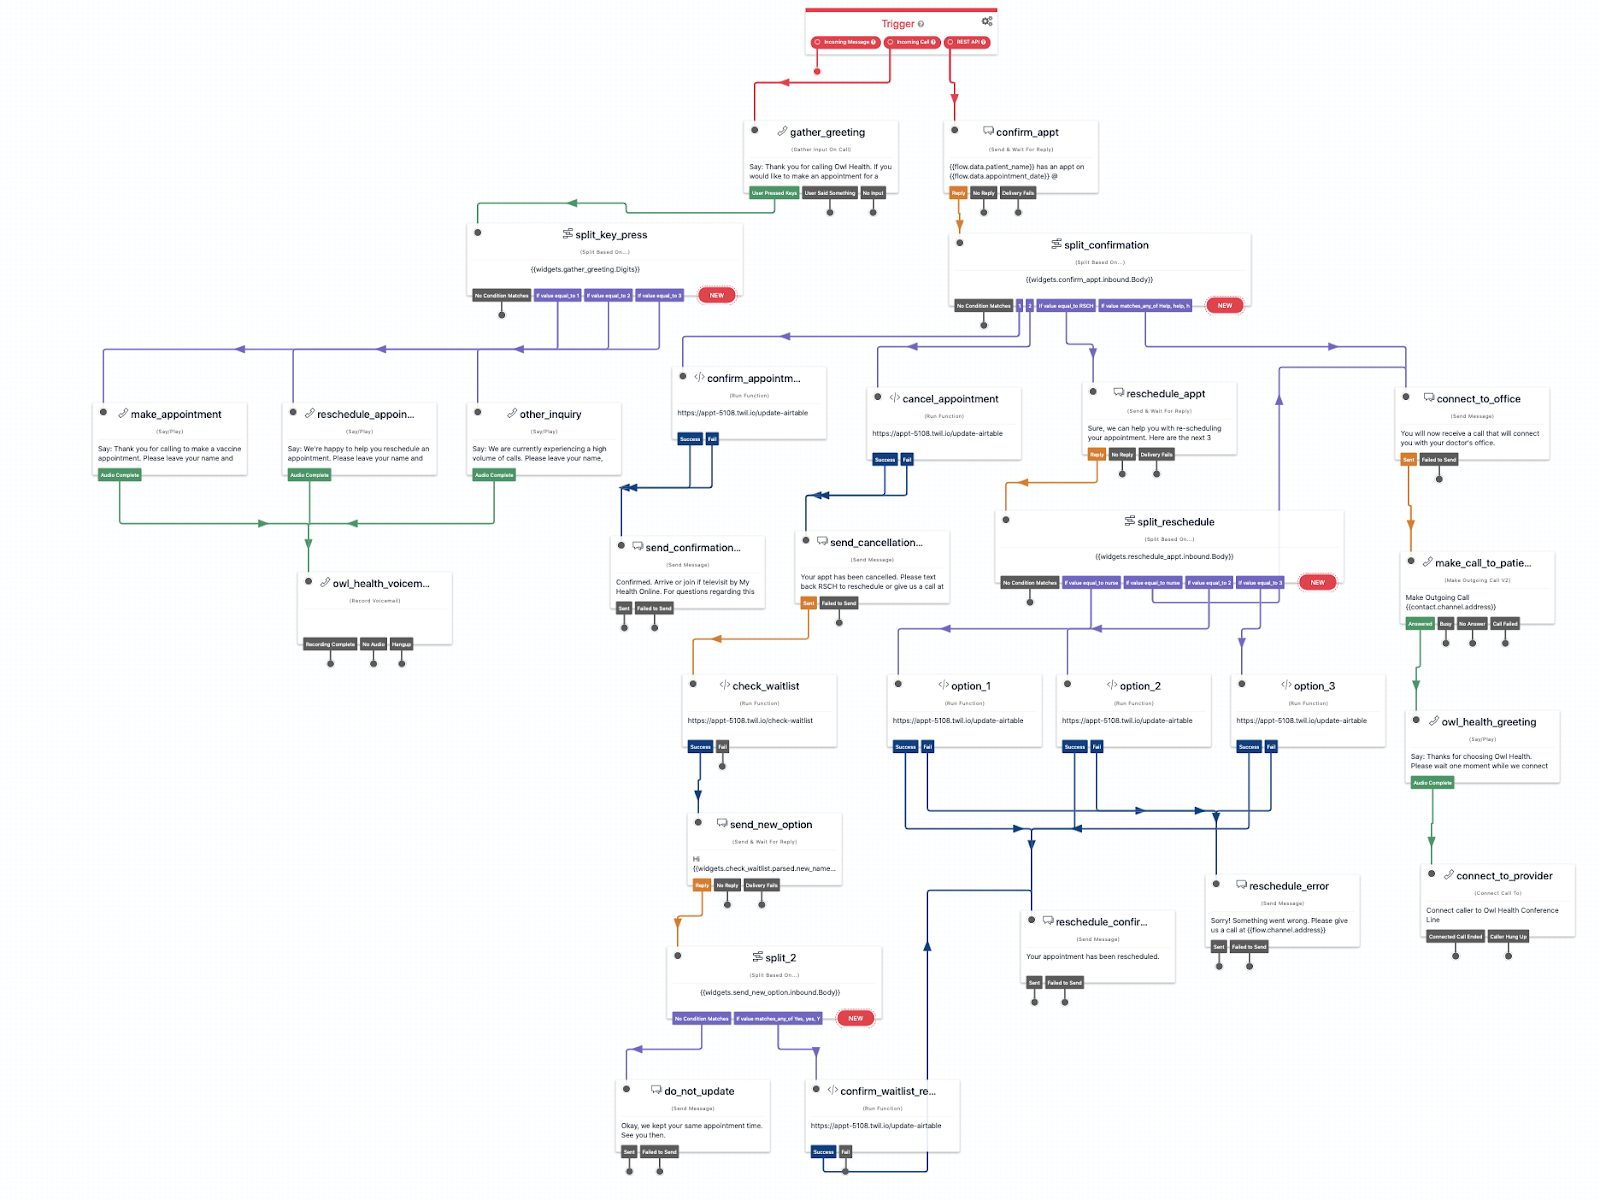
There are a few different things happening in this flow based on the defined uses cases. You may trace the different paths by zooming in on them in the Twilio Studio interface, and more detail about each is available in the following screenshots.
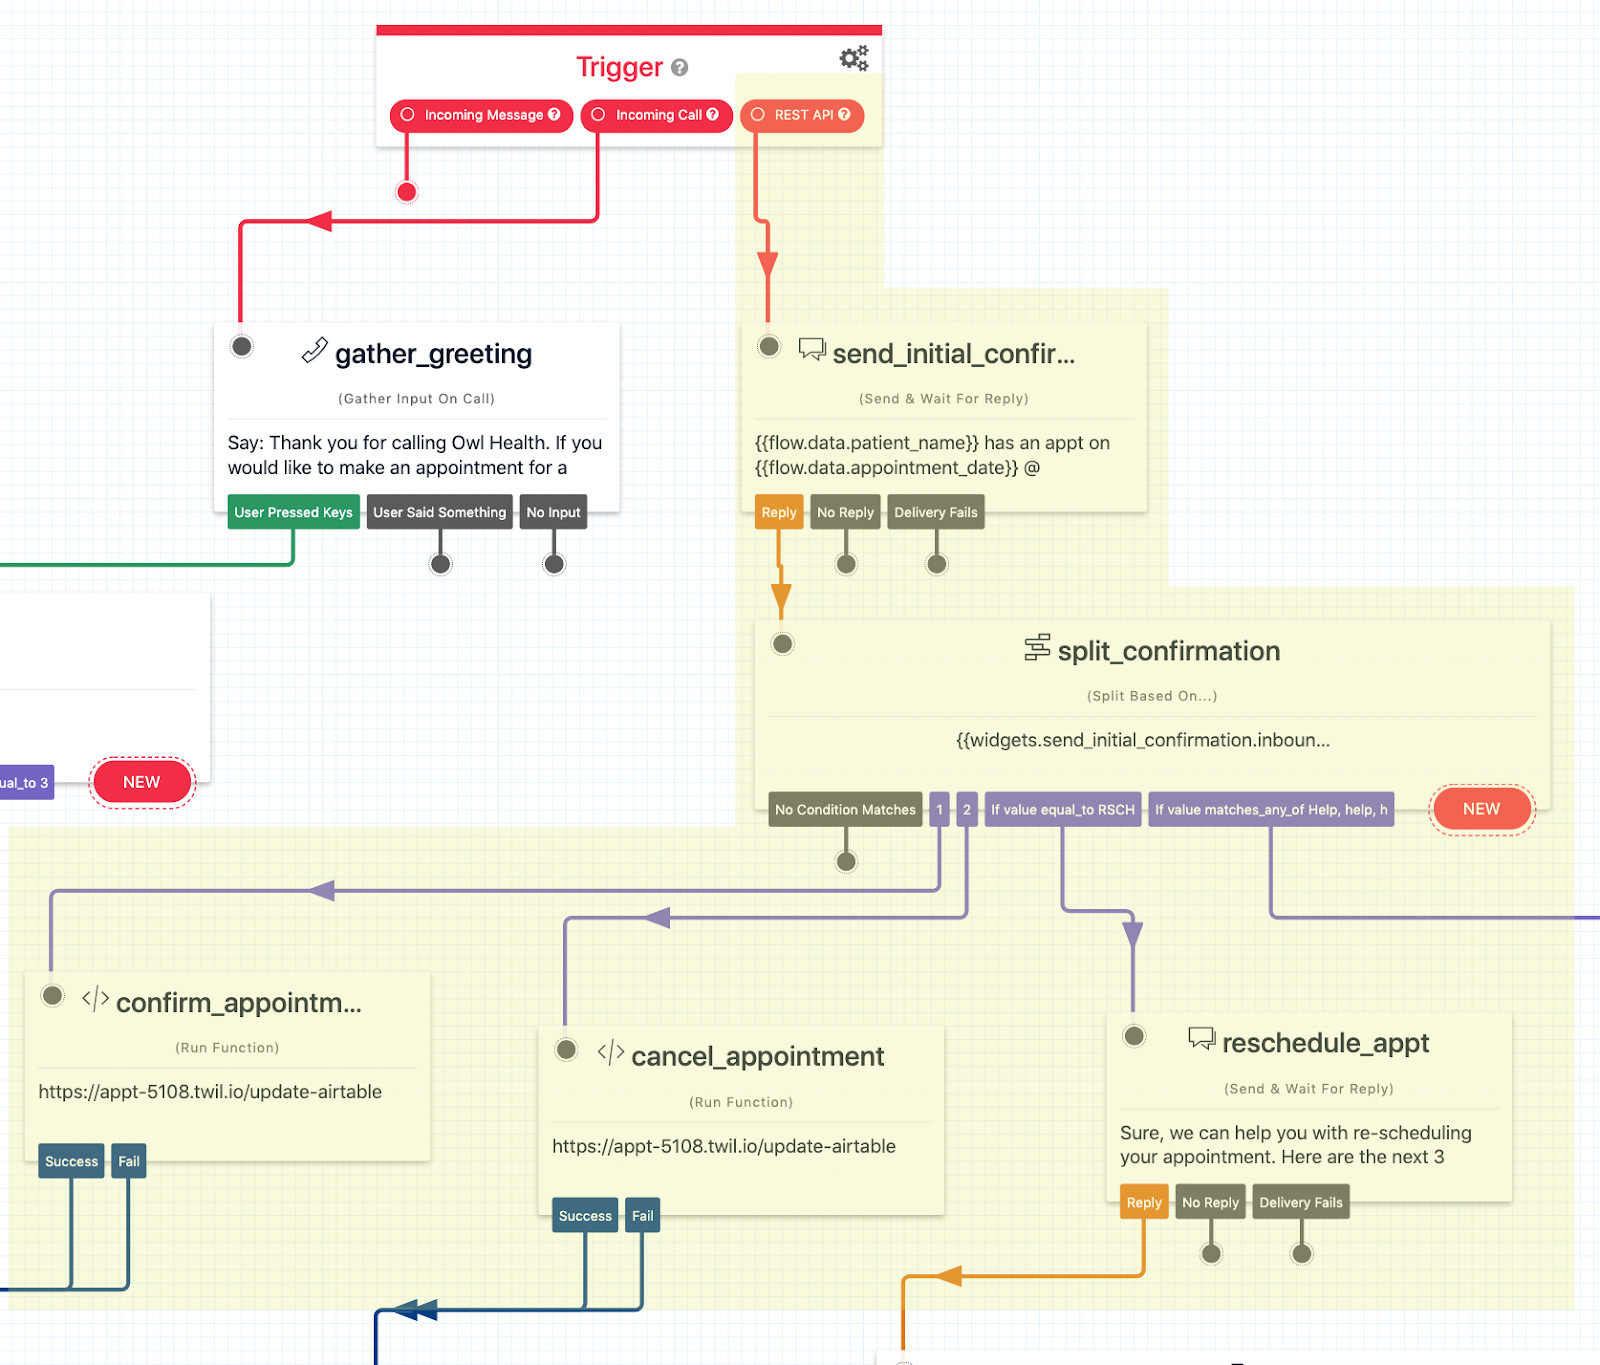
The flow is triggered when a POST request is made, and will hit the widget to send an SMS message to the patient to confirm their pending appointment. In a production environment you would want to hook into a scheduling system to send the message at a specific time ahead of an appointment; for the prototype you will make a POST request to mimic this action.
The split_confirmation widget routes the flow to the next action based on the patient’s response. If a patient presses 1, it will route to the confirm_appointment widget, and if they press 2 it will route to cancel_appointment: Both of these widgets call a Function that updates the Airtable. However, if they request to reschedule, it will route to a different part of the flow.
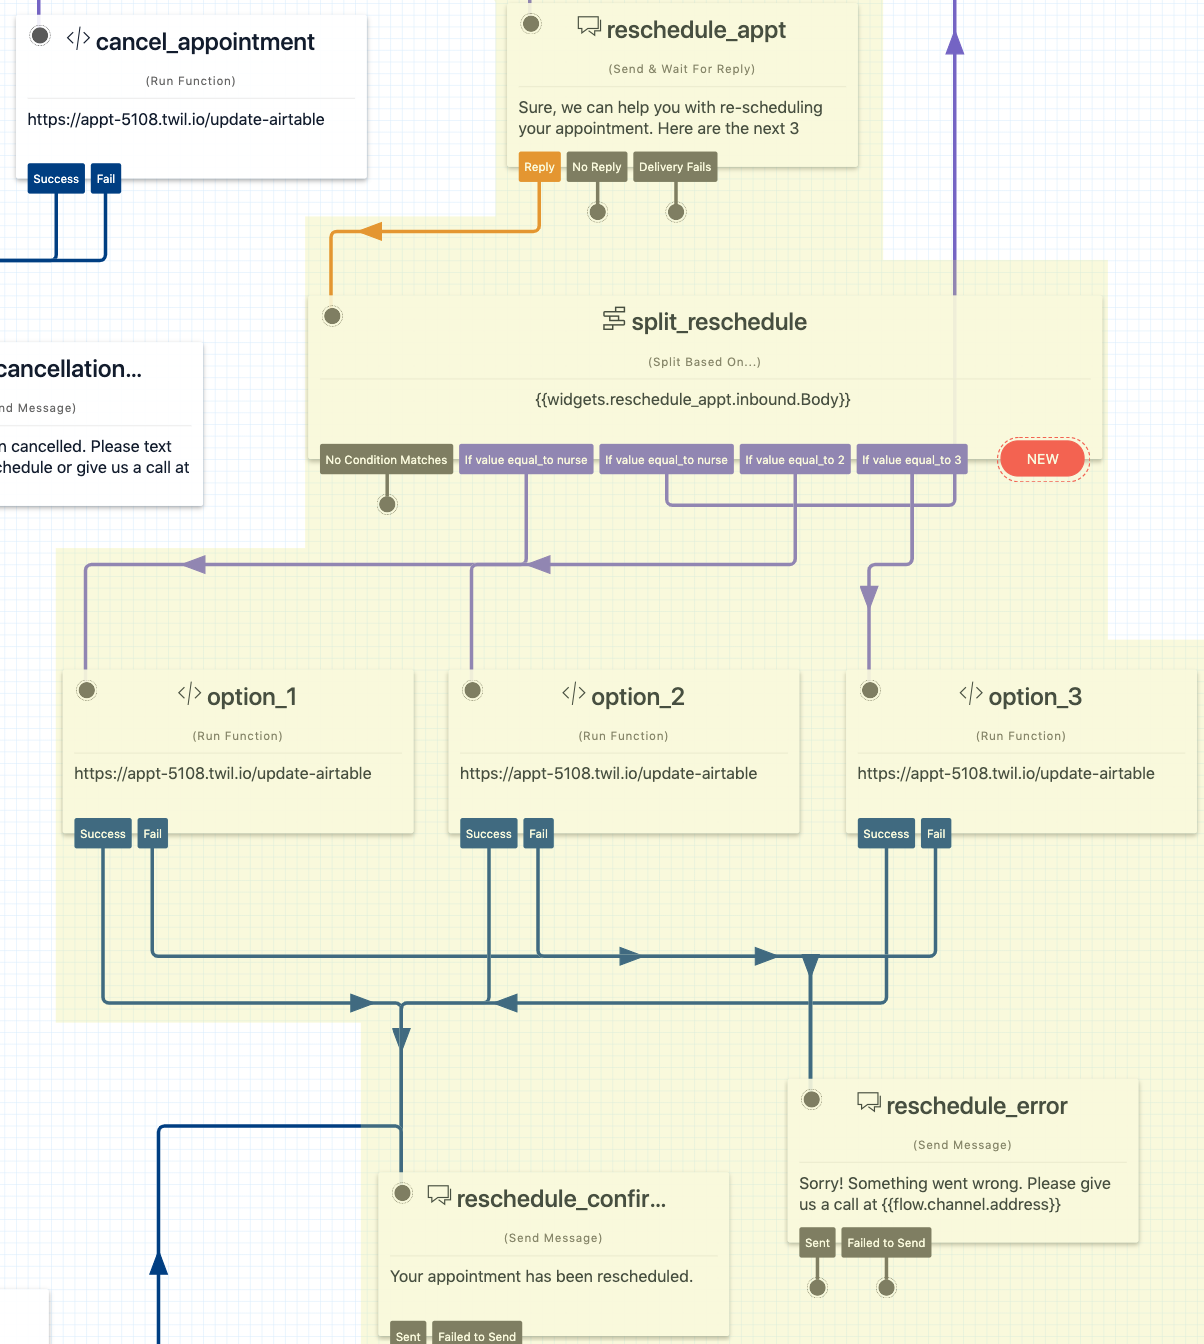
If the patient wants to reschedule their appointment, the system will offer them three alternate times. The different options are handled in the three option widgets. If the reschedule is successful, they will receive a confirmation message, and if it fails for some reason, the flow will send a message asking them to call the office.
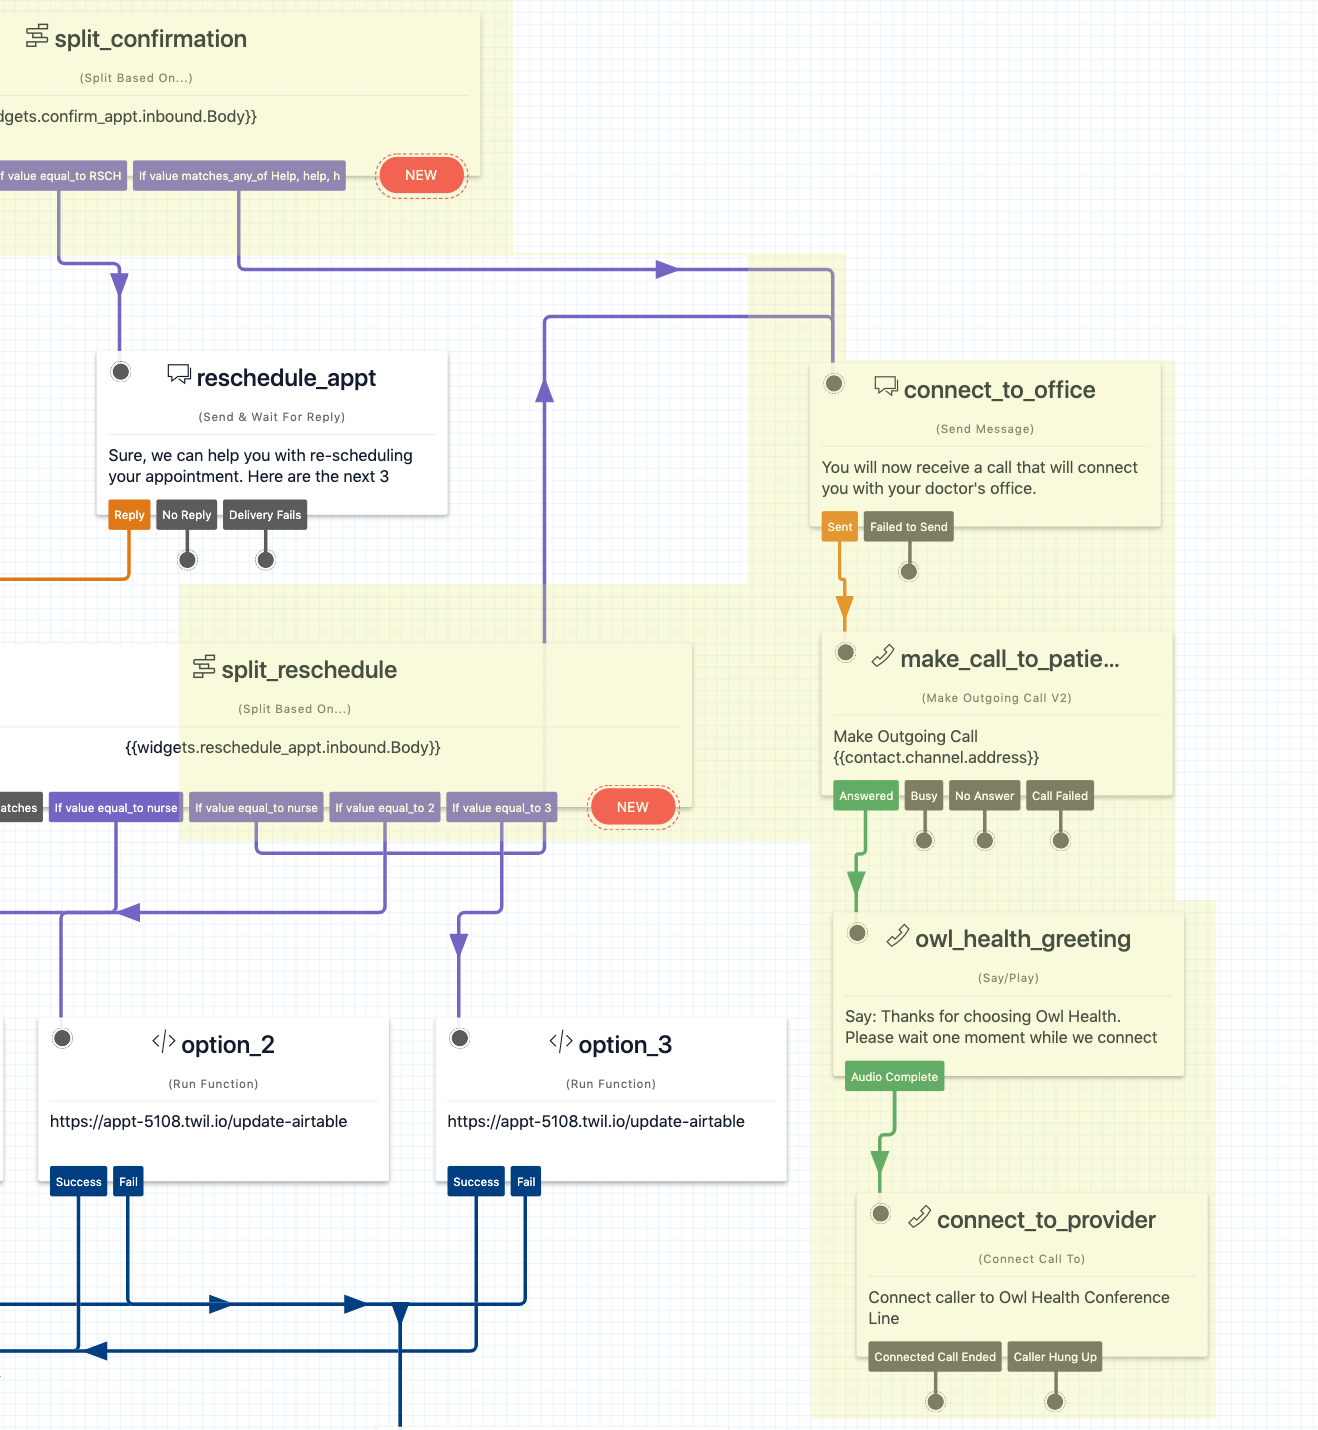
There are two cases in which the patient will automatically connect to the office via a call. One such instance is if they text “Help” in response to the initial SMS. The other is if they text “Call” in response to the rescheduling message. In the prototype, this calls the patient from the Twilio number, says a greeting if they answer, and then connects the patient to a provider conference line.
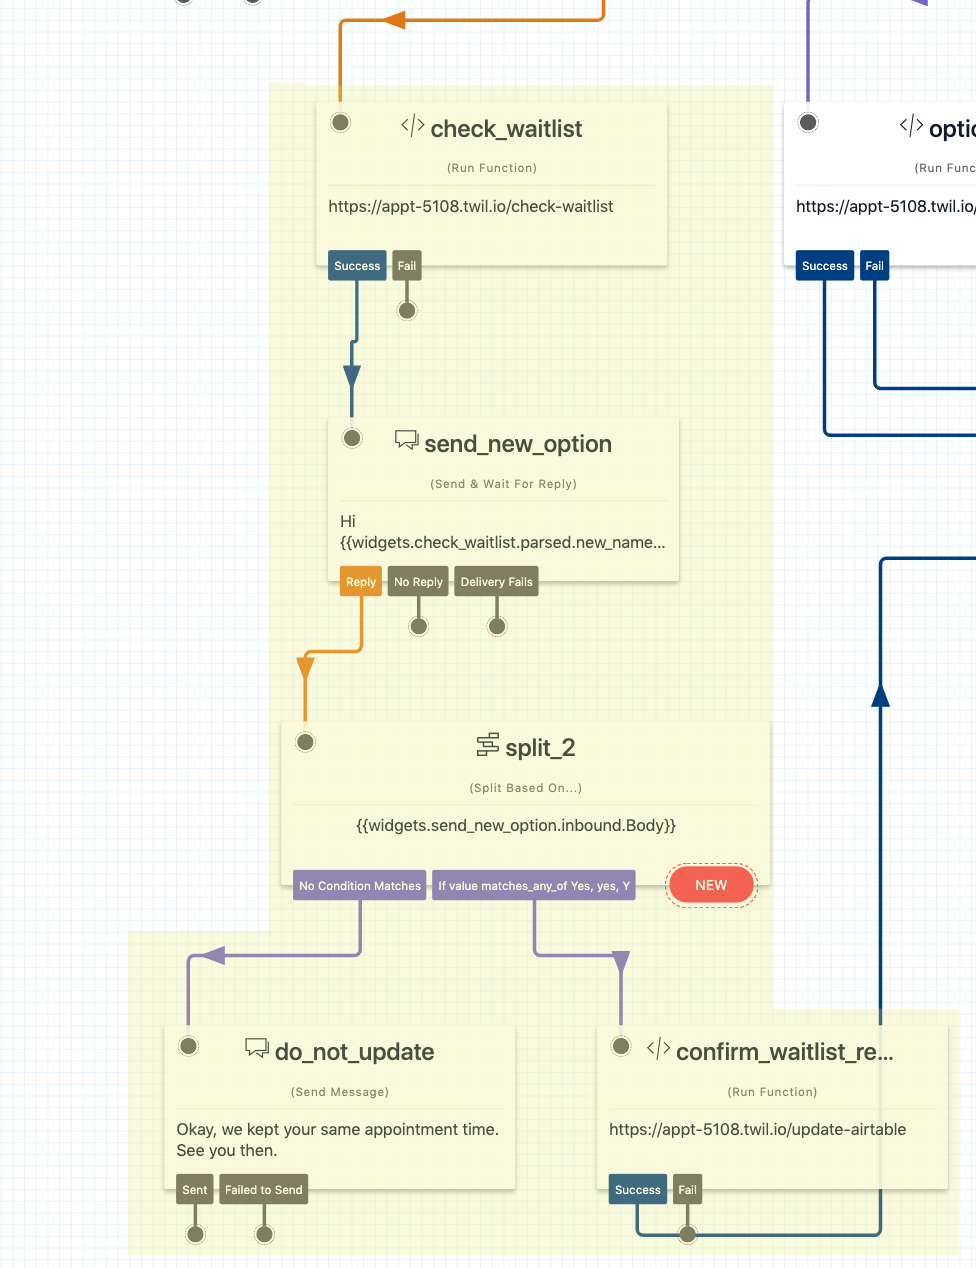
Part of the benefit of automating this process is that you can create efficiencies to fill canceled appointments. This part of the flow will run a Function that finds patients in the Airtable who have requested to be put on a waitlist. It will then send an SMS message to notify them that there is a new appointment time available and give them the option to reschedule. If they take the new appointment, the flow routes to the widget that sends a notification that their appointment has been rescheduled.
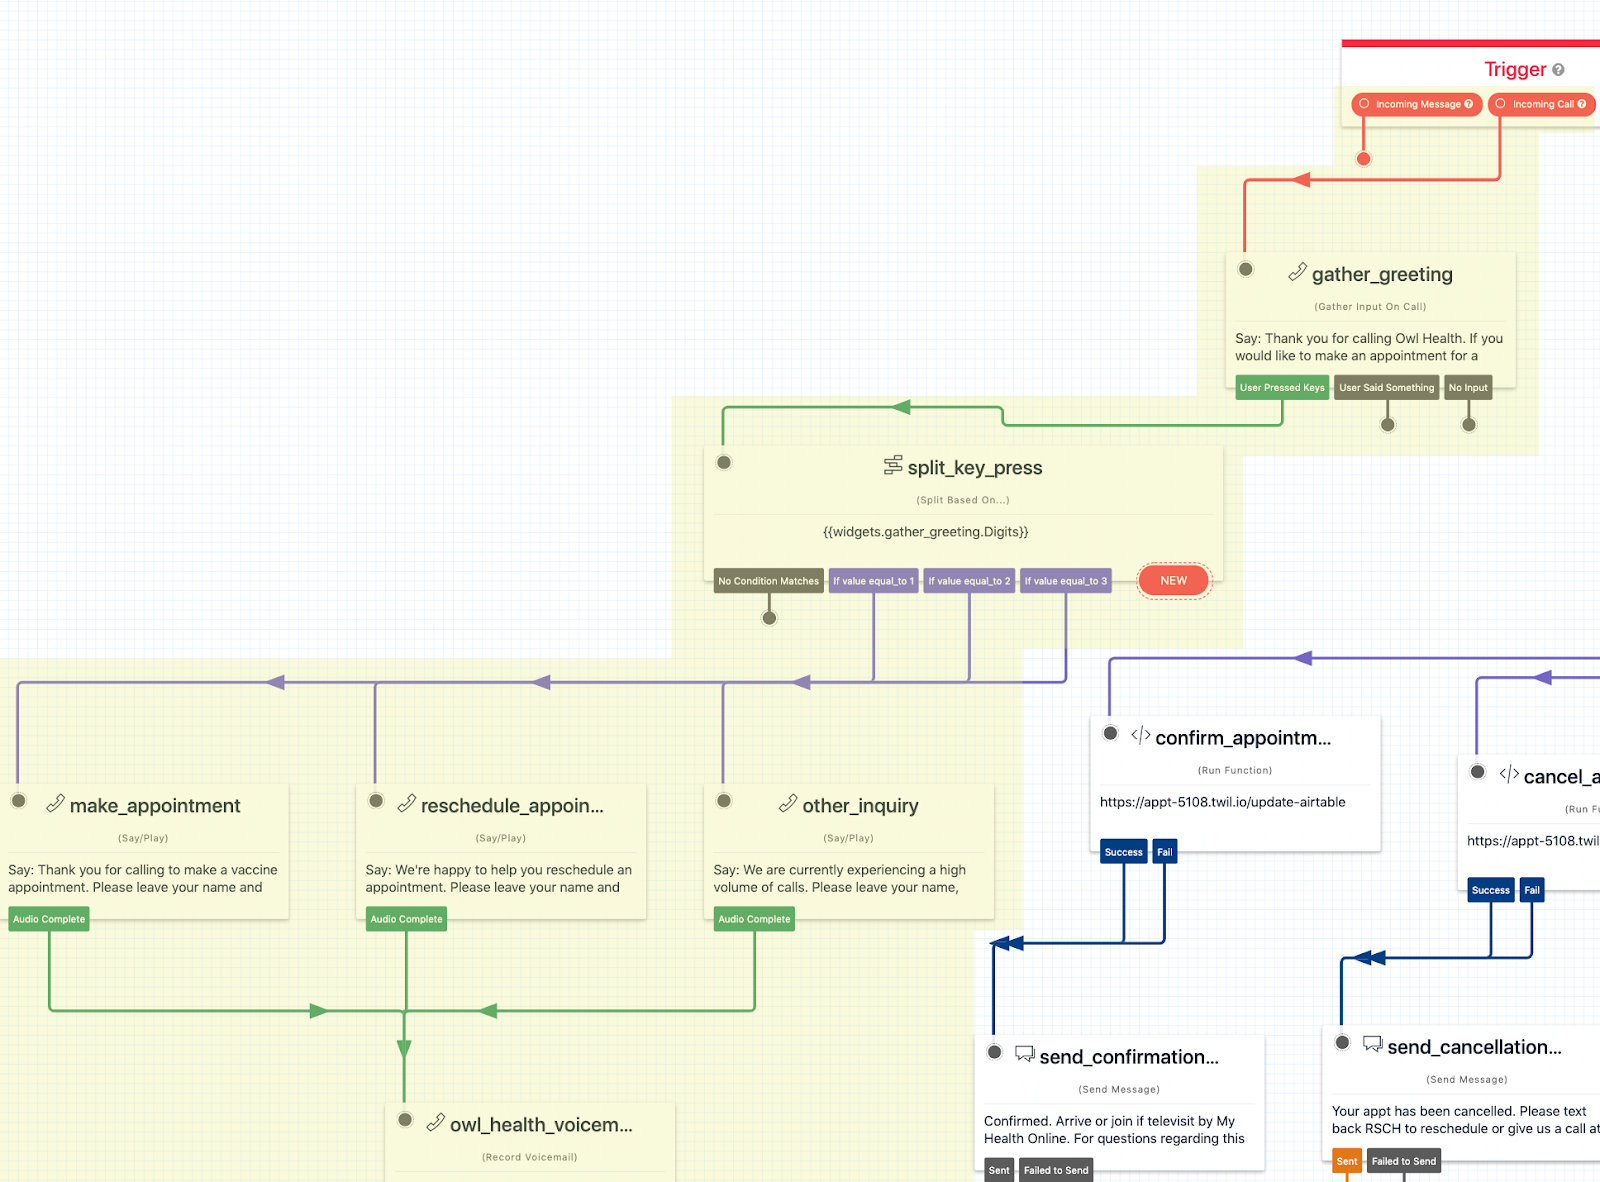
This prototype includes a basic Interactive Voice Response (IVR) system in the event that a patient were to make an inbound call to this number. The system gathers the patient’s choices via keypress, prompts them for the information that you would need in order to help them, and then routes them to a voicemail widget to gather their message; another option would be to route the call to another phone number to provide assistance.
The Studio flow powers the sending and receiving all of the SMS messages. Now, let’s set up the Airtable base that will serve as the mock EHR.
Set up Airtable
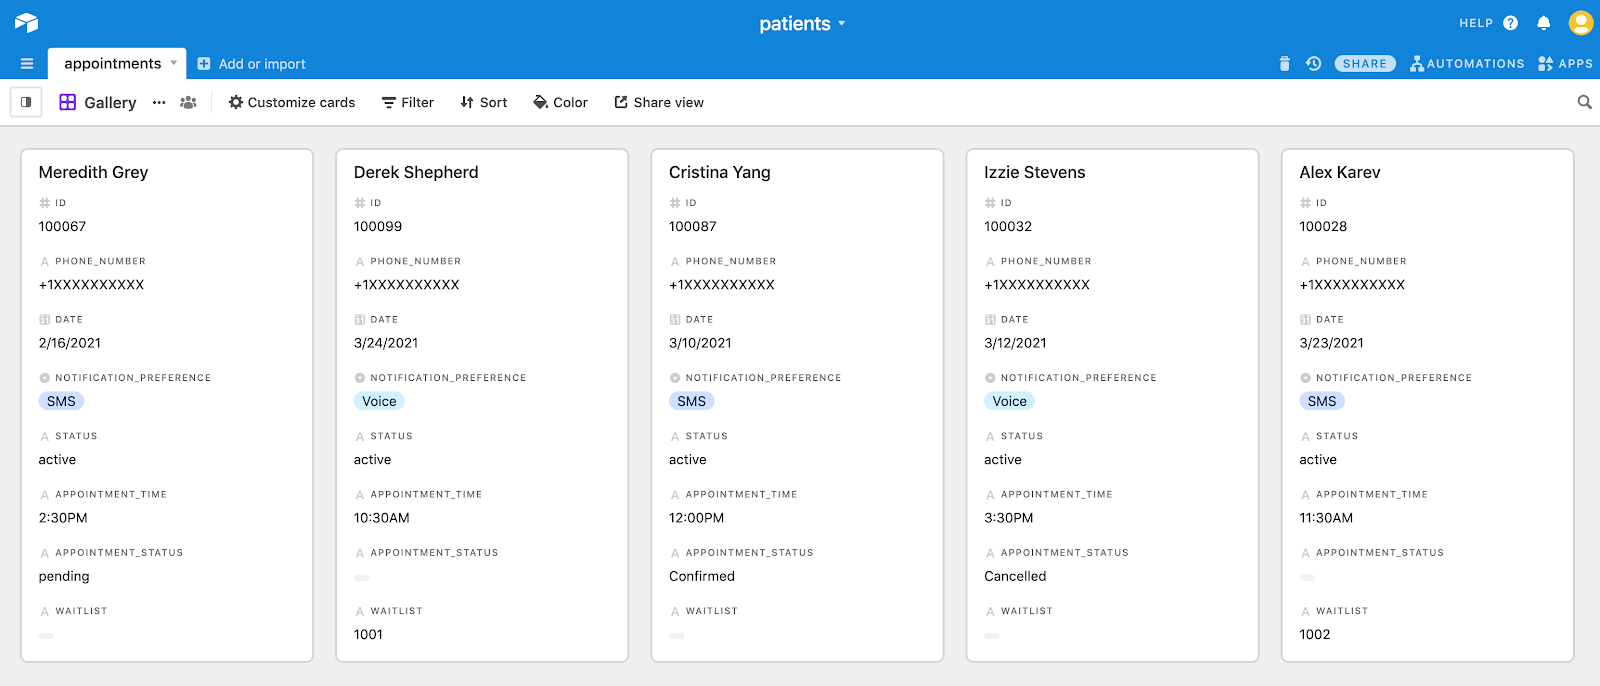
Copy this Airtable base by hitting “Copy Base” in the upper right hand corner. Name your base “patients” and your table “appointments”.
Here is a screenshot of sample data in the “appointments” table under “patients” base. The gallery view of your base should look similar to this:
You need the Airtable API key and a base ID for the next step in building the prototype. Generate an Airtable API key on your account page. Get the base ID from the auto-generated API documentation when you click on the appointments base. You can pull it from the URL, or the introduction section; it’s prepended with “app”.
Add Serverless code to access Airtable appointment data
Next, you’ll write some code to read and update appointment data from Airtable using Twilio Functions. Open the Services dashboard and click “Create Service”. Give your new service the name “appointment-reminders”.
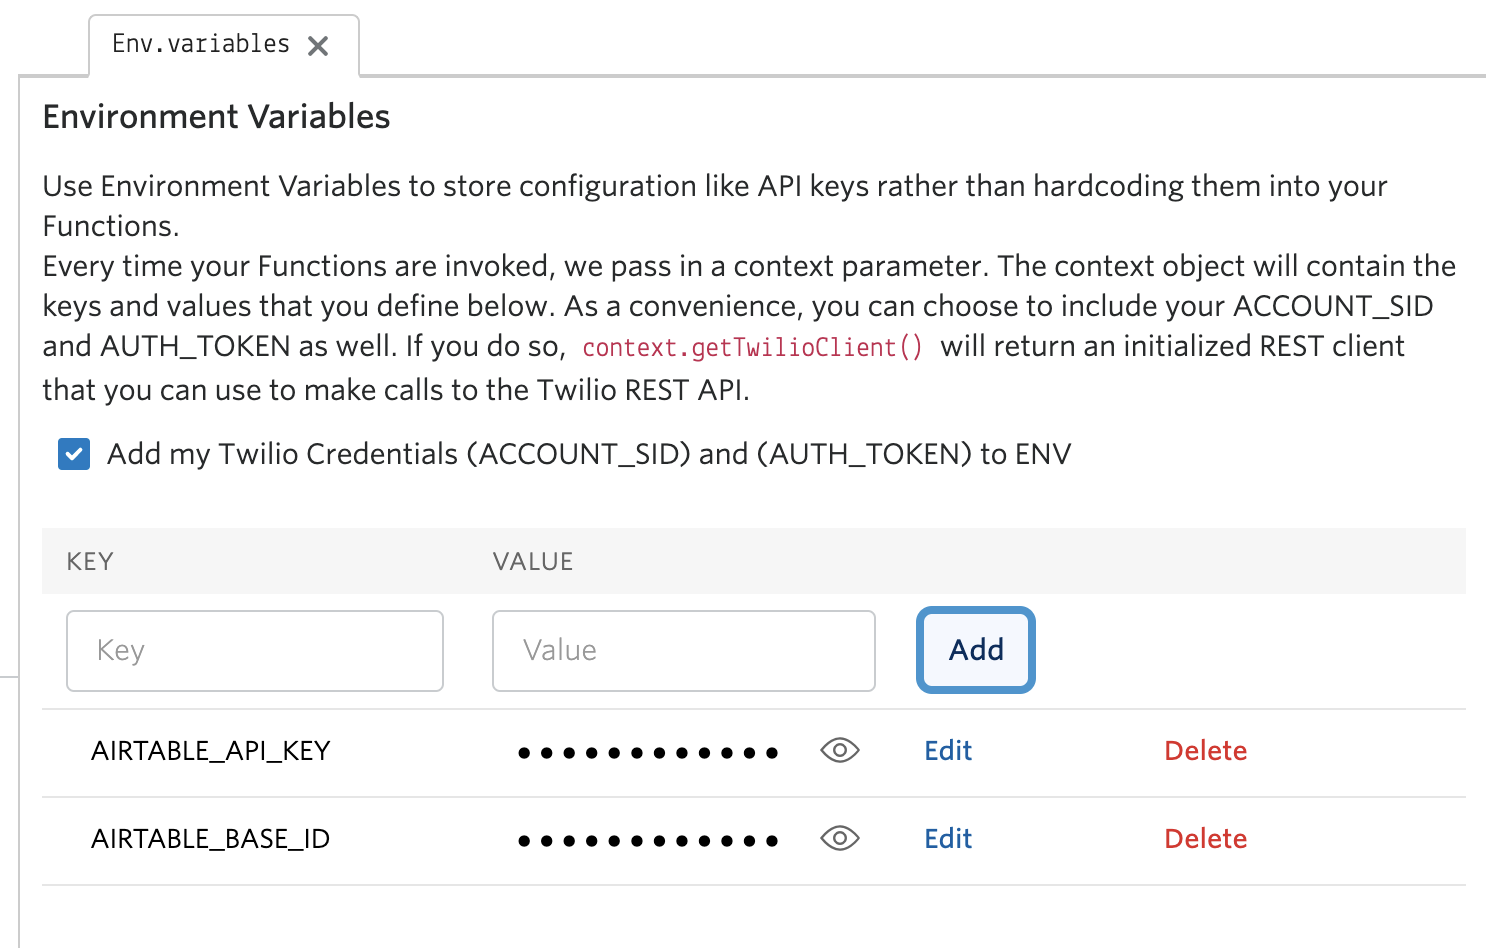
Under settings click on Environment Variables and add your Airtable credentials as AIRTABLE_API_KEY and AIRTABLE_BASE_ID. Be careful not to commit your Airtable API key anywhere, as it can give someone full access to your Airtable account.
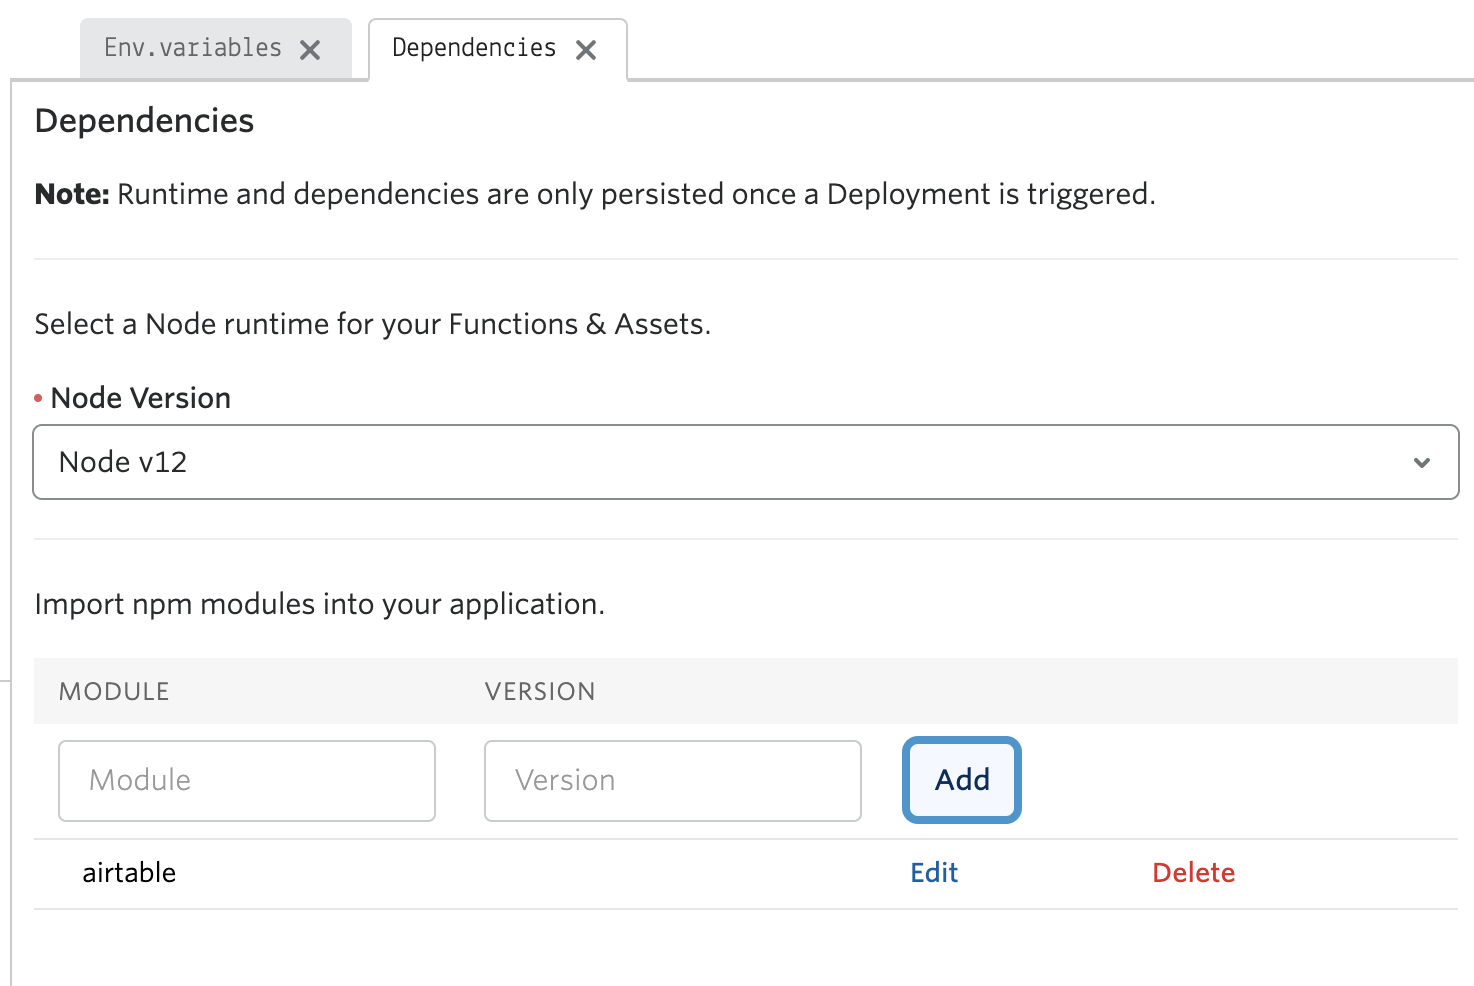
In settings under Dependencies, add the airtable helper library -- no need to supply a version number
Now you will create a new Function. Click on the blue Add button and name your function /sms-reminder (keep the leading slash). Delete the placeholder code.
The code below will read the first pending appointment from Airtable and call the Studio Flow to send out a reminder. Copy and paste this into your sms-reminder code.
This code will open up a connection to your base and table using the Airtable API. It reads the data from the table, and passes it into a JavaScript string to be sent to the Twilo Studio flow. When a flow receives a string sent as JSON, the data will be added to your flow's context and can be accessed as variables inside your flow (more details on this can be found in the REST API docs). This is how we can access information like the patient’s name from the stored context, which looks like {{flow.data.patient_name}} and is written using the liquid templating language.
It’s important to note that you must send the data as a JSON string, and not a map, or it will not be stored properly in the context. This code also calls the Twilio Studio API to begin executing the flow. If you try to run this Function via a POST request and do not receive an SMS message, it’s likely that something is off with your Flow SID, to number, or from number.
Additionally, Airtable is case-sensitive, and so if you do not match the capitalization of the column names, it will fail to get the data and will return as a null. If you get an Airtable error, it means something is wrong with your environment variables, and you likely have not configured your Airtable credentials correctly.
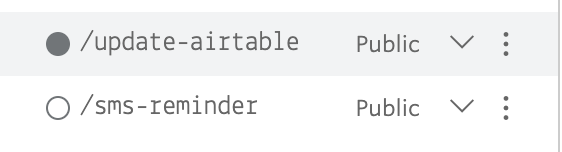
Go ahead and set the /sms-reminder Function to Public using the dropdown on the right. We will make a POST request to test it out, and we can only do so if the endpoint is publicly exposed.

Make a POST call to test it out
At this point you may want to test this to see if you get the initial message. To kick off your Studio flow, make a REST API call to the sms-reminder function endpoint. You can do this using a tool like Postman, running a shell script, or running a cURL.
Here is an example cURL request. Replace the URL with your sms-reminder function URL, and the auth token and account SID with your own values, which can be found on the Twilio Console:
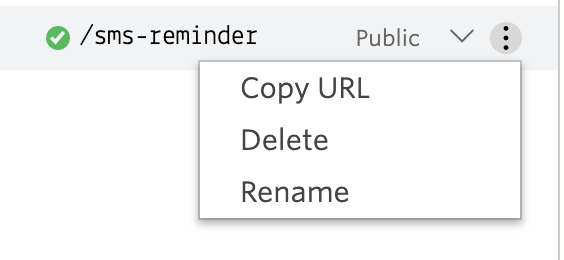
You can copy the url by clicking the three dots next to the function.
If it works, you will receive a text message like the one below. If you don’t receive a text, check to make sure that you copied the URL from the correct function and that you have filled in the correct Flow SID, to number, and from number.

Create Function to update Airtable appointment data
Next, add another Function named update-airtable. At this point, you will want to set both of your Functions to “public” by using the dropdown on the right hand side.
Delete the placeholder code inside the update-airtable Function and add the below code.
This code will run when a patient cancels or reschedules an appointment, updating the appointment status, date, and time. You do not need to replace any code in this block, because it is merely writing to the Airtable and is not sending any messages.
Add functionality to check for patients on the waitlist
Add one final Function called check-waitlist. Delete the placeholder code, add the below code, and make the Function public.
This code will run after a patient submits a request for cancellation. It will check if there are any patients on the waitlist to receive an earlier appointment time and will send the waitlisted patient information back to your flow so that the patient will receive a notification about an updated appointment time.
Deploy the service, update the Studio flow and phone number
You’re in the home stretch. Make sure you have saved each of your Functions in the console and then click the blue Deploy All button.
Navigate back to your Studio flow. If you kept it open in another window or tab, give it a refresh so that the Serverless functions that you just wrote will populate. You will need to update the following widgets to use the functions that you just created. You can do so by clicking on the widget, and then choosing, the service, environment, and Function from the options.
- confirm_appointment widget to your update-airtable Function
- cancel_appointment widget to your update-airtable Function
- confirm_waitlist_reschedule widget to your update-airtable Function
- option 1, option 2, and option 3 widget to your update-airtable Function
- check_waitlist widget to your check_waitlist Function
It should look like this:
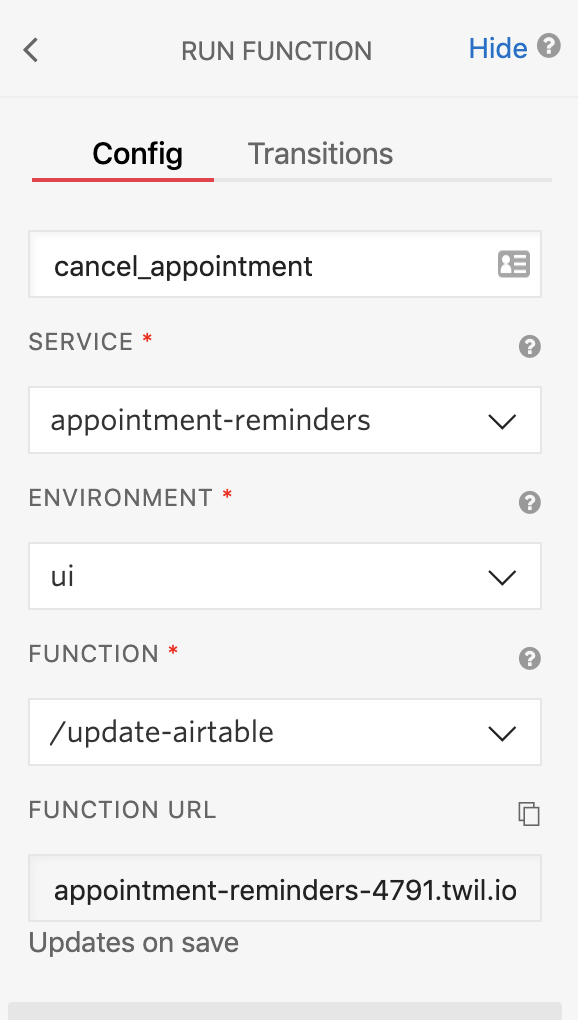
The reason why some of these do not route to the same widget using that Function is because the Function parameters differ depending on which action is being performed and where it falls in the flow. You can see the parameters being sent to the Function in the dark gray box at the bottom of the Run Function widget. In addition, the time options are hardcoded; in a production environment you would need to configure these to work with your own system and/or the EHR.
Once you have updated these widgets hit the Publish button at the top. Don’t forget this step: You will absolutely run into errors if your updated flow is not published.
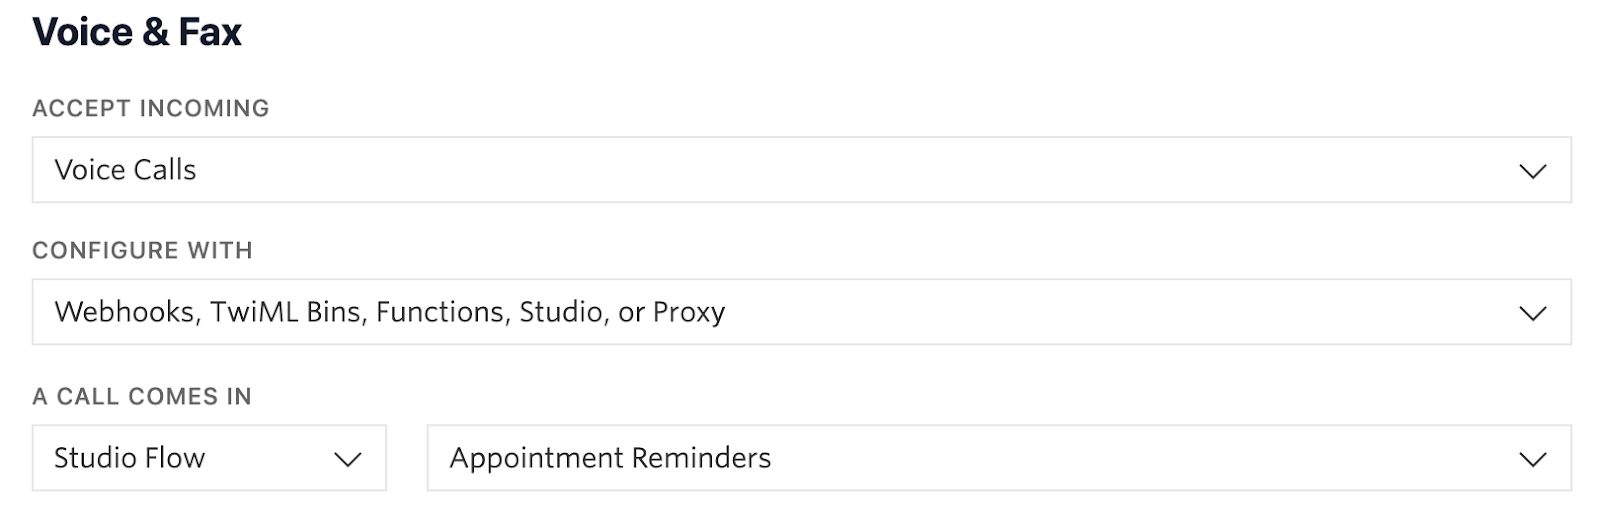
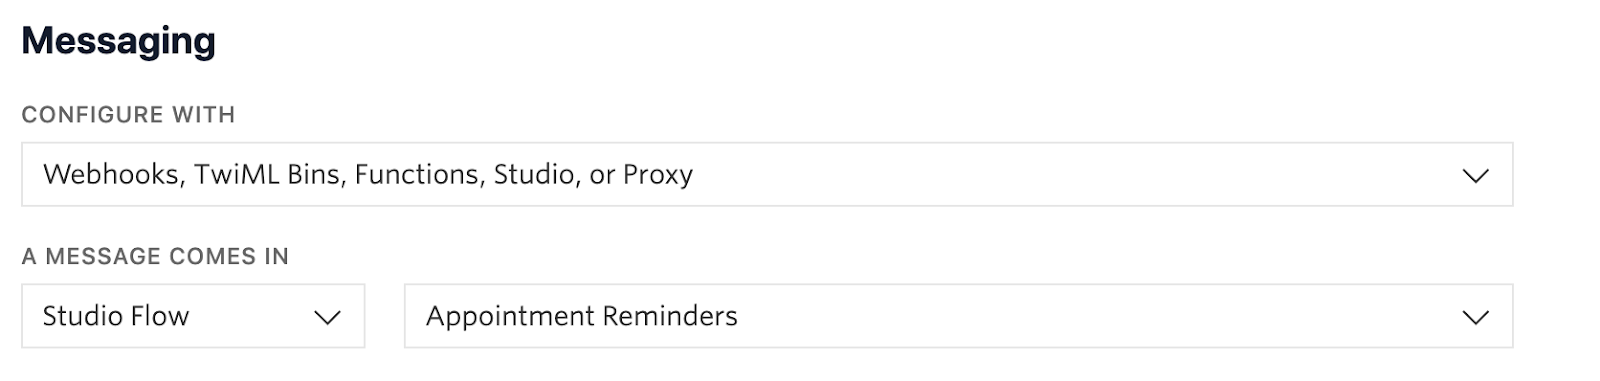
The last setup step is to go back to the phone numbers console and choose the number that you purchased at the beginning of the tutorial. Choose the Appointment Reminders flow for both the Voice and Messaging dropdowns and hit save.
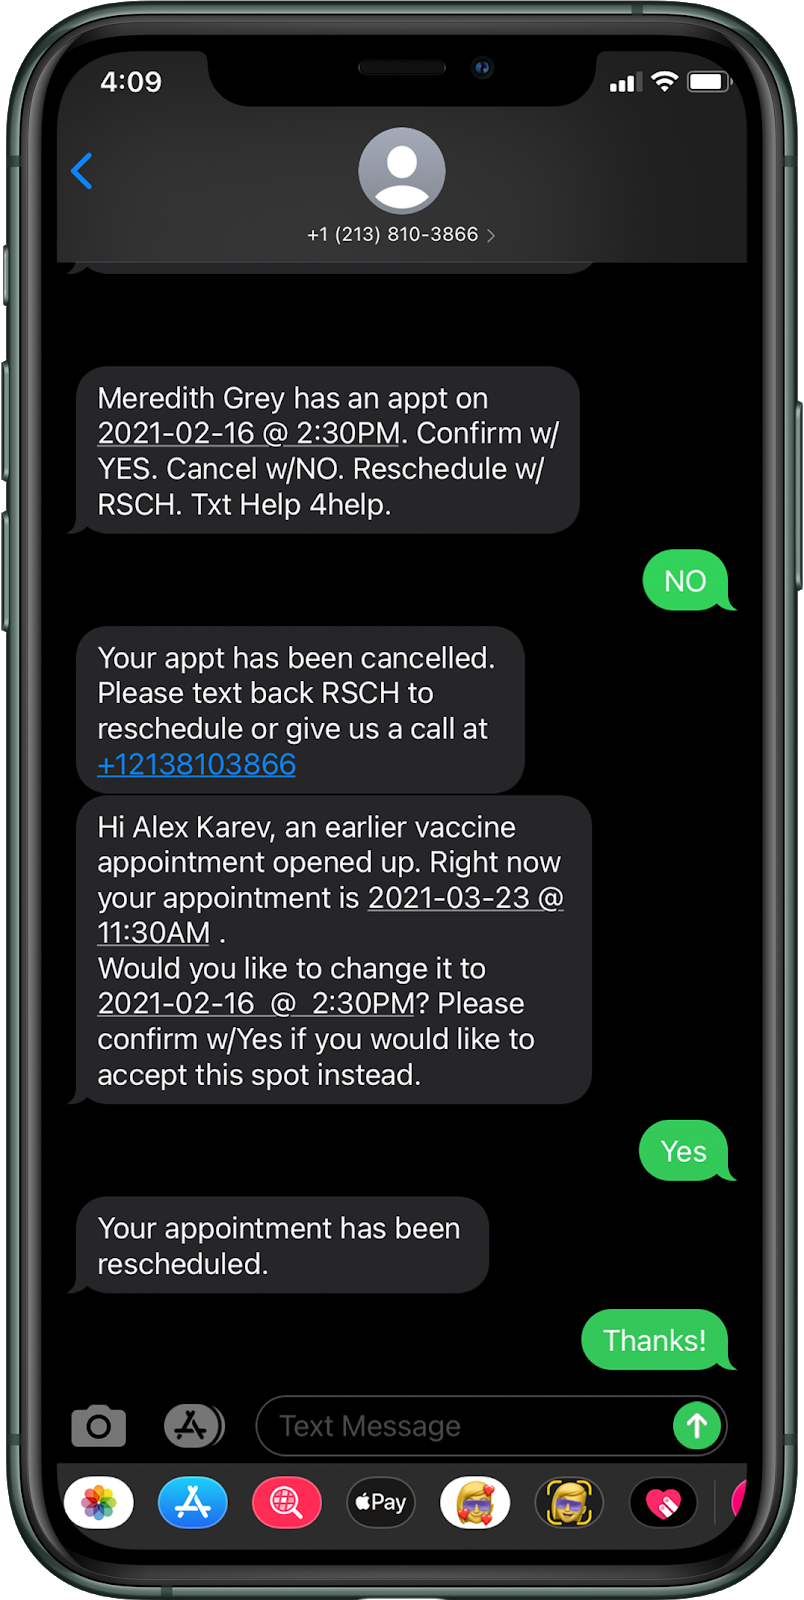
Testing the whole system
Now you can make another POST request using your tool of choice, and you can respond as a patient using any of the available options. Below is an example of what a conversation might look like. If you have used a dummy phone number that routes to your personal number to test the waitlist feature, you will see the auto-text sent to you upon an appointment cancellation.
After you make the POST you should receive an SMS message to your phone. Try out different paths. One way to repeat the test is to update the Appointment_Status column back to pending.
Here’s a quick video of one way to test the different workflows you built:
If you are testing and the state is in the middle of the flow, but you try to make another API call at the same time, you will run into issues. Go through each flow fully before triggering another API call. If your flow gets stuck mid-execution, you can manually end the execution via the logs link in your Studio Dashboard.
Twilio Studio and Functions both have a live debugger that you can access using the bug icon at the top right hand of the Twilio console. Errors will be visible there. You can also turn on the live logs feature in your Functions console, which is a toggle at the bottom of the page.
When you call the Twilio number, you can step through a basic IVR setup. Feel free to play around with this and customize it for your needs. If you try to call in and do not hear the IVR menu, double check that you have chosen the correct Studio Flow from the dropdown options in your phone number console.
Final thoughts and next steps
This prototype is meant to be a starting point. There are many opportunities for adding features in production that are unique to your own system and best serve healthcare providers and patients.
Sudheer Chekka is a Solutions Architect at Twilio with a primary focus in the Healthcare industry improving patient digital engagement and experience. He has 20+ years of experience in Enterprise Application Architecture and Technology Sales helping customers build scalable distributed applications.
Liz Moy is a Developer Evangelist learning a great deal about the healthcare space from the Twilio healthcare team. You can find her at lmoy [at] twilio.com or on Twitter @ecmoy.
Related Posts
-
 Leverage real-time data to deliver personalized care to patients, at scale, and uncover critical moments in the care journeyAtit Shah Darcelle Pluviose
 -
 Four recent GDPR changes your business needs to know aboutLisa Zavetz
 -
 Personalisation vs privacy: ensuring data compliance while building trustLoussiné Khatchadourian
Related Resources
Twilio Docs
From APIs to SDKs to sample apps
API reference documentation, SDKs, helper libraries, quickstarts, and tutorials for your language and platform.
Resource Center
The latest ebooks, industry reports, and webinars
Learn from customer engagement experts to improve your own communication.
Ahoy
Twilio's developer community hub
Best practices, code samples, and inspiration to build communications and digital engagement experiences.