Schedule a Daily SMS Reminder on Linux, MacOS, or Windows
Time to read:
December 08, 2020
Written by
Reviewed by
This post is part of Twilio’s archive and may contain outdated information. We’re always building something new, so be sure to check out our latest posts for the most up-to-date insights.

Introduction
Say you have a script that you want to run every so often. Maybe you want an hourly SMS about activity on your eBay auctions. Or perhaps you want to get a daily stock market email with the biggest movers of the day, or a daily SMS message with a German vocabulary word. You could just run your script by hand. But if you’re using the script to remind yourself of something, then you’d have to remind yourself to run the script, which is probably not what you had in mind.
The good news is that you can schedule a script to run periodically on any platform. In this post, I’m going to use the code described in the basic Twilio SMS Quickstart example for Node.js, but you could use this post to schedule any kind of script, on any kind of schedule. You can find my code at this GitHub repository if you’d rather clone and go.
Your Wish Needs a Command
Before you start to schedule, you’ll want to get the command to run your script schedule-ready. This requires a little bit of information gathering and set up.
Working directory: Your script’s home base
First, you need the full path to your working directory. When you run your script manually, you run it from a working directory that contains the script (and other files the script might need). When you schedule your script to run, you’ll also use this working directory for the files that track your script output. Make a note of the full path to this directory; you’ll use it later when you’re setting up the command.
Script output
It’s a good idea to store the script output, so it doesn’t trail into the ether. You’ll use two files: stdout.log for normal output, and stderr.log for error output. Make sure your script prints to the terminal upon success (prefixed with a timestamp) so that stdout.log can keep track. You can see an example of this in my code in the GitHub Repository.
Script environment variables
All Twilio scripts require your Account SID and Auth Token to run, which are usually stored in environment variables. For Node.js scripts, I use dotenv to access my tokens.
If that doesn’t work for your situation, you can populate environment variables via export. The safest way to do this is to put your export commands into a script called secrets.sh. Then, add that filename to your .gitignore (don’t push your secrets to GitHub). Finally, add the command source secrets.sh as part of your scheduled command.
Here is an example secrets.sh file:
MacOS users
You’re done with command information-gathering, since MacOS lets you specify environment variables, working directory, and output destinations when configuring your scheduled command. Skip to the “MacOS: launchd” section below to finish this configuration.
Linux and Windows: Your final script command
For Windows (via Git Bash) and Linux, everything must be configured in your script command.
This means your script command must handle changing into your working directory, loading environment variables if needed, and running the script itself. After the command, redirect output with >> and error output with 2>>.
Here are a couple of examples of complete script commands:
In the above commands, the && indicates that the command following the && should only run if the previous command succeeded.
Alternatively, to simplify your command, which can get quite long when including the working directory and the output destinations, you could create a script. Node.js users can use npm scripts. Here’s an example:
This npm script simplifies the command:
to:
For other platforms, you can write a shell script to accomplish the same thing. There are lots of shell scripting tutorials out there; I found this one to be useful.
Once you have your command, give it a spin on the command line and make sure it works! Fix any issues you find before moving on to scheduling.
The rest of this post is broken into three sections, one for each platform (Linux, Windows, and Mac). Feel free to skip straight to your platform of interest. There’s no need to read them in chronological order... or if you’re using Linux, cron-ological order. Thank you, I’ll show myself out.
Linux: cron
Task automation for Linux is well-documented via cron.
Prerequisites
- None! cron is standard on all Linux systems
What is cron?
There are two basic commands on Linux for cron.
First, you have crond, which serves as the daemon. A daemon is a process that runs all of the time to take care of business (so that you don’t have to do it yourself). In this case, crond is making sure your scheduled jobs launch when they’re supposed to. You shouldn’t have to interact with crond at all -- it’s just there to help out in the background.
The other command is crontab. This lets you see your scheduled jobs (crontab -l) or make new ones (crontab -e).
Set up a job
The first time you run crontab -e, it will ask you which editor you want to use. Choose wisely! If you’re not sure which option to choose, go with the default, nano.

The editor will present a new crontab file where you’ll add your scheduled command.
Setting the schedule
Each cron job has six (6) columns separated by spaces: minute / hour / day / month / weekday / command. An asterisk * for any entry is a wild card. It essentially means, “run my command no matter what this value is!” So, if you want to run your job every single minute from now to eternity, you’d enter a definition like:
Of course, you’d replace cd /home/bonnie/twilio-daily-reminder && npm run reminder with the command you worked out above.
In my case, I don’t want an SMS every minute for the rest of my Linux machine’s life, so I’ll narrow it down a bit. To run my command every day at 9:30 p.m., I would do the following:
To break this down:
- The first number,
30, indicates30minutes - The second number,
21, indicates the hour out of24. - The following four
*symbols indicate, in order: any day (between1and31), any month (between1and12), or any day of the week (0for this value would indicate Sunday and6would indicate Saturday).
Troubleshooting
Did cron run your command?
You can look in the syslog using grep CRON /var/log/syslog to see whether the command ran at the time you expected. If it didn’t, check your configuration via crontab -l and run the date command to make sure the time is what you expect it to be.
Were there errors starting the script?
In this case, the errors will be mailed to you. You may need to install a mail server and client (I use postfix and mutt on Ubuntu).
Did the script run, but error out?
Your stderr.log file will show you the light.
Windows: Task Scheduler
Prerequisites
- Windows Vista or above, or Windows Server 2008 or above
- Git Bash (the most reliable way I found to run a command via Task Scheduler)
What is Task Scheduler?
Task Scheduler is a Windows program that allows you to, well, schedule tasks. You can use a GUI interface or control it via code. This post will discuss the GUI; if you’d like to see an example of the code interface, see the “Windows” section of the 4 ways to schedule Node.js code Twilio blog post.
Note: I found Task Scheduler to be somewhat fussy. If you have Linux Subsystem for Windows installed, I’d recommend using the Linux cron instructions instead, as you’re likely to have fewer headaches.
How to schedule a task
You can find an XML export of my Task Scheduler settings on GitHub, which you can import and edit if you’d like.
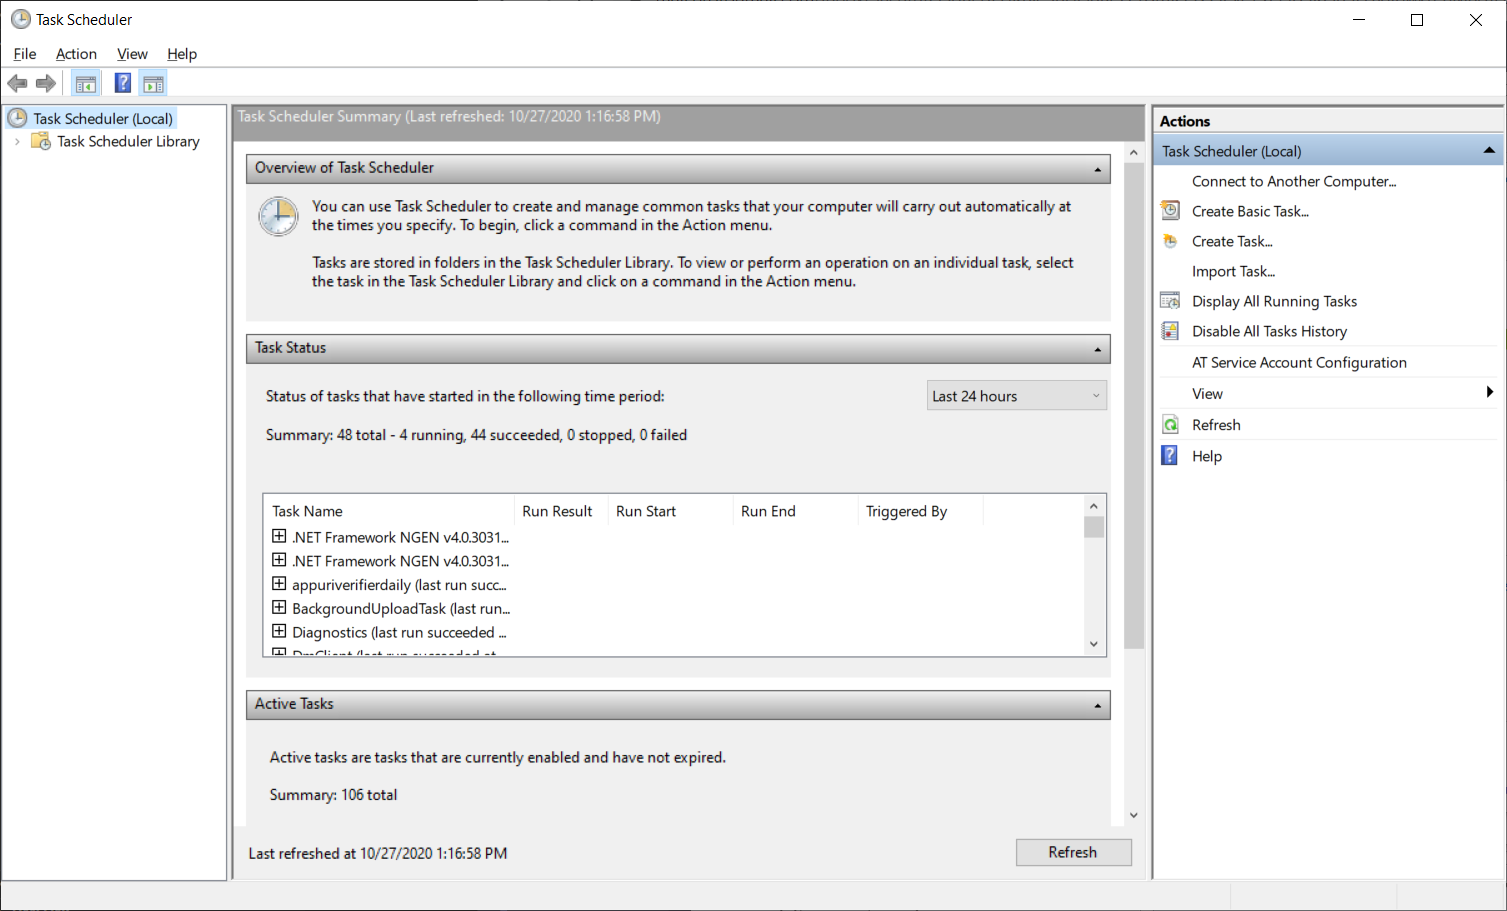
First you’ll need to open the Task Scheduler (the easiest way is to search for it in the search bar). You’ll see something like this:
Click Create Task… on the right hand side menu, and fill out the fields in the General tab for your task:
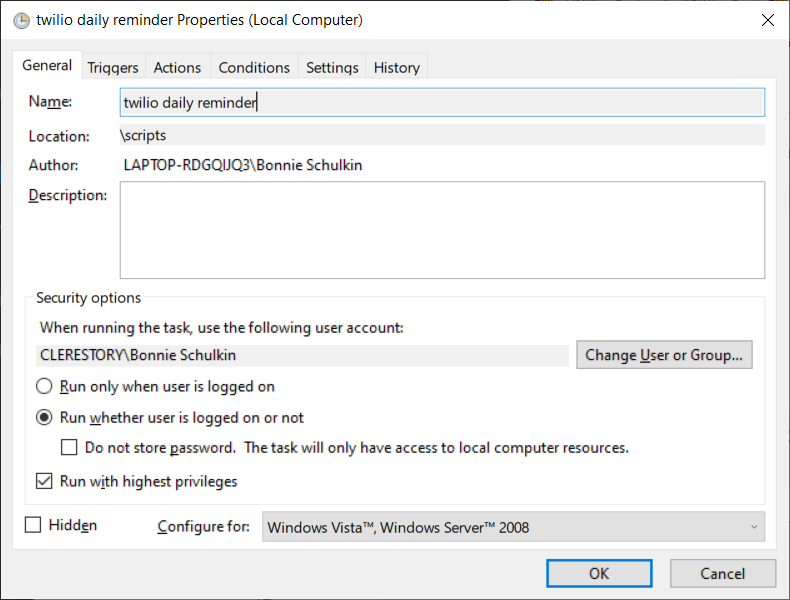
If you choose Run whether user is logged in or not you will have to enter your password when saving the task, but it’s worth it if you don’t anticipate being logged in all the time. Start with Run with highest privileges unchecked -- but if you run into permissions errors, checking this box might help.
This task scheduler is like a newspaper article: it catalogues the who, what, when, where, why, and how of your job (except maybe the why -- that’s more philosophical than Task Manager is prepared to deal with).
The General tab covers the what and the who. The when is configured in the Triggers tab. Click New... and you’ll be presented with a popup modal to schedule your job:
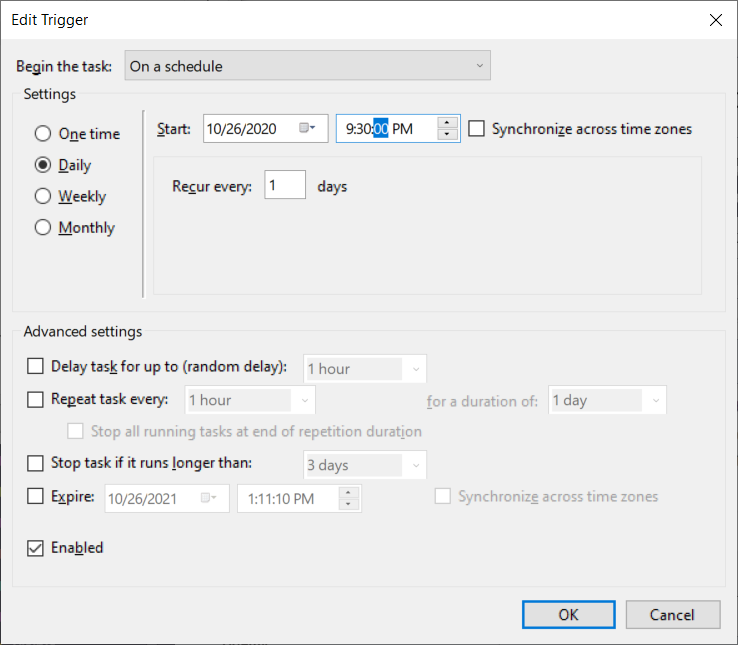
To run your task daily, select Daily and provide a time. Click OK when you’re done.
Now visit the Actions tab to configure the where. Inside the modal, click New…:
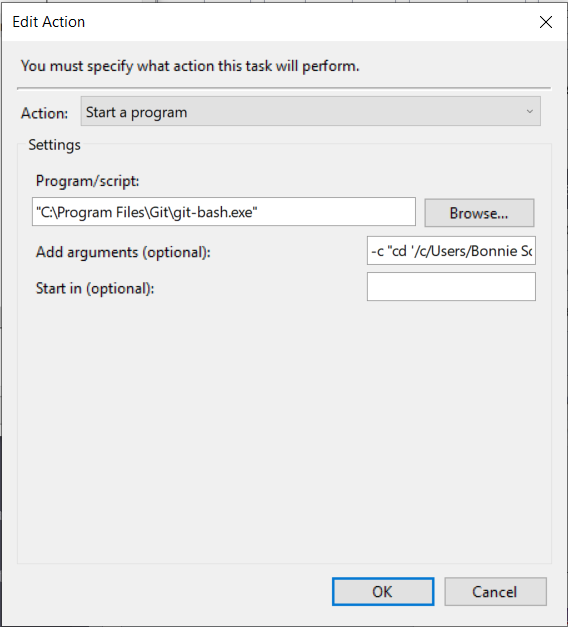
This is the part of the Task Scheduler that’s trickiest to get right. Git Bash allowed me to successfully run the command without permissions issues.
For the Program/script field, use the Browse… button to navigate to your installation of Git Bash. If you installed Git Bash to the default location chosen by the Git Bash installation wizard, it should be located in C:\Program Files\Git\git-bash
Then for the Add arguments field, enter -c followed by a space, and then your script command (the one you worked out in the first section) in double quotes. For example:
Note that the above path is “unix style” -- it uses /c instead of C: and forward slashes instead of backslashes. Also, you will need to install node/npm, python, or whatever command you will be using, as they don’t come for free with Git Bash.
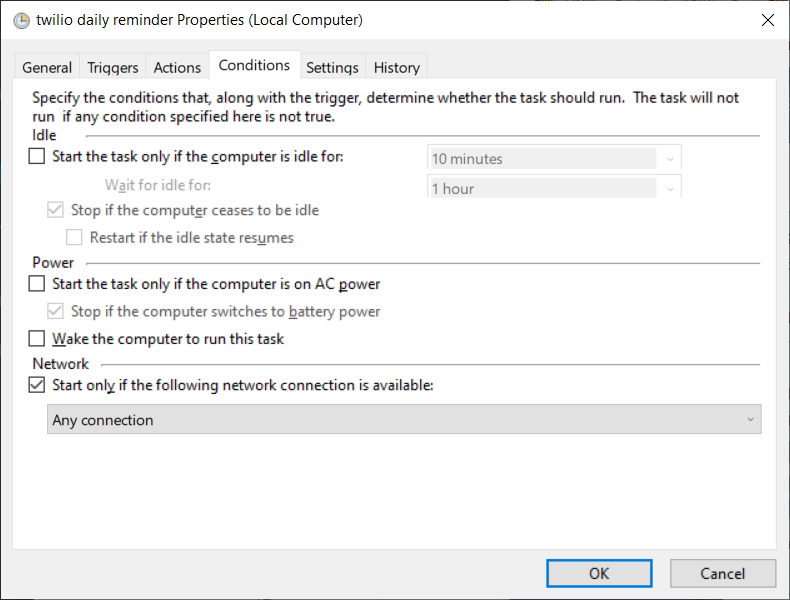
Now it’s time to configure the how of your script. Click into the Conditions tab. The default settings will work fine, but I chose to let the task run even if not connected to AC power, and to require a network connection.
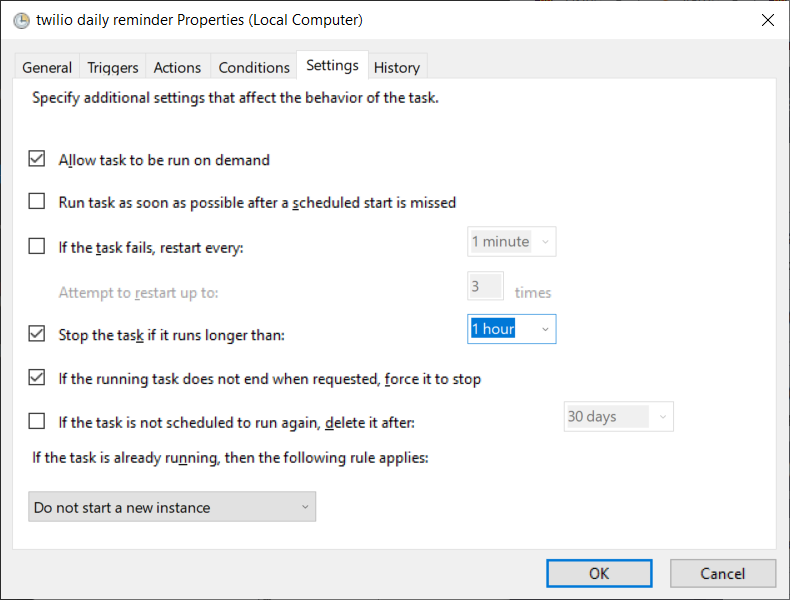
In the Settings tab, I chose to stop the task if it was running longer than one hour (rather than the default 3 days).
Troubleshooting
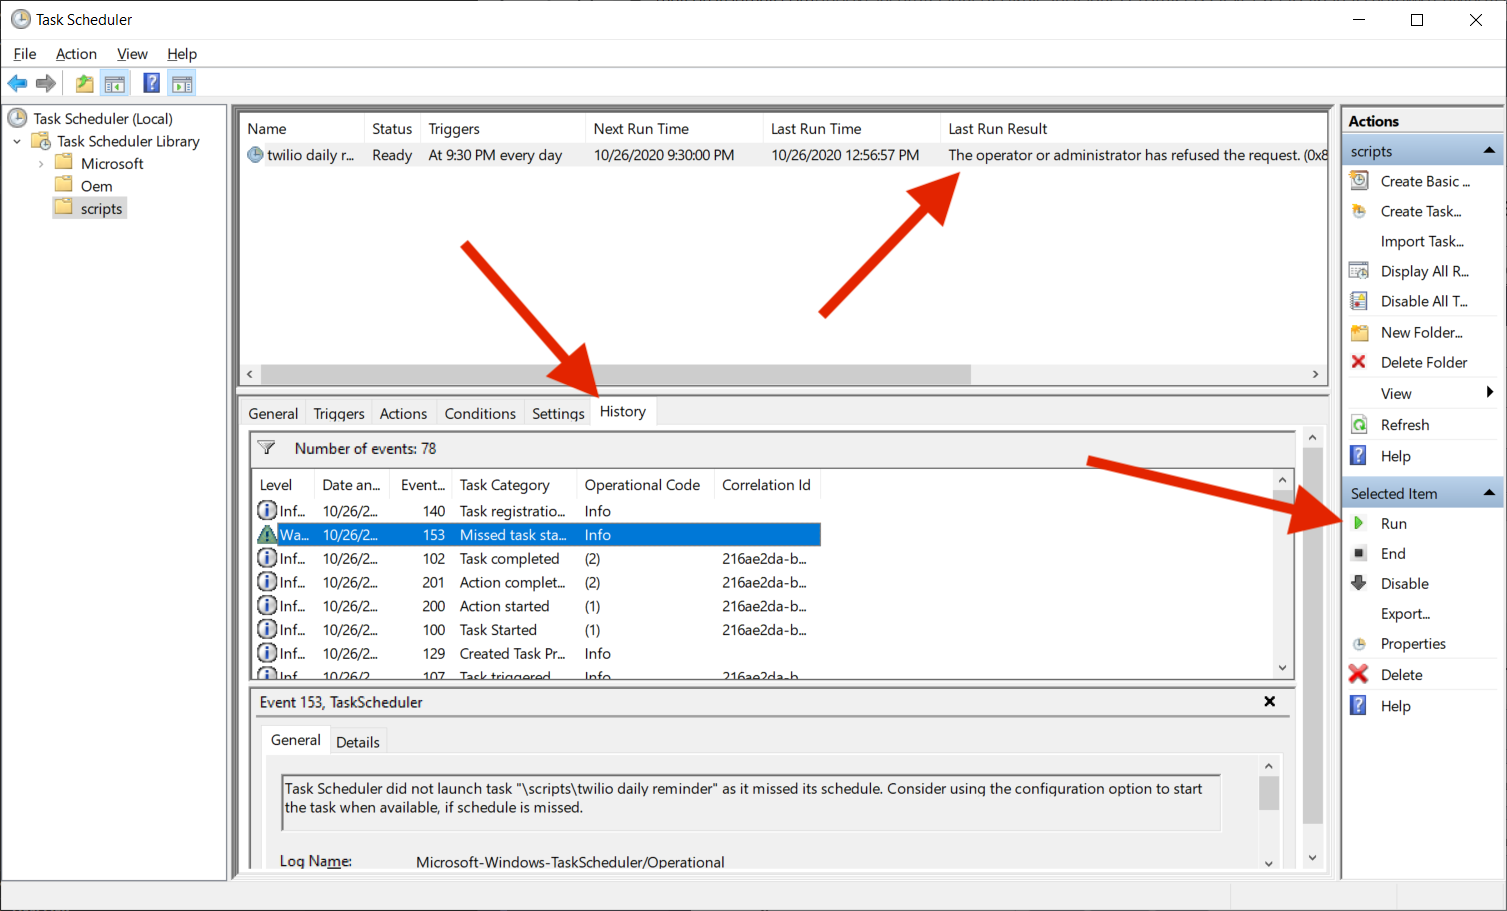
After you’ve set up the task, select it in the Task Scheduler and click Run in the right hand side menu to run the task “on demand” (meaning run it once, right now, independent of scheduling). If you get an SMS, that’s great news! Everything’s set up as it should be. If not, check the “Last result” listed for the task and the History tab for errors.
MacOS: launchd
Prerequisites
- Mac OS X 10.5 or higher
Introduction to launchd
launchd allows you to launch your own daemons on MacOS. A daemon is a process that always runs in the background, ready to spring into action when needed. For scheduling purposes, you will create a daemon that will watch the clock and launch a command whenever the schedule indicates.
Unfortunately, launchd will not run if the computer is off or asleep. If your job will be running when your computer is resting, it would probably be better to use a cloud server and run cron as indicated in the Linux section above, or check out the “Cloud Functions” and “Cloud Triggers” sections of 4 ways to schedule Node.js code.
You might also wonder whether you could just use the cron instructions for Linux. After all, OS X is just another flavor of UNIX, right? As it turns out, cron has been deprecated by OS X in favor of launchd, so its use is unsupported.
Set up launchd plist file
First you’ll need to create a launchd plist file in ~/Library/LaunchAgents (plist stands for “parameter list”). The naming convention is com.xxxxxx.daemon.plist -- so create this file: ~/Library/LaunchAgents/com.twilioreminder.daemon.plist .
Set up launchd plist File
Now you’ll add the configuration to the com.twilioreminder.daemon.plist file. The contents of the file are in XML format; you can find an example file with the configurations I used for this post on GitHub. There’s also a launchd plist man page with extensive documentation.
Alternatively, copy and paste the following code into the your new plist file:
Your specific configurations go inside the dict tag as indicated above. Each configuration has a <key> and a value that follows. You’ll add these configurations in the following steps:.
Label
This key gives your daemon a unique identifier. It is usually the filename without the plist.
StartCalendarInterval
This is where you’ll dictate when the task will fire. You can specify the same time intervals as cron (minute / hour / day / month / weekday), and omitting any of these keys means “run the task no matter what the value of this key is.” Since this example runs the task daily at 9:30 p.m. according to the computer’s local time, you can omit everything except minute and hour:
StandardErrorPath and StandardOutPath
Next, you’ll specify the output files. Remember to specify full paths starting with /.
WorkingDirectory
The value for the WorkingDirectory key is the full path to your working directory that you gathered earlier in this tutorial.
EnvironmentVariables
The environment variables for your script go here (but only if you need them in your environment because you’re not using a different solution like dotenv):
ProgramArguments
This is the command and any arguments, given as an array. Just like the path to the working directory and output files, this needs a full path to the command (in the example below, I’m using the full path to node on my computer, which I found by running which node). The script argument can be relative to the working directory.
Running Your Daemon
In the terminal, type launchctl load <path to plist file>. So in my case it would be:
That’s it! You should be up and running.
Troubleshooting
Did the launchctl command error with “Invalid property list”?
Try running plutil ~/Library/LaunchAgents/com.twilioreminder.daemon.plist to locate the error.
Did the command not run at the expected time?
Check Console.app for launchd errors.
Did your command run but you didn’t receive the SMS?
Check stderr.log and stdout.log (in the location you specified in your plist file) for errors. If that doesn’t help, try running your command and arguments (from the plist file “ProgramArguments” key) on the command line in the working directory and see what happens. In the example above, that would look like:
Conclusion
Congratulations on making it to the end of this detailed post! With the above instructions you can schedule any job you like to run on a regular basis. Tweet at me if you want to share how your computer is running jobs for you automatically! You can find me at @bonniedotdev.
Bonnie Schulkin is a teacher, coder, and mother of two cats. She recently transitioned to creating online content full-time and has Udemy courses you should check out! You can find out more at https://bonnie.dev . She feels weird writing about herself in the third person.


Related Resources
Twilio Docs
From APIs to SDKs to sample apps
API reference documentation, SDKs, helper libraries, quickstarts, and tutorials for your language and platform.
Resource Center
The latest ebooks, industry reports, and webinars
Learn from customer engagement experts to improve your own communication.
Ahoy
Twilio's developer community hub
Best practices, code samples, and inspiration to build communications and digital engagement experiences.