How to Make Twilio Flex WebChat Interactive

April 20, 2022
Written by
Reviewed by

interactive_webchat_hero

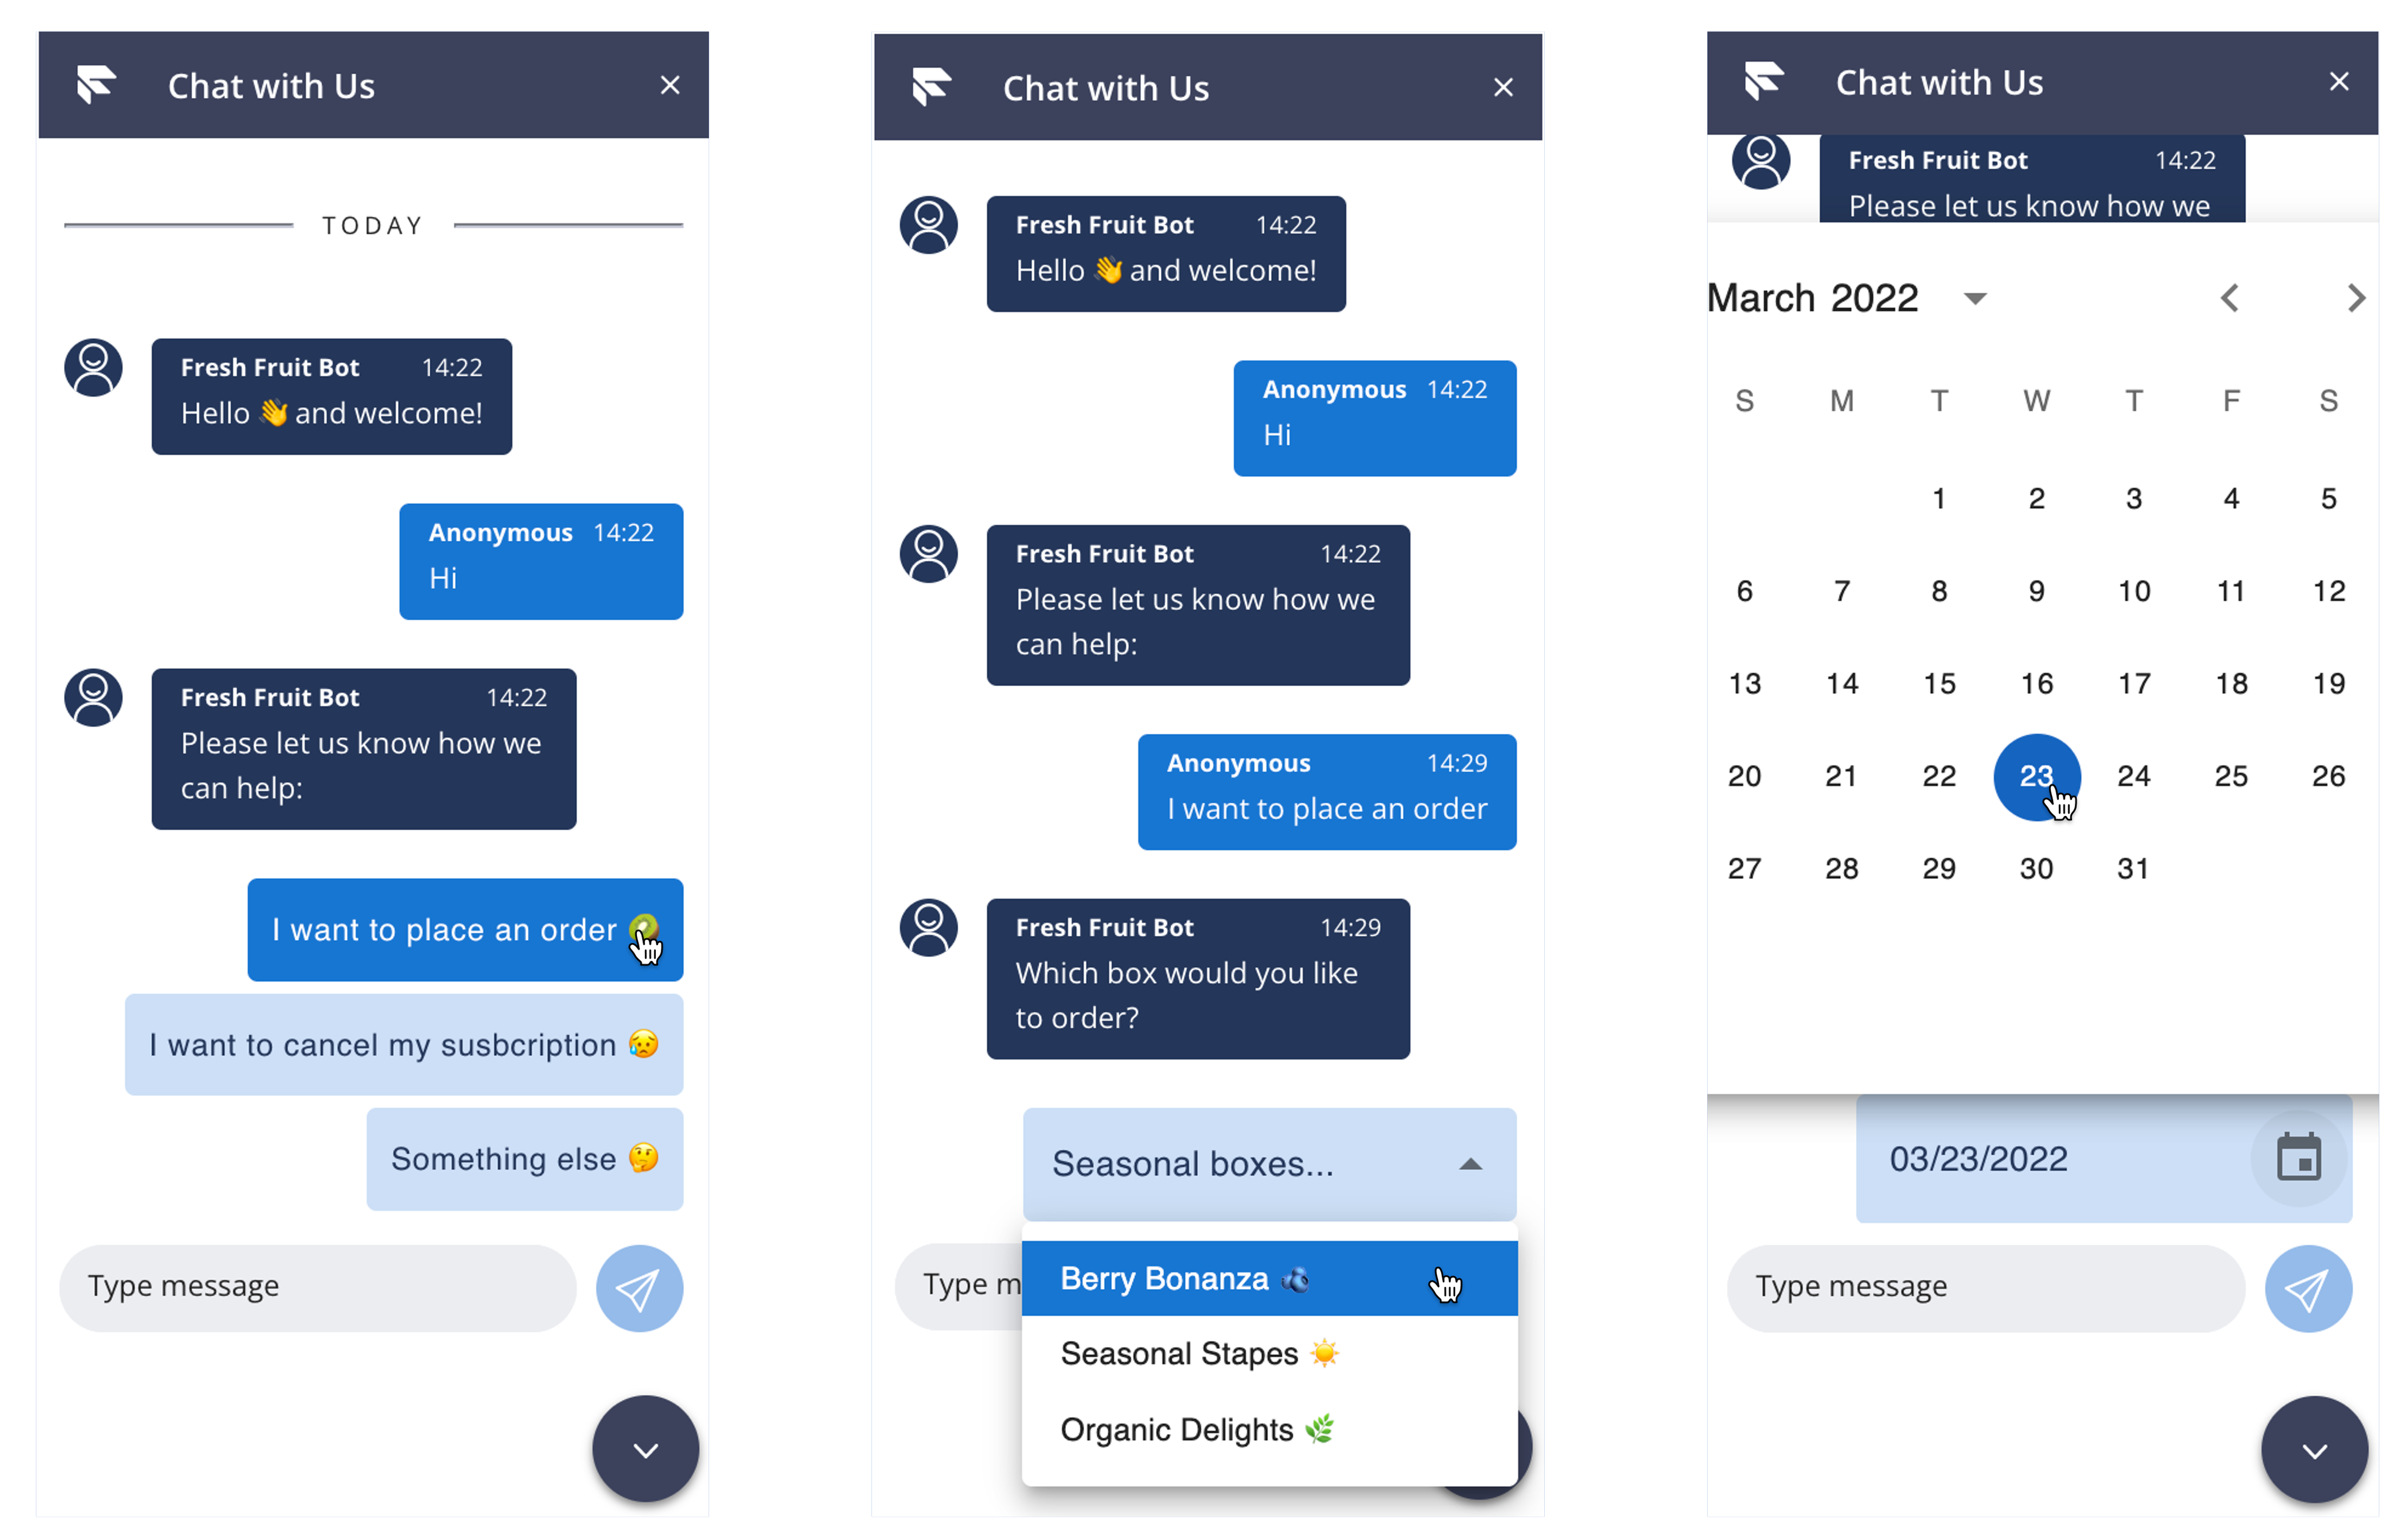
In this post, we'll take a look at how you can bring clickable buttons, drop-downs, and calendars into Twilio Flex WebChat. Interactive elements can be leveraged during automated exchanges with bots as well as during agent interactions. You can use them to deliver more engaging experiences, elicit clear and quick responses, guide customers down a set of predictable pathways, or standardise formatting of inputs such as dates and times.

Images of Flex WebChat showing clickable elements

Prerequisites

Getting Started

Before we get into the implementation, make sure you've done the following.

Understanding the Flow

This example will focus on an automated interaction which is orchestrated by Twilio Studio.

Flow of data between customer and Twilio Studio

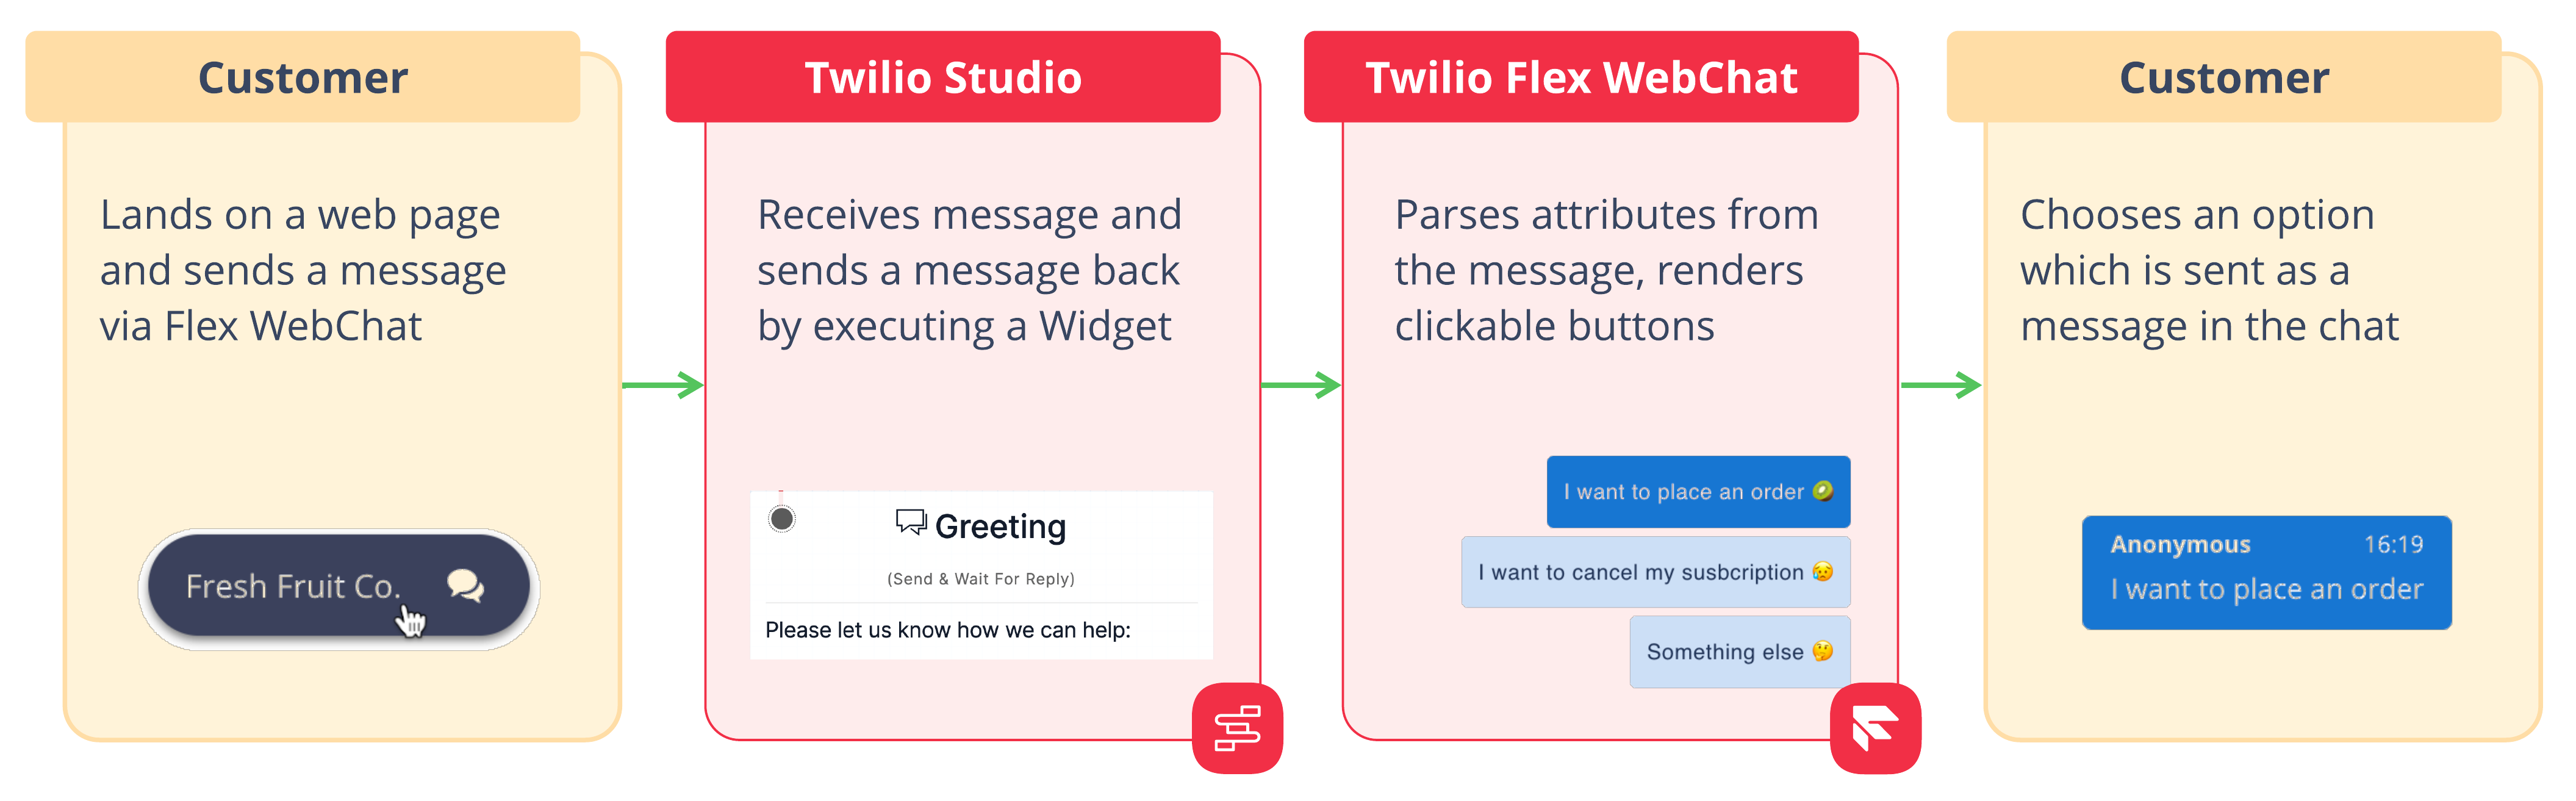
The implementation is separated into two parts:

  1. A Studio Flow which is set up to send and receive messages to and from the customer. These messages will include additional data that describes the interactive elements to be displayed.
  2. An adapted version of the Twilio Flex WebChat UI Sample which will render the interactive elements and add a message into the chat whenever the customer interacts with them.

Setting up Studio (~20 mins)

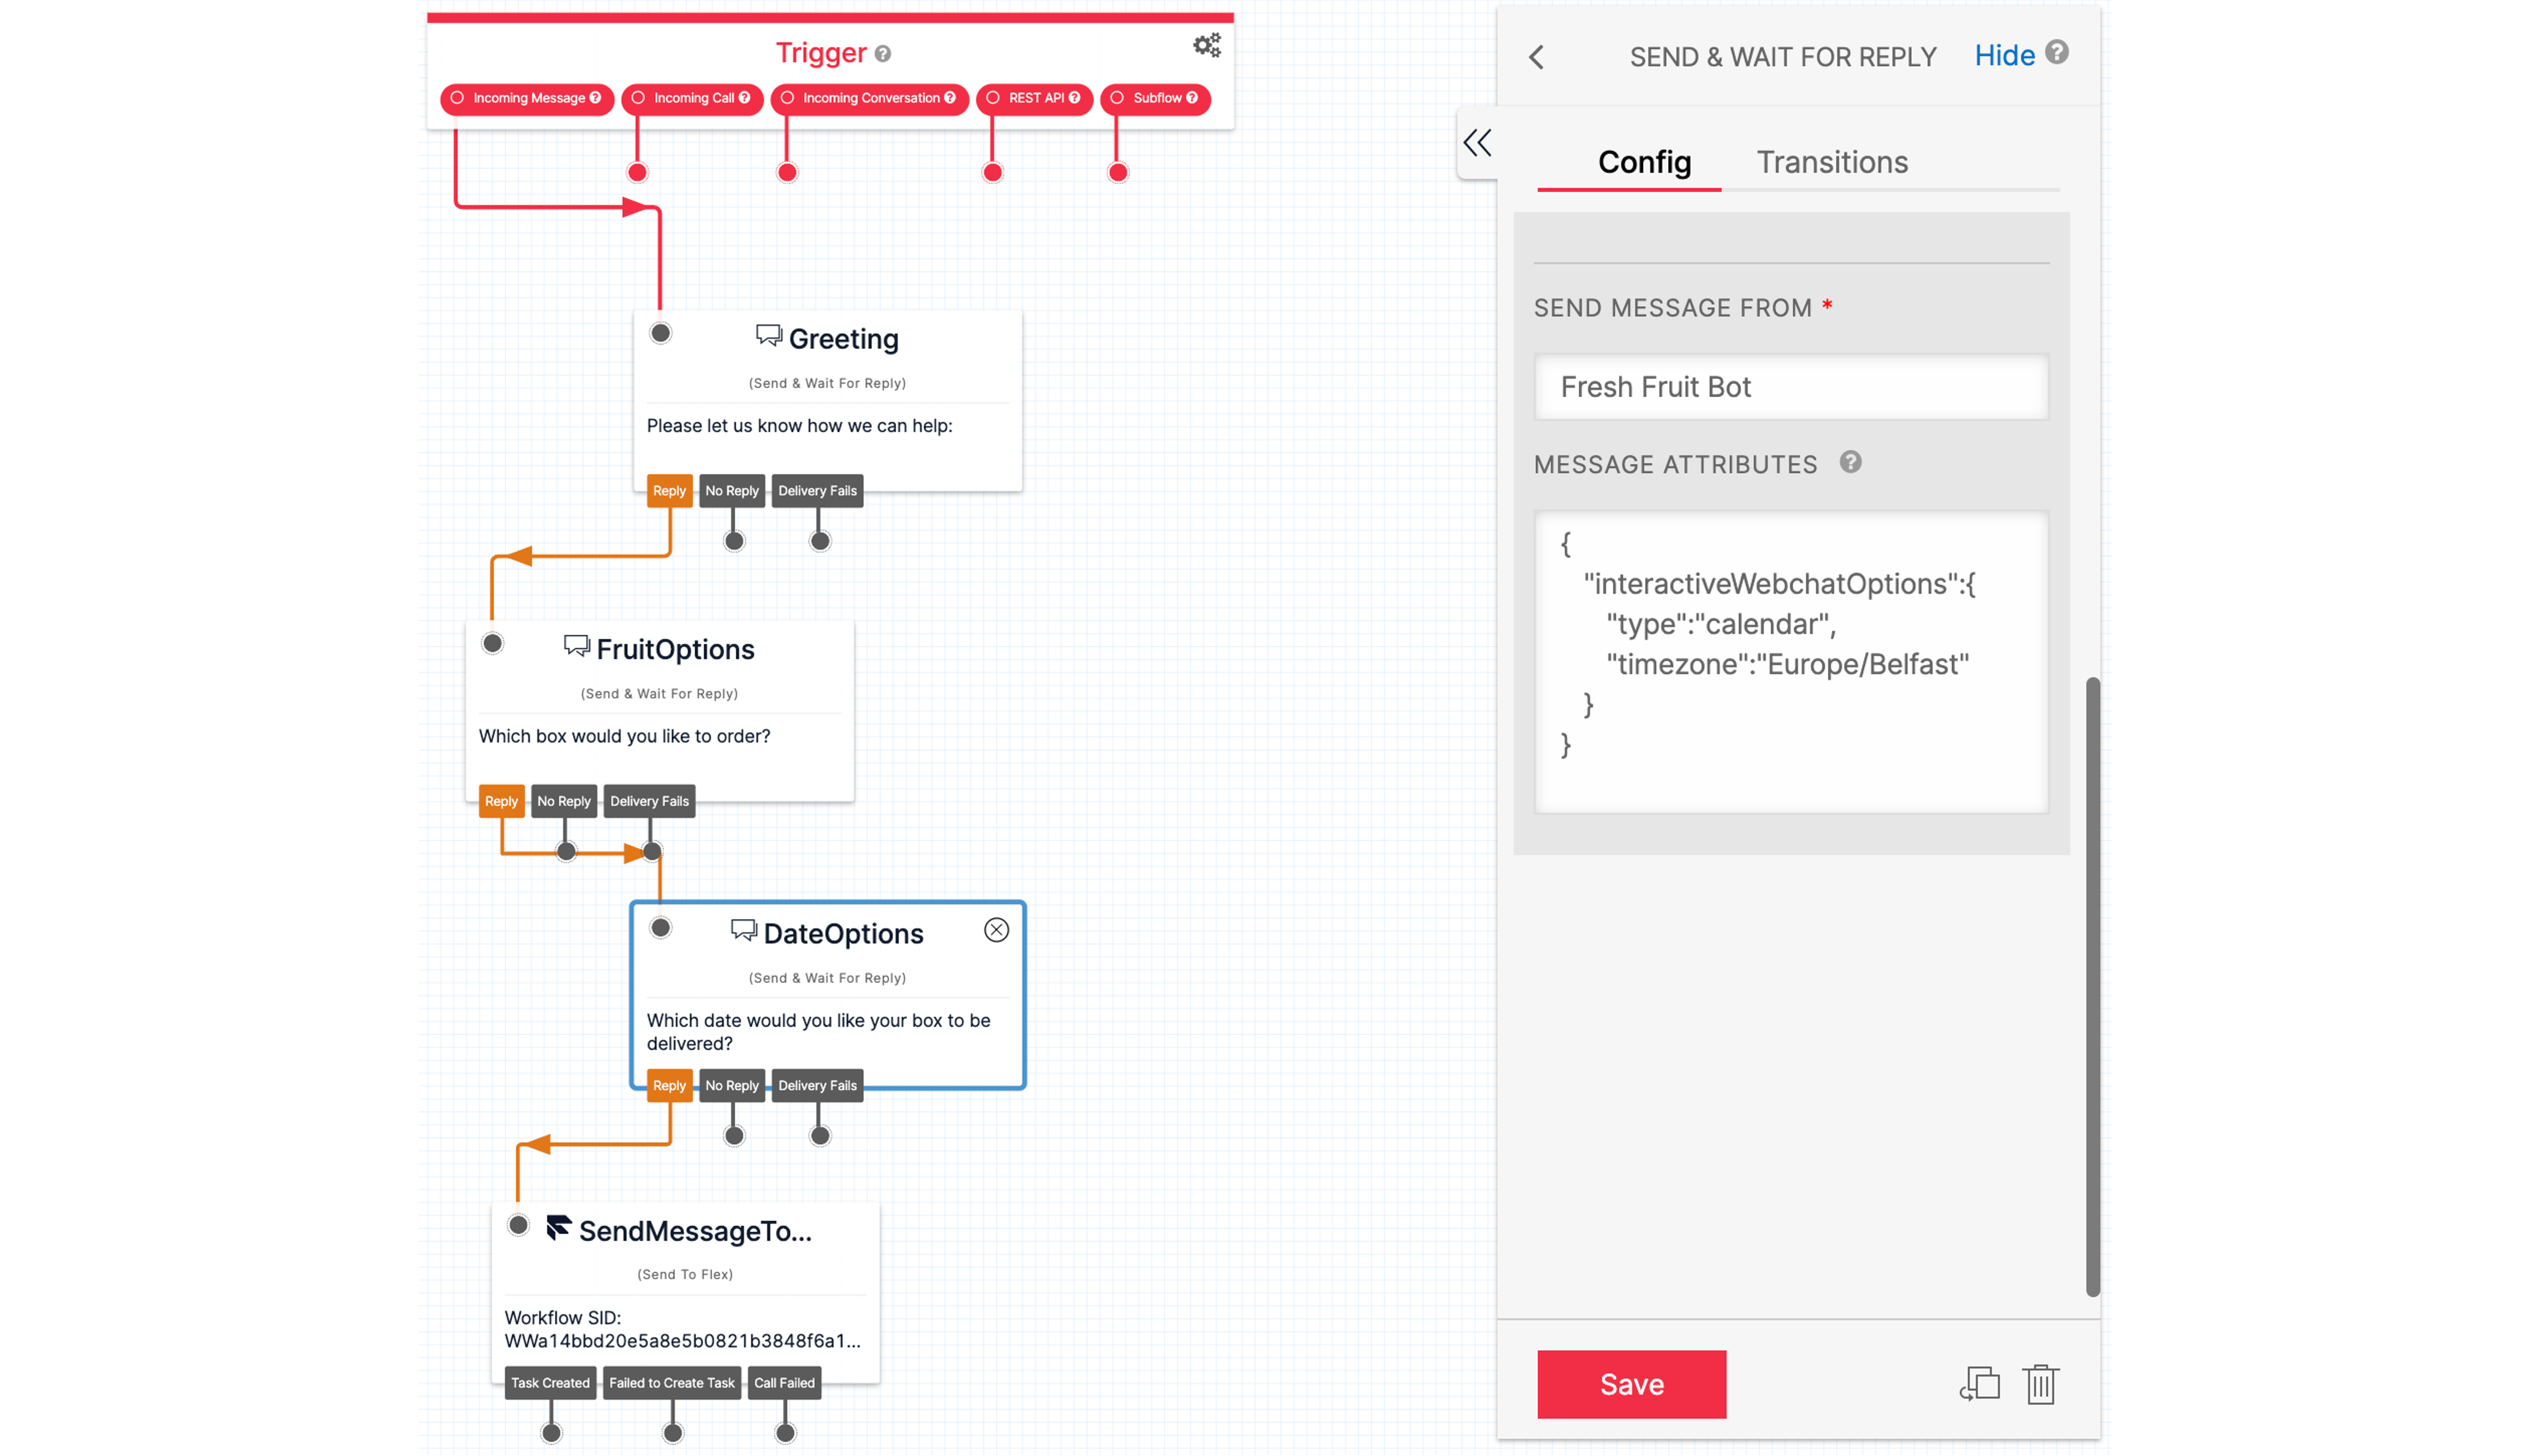
The first part of the solution requires a Studio Flow that will orchestrate an automated exchange during the web chat. This Flow will be comprised of four Studio Widgets in total.

  1. Three Send & Wait For Reply widgets that ask the customer a question, each one prompting response via a different interactive element: buttons, a drop-down, and a calendar.
  2. A Send to Flex widget which ends the Flow, connecting the customer to a Flex Agent and passing through contextual information from the exchange so far.

As well as building Studio Flows from scratch using the drag-and-drop interface, they can also be imported from a JSON object. This object is known as a Studio Flow Definition and is used to represent the contents and structure of a Flow. To build from a Studio Flow Definition, create a new Flow on the Studio Dashboard, give it a name, and then scroll down to select Import from JSON.

Import Studio Flow from JSON

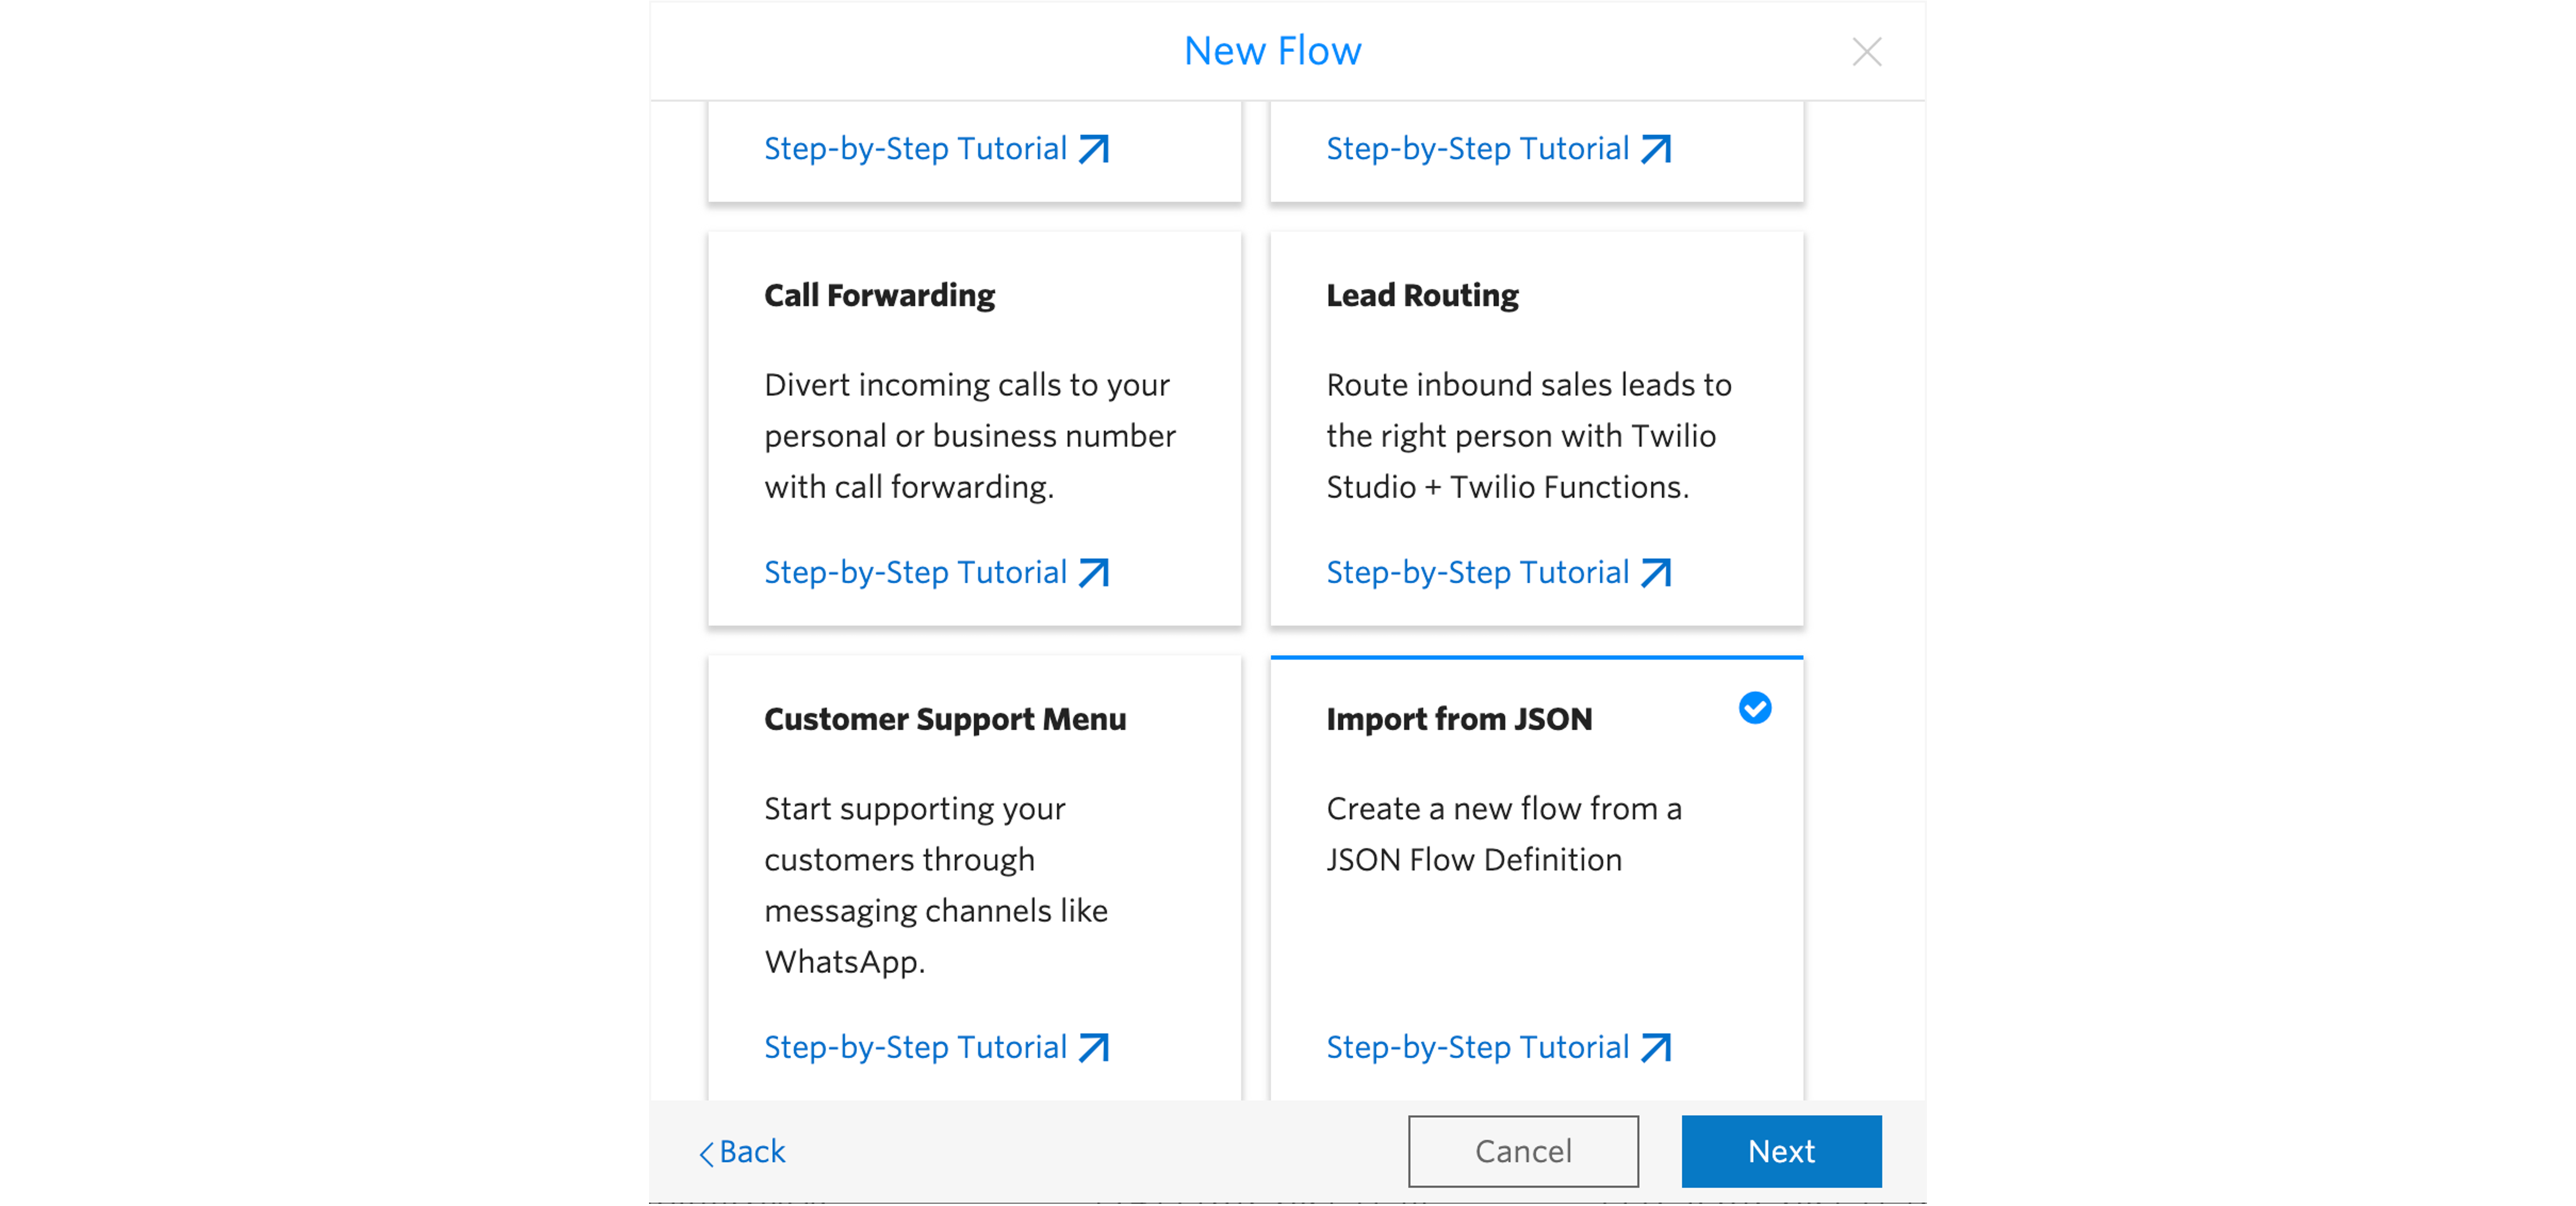
Copy in the Studio Flow Definition below when you're prompted to input JSON.

{
  "description": "Bot flow for creating a Flex webchat task",
  "states": [
    {
      "name": "Trigger",
      "type": "trigger",
      "transitions": [
        {
          "next": "Greeting",
          "event": "incomingMessage"
        },
        {
          "event": "incomingCall"
        },
        {
          "event": "incomingConversationMessage"
        },
        {
          "event": "incomingRequest"
        },
        {
          "event": "incomingParent"
        }
      ],
      "properties": {
        "offset": {
          "x": 480,
          "y": -10
        }
      }
    },
    {
      "name": "SendMessageToAgent",
      "type": "send-to-flex",
      "transitions": [
        {
          "event": "callComplete"
        },
        {
          "event": "failedToEnqueue"
        },
        {
          "event": "callFailure"
        }
      ],
      "properties": {
        "offset": {
          "x": 530,
          "y": 910
        },
        "workflow": "",
        "channel": "",
        "attributes": "{\"name\": \"{{trigger.message.ChannelAttributes.from}}\", \"channelType\": \"{{trigger.message.ChannelAttributes.channel_type}}\", \"channelSid\": \"{{trigger.message.ChannelSid}}\"}"
      }
    },
    {
      "name": "Greeting",
      "type": "send-and-wait-for-reply",
      "transitions": [
        {
          "next": "FruitOptions",
          "event": "incomingMessage"
        },
        {
          "event": "timeout"
        },
        {
          "event": "deliveryFailure"
        }
      ],
      "properties": {
        "offset": {
          "x": 640,
          "y": 220
        },
        "service": "{{trigger.message.InstanceSid}}",
        "channel": "{{trigger.message.ChannelSid}}",
        "from": "Fresh Fruit Bot",
        "attributes": "{\n \"interactiveWebchatOptions\": {\n \"type\": \"buttons\",\n \"options\": [{\"uuid\": \"78d7ffc3-bdb5-40dd-a455-3ef352fab140\", \"content\": \"I want to place an order 🥝\",  \"value\": \"I want to place an order\"},{\"uuid\": \"e11ef994-4a61-4a0c-aa5f-0ae4d93b91cf\", \"content\": \"I want to cancel my susbcription 😥\", \"value\": \"I want to cancel my subscription\"}, {\"uuid\": \"34506dc-76f5-4286-a0c9-3f63388a38b1\", \"content\": \"Something else 🤔\", \"value\": \"Something else\"}]\n  }\n  }",
        "body": "Please let us know how we can help:",
        "timeout": "3600"
      }
    },
    {
      "name": "FruitOptions",
      "type": "send-and-wait-for-reply",
      "transitions": [
        {
          "next": "DateOptions",
          "event": "incomingMessage"
        },
        {
          "event": "timeout"
        },
        {
          "event": "deliveryFailure"
        }
      ],
      "properties": {
        "offset": {
          "x": 510,
          "y": 460
        },
        "service": "{{trigger.message.InstanceSid}}",
        "channel": "{{trigger.message.ChannelSid}}",
        "from": "Fresh Fruit Bot",
        "attributes": "{\n \"interactiveWebchatOptions\": {\n \"type\": \"dropdown\",\n\"dropdownLabel\": \"Seasonal boxes...\",\n \"options\": [{\"uuid\": \"ccfbe80d-891e-4424-9a41-897ffdbb3932\", \"content\": \"Berry Bonanza 🫐\",  \"value\": \"Berry Bonanza\"},{\"uuid\": \"d2de75d0-5006-4c9a-8ce9-956d14a149e2\", \"content\": \"Seasonal Stapes ☀️\", \"value\": \"Seasonal Staples\"}, {\"uuid\": \"c3601efc-17b1-4978-8c93-964475bcdad7\", \"content\": \"Organic Delights 🌿\", \"value\": \"Organic Delights\"}]\n  }\n  }",
        "body": "Which box would you like to order?",
        "timeout": "3600"
      }
    },
    {
      "name": "DateOptions",
      "type": "send-and-wait-for-reply",
      "transitions": [
        {
          "next": "SendMessageToAgent",
          "event": "incomingMessage"
        },
        {
          "event": "timeout"
        },
        {
          "event": "deliveryFailure"
        }
      ],
      "properties": {
        "offset": {
          "x": 640,
          "y": 680
        },
        "service": "{{trigger.message.InstanceSid}}",
        "channel": "{{trigger.message.ChannelSid}}",
        "from": "Fresh Fruit Bot",
        "attributes": "{\n \"interactiveWebchatOptions\": {\n \"type\": \"calendar\",\n\"timezone\": \"Europe/Belfast\"\n  }\n  }",
        "body": "Which date would you like your box to be delivered?",
        "timeout": "3600"
      }
    }
  ],
  "initial_state": "Trigger",
  "flags": {
    "allow_concurrent_calls": true
  }
}

Once the import is complete, you should see a visualisation of the Flow, comprising of the four widgets we discussed earlier. There is one missing piece of information to take care of before the Flow can be published. Click on the Send to Flex widget and use the drop-downs to select the Workflow and Task Channel that you want Twilio to use when routing the customer through to an agent. You should choose Programmable Chat for the Task Channel unless you have already created a set of your own custom channels. Make sure that all changes have been saved, then click Publish.

Studio Flow With Missing Info for TaskRouter

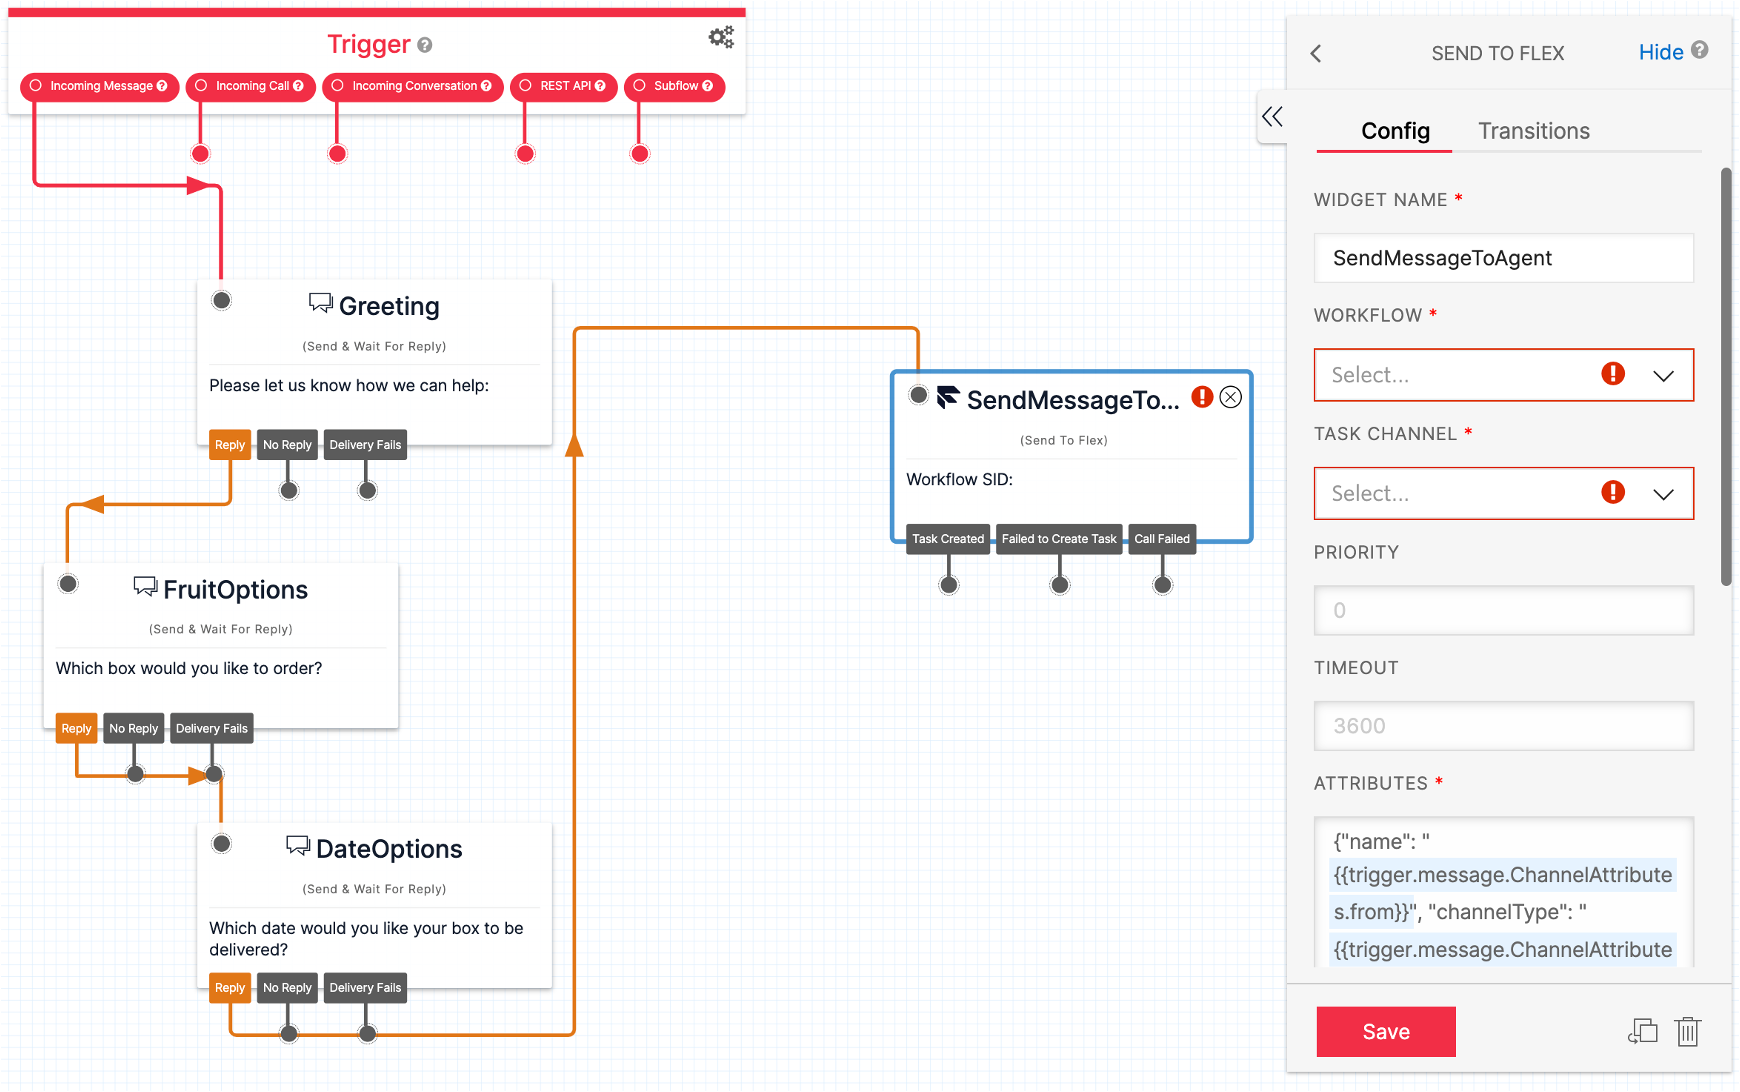
Before moving on, let's explore what's going on in the published Flow. A key part of this solution is that messaging widgets can store additional data as Message Attributes. It's these attributes that will be passed along to Flex WebChat and control which interactive element to render. You can find the attributes JSON that will trigger the button, drop-down, and calendar elements from within the Config tab of the respective Send & Wait For Reply widgets.

Studio Flow layour

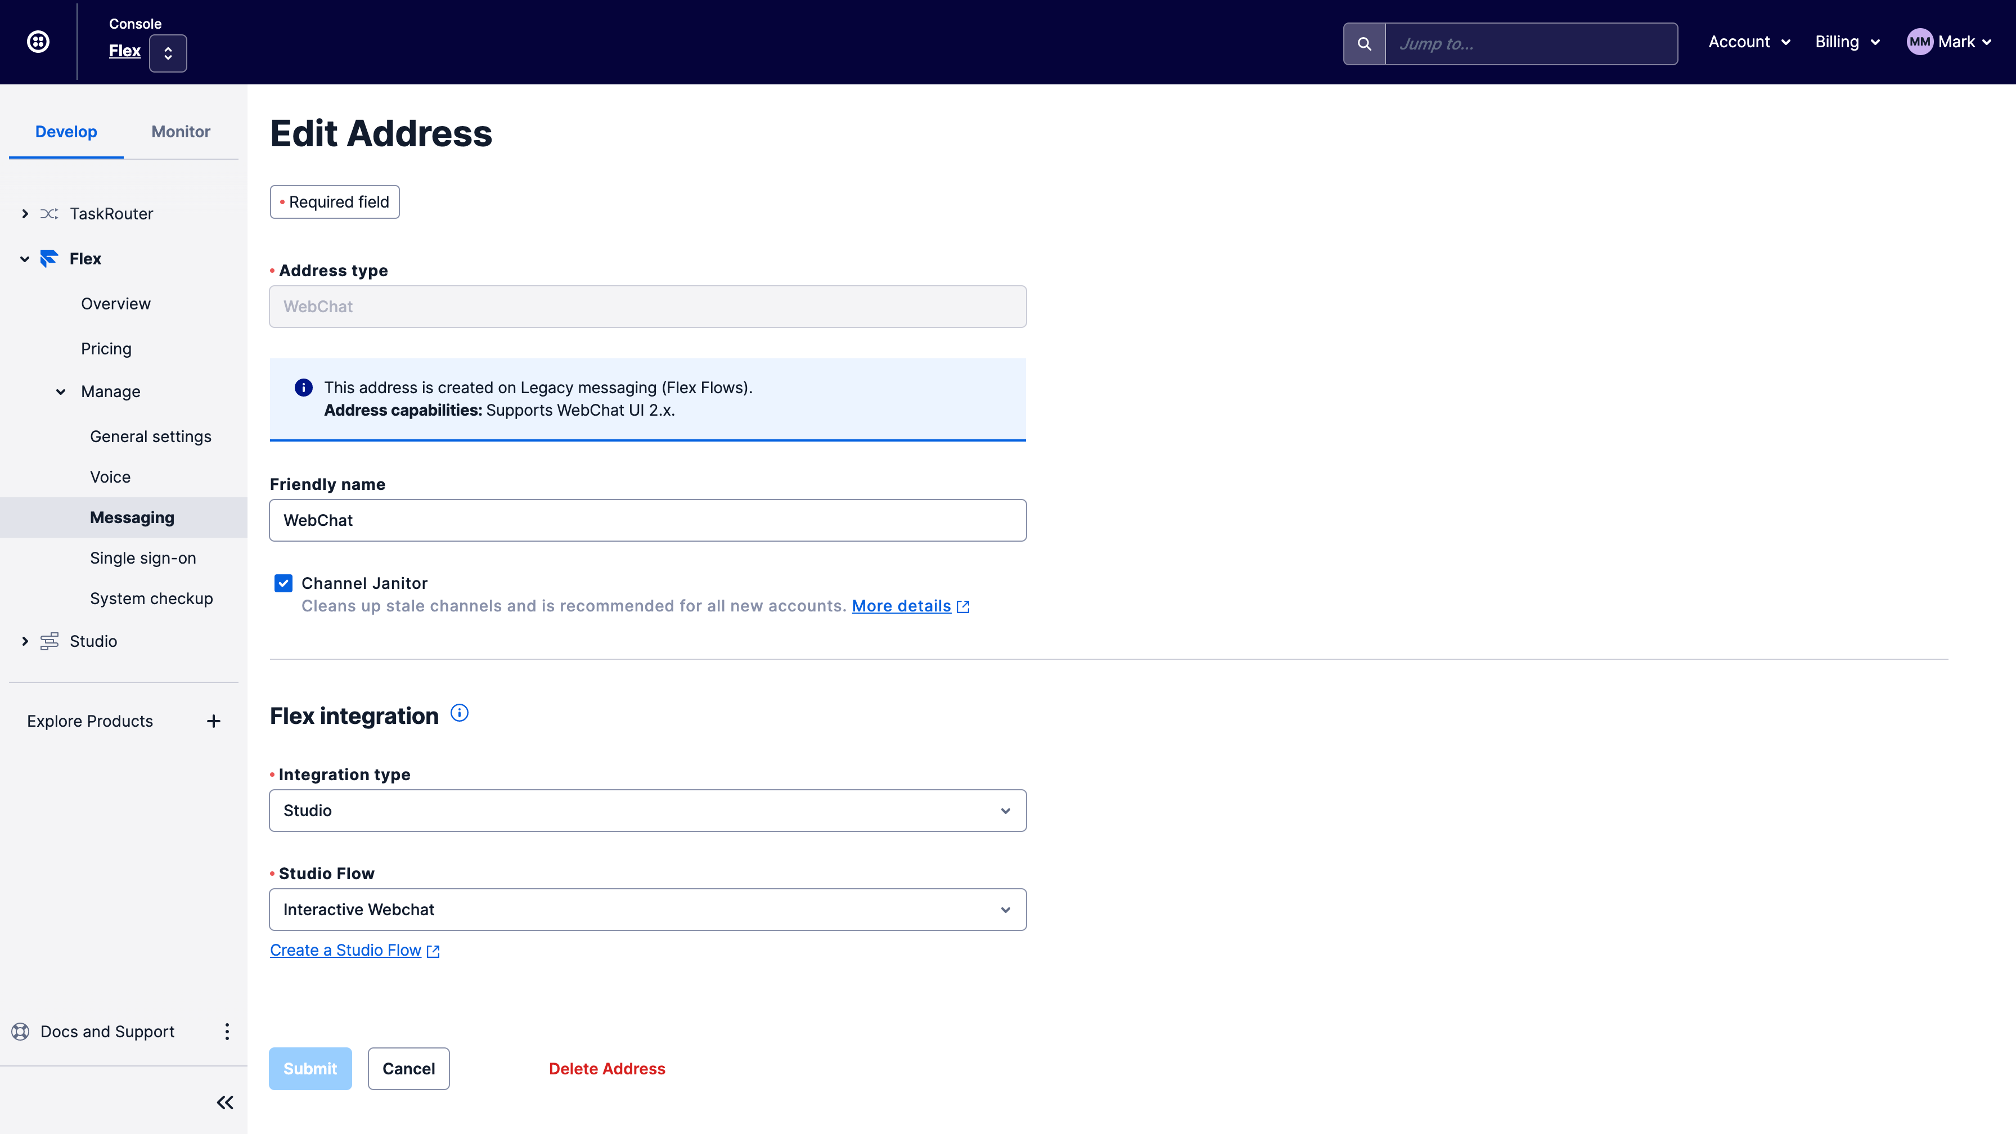
Next, we need to make sure that the new Studio Flow is used whenever a customer interacts over web chat. Flex accounts come pre-configured with a Flex Flow that defines how web-based messaging should be handled. This default definition, Flex Web Channel Flow, is located within the Console on the Flex Messaging view. Take note of the Flex Flow SID, FOxxxxxxxxxxxxxxxxxxxxxxxxxxxxx, which is listed as the WebChat Address, because we'll need this later on. When you go to edit this Flex Flow, you'll see that it is set up to push new interactions through a boilerplate Studio Flow called Flex Web Channel Flow. This can be changed in the Flex Integration section by switching out Flex Web Channel Flow with the name of your newly created Flow.

Flex Flow Screen

If you'd like to understand more about Flex Flows and how messages are orchestrated in Flex, please give this post a read.

Building with Flex WebChat (~60 mins)

The second part of the solution involves configuring the Twilio Flex WebChat UI Sample and then adapting it by adding a custom React Component which is capable of rendering the interactive elements.

Running the Flex WebChat UI Sample

Update the config file in your cloned sample repo with:

  1. Your Twilio Account SID, ACxxxxxxxxxxxxxxxxxxxxxxxxxxxxx, which is located on the Account Dashboard.
  2. The Flex Flow SID of the Flex Web Channel Flow, FOxxxxxxxxxxxxxxxxxxxxxxxxxxxxx, which you noted earlier from the Flex Messaging view.

Save and rename the file to webchat-appConfig.js and then follow instructions within the repo to run the app locally. You should now be able to send messages back and forth between the web chat and Flex. Give it a test!

Creating a Custom Component

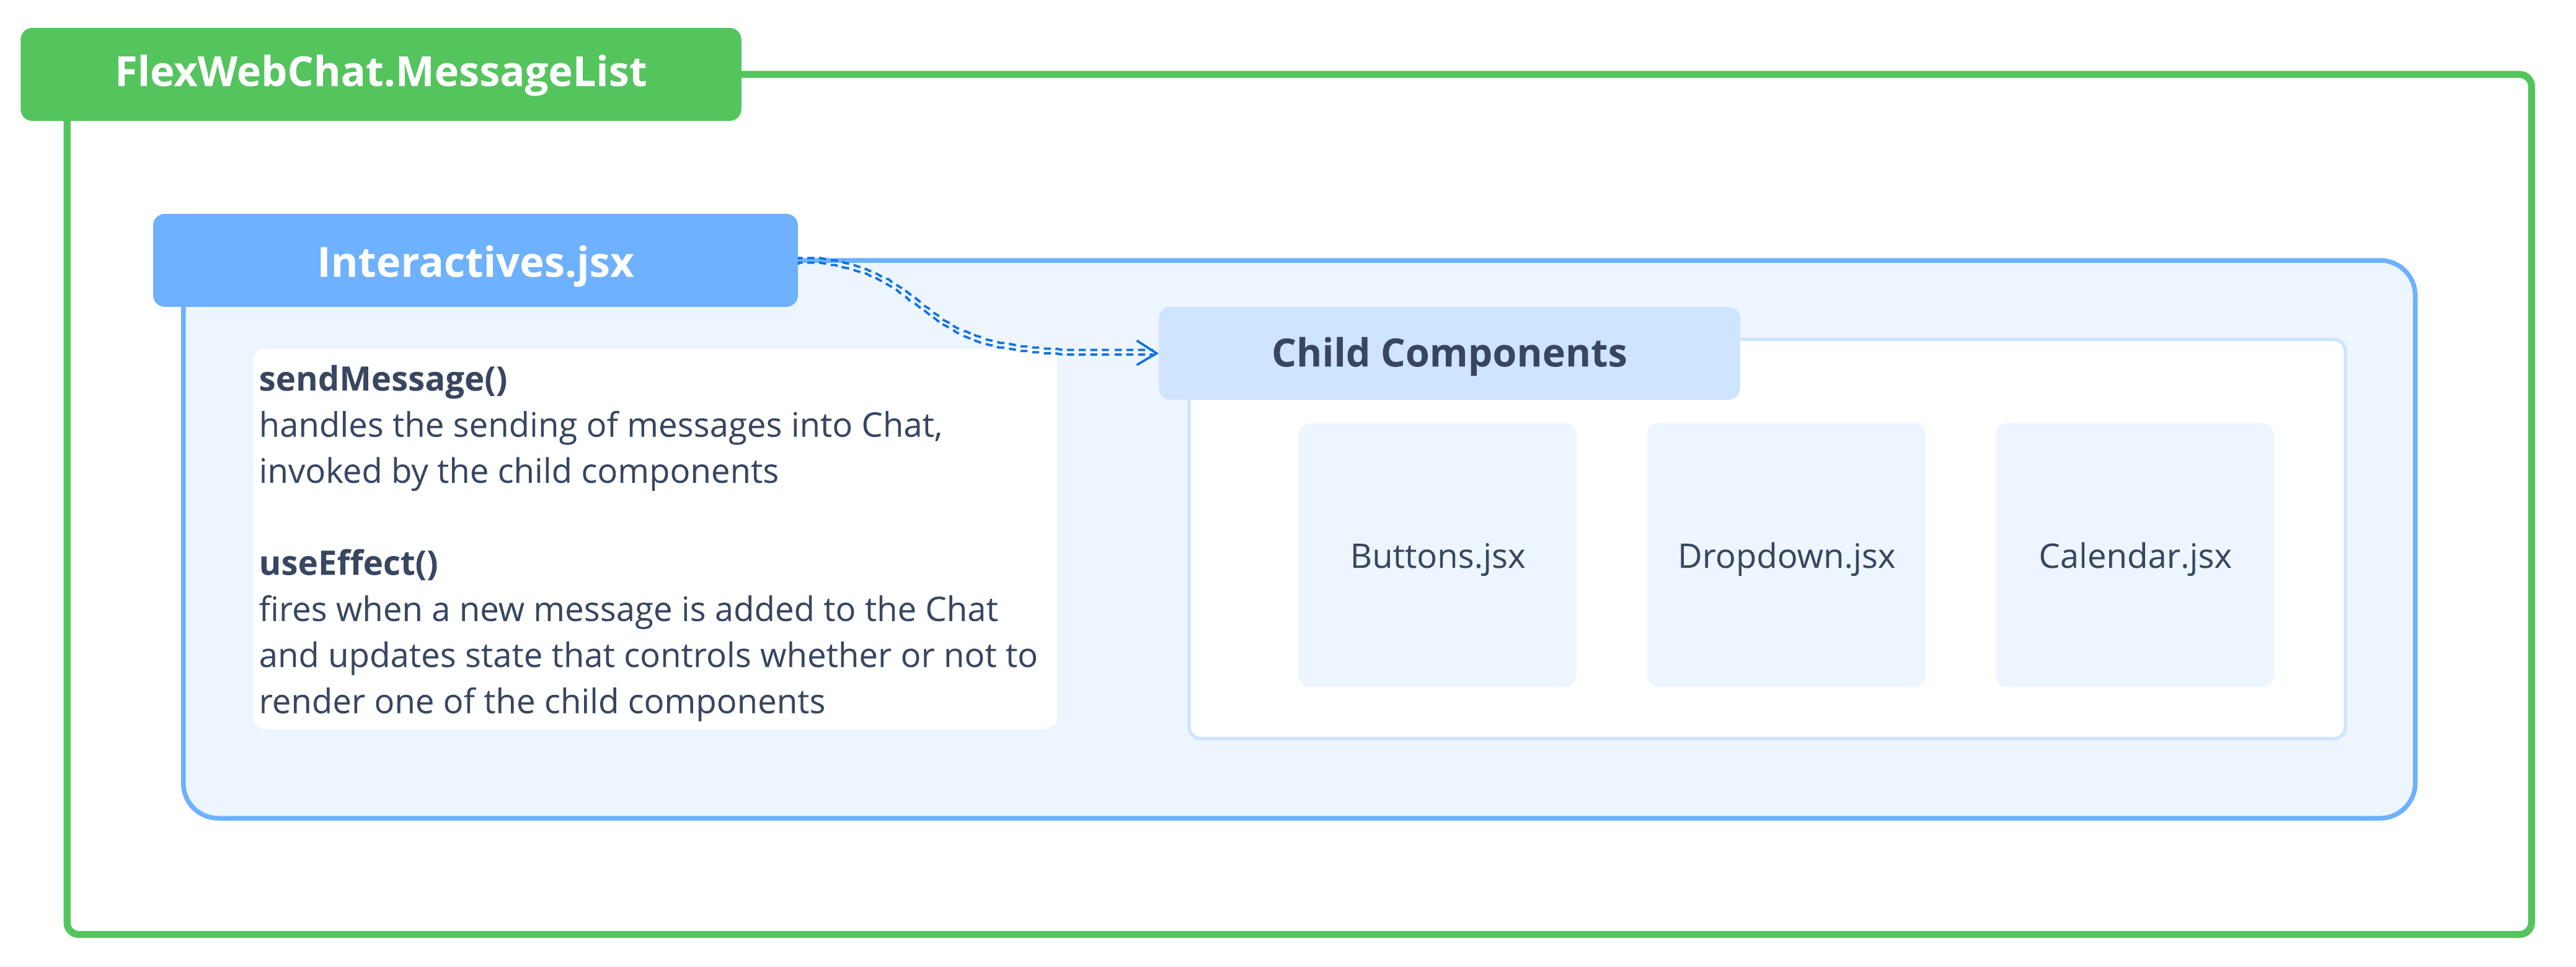
The custom component, which we'll refer to as Interactives.jsx, will handle most of the logic and feed into three UI-focussed child components: Buttons.jsx, Dropdown.jsx, and Calendar.jsx.

Component Structure for Flex Webchat

Start by adding skeleton React components for Interactives.jsx and each of its child components.

// Package Imports
import React from 'react';

// Component
const Interactives = () => {
  // Render
  return <div>Interactives Placeholder</div>;
};

export default Interactives;

Place each of these inside a components folder so that the overall folder structure now looks something like this:

flex-webchat-ui-sample
│   public 
└───src
   │   App.jsx
   │   index.js
   └───components
       │   Interactives.jsx
       │   Buttons.jsx
       │   Dropdown.jsx
       │   Calendar.jsx

Attaching Interactives.jsx

Flex WebChat UI is a library of components that each expose a content property. This property can be used to add, replace, and remove any component. In this case, Interactives.jsx is added onto the MessageList Component within the App.js file so that any interactive elements will be rendered as the latest item in the message exchange.

// Package Imports
import React, { useState, useEffect } from 'react';
import * as FlexWebChat from '@twilio/flex-webchat-ui';

// Component Imports
import Interactives from './components/Interactives';

// Component
const App = ({ configuration }) => {
  // State
  const [manager, setManager] = useState(null);

  // Effects
  useEffect(() => {
    getManager();
  }, []);

  // Functions
  const getManager = async () => {
    // Init Flex Webchat Manager
    const manager = await FlexWebChat.Manager.create(configuration);
    // Append custom Interactives Component
    FlexWebChat.MessageList.Content.add(
      <Interactives
        key="interactives"
        manager={manager}
      />
    );
    // Set manager on state
    setManager(manager);
  };

  // Render
  return (
    <>
      {manager ? (
        <FlexWebChat.ContextProvider manager={manager}>
          <FlexWebChat.RootContainer />
        </FlexWebChat.ContextProvider>
      ) : (
        <></>
      )}
    </>
  );
};

export default App;

Fleshing out Interactives.jsx

Interactives.jsx needs to re-render whenever new messages are added to the chat. We make the component privy to any new messages by subscribing it to the Flex WebChat Reducer. When a new message comes in, the re-render should either:

  1. Show nothing, if the last message was sent by the customer or if it came from Studio without the necessary message attributes JSON. This is reflected in the UI by setting the local curInteractives state with an empty placeholder.
  2. Render the correct interactive element if the last message came from Studio with the necessary message attributes. This is reflected in the UI by setting the message attributes on the curInteractives state.
// Package Imports
import React, { useState, useEffect } from 'react';
import { connect } from 'react-redux';

// Consts
const defaultCurInteractives = { type: '' };

// Component
const Interactives = ({ manager, messageList, channelSid }) => {
  // State
  const [curInteractives, setCurInteractives] = useState(
    defaultCurInteractives
  );

  // Effects
  useEffect(() => {
    if (
      messageList.length > 0 &&
      !messageList[messageList.length - 1].isFromMe &&
      messageList[messageList.length - 1].source.state.attributes
        .interactiveWebchatOptions
    ) {
      const lastMessageAttributes =
        messageList[messageList.length - 1].source.state.attributes
          .interactiveWebchatOptions;
      setCurInteractives(lastMessageAttributes);
    } else {
      setCurInteractives(defaultCurInteractives);
    }
  }, [messageList]);

  // Render
  return (
    <>
      {curInteractives !== defaultCurInteractives ? (
        <div>
          {curInteractives.type === 'buttons' ? (
            <div>
              Buttons Placeholder
            </div>
          ) : curInteractives.type === 'dropdown' ? (
            <div>
              Dropdown Placeholder
            </div>
          ) : curInteractives.type === 'calendar' ? (
            <div>
              Calendar Placeholder
            </div>
          ) : (
            <></>
          )}
        </div>
      ) : (
        <></>
      )}
    </>
  );
};

// Redux
const mapStateToProps = (state) => {
  return {
    messageList:
      state.flex.chat.channels[state.flex.session.channelSid].messages,
    channelSid: state.flex.session.channelSid,
  };
};

export default connect(mapStateToProps)(Interactives);

Flex WebChat will handle scrolling whenever responses are added into the chat so that the latest message is always visible. This scroll behaviour will not extend to our appended interactive elements so we need to set up a useEffect() Hook that will scroll our custom elements into view whenever the curInteractives state changes.

// Package Imports
import React, { useEffect, useRef } from 'react';

// Refs
const interactivesContainer = useRef(null);

// Effects
useEffect(() => {
   if (curInteractives !== defaultCurInteractives) {
      interactivesContainer.current.scrollIntoView();
   }
}, [curInteractives]);

// Example render
  return (
    <>
      {curInteractives !== defaultCurInteractives ? (
        <div ref={interactivesContainer}>
           // Redacted interactive element placeholders
        </div>
      ) : (
        <></>
      )}
    </>
  );
};

Finally, Interactives.jsx will include a sendMessage() handler that is passed on to each of the child components. The purpose of this function is to add a message into the chat any time that a customer chooses a response by clicking on the interactive elements. Twilio exposes the Chat client via Flex WebChat Manager.

  const sendMessage = async (message) => {
    const curChannel = await manager.chatClient.getChannelBySid(channelSid);
    curChannel.sendMessage(message);
  };

Fleshing out the Child Components

The interactive element placeholders need to be replaced with the actual children that will be rendered. Material UI is leveraged in the examples below but you can use any framework or design system of your choosing, including Twilio's very own Paste.

Buttons.jsx

// Package Imports
import React from 'react';

// Material UI
import { Button } from '@mui/material';

// Component
const Buttons = ({ curInteractives, sendMessage }) => {
  // Render
  return (
    <div>
      {curInteractives.options.map((o, idx) => (
        <Button
          key={o.uuid}
          onClick={() => sendMessage(o.value)}
          variant="contained"
        >
          {o.content}
        </Button>
      ))}
    </div>
  );
};

export default Buttons;

Dropdown.jsx

// Package Imports
import React from 'react';

// Material UI
import {
  FormControl,
  Select,
  MenuItem,
} from '@mui/material';

// Consts
const defaultDropdownLabel = 'Please select an option';

// Component
const Dropdown = ({ curInteractives, sendMessage }) => {
  // Render
  return (
    <div>
      <FormControl fullWidth>
        <Select
          labelId="select-label"
          id="select"
          defaultValue={''}
          displayEmpty={true}
          renderValue={(value) =>
            value || curInteractives.dropdownLabel || defaultDropdownLabel
          }
          onChange={(e) => sendMessage(e.target.value)}
        >
          {curInteractives.options.map((o, idx) => (
            <MenuItem key={o.uuid} value={o.value}>
              {o.content}
            </MenuItem>
          ))}
        </Select>
      </FormControl>
    </div>
  );
};

export default Dropdown;

Calendar.jsx

// Package Imports
import React, { useEffect } from 'react';
import moment from 'moment-timezone';

// Material UI
import { TextField } from '@mui/material';
import LocalizationProvider from '@mui/lab/LocalizationProvider';
import { DatePicker } from '@mui/lab';
import DateAdapter from '@mui/lab/AdapterMoment';

// Component
const Calendar = ({ curInteractives, sendMessage }) => {
  // Effects
  useEffect(() => {
    moment.tz.setDefault(curInteractives.timezone);
  }, []);

  // Render
  return (
      <div>
        <LocalizationProvider dateAdapter={DateAdapter}>
          <DatePicker
            renderInput={(props) => <TextField {...props} />}
            value={moment()}
            default={moment()}
            onChange={(value) =>
              sendMessage(
                moment(value)
                  .tz(curInteractives.timezone)
                  .format('MM/DD/YYYY')
              )
            }
            allowSameDateSelection={true}
          />
        </LocalizationProvider>
      </div>
  );
};
export default Calendar;

Bringing it all together

Once the child components have been implemented, a final version of Interactives.jsx should look something like this.

// Package Imports
import React, { useState, useEffect, useRef } from 'react';
import { connect } from 'react-redux';

// Component Imports
import Buttons from './Buttons';
import Dropdown from './Dropdown';
import Calendar from './Calendar';

// Consts
const defaultCurInteractives = { type: '' };

// Component
const Interactives = ({ manager, messageList, channelSid }) => {
  // Refs
  const interactivesContainer = useRef(null);

  const [curInteractives, setCurInteractives] = useState(
    defaultCurInteractives
  );

  // Effects
  useEffect(() => {
    if (
      messageList.length > 0 &&
      !messageList[messageList.length - 1].isFromMe &&
      messageList[messageList.length - 1].source.state.attributes
        .interactiveWebchatOptions
    ) {
      const lastMessageAttributes =
        messageList[messageList.length - 1].source.state.attributes
          .interactiveWebchatOptions;
      setCurInteractives(lastMessageAttributes);
    } else {
      setCurInteractives(defaultCurInteractives);
    }
  }, [messageList]);

  useEffect(() => {
    if (curInteractives !== defaultCurInteractives) {
      interactivesContainer.current.scrollIntoView();
    }
  }, [curInteractives]);

  // Functions
  const sendMessage = async (message) => {
    const curChannel = await manager.chatClient.getChannelBySid(channelSid);
    curChannel.sendMessage(message);
  };

  // Render
  return (
    <>
      {curInteractives !== defaultCurInteractives ? (
        <div ref={interactivesContainer}>
          {curInteractives.type === 'buttons' ? (
            <Buttons
              curInteractives={curInteractives}
              sendMessage={sendMessage}
            />
          ) : curInteractives.type === 'dropdown' ? (
            <Dropdown
              curInteractives={curInteractives}
              sendMessage={sendMessage}
            />
          ) : curInteractives.type === 'calendar' ? (
            <Calendar
              curInteractives={curInteractives}
              sendMessage={sendMessage}
            />
          ) : (
            <></>
          )}
        </div>
      ) : (
        <></>
      )}
    </>
  );
};

// Redux
const mapStateToProps = (state) => {
  return {
    messageList:
      state.flex.chat.channels[state.flex.session.channelSid].messages,
    channelSid: state.flex.session.channelSid,
  };
};

export default connect(mapStateToProps)(Interactives);

It's time to give everything a test. Send a message from the Flex WebChat that's running locally and respond to each of the automated Studio messages. You should cycle through a set of buttons, a dropdown, and a calendar. Click on each of these interactive elements and make sure that a message is added to the chat that reflects your selection. The last thing that you'll need to do is add some styling. You can find all of the code for this proof of concept, along with ready-to-go-styling, in this repo.

Next Steps for your interactive Flex WebChat

That's it! You've created an interactive web chat experience that will benefit both your customers and your contact center. You might want to explore some further additions for your project such as developing an interactive ratings card or building a Flex Plugin that allows agents to request interactive responses from their customers.

Mark Marshall is a Solutions Engineer at Twilio and can be reached at mmarshall [at] twilio.com.