Call Me When You're Free - Using Twilio Studio and Python to Retry a Busy Number
Time to read:
April 24, 2020
Written by
.png")
Like millions of others, my wife recently found herself unemployed. In my efforts to help her, I offered to call the unemployment office for her, fully expecting a day’s worth of hold music before I finally connected and could hand it off to her.
I sat down at my desk, full of optimism and joy in being able to help my wife in whatever ways I could. This was quickly tempered as my first dialing attempt was met with a busy signal. Had I dialed the wrong number? A subsequent call was met the same way. While I didn’t mind listening to on-hold music all day, I wasn’t going to be able to endlessly dial, wait for a busy signal, end the call, redial, wait for a busy signal… The system was so overloaded, I couldn’t even connect to be placed on hold! Not about to walk back my offering to my wife, my mood was quickly souring.
“There’s got to be a better way” resonated in my head while I realized I didn’t know anything about programming phone calls. Twilio does however, and they make it very simple for the rest of us!
The Plan
The goal was simple. Twilio would monitor the unemployment line and once it was finally open would transfer the call to my phone. Twilio Studio made this trivially easy with a few button clicks. After watching a 2 minute 47 second video, I was a certified pro full of confidence and ready to once again assist my wife.
Requirements
- A Twilio account. Note that if you are using a trial account you will be limited to calling numbers that you have previously verified with Twilio. Once you upgrade to a paid account this limitation is removed and you will be able to call any numbers.
- A Twilio Phone Number. Follow this short how-to to get a number if you do not already have one.
- Python 3. We will use a bit of Python code at the end to launch our project. If your operating system does not provide a Python interpreter, you can go to python.org to download an installer.
Twilio Studio
“Develop and iterate applications quickly” is a tagline on the Studio landing page and I have to say, it is true. Within 15 minutes, I went from having a passing familiarity with Studio to having a solution to my problem.
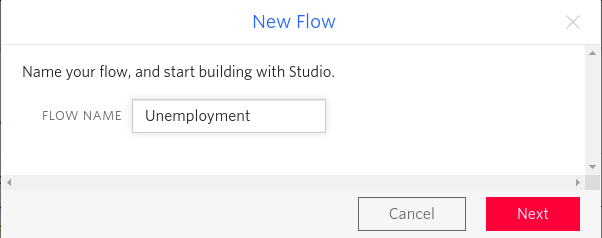
Log in to your Twilio account and then access the Studio Dashboard from the menu on the left. From the dashboard, go ahead and create a new Flow, naming it whatever you’d like.

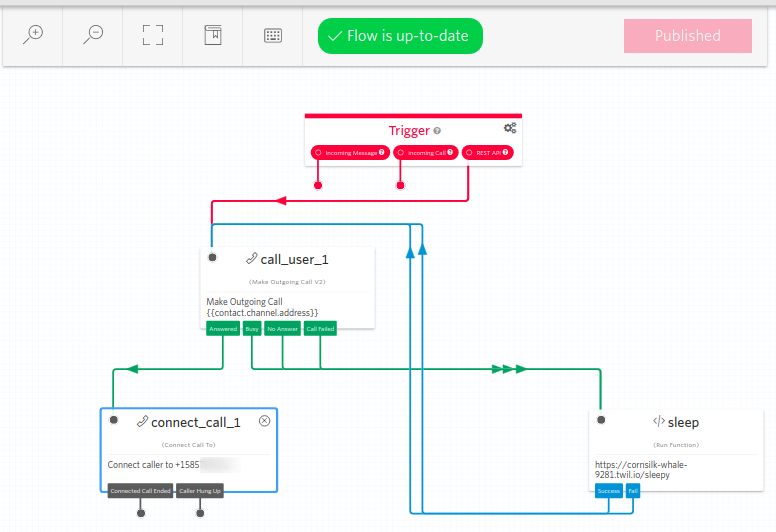
Conceptually, we know when we’re told “go!” we’ll want to dial the target phone line. With that in mind, we drag a “Make Outgoing Call” widget from the right sidebar onto the screen.
Next draw a line connecting the REST API trigger to the input of the Make Outgoing Call widget.
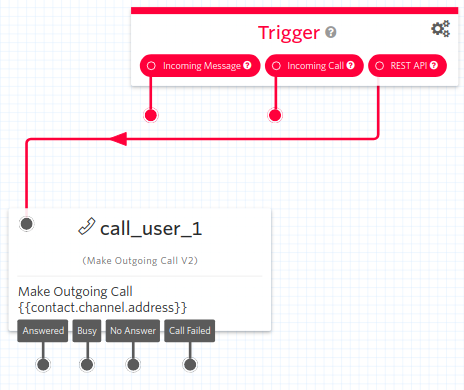
Click on the Trigger and at its properties in the editor, making note of the REST API URL.

The marked area of the URL is your Flow ID. We’ll need this later, so keep track of it!
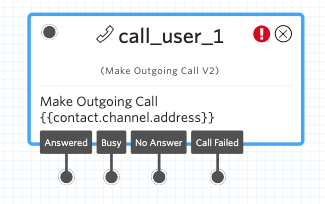
Make Outgoing Call
The core of our application is the Make Outgoing Call widget.
You may be wondering how to set the number that we’d like to call. The number will be provided by us to the Trigger widget as an argument, and passed through to the Make Outgoing Call widget. We will worry about this later, but in the end, the phone number will be mapped to the {{contact.channel.address}} variable defined in the widget by default.

The Make Outgoing Call has three failure conditions: Busy, No Answer, and Call Failed. In all of these cases we want to try again. Now you might be tempted to tie those conditions back to the input of the Make Outgoing Call widget, but we’re trying to be polite as we try to find our way into the queue. Instead we will take a short break before trying to dial the number again.
Run Function
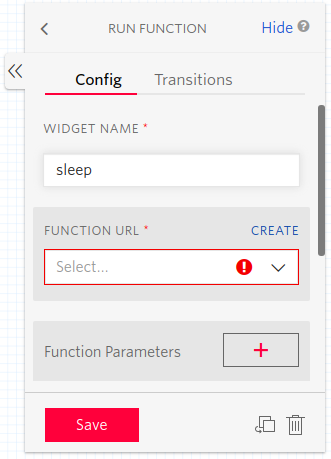
As a Python developer, I was hoping to just run import time; time.sleep(5) so the Run Function widget caught my eye. You will find it down the list of widgets, in the “Tools & Execute Code” section. After dragging it onto the screen I clicked on it to see its properties, and then I clicked on “Create” to start writing my own function.
This opens a new window on the Functions dashboard. Click “Create a Function” and select a blank template.
Looking at the boilerplate function that was generated for us we determine that we’ll be using JavaScript and TwiML for our function defaulting to a Voice Response. It’s not Python, but we’ll manage.
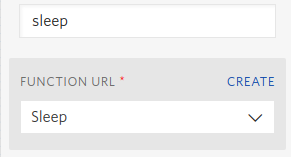
We give the function the name sleep and the path /sleepy, then replace everything in the function with JavaScript code that waits for 5 seconds before invoking the function's callback. Our entire function is just one line long and it looks like this:
Click “Save” to store the function, then switch back to the Studio Flow screen and select our function from the drop down list.
Now we route all of the failed call attempts to the input of our sleep function and then all sleep results back to the input of the Make Outgoing Call widget.

Connect Call
Now that our try-until-it-works loop is in place, we’ll optimistically take action, assuming that eventually we won’t get a busy signal and transfer the call to a number of our choosing. Drag the Connect Call To widget onto the Studio Editor, select it to see its properties and then enter your personal phone number in the “Connect call to” field. This is the number that you’d like to ring once the connection to the target number is made.
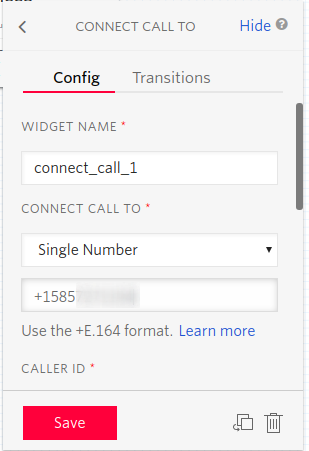
Note that if you are using a free Twilio account, the number that you want Twilio to connect the call must be verified.
Connect the “Answered” output of the Make Outgoing Call widget to the input of our Connect Call widget and our application is complete.
All that remains is to hit the Publish button!
The Execution
With a plan and a published Flow in place, it’s time to see if it works. As we chose the REST API Trigger, we can use the Twilio Python Helper Library to help launch the flow into action.
To keep our libraries separate from the system libraries, we follow Python best practices and create a virtualenv and activate it. Open a terminal or command prompt window and enter the following commands:
Installation of the Twilio Python Helper library is as simple as running the following command:
Twilio makes it easy to do things, and Python's REPL makes it very easy to just try those things. With that in mind, and the thought that hopefully this is a one-time event, we fire up a Python interpreter and interactively kick off our Flow.
There we go! Twilio is now polling the unemployment office and once it makes it through the call will get connected to my phone!
The account_sid and auth_token variables need to be set to the Account SID and Auth Token values reported in the Twilio Console, so you just need to copy/paste them here. These are different for every account and are used to authenticate against the Twilio API.
The flow_id variable comes directly from the flow URL, as noted earlier. Also copy/paste that identifier.
When the Flow execution is created in the last line, we see that the create() method takes two arguments, to and from_. The to argument is passed from the Trigger widget into the Make Outgoing Call widget and winds up as the {{ contact.channel.address }} value that we saw earlier when setting it up.
The from_ argument has a trailing underscore so that it does not conflict with the Python keyword. It needs to be a Twilio number, so if you do not have a number present in your account, you may buy one now.
Both phone numbers must be given in the E.164 format.
Conclusion
In reality, the unemployment system was so overloaded that even though the call connected, even once I pressed the number to continue, I was met with a message telling me that all lines were full and the call was ending. While I would have loved to have incorporated a bit more logic to deal with that case, I simply hit the up arrow in the Python REPL followed by Enter to kick it off again. After ~ 10 tries, I was finally placed into the hold queue where I waited for two hours before I was successfully connected to an agent.
Cliche though it may be, in these interesting times, it can be fun to find solutions to problems that prior I never imagined were even solvable programmatically. Twilio and Python are incredibly powerful and it’s great to be able to bring the two together! With a few commands on the REPL and the Twilio Python Helper Library, we’re able to add the last bit of glue that brings them together for a seamless experience.
Thanks for your time!
Related Posts


Related Resources
Twilio Docs
From APIs to SDKs to sample apps
API reference documentation, SDKs, helper libraries, quickstarts, and tutorials for your language and platform.
Resource Center
The latest ebooks, industry reports, and webinars
Learn from customer engagement experts to improve your own communication.
Ahoy
Twilio's developer community hub
Best practices, code samples, and inspiration to build communications and digital engagement experiences.