Building smart voice applications: A developer’s guide in Node.js
Time to read:
September 20, 2023
Written by
Reviewed by
Smart voice applications are revolutionizing traditional voice technology with innovations to automate and streamline communication processes. These sophisticated applications are also transforming the way businesses engage with customers. Here are a few of the benefits of smart voice applications:
- Enhances the customer experience by offering always-available, personalized interactions.
- Boosts operational efficiency by automating routine inquiries and handling high call volumes without issues.
- Provides an inclusive environment and offers hands-free interactions, multilingual support, and a platform for those with difficulties with text-based interfaces.
In this guide, we'll dive into the world of smart voice applications. We'll begin by examining the key features, then explore the significant role that AI plays in these applications. Lastly, we’ll walk through a tutorial to build a simple smart voice application with Programmable Voice from Twilio using Node.js and the Twilio JavaScript Helper Library.
Let’s begin by looking at the key features smart voice applications offer.
Key features of smart voice applications
Although smart voice applications are evolving with the emergence of new technologies and innovations, the following four key features serve as the backbone of smart voice applications.
1. Text-to-speech (TTS) technology
Text-to-speech (TTS) technology is a core feature of smart voice applications. With TTS, applications can convert written text into spoken words, enabling verbal communication of information from a machine to a human user. With continued improvements in TTS, robotic voices and awkward intonation are a thing of the past.
Here’s how it works: TTS applications read out various types of written content, such as news articles, emails, or notifications, to the user. The result is more accessible and engaging information that especially benefits users with visual impairments or those otherwise occupied with tasks preventing them from reading text.
2. Voice intelligence
Voice intelligence enables an application to understand, analyze, and derive meaningful insights from spoken language. With voice intelligence, an application can perform sentiment analysis, detect key topics or phrases, and provide real-time coaching or insights for customer service representatives. By processing and understanding speech in real time, voice intelligence helps businesses offer more personalized and effective customer service.
3. Speech recognition
Speech recognition technology allows an application to convert spoken language into written text. This technology also powers digital voice assistants (like Siri or Alexa), enabling them to understand user commands and respond accordingly. In addition, speech recognition can transcribe voice calls or meetings, providing a text record for further analysis or reference.
4. Interactive voice response (IVR)
Interactive voice response (IVR) technology enables applications to interact with users through prerecorded or dynamically generated audio prompts. IVR systems gather input via speech or touch-tone entry, then perform the appropriate action, such as routing a call to a recipient.
IVR is prevalent in customer service because it can handle large call volumes efficiently, routing only the more complicated inquiries to human agents. By providing fast and automated responses, IVR systems help businesses boost efficiency and improve customer service.
Now that we've explored the fundamental features of smart voice applications, let's turn our attention to the technology that makes all this possible: AI.
The role of AI in smart voice
AI serves as the cornerstone of smart voice applications, powering and enhancing the key features we've discussed above. Let's take a closer look at the critical role that AI plays.
Machine learning and natural language processing
Natural language processing (NLP) is a branch of AI that—coupled with machine learning (ML)—is integral to understanding and interpreting user input. ML algorithms help systems learn from data and improve over time, while NLP helps them understand, interpret, and generate human language in a meaningful and useful way.
Speech synthesis
Speech synthesis focuses on using computers to produce human speech. While TTS transforms written words into spoken words, speech synthesis takes this further by leveraging NLP to generate speech from text that sounds authentically human. When speech synthesis reads written content aloud, the result is a more engaging and accessible user experience.
Speech recognition
Speech recognition converts spoken language into written text. In addition to applying speech recognition to the area of transcription, computer systems can also use it to understand and act on user commands. As mentioned above, voice assistants depend on speech recognition to create a seamless and responsive user interface.
Voice biometrics
Voice biometrics can identify and authenticate by determining and analyzing the unique physiological and behavioral characteristics of a person’s voice. This AI-powered feature provides an additional layer of security in voice applications. For example, the phrase “My voice is my password.”
Sentiment analysis
Sentiment analysis uses AI to determine the emotional tone (or sentiment) behind written or spoken words. With sentiment analysis, businesses can better determine a customer’s thoughts or feelings—in real time—during a voice interaction. The insights gained through sentiment analysis enable businesses to tailor responses and improve customer satisfaction.
Conversational AI
Conversational AI comes from ML and NLP, enabling natural and engaging interactions between computers and human users in voice applications. This AI feature drives chatbots and voice assistants, making them more effective in understanding and responding to user requests.
Real-time translation
Real-time translation is an application of NLP used for instantly translating spoken language into other languages. Of course, for businesses operating in multicultural and multilingual environments, real-time translation can be critical for reducing communication friction.
Now that we have a solid understanding of the core features of smart voice applications and the role of AI, let's put theory into practice by building a simple smart voice application with an IVR system.
Prerequisites
- Node.js
- NPM
- Yarn
- Your preferred text editor or IDE, such as Visual Studio Code
Building a smart voice application: An IVR system
For our smart voice application, we’ll implement a simple IVR phone tree by building a Node.js Express application that works with TwiML. TwiML is XML that you use specifically to tell Twilio what to do when receiving an incoming voice call or SMS.
Our IVR phone tree will work like this:
- When the call comes in, provide (via spoken language) a menu for the caller.
- If the caller presses 1 or says the word “astronaut,” Twilio will respond by providing the names of the astronauts currently aboard the International Space Station.
- If the caller presses 2 or says the word “joke,” Twilio will respond by telling a joke.
If you want to build an application as you follow along with this tutorial, your first step will be to sign up for a free Twilio account. You’ll receive a small free trial balance to use for testing.
1. Sign up for a Twilio number
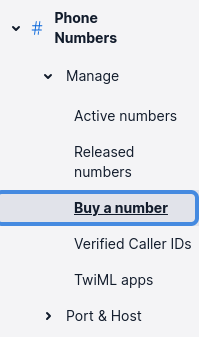
The first thing we’ll need to do is buy a Twilio number for receiving phone calls. After logging into the Twilio Console, we search for the Phone Numbers product. Then, we click Buy a number in the navigation.
Next, we select a Twilio number to buy. Using this number incurs a monthly fee. Fortunately, our free trial balance will be more than enough to cover this cost while we develop and test.

After buying our Twilio number, we need to configure it to handle incoming calls through a webhook. However, we don’t have the URL (or application) for handling the webhook yet. For this, we’ll write a simple Node.js Express application to handle our call.
2. Build the initial Node.js Express application
Eventually, we’ll configure Twilio to handle an incoming call by sending a POST request to an endpoint in our Express API server application. For now, our Node.js code will handle incoming requests by generating the appropriate TwiML, which Twilio will use for responding to the caller.
Let’s walk through the steps for building our application.
In a project folder, we initialize a new Node.js application. We’ll use yarn as our package manager, allowing us to accept all the default responses for the prompts given.
Next, we add the dependency packages that we’ll need.
We’ll keep our entire application in a single file (index.js). Create the file in the project's top-level directory and add the code below:
After saving the file, start up the application with the following command:
In a separate terminal, we can use curl to send a POST request, just like Twilio will do when calling the webhook.
Notice that our Express application emits TwiML as its response. Ultimately, our Node.js application will run custom business logic and piece together a TwiML document as a response, which Twilio then uses for responding appropriately in the voice call.
3. Use ngrok to expose our Node.js application
With our initial Node.js application running, we need to make it reachable via the internet. For this, we’ll use ngrok. We run the following command, in a new terminal session or tab, to expose our Express server (which listens on port 3000):
Now, our application is accessible at https://78a-174-17-5-11.ngrok-free.app. Copy the URL provided by ngrok, as you'll need it in just a moment.
4. Configure the Twilio number webhook
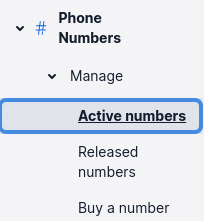
Back in our Twilio Console, from the left-hand-side navigation menu, navigate to Explore Products → Phone Numbers → Manage → Active numbers.
Then, we look for the Twilio number we bought earlier and navigate to the Configure tab. On this page, under Voice Configuration, we want to handle an incoming call with a webhook that points to the URL we have from ngrok. Along with the base URL, we need to include the /welcome endpoint in the URL since that’s the path we’ve implemented for our server and set the HTTP field to HTTP POST.
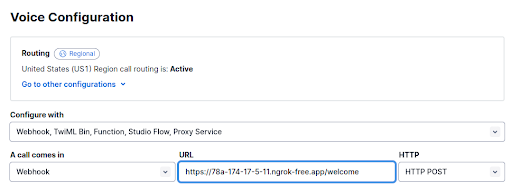
At the bottom of the page, we click Save configuration. Then, we’re ready to run our first test.
5. Test first call
Now, when we call our Twilio number, we hear Twilio say, “Hello, from Twilio!”
Our initial test was successful. Now, let’s enhance our application to accept and handle inputs from the caller.
6. Enhance our IVR phone tree application
Next, we’ll modify index.js so that our IVR phone tree supports the flow we described at the beginning of this walk-through. The entire file looks like this:
Let’s explain our code step-by-step.
Our /welcome endpoint uses TwiML’s gather verb to collect digits pressed by the user or transcribe speech. We’ve set the possible inputs as dtmf (touch tones) or speech, so if the user inputs touch tones, we’ll collect one digit. After collecting the input, Twilio will take this data and send it in a POST request to the /menu endpoint for this same webhook base URL.
We also instruct the gather verb to say the entire menu of options to the caller so the caller knows what to do.
Our /menu endpoint checks for data either in req.body.Digits or req.body.SpeechResult. When Twilio gathers the user input data and sends a POST request to /menu, it’ll include that data in the payload body. We’ll find touch-tone digits in req.body.Digits or any transcribed speech in req.body.SpeechResult.
If the user pressed 1 or said the word “astronaut,” we’ll call getAstronauts() to generate our TwiML. But if the user pressed 2 or said the word “joke,” we’ll call getJoke() to generate the TwiML.
The getAstronauts() function calls an open API that returns information about the people currently in space. This allows us to use node-fetch to send a request to that external API. Then, we can process the JSON response to craft a message (using the TwiML say verb) with the number of people currently aboard the International Space Station, followed by a listing of their names.
On the other hand, the getJoke() function is much simpler, using the say verb to respond with a simple joke.
Back in our /menu endpoint code, we craft a response either through getAstronauts() or getJoke(), then pause for two seconds before saying, “Have a nice day!” and hanging up.
7. Restart and test our final application
In the terminal window running node index.js, we end and restart that process.
So when we test our application with a curl request, the response looks like this:
With ngrok still running and our application restarted, we can call our Twilio number again.
Let’s test what happens when we say the word “astronaut.”
Also, we’ll test what happens when we say the word “joke.”
Success! With that, we’ve built an uncomplicated IVR phone tree for our Twilio number, using a Node.js Express application and TwiML.
Unlock the power of Twilio’s Voice API
The IVR system we built only scratched the surface of the potential applications for Twilio's Voice API. From here, you can build a much more sophisticated IVR system—one that queries a database for order tracking information or onboards new customers by asking them to set a new PIN.
With Twilio’s Programmable Voice SDKs available in several languages (including Node.js, Python, and Go) and for different platforms (such as Android and iOS), you can integrate Twilio Voice and work with TwiML in a straightforward and convenient way.
Here are some examples of other powerful use cases for smart voice applications to explore:
- Automated surveys: Automated surveys, built by Twilio’s Voice API, can call your customers and provide an immediate and direct channel for feedback. This can lead to more timely and actionable insights to improve your service or product offerings.
- Call tracking: Call tracking is an invaluable tool for assessing the effectiveness of your marketing campaigns. By assigning unique Twilio numbers to different campaigns, you can track which campaigns have the highest call rates and gather data about the callers themselves. As a result, you’ll have a more complete picture of your audience.
- Transcriptions and sentiment analysis: Transcriptions from your customer service voice calls are also possible with Twilio’s voice intelligence capabilities. From there, you can use AI-powered sentiment analysis to assess the emotional tone and overall sentiment of your customers, helping you to understand their perceptions and experiences better.
Ready to step up your company’s voice application game and engage with your customers on an entirely new level? With Twilio Programmable Voice, the possibilities to explore are endless.
Start your journey by signing up for an account with Twilio. From there, you can start building with Twilio for free.


Related Resources
Twilio Docs
From APIs to SDKs to sample apps
API reference documentation, SDKs, helper libraries, quickstarts, and tutorials for your language and platform.
Resource Center
The latest ebooks, industry reports, and webinars
Learn from customer engagement experts to improve your own communication.
Ahoy
Twilio's developer community hub
Best practices, code samples, and inspiration to build communications and digital engagement experiences.