Design a Phone Survey System with Python, Google Sheets and Twilio
Time to read:
July 31, 2020
Written by

Surveys serve as a great tool for gathering information from a sample of people and can take multiple forms but are most common in the form of a questionnaire, either written, online or over the phone.
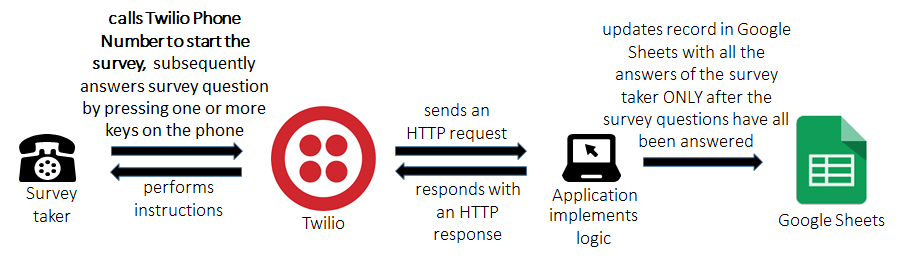
In this tutorial, I’m going to walk us through how to build an automated Phone Survey System which is a form of an Interactive voice response (IVR) system. An IVR system is a technology that allows a computer to interact with humans through the use of voice and DTMF tone input via the phone’s keypad. To build this application, I will be working with the Twilio Python Helper Library, the Flask framework for Python and Google Sheets. Below is a high-level overview of how the application works:
For the purpose of building this application, I have selected the following three questions to include in the survey:
- Do you own or rent a house?
- What is your marital status?
- How old are you?
Note that even though we have kept the survey questions to three, the approach that we will be adopting to build the application scales seamlessly to as many questions as we want and also to other question types.
What you need to start
In order to follow along with the tutorial, you will need to have the following items:
- A Twilio account. Create one if you don’t already have, as this is key to getting the Twilio phone number which will implement the survey.
- A Google account. Create one if you don’t already have one, as this will be needed to get Google Sheets working. We will use it to store the collected responses from users.
- An active phone line to test our web application.
- Python 3.6 or newer. Download the Python installer for your OS here.
- ngrok. Since Twilio needs to connect to a public URL, we will be using ngrok (a free tool) to put our web app running on our local machine temporarily on the Internet. Download the ngrok installer for your OS here.
Optional: You can go through the features and limitations of a free Twilio account before proceeding.
Purchase and configure a Twilio phone number
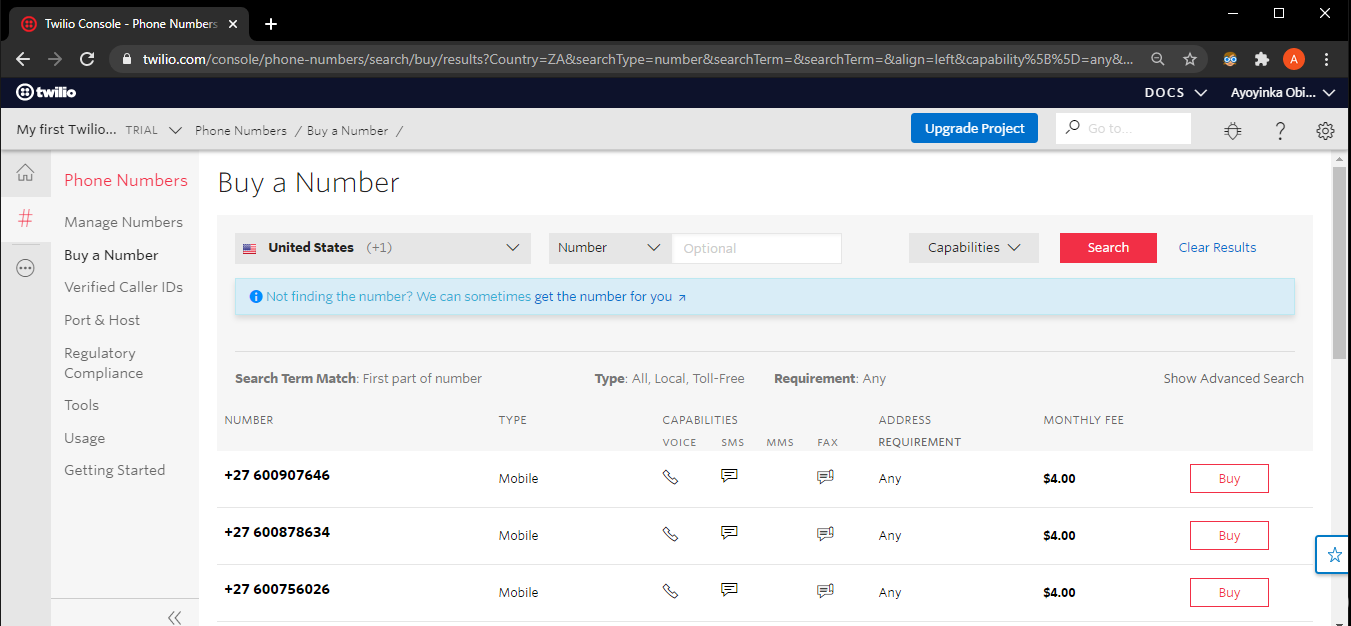
As stated in the previous section, a Twilio account is required for this project. If you plan to follow this tutorial but you don’t already have a Twilio account, create a free account now. Once that’s done, log in to your Twilio Console to buy a phone number.
Configure Google Sheets
For our web application, we will use Google Sheets as a database, so you need a Google account. If you don’t have an account already, create one now and log in.
Once you log in to your Google account, you need to create a blank Google Sheet to use with this project. The name of the spreadsheet is important, as we will use it to access it from Python. In this tutorial I’m going to use the name “IVR_Survey”. If you give yours a different name make sure to adapt the code shown later in the tutorial accordingly.
On the first row of your spreadsheet create column names based on the three survey questions in our application.

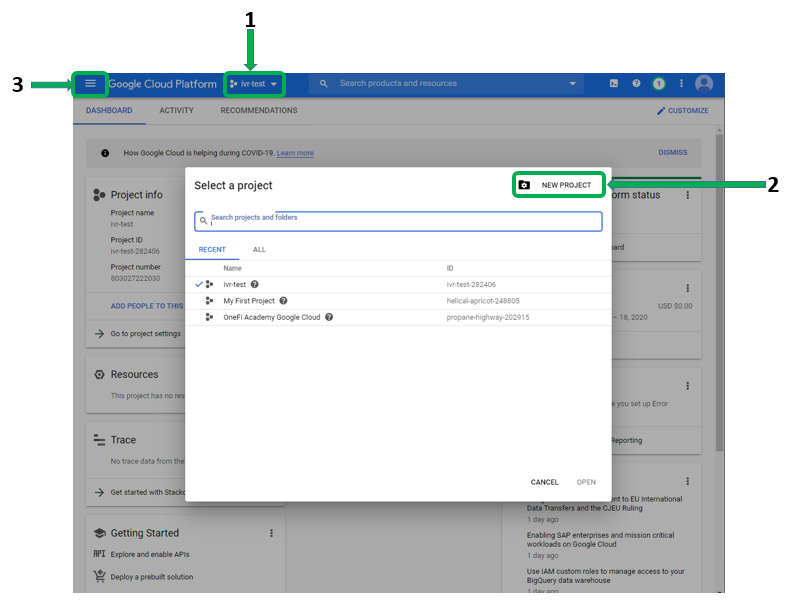
Next, let’s visit Google Cloud Platform to create a new project, which is necessary for Python to authenticate and obtain access to the spreadsheet.
You would be presented with a page like what is shown below. In order to see the “Select a project” dialog box, click on (1) to open it. Then click on (2) to create a new project.
On the “New project” page, choose “ivr_test” as your project name and you can leave the organization as blank. Once the project is created, make sure the new project is selected in the dropdown (1).
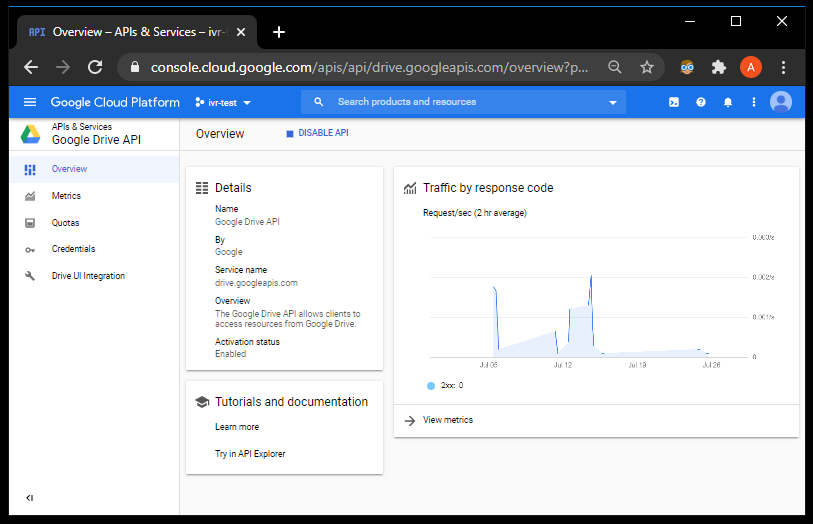
For the next step, we need to add Google Drive and Google Sheets APIs to the created project. In order to do this, click on (3) above and then click on APIs & Services. On the new page presented, click on “Library” on the left navigation bar, type “Google Drive” in the search input field and click on the result that matches your search. On the next page, click “Enable” to install the API on our project.
You will see a page like the one below:
Go back to the menu, select “APIs and Services” and then “Credentials”. Click on “CREATE CREDENTIALS” to add credentials for our project, and select “Help me choose” to go through this process step by step.
You will now be asked several questions. Here are the answers you need to provide:
- For “Which API are you using?” select “Google Drive API”.
- For “Where will you be calling the API from?”, choose “Web server (e.g. node.js, Tomcat)”.
- Select “Application data” for “What data will you be accessing?”.
- For “Are you planning to use this API with App Engine or Compute Engine?” choose “No, I’m not using them” .
Below is the view showing all the options chosen above:
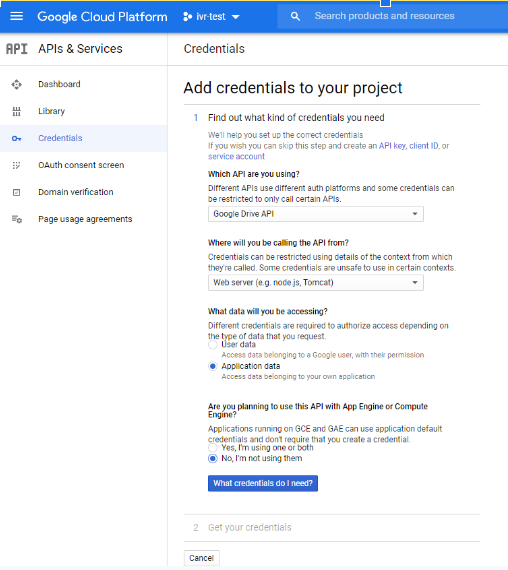
To proceed, click on “What credentials do I need?”.
In the “Create a service account” section choose “ivr” as the service account name. The project role must be “Editor”, which appears under the “Project” section in “Role” dropdown. Make sure “JSON” is selected for the key type before clicking “Continue”. At this point a JSON file is going to be downloaded by your web browser.
The second API that needs to be enabled is “Google Sheets”. Go back to the “Library” page, search for “Google Sheets” like before and click “Enable”.
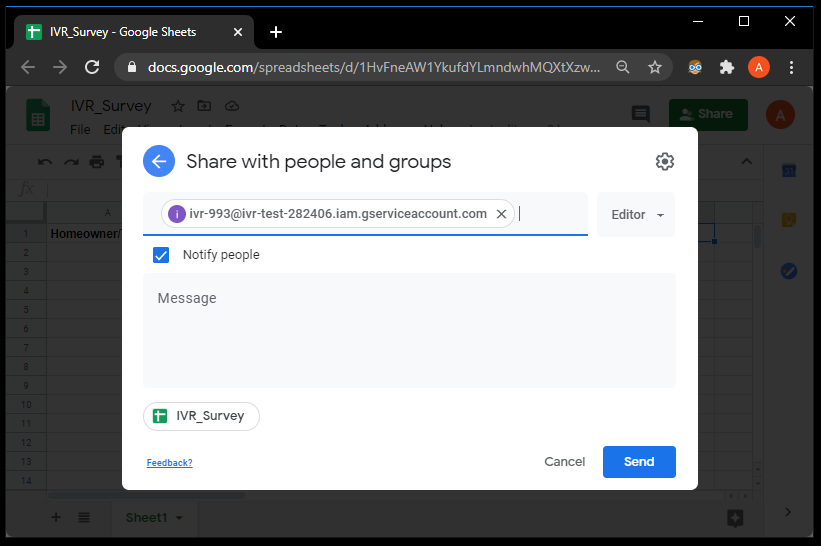
In order to allow us access to the Google sheet from our Python code, open the downloaded JSON file using a text editor of your choice and copy the value assigned to the client_email key. Then go to the Google sheet you created earlier, click on the “Share” button, paste the copied email address and click “Send” as shown below:
Creating the Python web application
We are finally going to start building our application!!!
First, I will like to introduce you to a concept called TwiML that is important to work with Twilio. TwiML (the Twilio Markup Language) is a set of instructions you can use to tell Twilio what to do when you receive an incoming call, SMS, or fax. An example in our application would be to use the TwiML's <Say> verb to instruct Twilio to read out the survey questions. At its core, TwiML is an XML document with special tags defined by Twilio to help you build your Programmable Voice application.
Now, let’s create a new directory for our project and move there. From inside the directory, we are going to create a virtual environment which is in line with best practices for a python project. Also, we would copy our downloaded JSON file to the project folder and rename it to creds.json.
If you are using a Windows machine, enter the following commands in the command prompt window to complete the tasks describe above:
For those of you following the tutorial on a Unix or Mac OS system, enter the following commands in your terminal:
Now we should have the following in our project folder:
- venv_ivr_survey
- creds.json
- requirements.txt
The picture below shows the final structure of our project, after all the code is added in. I like using this structure to create my Flask applications because it scales seamlessly from small to large projects.
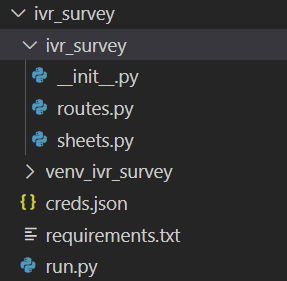
Next, I am going to walk us through how everything fits together to get our application running. Create a sub-directory in our project folder with the name ivr_survey. This is the Python package where we will have the application code.
Interfacing with Google Sheets
The sheets.py module will provide all the code required for the application to write survey entries to the spreadsheet. In order to use the Google Sheets API, we had installed the gspread and oauth2client packages. The following code creates a sheet variable that exposes the Google Sheets API to our web application. Copy this code into the ivr_survey/sheets.py file.
The sheet variable created above will be used to access the Google sheet. Note that in order to be able to use this code as-is, the Google sheet created earlier needs to have the name “IVR_Survey”. Alternatively, you can replace the name of the sheet in the code with your own chosen name.
Flask application
The __init__.py module helps us to create an instance of the Flask class which will be our WSGI application. Also, this module makes our ivr_survey sub-directory a Python package. Copy the code below to the ivr_survey/__init__.py file.
Notice the import at the end? This is a workaround to prevent circular imports, which are a common problem with Flask applications. Also, we are setting app.secret_key because Flask will not allow us to set or access the session dictionary without the secret_key configured. The secret key will be imported from an environment variable named SECRET_KEY.
Welcome route
The routes.py module is where we will implement the logic for our application. Here, we will define the survey questions and perform the action to save the user’s answers into Google Sheets.
Since this module contains the core of the application, we will develop it in parts. Below you can find the first part. Copy this code to the ivr_survey/routes.py file.
This section of the routes.py module contains all the imports required and a helper function that takes a TwiML response and transforms it into a valid HTTP Response.
Let’s write our first route, which welcomes the caller to the survey. Add this code at the bottom of ivr_survey/routes.py.
By leveraging the Python Twilio Helper Library, we created an instance of the VoiceResponse class and called its gather method (representing the TwiML's <Gather> verb) to collect digits from the survey taker. Specifically, we asked the survey taker to press any number to start the survey. The gather method has many attributes to configure how to request information through from the caller. Here we have used the following;
num_digits: this is the number of digits expected from the survey taker and here we have assigned 1 as its value because we only want the caller to press a digit to begin the survey.action: this takes the URL where Twilio will make an HTTP request when the caller finishes entering the number of digits expected or a timeout is reached. The URL can be absolute or relative and here we have defined a relative URL to a route that will implement the first question.method: this tells Twilio whether to request the action URL via HTTP GET or POST.
The response.gather call functions as a context manager that returns the Gather object. This object has methods of its own, including g.say, which wraps the <Say> verb, and can be used to speak to the caller using text-to-speech. The say method also takes in the following attributes;
message: the text that we want to read to the callerloop: number of times to repeat the messagevoice: the voice that says the message
Finally, we return a response using the twiml helper function defined earlier.
Survey questions
The next step is to implement the three routes that will ask questions to the caller and collect responses. Here is the route that asks the first question. Copy this code at the bottom of ivr_survey/routes.py.
Note how we read the question to the caller, indicating what number to press for each possible answer. The action in this question points to the route that implements the second question.
When Twilio invokes the second question route the request is going to include the answer entered for the first question in the request.form[‘Digits’] field. We are going to save it to the Flask session object, and when the survey ends we will save all the answers to the Google sheet.
Here is the code for the second question:
The third question is implemented using the same style as the second. We first save the answer we received for the previous question to session and then we issue the new question as before. Here is the code for the third and final question in the survey:
Survey end
Since we have now reached the end of the survey, the action attribute in the last question tells Twilio to invoke a final endpoint that will receive the answer to the final question and save all the answers to the spreadsheet.
Here is the implementation of the survey completion route:
The sheet object exported by the sheets.py module makes writing data to the spreadsheet easy. The insert_row method takes a list of values that are inserted in consecutive cells in a row and the row number where the new data should be inserted. Passing 2 in the second argument will cause new survey entries to be inserted in the first row of the table, right below the column headings, pushing older entries one row down.
Application entry point
The run.py module is the entry point of the application, which exposes the Flask application to the world.
Copy the following code to the file run.py in the top-level directory of the project.
Testing the application
Given all the work is now done, it’s time to actually test that everything is working fine. With the virtual environment activated, let’s define two environment variables required to start the application and then run the application;
FLASK_APPSECRET_KEY
If you are using a Windows machine, enter the following commands in the command prompt window:
For those of you following the tutorial on a Unix or Mac OS system, enter the following commands in your terminal:

The output should be something like the above and this shows that the application is running on your local machine.
As discussed earlier, we are going to use ngrok to make the application reachable by Twilio over the internet. In order to achieve this, open another terminal window and run the following command, which allocates a temporary domain accessible over the internet and redirects the HTTP requests sent to it to your local port on 5000:
The output should look something like this;
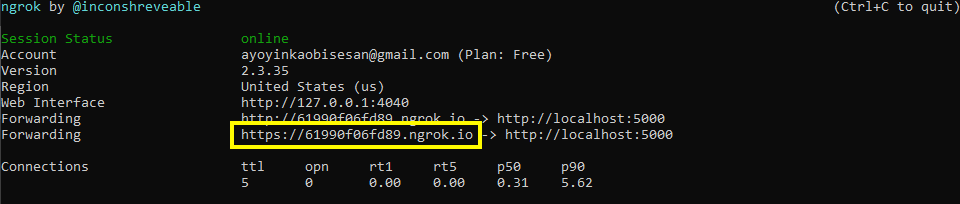
Given that Twilio uses the webhook callback pattern for evented interaction between two systems connected over the Internet, we need to configure the phone number purchased earlier to work with our web application at the ngrok URL indicated with the yellow box, which in my case is https://61990f06fd89.ngrok.io. This root URL needs to be appended with the URL that is the starting point of the survey, which is /survey/description. This gives us https://61990f06fd89.ngrok.io/survey/description. In your case the URL will be similar, but the first portion of the domain will be different every time you start an ngrok session.
Go to the Twilio Console and select the Phone Numbers option. Here you will see the Twilio phone numbers associated with your account. Select the desired number to access its configuration page, which you can see below:
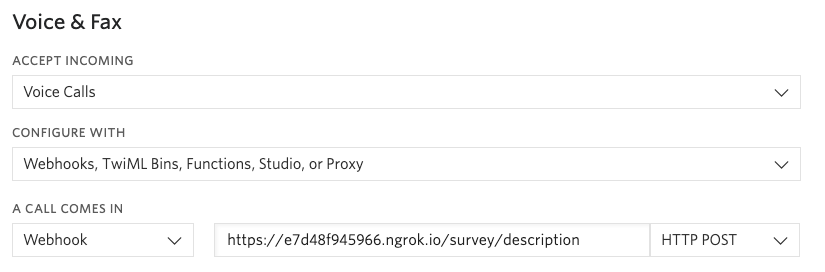
In this page locate the “Voice & Fax” section. Under “A call comes in”, select “Webhook” in the first dropdown, paste the ngrok webhook URL in the second field, and select “HTTP POST” in the third.
Click “Save” to continue. With this done, you can call the Twilio phone number to do the survey. Once you reach the end, check the Google Sheets to confirm that the entries were saved.
Conclusion
Collecting structured data through surveys to make informed decisions is common across every business. In this tutorial we have seen how to build an automated telephone survey system to achieve this goal.
I hope you would find this as useful as I have found it and I hope this tutorial has been informative. One last thing to note is that the <Gather> verb can transcribe speech during a call, and this can be used instead of asking for information through the keypad. I encourage you to try that out. Thank you!
Ayoyinka is a software developer at night and a technology consultant at Deloitte during the day.

Related Resources
Twilio Docs
From APIs to SDKs to sample apps
API reference documentation, SDKs, helper libraries, quickstarts, and tutorials for your language and platform.
Resource Center
The latest ebooks, industry reports, and webinars
Learn from customer engagement experts to improve your own communication.
Ahoy
Twilio's developer community hub
Best practices, code samples, and inspiration to build communications and digital engagement experiences.