Forward Voicemail Recordings to Email w/ Studio, Functions, & SendGrid
Time to read:
January 25, 2022
Written by
Reviewed by

While the Voicemail Twimlet has email forwarding built in, many Twilio customers find it limiting and ask if there's a way to forward recordings to email without the Twimlet or a web server.
This document shows how to forward voicemail recordings to email using Twilio Studio, Functions, and SendGrid.
Things you'll need
In order to follow this tutorial, you will need:
- A Twilio account and a phone number that can receive calls.
- A SendGrid account with a verified sender.
SendGrid Account
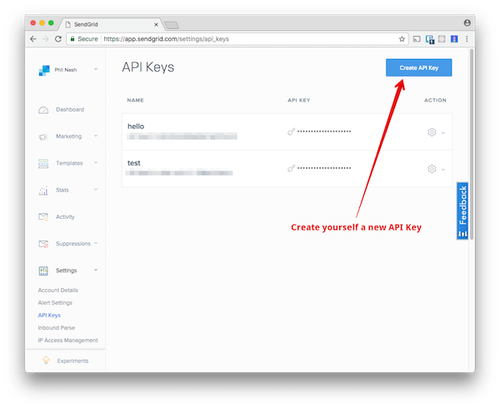
In order to use the SendGrid API to send emails we need a SendGrid API key. Create a SendGrid account (if you don't have one already), confirm your email address, then head to the API Keys area in the SendGrid dashboard and create an API Key with Full Access.
Be sure to save the API Key Secret to your notepad.
Verified Sender
You also need to verify one of your emails to send from it with SendGrid. To do this, go to the Senders page under Marketing, click "Create New Sender", fill out the information, then go to that email inbox and click the link in the verification email.
Twilio Function
Now let's write your Function. Your Function will initialize a SendGrid mail client and use it to email your voicemail recording URL.
Create a Service
- Log in to the Twilio Console and navigate to the Functions tab.
- Functions are contained within Services. Create a Service by clicking the Create Service button and providing a name such as test-function.
Configure
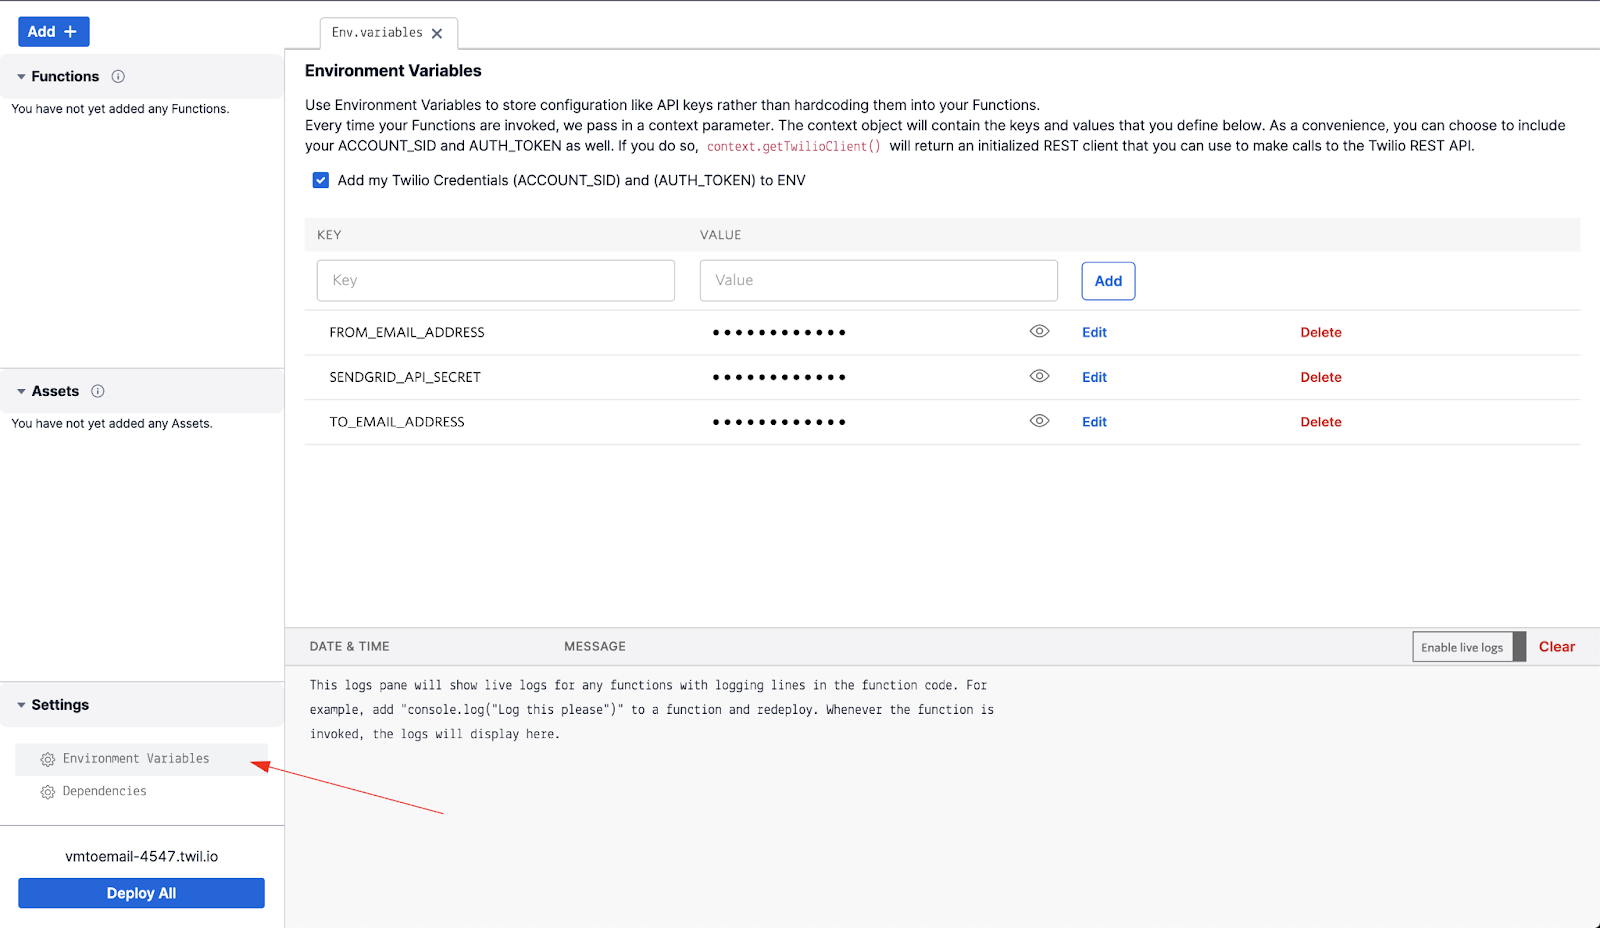
Your function needs to know some information to interact with SendGrid. We will securely store these in environment variables. You can edit these by clicking on Environment Variables in the Settings menu.
- Add a new environment variable called SENDGRID_API_SECRET and paste in your API Key Secret (begins with SG).
- Create a TO_EMAIL_ADDRESS variable and enter the email to receive your voicemails.
- Create the variable FROM_EMAIL_ADDRESS and enter one of the verified sender emails in your SendGrid account.
(It’s best to use two of your personal emails when testing. Emails from a company domain (e.g. @twilio.com) can be blocked if not verified properly.)
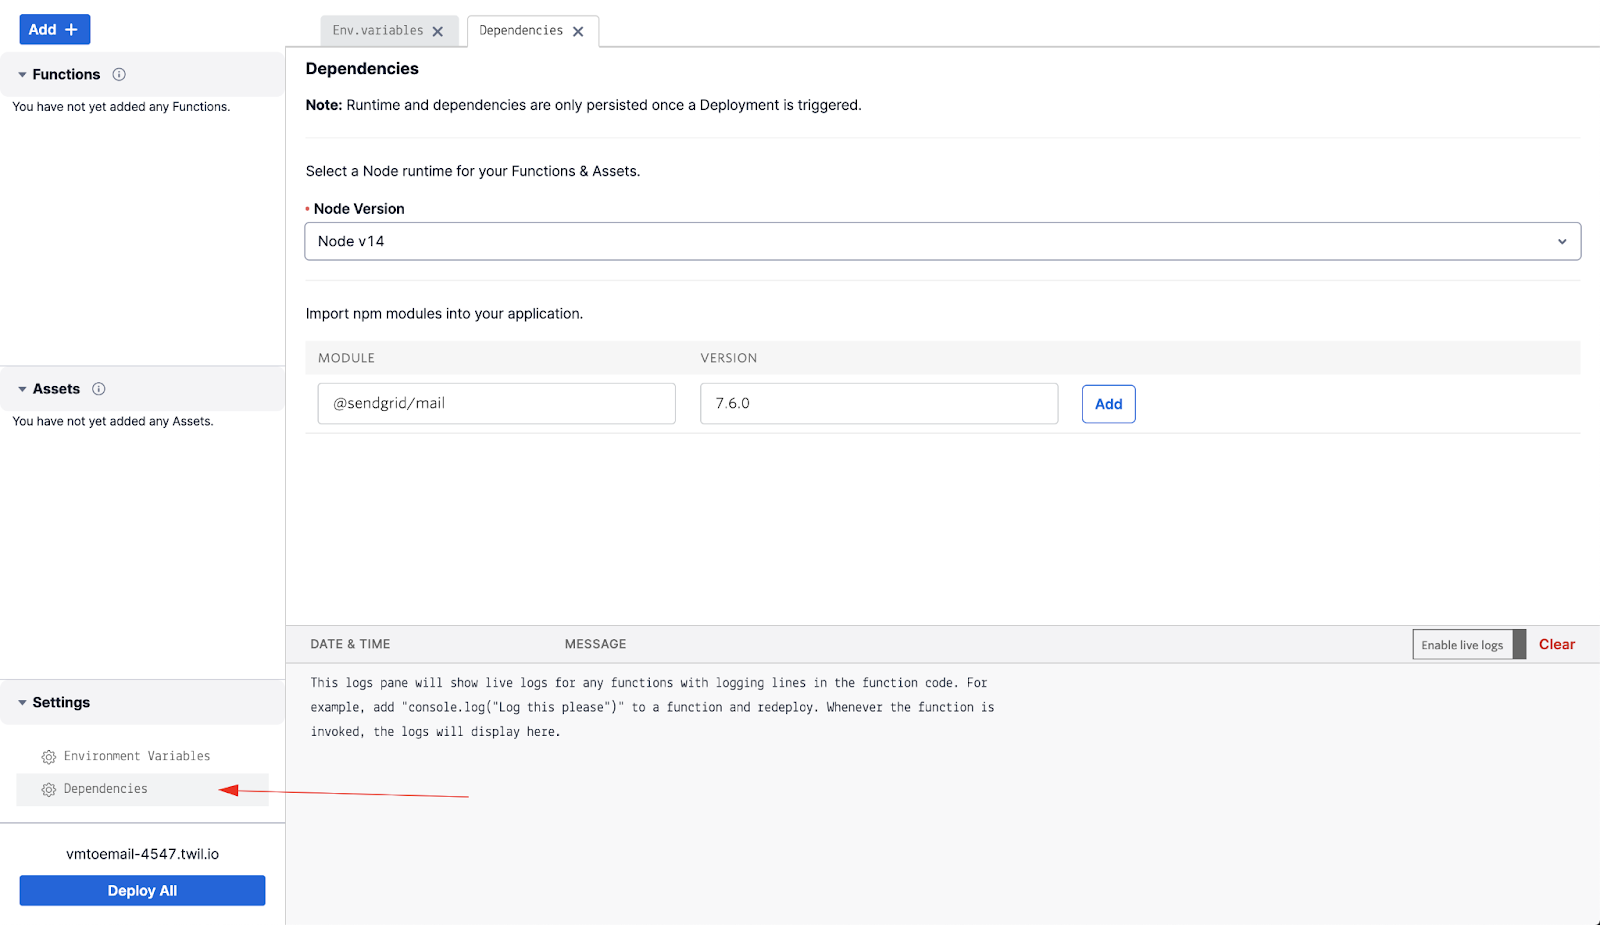
In addition to the Environment Variables, we need to include the “@sendgrid/mail” library in our Dependencies.
- Switch to the dependencies settings, add @sendgrid/mail and the version 7.6.0, then save.
Write the Function
- Click on the blue Add+ button in the top left of the console and select "Add Function".
- You can edit the function name if desired. The name does not affect anything in this tutorial and can be whatever makes the most sense to you.
- The Function is included below. It works out of the box, so feel free to copy, paste, and save. If you'd like to understand what's happening, read on.
How your Function works
There’s a bunch of code there, and it might not be immediately obvious what we’re doing. Here’s the play-by-play on how it works.
- At the top of your Function, we initialize the @sendgrid/mail module which will help us craft a mail request to SendGrid.
- We then call Twilio's handler function, which is required for all Twilio Functions. For more information about how the handler function works and what the context, event, and callback arguments are used for, check out the docs here.
- Next, we build the SendGrid request per the guidelines in the docs here.
- Since Twilio Functions are written in Javascript, we use the SendGrid Node.js library.
- The first thing we do when building our request is use the setApiKey() method which will authenticate our request. Inside it, we place our API Secret, which we pull from the Function context.
- Next, we build our message parameters. Again, we pull our to and from emails from context, and we also reference a couple variables, url and From, from the event argument of our Function. We’ll cover how exactly we’re passing these into our Function when we build our flow, but just know that the event argument is where you’ll reference variables passed into a Function.
- Lastly, we call the send() method to actually send the request to SendGrid for delivery. Inside the promise handler, we print a message to let us know the request was accepted, then we embed our empty Function callback() which is required in every Twilio Function. Below that we add a catch statement so we can know what’s wrong if SendGrid fails our request.
Studio Flow
The last piece of our app is the Studio Flow, which we'll use for our voicemail. Studio makes it easy to set up a Voicemail with the Say/Play and Record Voicemail widgets, so that's what we'll do.
Create Your Flow
- Go to the Manage Flows Studio page, then click either the red Create new Flow button (if this is your first Flow) or the red plus (‘+’) sign (if it’s not your first Flow).
- Give your Flow a name and click Next. I used Voicemail w/ Email.
- Select “Start from scratch” in the menu, and click Next again.
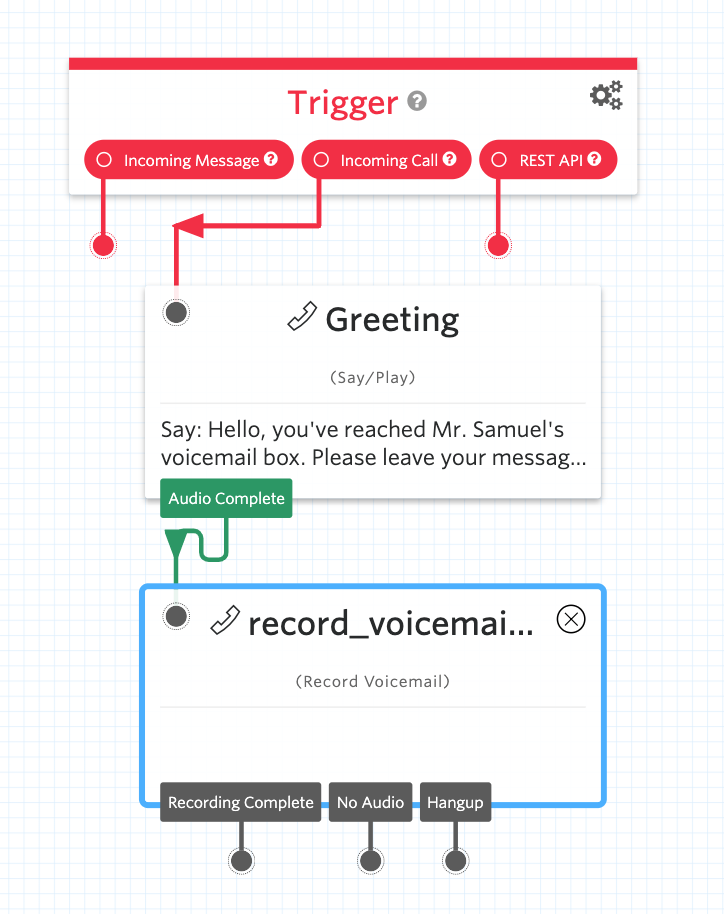
- Drag a Say/Play widget onto your canvas and connect this to the Incoming Call port of your Trigger.
- Configure this widget to say or play your voicemail greeting. If you plan to have your user end their message with a button press, be sure to include this instruction.
- Drag a Record Voicemail widget onto the canvas and connect this to the Audio Complete port of your Say/Play widget.
- Configure your voicemail widget as you like. In mine, I end the recording with the press of # or 5 seconds of silence, do not trim silence, and play a beep.
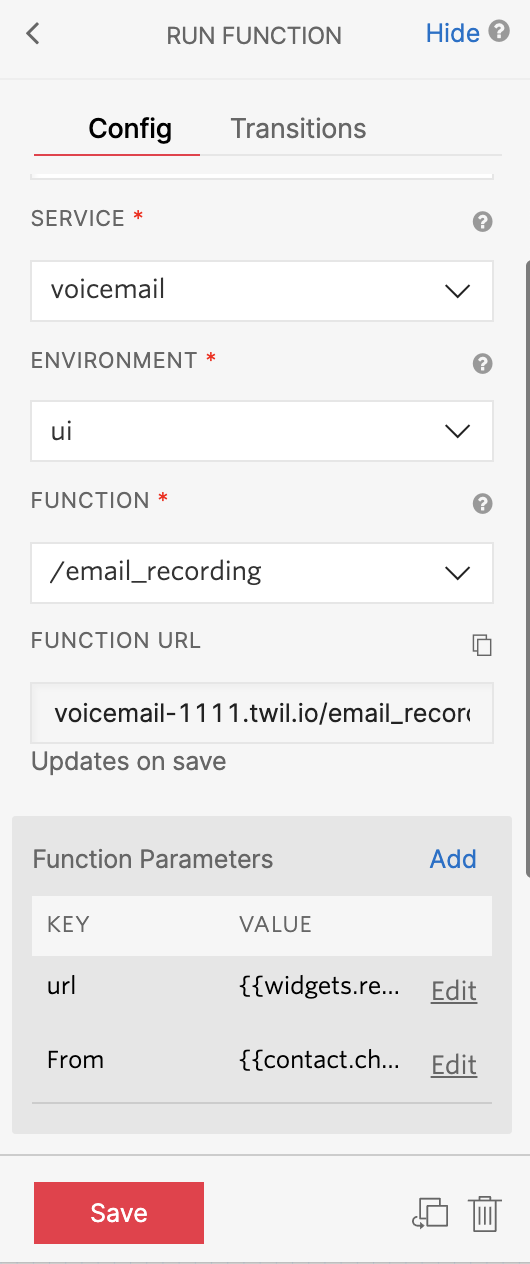
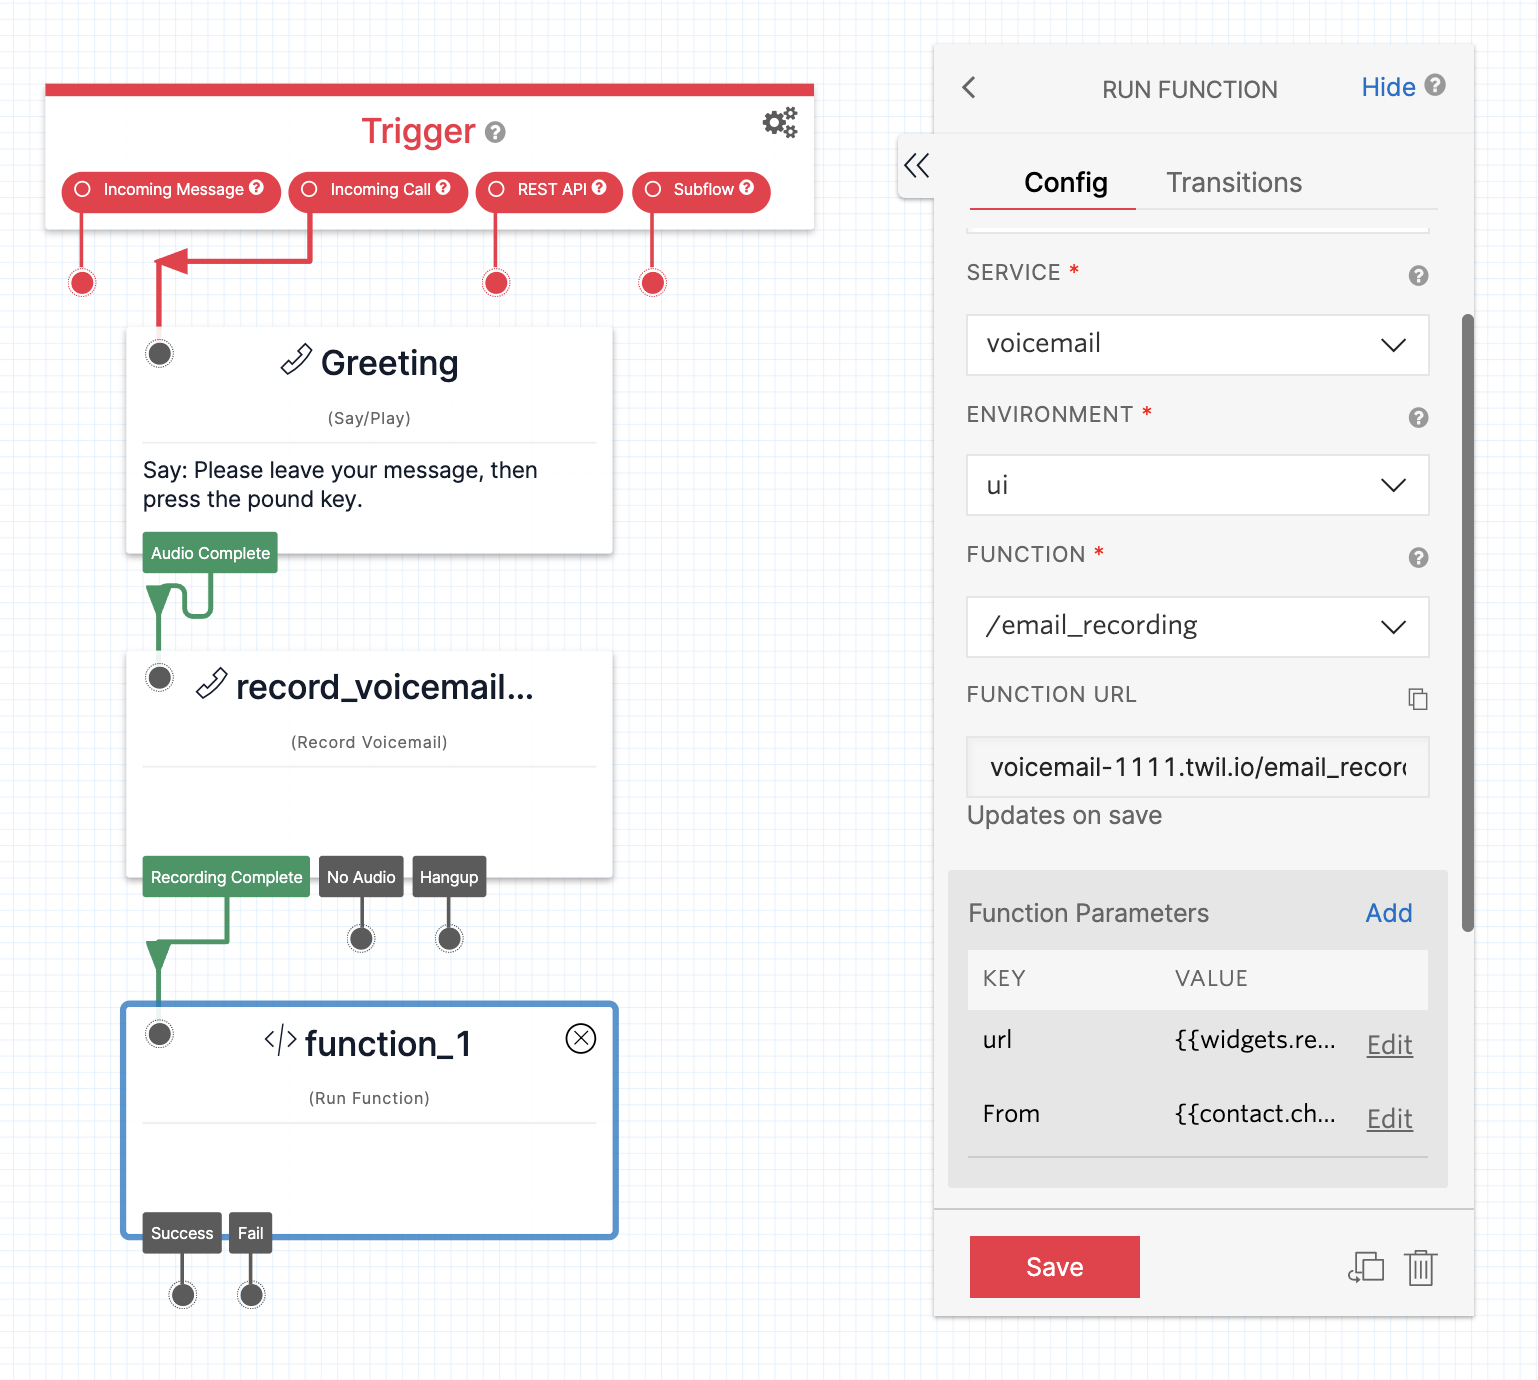
- Lastly, drag a Run Function widget onto your canvas and connect this to the Recording Complete port.
- Select the Service you created earlier from the Service dropdown.
- Select ui from the Environment dropdown.
- Then select the Function you created in the Function dropdown.
- Now create the Function Parameters we use in the Function. Function parameters are passed as additional parameters into the Function you call and are taken from the event argument.
- Click the + sign, set the Key field to url, and set the value to the recording URL {{widgets.record_voicemail_1.RecordingUrl}}, then click Save.
- Click Add, set the Key field to From, and set the value to {{contact.channel.address}}, which is the caller's number, then click Save.
- Your flow should now look something like this.
- When you’re finished editing your Flow, click the Publish button just above it.
- (OPTIONAL) Add functionality to support instances where no audio is heard in your recording or if it fails. You can also add a goodbye message to play to the user after they record their voicemail.
Configure Your Twilio Number
Now you just need to configure the Incoming Call webhook of your Twilio Number to use the Studio Flow you just created.
- Click the number you want to use for your voicemail in your Active Numbers here.
- Scroll down to the A CALL COMES IN dropdown in the Voice section and select Studio Flow.
- Select your new Flow in the Select a Flow dropdown to the right.
- Hit Save at the bottom, and you’ll be all set to test your app!
If everything went smoothly, you should now hear your voicemail greeting when you call your Twilio number and the voicemail you leave should be emailed to you.
(Optional) Add Transcriptions
The original version of this post did not support transcription. Follow the steps below if you would like to send the transcribed recording in your email in addition to the recording URL.
Forwarding voicemails to email with Studio, Functions, and SendGrid
You may find it useful to build additional functionality around this app. For example, you may want to forward your calls to your work number during business hours, but use the voicemail otherwise. To set something like this up, check out this Twilio Blog Post.
Samuel Eddy is a Senior Technical Support Engineer at Twilio. When he’s not helping customers build at work, he’s often building for himself, friends, or family at home. He can be reached at seddy [at] twilio.com.
Austin is a Technical Support Engineer on the Developer Support team. When he's not helping customers you can find him out in the garden or an adventure. He can be reached at apachano [at] twilio.com.
Related Posts


Related Resources
Twilio Docs
From APIs to SDKs to sample apps
API reference documentation, SDKs, helper libraries, quickstarts, and tutorials for your language and platform.
Resource Center
The latest ebooks, industry reports, and webinars
Learn from customer engagement experts to improve your own communication.
Ahoy
Twilio's developer community hub
Best practices, code samples, and inspiration to build communications and digital engagement experiences.