Build Real-Time Speech to Speech with Twilio Media Streams and NVIDIA PersonaPlex
Time to read:
June 30, 2026
Written by
Reviewed by
Voice calls don't have to be limited by language. In this tutorial, you'll learn how to build a Node.js bridge server that connects Twilio Media Streams to NVIDIA's PersonaPlex, a state-of-the-art conversational speech model, enabling low-latency, real-time translated phone calls.
Imagine a caller speaking English into their phone. Within milliseconds, the other party hears fluent Spanish. No awkward pauses, no robotic turn-taking—just a natural conversation flow that seamlessly crosses a language barrier.
In this post, I will walk through setting up an intermediate orchestration layer that bridges Twilio's telephony infrastructure with PersonaPlex's hybrid text-audio streaming protocol.
What Is NVIDIA PersonaPlex?
Before we dive into the code, let's look at what makes PersonaPlex an interesting project to explore for speech-to-speech interactions.

PersonaPlex is built on top of the duplex Moshi architecture, processing three simultaneous audio/text input streams. This means it listens while it speaks, enabling it to model real-time conversational dynamics natively and understand backchanneling ("uh-huh"). Using a Mimi-Neural Audio Codec layer to parse and generate audio pipelines concurrently, it can process user interruptions mid-sentence.
Conversational AI has historically forced a strict engineering trade-off:
- Cascaded pipelines (ASR → LLM → TTS) let you customize voices and roles, but can suffer from less than ideal latency.
- Standard Full-Duplex Models deliver more natural turn-taking but are traditionally locked into a single, fixed voice identity and role.
PersonaPlex breaks this trade-off by introducing Hybrid System Prompts. By combining a short audio sample for zero-shot voice cloning with a text prompt for behavioral role conditioning, it allows developers to dynamically customize both voice and personality on top of a low-latency framework.
Architecture of this project
The application we will build operates as an active WebSocket proxy capable of transforming telephony-safe formats into dense model-compliant token data streams:
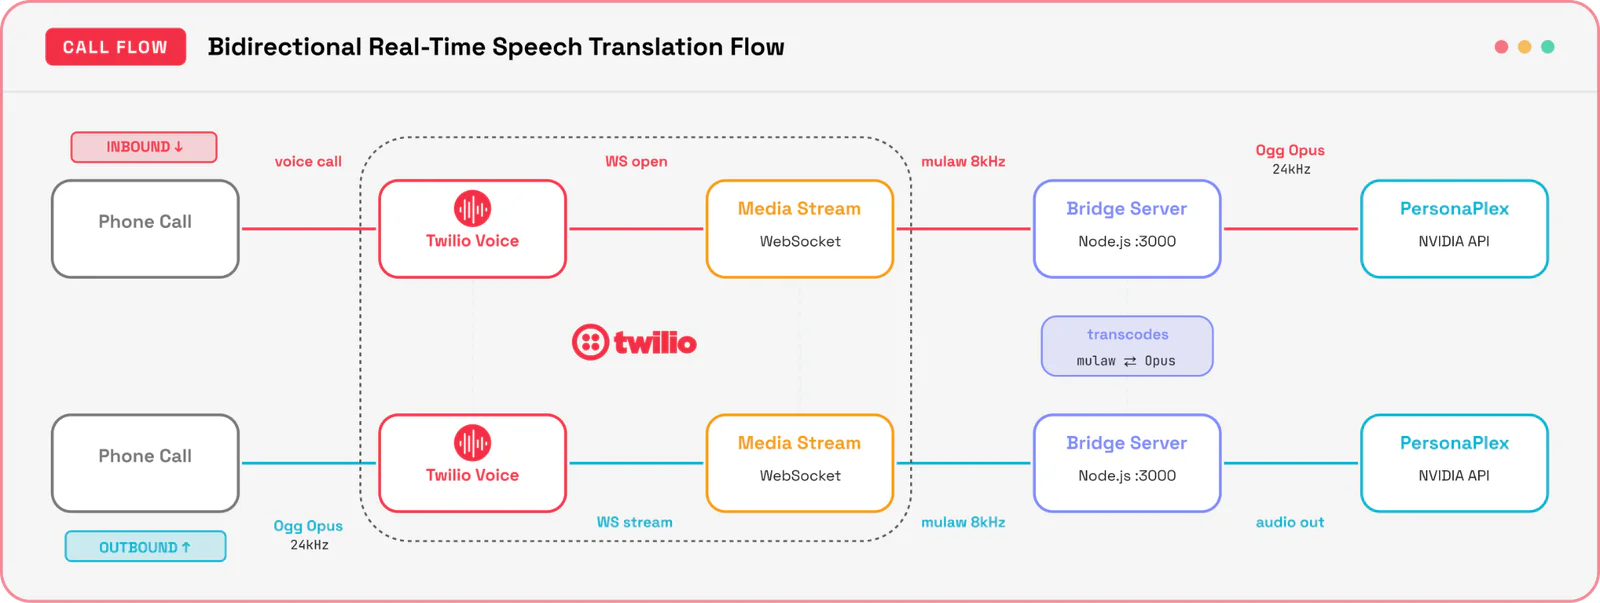
A user places a call to your Twilio phone number.
- Twilio fetches instructions from your backend and invokes a
<Stream>command, initializing a persistent outbound WebSocket connection. - The Bridge Server ingests 8kHz narrow-band mulaw telephony streams, upsamples the linear audio array to 24kHz, maps it to Ogg Opus containers, and sends it to PersonaPlex.
- PersonaPlex processes the incoming stream, executing speech-to-speech tasks in real-time.
- The Bridge Server translates the returned 24kHz Ogg Opus streaming data blocks back down into 8kHz mulaw frames, feeding them directly back into the live Twilio stream payload channel.
Tech Used
This project combines several services and tools beyond the core Twilio + PersonaPlex integration:
| Component | Details |
|---|---|
| Twilio Programmable Voice | Media Streams, Voice SDK (WebRTC), TwiML Apps |
| NVIDIA PersonaPlex | 7B parameter full-duplex speech model (GitHub) |
| RunPod GPU Cloud | On-demand GPU hosting for PersonaPlex inference |
| Node.js + TypeScript | Bridge server runtime |
| ngrok | Local tunnel for Twilio webhook callbacks |
RunPod Configuration
PersonaPlex requires GPU inference. In this example, I used RunPod to provision a pod with the following specs, however you should note that reproducing with exactly the same spec might be difficult due to machine availability.
The important aspect is to choose a GPU with the same or better specification:
| Resource | Spec |
|---|---|
| GPU | RTX 4090 x1 |
| vCPU | 16 (AMD EPYC 75F3 32-Core Processor) |
| Memory | 62 GB |
| Container disk | 20 GB |
| Volume storage | 50 GB |
RunPod Pricing (as of June 30, 2026):
| Item | Cost |
|---|---|
| Compute | Billed only while running |
| Volume storage (50 GB) | $0.010 Gb/month |
| Total (idle) | ~$0.01/hr |
The RTX 4090 provides enough VRAM (24 GB) to load PersonaPlex and run real-time inference. RunPod's TCP proxy exposes port 8998 as a public wss:// endpoint — this becomes your PERSONAPLEX_URL environment variable. Spin the pod down when you're not testing to avoid unnecessary charges!
Prerequisites
To complete this tutorial successfully, you will need:
- A Twilio Account— sign up for a free Twilio trial account if you haven't yet.
- A voice-enabled phone number managed through Twilio Programmable Voice. See how to search and purchase here.
- An active instance running PersonaPlex (accessible via an open WebSocket interface).
- We used RunPod, but you could also use another service or run it locally.
- Node.js 20+ installed on your local environment.
- ngrok (or other tunnel) installed to securely expose your local development server to the internet.
Source repository: https://github.com/chaosloth/spike-persona-plex
Project setup
This project has two deployable components: the PersonaPlex model running on a RunPod GPU, and the bridge server that connects Twilio's telephony audio to the model over WebSockets. You'll deploy PersonaPlex first, then wire up the bridge and point your Twilio phone number at it.
Clone and install the example
You’ll clone this repo https://github.com/chaosloth/spike-persona-plex, install the dependencies, then set up your Twilio account and follow the steps below.
Deploy PersonaPlex to RunPod
PersonaPlex requires a GPU with at least 24GB VRAM. I used RunPod for on-demand GPU hosting.
1. Sign up at RunPod and get an API key. Accept the PersonaPlex model license on HuggingFace and generate an access token.
2. Build and push the Docker image (note: must be linux/amd64 — RunPod doesn't run ARM):
3. Create a .env file in the project root:
4. Deploy the pod:
The script outputs a Pod ID. Your PersonaPlex WebSocket URL is: wss://<POD_ID>-8998.proxy.runpod.net
First boot takes up to 5–10 minutes to download ~14GB of model weights. Monitor progress at https://www.runpod.io/console/pods.
Run the Bridge Server
The bridge server handles audio transcoding between Twilio and PersonaPlex. It runs locally and is exposed to the internet via ngrok.
1. Install dependencies and configure the environment:
2. Create a .env file in the twilio-project/ directory:
3. Start the server
4. Expose it with ngrok (in a separate terminal):
ngrok will output a public URL like https://abc123.ngrok-free.app.
Configure Twilio
- In the Twilio Console, go to Phone Numbers, select your number.
- Under Voice Configuration, set the webhook URL to
https://<your-ngrok-url>/voice/inbound
Test It
Call your Twilio phone number and start speaking in English. If everything is configured correctly, PersonaPlex will stream its translation back to you in Spanish (or whichever language you specified in your prompt) in near-real-time. As you talk, pay close attention to the latency – you’ll notice the response time is incredibly low (~70ms speaker-switch latency), making it feel like an instant, live translation.
Try changing the prompt to one of the following to see how these dynamics warp to fit a whole new character!
You also might notice…
You also might notice that keeping PersonaPlex on task can be a challenge in itself, that’s because it uses a light weight Helium LLM. The purpose of PersonaPlex is to demonstrate the real-time speech to speech rather than deliver polished responses like current frontier models.
Sports commentator
Easily Distracted, Overly Honest AI
Mildly Snarky 1940s Noir Detective
How it Works
Below we break down how this all comes together. Take a peek at the source code to follow along.
Step 1: Connecting to the PersonaPlex Protocol
The model leverages a binary formatting scheme over WebSockets. Messages are structured using an explicit type prefix byte:
| Byte Identifier | Traffic Flow | Contextual Meaning |
|---|---|---|
| 0x00 | Server → Client | Handshake verification completed successfully |
| 0x01 | Bidirectional | Live Audio Data Frame payload string |
| 0x02 | Server → Client | Streaming raw UTF-8 textual output token strings |
Here is the helper client implementation to manage this bidirectional pipe:
Source: src/personaplex-client.ts
Step 2: Inbound and Outbound Audio Transcoding
Twilio passes streaming audio via 8000Hz Mu-Law encoding. PersonaPlex requires an exact native resolution of 24000Hz structured inside Ogg containers. Below is the interpolation logic used to shift sample rates and pack audio into valid containers:
Source: src/audio-transcoder.ts
Step 3: Managing the Session State
The runtime environment encapsulates active phone configurations in a dedicated session instance to track data parsing without crossing call audio paths:
Source: src/bridge-session.ts
Step 4: Routing Twilio Media Streams via WebSockets
When an inbound call hits your application routing layer, respond with TwiML instructions pointing toward this bridge server. Note that you could instead use Twilio Studio for the TwiML responses and keep the socket server as your gateway:
Source: src/server.ts
Deployment and testing tips
- Query Parameter Stripping: Twilio Media Streams strip regular HTTP standard query strings directly off your target WebSockets stream declarations silently. If you want to dynamically switch system roles per call, pass target definitions explicitly utilizing nested
<Parameter>elements inside your TwiML code block instead. - Trial Account Constraints: Keep in mind that a Twilio trial account can only send outbound messages or voice calls to pre-verified numbers. Make sure your destination tester target endpoints match your dashboard settings before initiating complex multi-party testing routines.
- VAD Tuning Requirements: Because full-duplex systems process audio continually, ambient environmental noise can confuse the model into generating unprompted gibberish. Deploy a solid downstream local Voice Activity Detector (VAD) layer directly on your proxy application to slice off empty transmission frames cleanly during silent intervals - or use Twilio Conversation Relay where we solved this problem for you.
Conclusion and next steps
You have successfully constructed a scalable, custom proxy server that links the structural reliability of Twilio Media Streams with the advanced contextual flexibility of NVIDIA PersonaPlex to build real-time translation for phone calls.
To take this architecture further, look into configuring auto-scaling capabilities for your translation proxy layer, or explore deep tracing parameters to log translation metrics dynamically. Want to scale up your deployment? Dive deep into the full mechanics of telephony network configurations by reviewing the official Twilio Media Streams documentation.
Sources:
- https://research.nvidia.com/labs/adlr/files/personaplex/personaplex_preprint.pdf
- https://www.twilio.com/docs/voice/media-streams
- https://github.com/chaosloth/spike-persona-plex
- https://github.com/kyutai-labs/moshi
- https://kyutai.org/blog/2025-04-30-helium/
Christopher Connolly leads the Solutions Engineering team for the Communications business at Twilio. Based in Sydney, Australia, Connolly leads the development and implementation of innovative, customer-centric strategies at Twilio. Known for delivering business-critical solutions, Connolly excels at driving growth and innovation for Twilio’s customers.
Related Posts


Related Resources
Twilio Docs
From APIs to SDKs to sample apps
API reference documentation, SDKs, helper libraries, quickstarts, and tutorials for your language and platform.
Resource Center
The latest ebooks, industry reports, and webinars
Learn from customer engagement experts to improve your own communication.
Ahoy
Twilio's developer community hub
Best practices, code samples, and inspiration to build communications and digital engagement experiences.