Add an AI Voice Assistant to a Twilio Video Room with Conversation Relay
Time to read:
August 18, 2026
Written by
Reviewed by
AI generated summary
- Add an AI assistant to a Twilio Video room to utilize patient waiting time productively.
- The AI joins as an audio participant, collecting intake information through natural conversation.
- Combines Twilio Programmable Video, Conversation Relay, and an LLM to manage real-time voice AI interactions efficiently.
This summary was generated by AI.
Add an AI Voice Assistant to a Twilio Video Room with Conversation Relay
Telehealth applications often waste patient time in empty waiting rooms before a provider joins. An AI voice assistant can use that time productively by collecting intake information: reason for visit, symptom updates, and current medications.
This tutorial shows you how to add an AI voice assistant to a Twilio Video room. The AI joins as an audio-only participant, listens to the patient speak, and responds with natural speech. The solution combines Twilio Programmable Video with Conversation Relay, a Twilio feature that manages the full complexity of real-time voice AI interactions. It handles speech-to-text transcription, text-to-speech synthesis, interruption detection, and turn-taking, all over a single WebSocket connection to your server. Your application just receives transcribed text and sends back text responses.
By the end, you'll have a working application where a patient can join a video room, interact with an AI intake assistant through natural conversation, and then be joined by a provider. The complete source code is available on GitHub if you'd like to jump ahead.
Prerequisites
Before you get started, make sure you have the following:
- A Twilio account upgraded from Trial. Sign up for an account here.
- Node.js v18 or higher installed
- npm (comes with Node.js)
- ngrok installed and authenticated
- An OpenAI API key (or another LLM provider; this tutorial uses OpenAI, but the WebSocket handler is provider-agnostic)
- A Twilio phone number (any number on your account will work)
You'll also need your Twilio API Key and API Secret. If you haven't created one yet, head to the Twilio Console API Keys page and create a new Standard key. Save both the SID (starts with SK) and the Secret.
How the architecture works
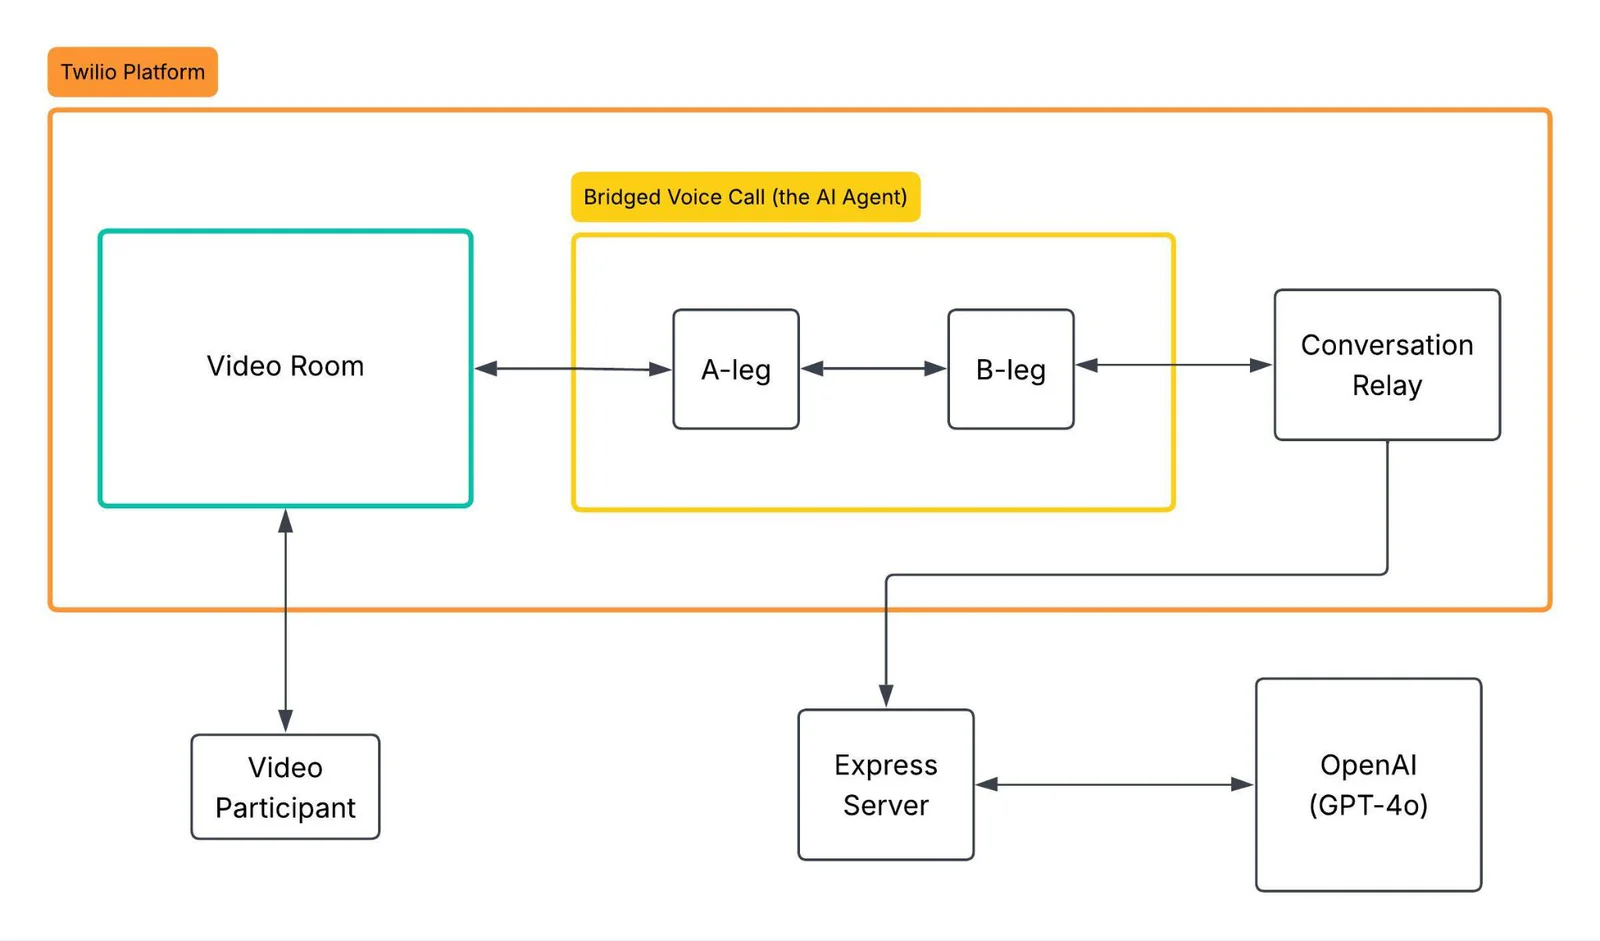
Before writing any code, it helps to understand the approach at a high level. The key insight is that Twilio Programmable Voice calls can join a Video room as audio-only participants. By creating a two-leg Voice call, you bridge the Video room to Conversation Relay: one leg sits in the room hearing (and being heard by) all participants, while the other leg connects to Conversation Relay, which streams transcribed audio to your WebSocket server and speaks the LLM's responses back. Your server just needs to handle the WebSocket messages and talk to an LLM.
Add an AI Voice Assistant to a Twilio Video Room with Conversation Relay
Telehealth applications often waste patient time in empty waiting rooms before a provider joins. An AI voice assistant can use that time productively by collecting intake information: reason for visit, symptom updates, and current medications.
This tutorial shows you how to add an AI voice assistant to a Twilio Video room. The AI joins as an audio-only participant, listens to the patient speak, and responds with natural speech. The solution combines Twilio Programmable Video with Conversation Relay, a Twilio feature that manages the full complexity of real-time voice AI interactions. It handles speech-to-text transcription, text-to-speech synthesis, interruption detection, and turn-taking, all over a single WebSocket connection to your server. Your application just receives transcribed text and sends back text responses.
By the end, you'll have a working application where a patient can join a video room, interact with an AI intake assistant through natural conversation, and then be joined by a provider. The complete source code is available on GitHub if you'd like to jump ahead.
Prerequisites
Before you get started, make sure you have the following:
- A Twilio account upgraded from Trial. Sign up for an account here.
- Node.js v18 or higher installed
- npm (comes with Node.js)
- ngrok installed and authenticated
- An OpenAI API key (or another LLM provider; this tutorial uses OpenAI, but the WebSocket handler is provider-agnostic)
- A Twilio phone number (any number on your account will work)
You'll also need your Twilio API Key and API Secret. If you haven't created one yet, head to the Twilio Console API Keys page and create a new Standard key. Save both the SID (starts with SK) and the Secret.
How the architecture works
Before writing any code, it helps to understand the approach at a high level. The key insight is that Twilio Programmable Voice calls can join a Video room as audio-only participants. By creating a two-leg Voice call, you bridge the Video room to Conversation Relay: one leg sits in the room hearing (and being heard by) all participants, while the other leg connects to Conversation Relay, which streams transcribed audio to your WebSocket server and speaks the LLM's responses back. Your server just needs to handle the WebSocket messages and talk to an LLM.
Build the app
Step 1: Set up the project
Create a new directory for your project and initialize it with npm.
Build the app
Step 1: Set up the project
Create a new directory for your project and initialize it with npm.
Install the dependencies you'll need: Express for the web server, the Twilio helper library, the OpenAI SDK, the ws package for WebSocket support, and dotenv for environment variables.
Install the dependencies you'll need: Express for the web server, the Twilio helper library, the OpenAI SDK, the ws package for WebSocket support, and dotenv for environment variables.
For development, you can optionally install nodemon to automatically restart the server when you make changes:
For development, you can optionally install nodemon to automatically restart the server when you make changes:
Open package.json and update the scripts section so that npm start runs your server:
Open package.json and update the scripts section so that npm start runs your server:
Now create a .env file in the root of your project to store your credentials. Add the following, replacing the placeholder values with your actual keys:
Now create a .env file in the root of your project to store your credentials. Add the following, replacing the placeholder values with your actual keys:
Leave TWIML_APP_SID empty for now. You'll generate it with a setup script in the next section.
Step 2: Create the TwiML App with a setup script
Conversation Relay needs a TwiML App to know where to route the B-leg of the call. Instead of creating this manually in the Twilio Console, you can write a quick script that creates it programmatically and writes the SID back into your .env file.
Create a file called setup.js in the root of your project:
Leave TWIML_APP_SID empty for now. You'll generate it with a setup script in the next section.
Step 2: Create the TwiML App with a setup script
Conversation Relay needs a TwiML App to know where to route the B-leg of the call. Instead of creating this manually in the Twilio Console, you can write a quick script that creates it programmatically and writes the SID back into your .env file.
Create a file called setup.js in the root of your project:
This script creates a TwiML App whose Voice URL points to your server's /voice-handler endpoint. When the bridge call is placed, Twilio will hit that URL to get TwiML instructions for the B-leg.
Don't run this script yet. You'll need ngrok running first, which you'll set up after the server is built.
Step 3: Build the Express server
Now for the main event. Create a file called server.js. This file will contain your Express app, the API routes for token generation and call management, and the WebSocket handler for the AI.
Start by setting up the imports and Express app:
This script creates a TwiML App whose Voice URL points to your server's /voice-handler endpoint. When the bridge call is placed, Twilio will hit that URL to get TwiML instructions for the B-leg.
Don't run this script yet. You'll need ngrok running first, which you'll set up after the server is built.
Step 3: Build the Express server
Now for the main event. Create a file called server.js. This file will contain your Express app, the API routes for token generation and call management, and the WebSocket handler for the AI.
Start by setting up the imports and Express app:
Here you're initializing Express, the Twilio client (using API Key authentication), and the OpenAI client. The express.static('public') line will serve your frontend files from a public directory.
Step 4: Generate Video access tokens
Your frontend needs a short-lived access token to connect to a Video room. Add this route to server.js:
Here you're initializing Express, the Twilio client (using API Key authentication), and the OpenAI client. The express.static('public') line will serve your frontend files from a public directory.
Step 4: Generate Video access tokens
Your frontend needs a short-lived access token to connect to a Video room. Add this route to server.js:
The access token is a short-lived credential that grants a specific user access to a specific Video room. The VideoGrant scopes the token so it can only be used for the room you specify.
Step 5: Create the TwiML endpoints
You need two TwiML endpoints: one for the A-leg (joining the Video room) and one for the B-leg (connecting to Conversation Relay).
Add both to server.js:
The access token is a short-lived credential that grants a specific user access to a specific Video room. The VideoGrant scopes the token so it can only be used for the room you specify.
Step 5: Create the TwiML endpoints
You need two TwiML endpoints: one for the A-leg (joining the Video room) and one for the B-leg (connecting to Conversation Relay).
Add both to server.js:
The /voice-handler endpoint is called by Twilio when the TwiML App is triggered. It responds with TwiML that tells Twilio to connect the call to Conversation Relay, pointing at your WebSocket URL. The welcomeGreeting attribute is what the AI will say when it first joins.
The /join-room endpoint tells the A-leg to join the Video room with the identity cr-ai-agent. Since it's joining via a Voice call, it automatically becomes an audio-only participant.
Step 6: Invite the AI agent into the room
This is where the two-leg bridge call gets created. When the frontend sends a request to invite the AI, your server places a call using the Twilio REST API.
Add the /invite-ai endpoint to server.js:
The /voice-handler endpoint is called by Twilio when the TwiML App is triggered. It responds with TwiML that tells Twilio to connect the call to Conversation Relay, pointing at your WebSocket URL. The welcomeGreeting attribute is what the AI will say when it first joins.
The /join-room endpoint tells the A-leg to join the Video room with the identity cr-ai-agent. Since it's joining via a Voice call, it automatically becomes an audio-only participant.
Step 6: Invite the AI agent into the room
This is where the two-leg bridge call gets created. When the frontend sends a request to invite the AI, your server places a call using the Twilio REST API.
Add the /invite-ai endpoint to server.js:
Let's break down what happens here:
from: Your Twilio phone number (required for any outgoing call).to: Theapp:prefix tells Twilio to route the B-leg through the specified TwiML App. Twilio will fetch TwiML from the app's Voice URL (/voice-handler), which connects to Conversation Relay.url: The TwiML URL for the A-leg, which joins the Video room.
The result is a single bridged call where one end is in the Video room and the other end is connected to Conversation Relay.
Step 7: Add cleanup logic
When a participant leaves the room, you'll want to end the bridge call and optionally complete the Video room. Add a /cleanup endpoint:
Let's break down what happens here:
from: Your Twilio phone number (required for any outgoing call).to: Theapp:prefix tells Twilio to route the B-leg through the specified TwiML App. Twilio will fetch TwiML from the app's Voice URL (/voice-handler), which connects to Conversation Relay.url: The TwiML URL for the A-leg, which joins the Video room.
The result is a single bridged call where one end is in the Video room and the other end is connected to Conversation Relay.
Step 7: Add cleanup logic
When a participant leaves the room, you'll want to end the bridge call and optionally complete the Video room. Add a /cleanup endpoint:
Step 8: Handle the AI WebSocket
This is where Conversation Relay sends transcribed speech and where you respond with LLM-generated text. Add the WebSocket server at the bottom of server.js:
Step 8: Handle the AI WebSocket
This is where Conversation Relay sends transcribed speech and where you respond with LLM-generated text. Add the WebSocket server at the bottom of server.js:
Conversation Relay sends several message types over the WebSocket:
connected: The session has started. You get asessionIdfor logging.prompt: ContainsvoicePrompt, which is the transcribed speech from the room. This is where you call your LLM and send the response back.interrupt: The user started speaking while the AI was still responding. You can use this to cancel in-progress LLM calls if needed.disconnected: The session ended.
To respond, you send a JSON message with type: 'text' and a token field containing the text you want spoken. Conversation Relay handles the text-to-speech conversion automatically.
Note: This tutorial uses OpenAI's gpt-4o-mini model, but the WebSocket handler is provider-agnostic. You can swap in Anthropic's Claude, Google's Gemini, or any other LLM by replacing the openai.chat.completions.create call with your provider's equivalent.
Step 9: Build the frontend
Create a public directory and add an index.html file inside it. This will be the interface your users interact with.
Conversation Relay sends several message types over the WebSocket:
connected: The session has started. You get asessionIdfor logging.prompt: ContainsvoicePrompt, which is the transcribed speech from the room. This is where you call your LLM and send the response back.interrupt: The user started speaking while the AI was still responding. You can use this to cancel in-progress LLM calls if needed.disconnected: The session ended.
To respond, you send a JSON message with type: 'text' and a token field containing the text you want spoken. Conversation Relay handles the text-to-speech conversion automatically.
Note: This tutorial uses OpenAI's gpt-4o-mini model, but the WebSocket handler is provider-agnostic. You can swap in Anthropic's Claude, Google's Gemini, or any other LLM by replacing the openai.chat.completions.create call with your provider's equivalent.
Step 9: Build the frontend
Create a public directory and add an index.html file inside it. This will be the interface your users interact with.
Create public/index.html with the HTML structure and styles:
Create public/index.html with the HTML structure and styles:
The page loads the Twilio Video JS SDK from the CDN. The UI consists of three buttons (Join, Invite AI, Leave), a status bar, a container for participant video tiles, and a log panel.
Now add the JavaScript. Still inside public/index.html, below the SDK script tag, add:
The page loads the Twilio Video JS SDK from the CDN. The UI consists of three buttons (Join, Invite AI, Leave), a status bar, a container for participant video tiles, and a log panel.
Now add the JavaScript. Still inside public/index.html, below the SDK script tag, add:
These are your utility functions and state variables. The room variable will hold the Twilio Video Room instance, aiInvited tracks whether the AI has been invited, and bridgeCallSid stores the call SID so you can end it during cleanup.
Next, add the functions to manage participant tiles:
These are your utility functions and state variables. The room variable will hold the Twilio Video Room instance, aiInvited tracks whether the AI has been invited, and bridgeCallSid stores the call SID so you can end it during cleanup.
Next, add the functions to manage participant tiles:
These functions create a visual tile for each participant, attach their audio and video tracks, and clean up when someone leaves. Notice the guard at the top of addParticipantTile: it prevents showing the AI agent's tile before you've explicitly invited it.
Now add the room join logic:
These functions create a visual tile for each participant, attach their audio and video tracks, and clean up when someone leaves. Notice the guard at the top of addParticipantTile: it prevents showing the AI agent's tile before you've explicitly invited it.
Now add the room join logic:
This fetches a token from your server, creates local audio and video tracks, connects to the room, and sets up event listeners for participants joining and leaving.
Finally, add the AI invite and leave handlers:
This fetches a token from your server, creates local audio and video tracks, connects to the room, and sets up event listeners for participants joining and leaving.
Finally, add the AI invite and leave handlers:
The Invite AI Agent button sends a POST to /invite-ai, which triggers the bridge call. After a brief moment, the AI agent appears as a participant in the room. The Leave Room button calls /cleanup to end the bridge call and complete the Video room, then disconnects the local participant.
Run and test the application
Now let's put it all together. Open a terminal and start ngrok to create a public URL for your local server:
The Invite AI Agent button sends a POST to /invite-ai, which triggers the bridge call. After a brief moment, the AI agent appears as a participant in the room. The Leave Room button calls /cleanup to end the bridge call and complete the Video room, then disconnects the local participant.
Run and test the application
Now let's put it all together. Open a terminal and start ngrok to create a public URL for your local server:
Copy the HTTPS URL (it will look something like https://abc123.ngrok.app) and paste it as the SERVER_URL value in your .env file.
Next, run the setup script to create your TwiML App:
Copy the HTTPS URL (it will look something like https://abc123.ngrok.app) and paste it as the SERVER_URL value in your .env file.
Next, run the setup script to create your TwiML App:
You should see output confirming the TwiML App was created and the TWIML_APP_SID was written to your .env file.
Now start the server:
You should see output confirming the TwiML App was created and the TWIML_APP_SID was written to your .env file.
Now start the server:
Open your browser and navigate to http://localhost:3000. You should see the application with three buttons.
- Click Join Room. Your browser will ask for camera and microphone permissions. After granting them, you'll see your video feed appear.
- Click Invite AI Agent. After a moment, a new participant tile labeled
cr-ai-agentwill appear. You'll hear the AI greet you with "Hello, how can I help you today?" - Speak naturally. The AI will listen, transcribe your speech, process it through GPT-4o-mini, and respond with spoken audio.
- Click Leave Room when you're done.
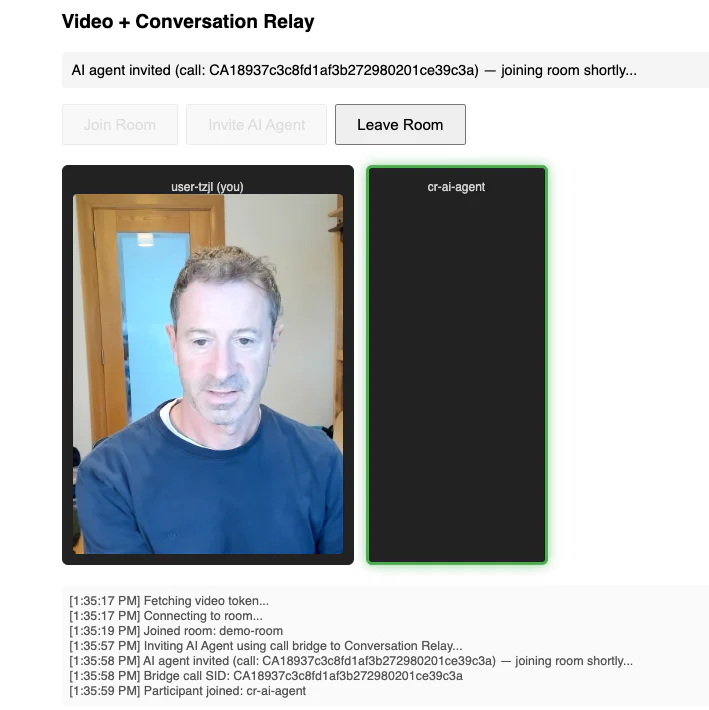
Open your browser and navigate to http://localhost:3000. You should see the application with three buttons.
- Click Join Room. Your browser will ask for camera and microphone permissions. After granting them, you'll see your video feed appear.
- Click Invite AI Agent. After a moment, a new participant tile labeled
cr-ai-agentwill appear. You'll hear the AI greet you with "Hello, how can I help you today?" - Speak naturally. The AI will listen, transcribe your speech, process it through GPT-4o-mini, and respond with spoken audio.
- Click Leave Room when you're done.
Troubleshooting
If things aren't working as expected, here are some common issues:
- AI agent never joins the room. Check that your
SERVER_URLin .env matches your current ngrok URL. Ngrok generates a new URL each time you restart it, so you'll need to update .env and re-runnode setup.jsto update the TwiML App's Voice URL. - "invite-ai error" in the server console. Verify that
TWIML_APP_SIDis populated in your .env file. If it's empty, run node setup.js again. - AI joins but doesn't respond to speech. Confirm your
OPENAI_API_KEYis valid and has available credits. Check the server console for "OpenAI error" messages. - Browser denies camera/microphone access. Ensure you're accessing the app via
localhostor an HTTPS URL. Browsers block media access on plain HTTP. - "Cannot connect to room" error. Your Twilio API Key may not have Video permissions, or the key/secret pair may be incorrect. Double-check the values in .env against the Twilio Console.
Conclusion
Congratulations! You've built a video application where an AI voice assistant joins a Twilio Video room via a bridged Voice call and Conversation Relay. The same pattern works for any scenario where you want an AI participant in a video call, from customer support triage to automated meeting summaries. To explore further, try customizing the system prompt for a specific use case, swapping in a different LLM provider, or adding a real-time transcript to the UI. The complete source code is available at https://github.com/donaltoomey/twilio-video-cr-demo.
Additional resources
Troubleshooting
If things aren't working as expected, here are some common issues:
- AI agent never joins the room. Check that your
SERVER_URLin .env matches your current ngrok URL. Ngrok generates a new URL each time you restart it, so you'll need to update .env and re-runnode setup.jsto update the TwiML App's Voice URL. - "invite-ai error" in the server console. Verify that
TWIML_APP_SIDis populated in your .env file. If it's empty, run node setup.js again. - AI joins but doesn't respond to speech. Confirm your
OPENAI_API_KEYis valid and has available credits. Check the server console for "OpenAI error" messages. - Browser denies camera/microphone access. Ensure you're accessing the app via
localhostor an HTTPS URL. Browsers block media access on plain HTTP. - "Cannot connect to room" error. Your Twilio API Key may not have Video permissions, or the key/secret pair may be incorrect. Double-check the values in .env against the Twilio Console.
Conclusion
Congratulations! You've built a video application where an AI voice assistant joins a Twilio Video room via a bridged Voice call and Conversation Relay. The same pattern works for any scenario where you want an AI participant in a video call, from customer support triage to automated meeting summaries. To explore further, try customizing the system prompt for a specific use case, swapping in a different LLM provider, or adding a real-time transcript to the UI. The complete source code is available at https://github.com/donaltoomey/twilio-video-cr-demo.
Additional resources

Related Resources
Twilio Docs
From APIs to SDKs to sample apps
API reference documentation, SDKs, helper libraries, quickstarts, and tutorials for your language and platform.
Resource Center
The latest ebooks, industry reports, and webinars
Learn from customer engagement experts to improve your own communication.
Ahoy
Twilio's developer community hub
Best practices, code samples, and inspiration to build communications and digital engagement experiences.