How to Confirm Phone Number Ownership with Lookup Identity Match in Python

August 28, 2026
Written by

Identity Match for phone numbers in the United States and Brazil doesn't require carrier registration and approval. Phone numbers from Canada, France, Germany, Italy, the Netherlands, Spain, and the United Kingdom require additional carrier registration and approval. Learn more about the carrier approval process here.

There's a lot you can learn from a phone number. Lookup Identity Match uses phone numbers as an identity to provide a zero-knowledge match against authoritative data sources like mobile carrier records. This allows you to build real-time confirmation that you're interacting with a real person linked to the phone number provided.
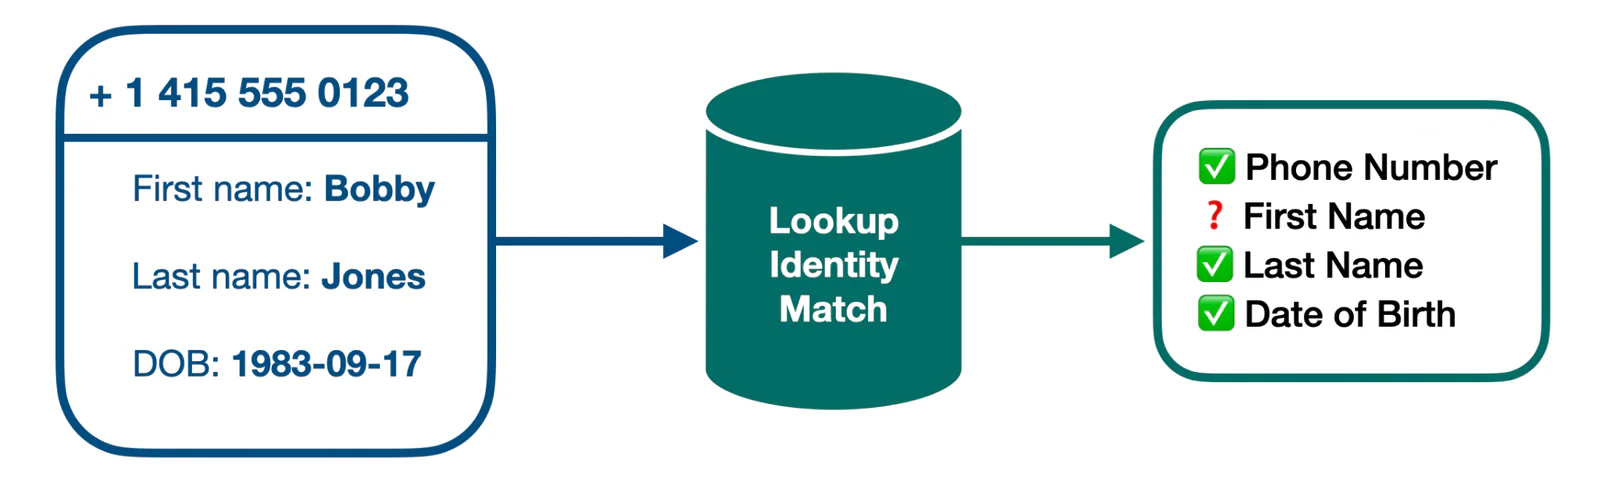
Diagram showing identity lookup with phone number, first name, last name, and date of birth verification.

Use Identity Match to prevent fake accounts and improve trust with legitimate, unique users. Customers can use Identity Match at sign up, login, and even during account changes or checkout. Best of all, Identity Match happens seamlessly in the background, with lower costs and friction than alternatives like credit bureau and document verification used to satisfy Anti-Money Laundering (AML) rules.

This blog post will show you how to use Twilio Lookup Identity Match to confirm phone number ownership and reduce sign up fraud.

Here's a sneak peak at what the Identity Match request looks like. Learn more about accepted parameters and coverage in the documentation.

curl -X GET "https://lookups.twilio.com/v2/PhoneNumbers/+14159929960\
?Fields=identity_match\
&FirstName=Jane\
&LastName=Doe\
&AddressLine1=321+Main+Street\
&City=Kingston\
&State=NY\
&PostalCode=12401\
&AddressCountryCode=US\
&DateOfBirth=19860414" \
-u $TWILIO_ACCOUNT_SID:$TWILIO_AUTH_TOKEN

Programming Language Support

This tutorial is geared towards Python developers, but you can find other languages below:

Prerequisites

To code along with this post you'll need:

  1. A Twilio account. Sign up or sign in.
  2. Submit this form for Identity Match approval (Outside the US and Brazil only; takes 2-4 weeks)
  3. Python 3.14 ( download)
  4. pip

Build the app

This post builds a simple Flask application with a phone number input form as a starting point, but you could use your own sign up form instead. The base form relies on the excellent intl-tel-input plugin for collecting phone numbers in E.164 format

You can find the source code on GitHub.

Step 1: Set up the base project

Create a new project directory:

mkdir identity-match && cd identity-match

Create a requirements.txt file:

flask==3.1.3 
twilio==9.11.0 
python-dotenv==1.2.3

Create and activate a virtual environment:

python3 -m venv .venv && source .venv/bin/activate

Install the dependencies:

pip install -r requirements.txt

Create a .env file and add your Twilio Account SID and Auth Token; you can find both on the front page of your Twilio Console:

TWILIO_ACCOUNT_SID=your_account_sid_here 
TWILIO_AUTH_TOKEN=your_auth_token_here

Create app.py with the following:

import os
from dotenv import load_dotenv
from flask import Flask, jsonify, request, send_from_directory
from twilio.rest import Client
load_dotenv()
app = Flask(__name__, static_folder="static")
@app.route("/")
def index():
    return send_from_directory("static", "index.html")
@app.route("/lookup", methods=["POST"])
def lookup():
    phone = request.form.get("phone", "")
    if not phone:
        return jsonify({"success": False, "error": "Missing parameter; please provide a phone number."}), 400
    try:
        client = Client(os.environ["TWILIO_ACCOUNT_SID"], os.environ["TWILIO_AUTH_TOKEN"])
        result = client.lookups.v2.phone_numbers(phone).fetch()
        success = result.valid
        if not success:
            raise ValueError(f"Invalid phone number {phone}: {result.validation_errors}")
        return jsonify({"success": True})
    except Exception as e:
        return jsonify({"success": False, "error": str(e)}), 400
if __name__ == "__main__":
    app.run(debug=True)

Create a static directory and add static/index.html:

<!DOCTYPE html>
<html lang="en">
  <head>
    <title>International Telephone Input</title>
    <meta name="viewport" content="width=device-width, initial-scale=1" />
    <link rel="stylesheet" href="https://twilio-labs.github.io/function-templates/static/v1/ce-paste-theme.css" />
    <link rel="stylesheet" href="styles.css" />
    <link rel="stylesheet" href="https://cdn.jsdelivr.net/npm/intl-tel-input@23.1.0/build/css/intlTelInput.css" />
  </head>
  <body>
    <div class="page-top">
      <main>
        <div class="content">
          <header>
            <h1>International Telephone Input</h1>
            <p class="subtitle">
              Validate phone numbers with automatic country detection and the
              <a href="https://twilio.com/docs/lookup/api">Twilio Lookup API</a>
            </p>
          </header>
          <section class="card">
            <h2>Try it out</h2>
            <form id="lookup">
              <div class="form-field">
                <label for="phone">Enter your phone number</label>
                <input id="phone" type="tel" name="phone" placeholder="(201) 555-0123" />
              </div>
              <div class="actions">
                <input type="button" class="btn" value="Verify Phone Number" />
              </div>
            </form>
            <div class="alert alert-info" style="display: none"></div>
            <div class="alert alert-error" style="display: none"></div>
          </section>
        </div>
      </main>
    </div>
    <script src="https://cdn.jsdelivr.net/npm/intl-tel-input@23.1.0/build/js/intlTelInput.min.js"></script>
    <script>
      const input = document.querySelector("#phone");
      const iti = window.intlTelInput(input, {
        initialCountry: "auto",
        geoIpLookup: function (callback) {
          fetch("https://ipapi.co/json")
            .then((res) => res.json())
            .then((data) => callback(data.country_code))
            .catch(() => callback("us"));
        },
        utilsScript: "https://cdn.jsdelivr.net/npm/intl-tel-input@23.1.0/build/js/utils.js",
      });
      const info = document.querySelector(".alert-info");
      const error = document.querySelector(".alert-error");
      document.querySelector(".btn").addEventListener("click", function () {
        info.style.display = "none";
        error.style.display = "none";
        if (!iti.isValidNumber()) {
          error.style.display = "";
          error.innerHTML = "Invalid phone number.";
          return;
        }
        const data = new URLSearchParams();
        data.append("phone", iti.getNumber());
        fetch("/lookup", {
          method: "POST",
          body: data,
        })
          .then((res) => res.json())
          .then((json) => {
            if (json.success) {
              info.style.display = "";
              info.innerHTML = `Phone number in E.164 format: <strong>${iti.getNumber()}</strong>`;
            } else {
              error.style.display = "";
              error.innerHTML = "This phone number could not be validated. Please check and try again.";
            }
          })
          .catch((err) => {
            error.style.display = "";
            error.innerHTML = `Something went wrong: ${err.message}`;
          });
      });
    </script>
  </body>
</html>

Also download static/styles.css from the completed project on GitHub and save it to your static directory.

Test out the project by running flask run, you should be able to open http://localhost:5000 and see a phone number input form.

Identity match needs information about the phone number owner to match against. Parameters can be any combination of name, address, national ID or date of birth.

This example is going to use first and last name, so you need to start by making sure your form has fields to collect those separately:

Open static/index.html file and replace everything inside the <form> tags with the following:

<div>
  <label for="firstName">First name:</label>
  <input id="firstName" type="text" name="firstName">
</div>
<div>
  <label for="lastName">Last name:</label>
  <input id="lastName" type="text" name="lastName">
</div>
<div>
  <label for="phone">Phone number:</label>
  <input id="phone" type="tel" name="phone">
</div>
<input type="button" class="btn" value="Verify" />

This adds a first name and last name input in addition to the phone number input. Further down in index.html in the script section, add the following code under const data = … to extract the name input values.

data.append("firstName", document.getElementById("firstName").value);
data.append("lastName", document.getElementById("lastName").value);

Then, head over to app.py file to make use of the data and call the Lookup Identity Match API. The existing code already calls the basic Lookup API for formatting and validation, so you need to add the additional data parameters to tell the API to use the Identity Match package.

Add first_name and last_name to the form data extraction after the phone variable:

first_name = request.form.get("firstName", "") 
last_name = request.form.get("lastName", "")

Then, update the .fetch() call to pass the Identity Match fields:

result = client.lookups.v2.phone_numbers(phone).fetch(
    fields="identity_match",
    first_name=first_name,
    last_name=last_name,
)

Step 3: Interpret the results of a Lookup Identity Match response

After calling the Lookup API, you need to decide what to do with the information in the response. Here's what the identity match portion of a sample response looks like:

{
  "first_name_match": "exact_match",
  "last_name_match": "high_partial_match",
  "address_lines_match": "no_match",
  "city_match": "no_match",
  "state_match": "high_partial_match",
  "postal_code_match": "no_data_available",
  "address_country_match": "exact_match",
  "national_id_match": null,
  "date_of_birth_match": "exact_match",
  "summary_score": 90,
  "error_code": null,
  "error_message": null
},

Possible responses include exact_match, no_match, and no_data_available. Name and address fields also support partial matches. Learn more about match scores in the documentation. The API will respond null if you don't provide an input to match on.

This application is only looking at name matches and will consider the match a success if it's an exact match or high partial match (e.g. Kelly instead of Kelley – happens all the time).

Back in app.py, replace success = result.valid and the if not success block with the following:

fnm = result.identity_match.get("first_name_match")
lnm = result.identity_match.get("last_name_match")
match_values = ("exact_match", "high_partial_match")
success = (
    result.valid
    and fnm in match_values
    and lnm in match_values
)
resp_body = {
    "success": success,
    "msg": f"First name is {fnm}. Last name is {lnm}",
}

Then replace return jsonify({"success": True}) with:

return jsonify(resp_body)

Finally, make two small changes to display the response message in the index.html file. Replace the inside of the if (json.success) { block with:

info.style.display = ""; 
info.innerHTML = json.msg;

And since you're no longer only checking the phone number, update the error message line (error.innerHTML) in the else block a few lines below:

error.innerHTML = "Cannot register with the information provided. Please ensure you're using a phone number you own."

Run the application

Navigate back to your terminal, and restart the application with flask run (enter CTRL + C first if it's still running). Now head back over to http://localhost:5000 and test it out!!
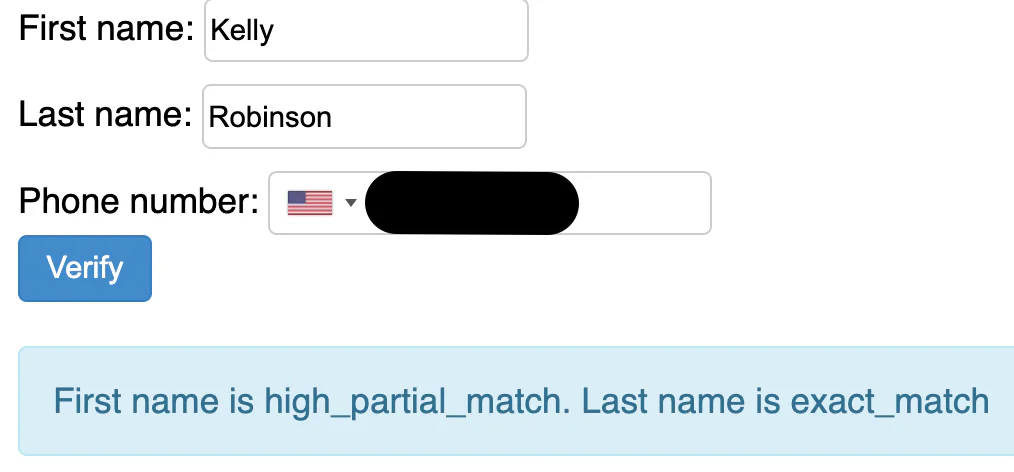
A form showing first name as Kelly, last name as Robinson, and phone number partially hidden.

Next steps for identity verification

You can extend your application with other Lookup packages like Line Type Intelligence, SIM swap detection and more. Check out our documentation to learn more about what's possible with the Lookup API.

Another way to prevent invalid phone numbers is to do phone verification - we also have an API for that! I can't wait to see what you build and secure.