Simply Business Revamps Their Call Center With Twilio TaskRouter
Time to read:
July 28, 2016
Written by
This post is part of Twilio’s archive and may contain outdated information. We’re always building something new, so be sure to check out our latest posts for the most up-to-date insights.

Simply Business is the UK’s leading business insurance broker, protecting over 300,000 businesses and landlords in the UK. When their customers call in, they want to make sure they have the best experience possible — no long hold times, or repeating the same information over and over. To build a better customer experience, they built a better call center using Twilio TaskRouter. In the following post, originally published on Simply Business’s blog here.
Lukas Oberhuber, Chief Technology Officer of Simply Business will talk about how they scaled their call center for success at SIGNAL London on September 20th. Grab your tickets here
Building A Scalable TaskRouter Powered Call Center
At Simply Business, we are currently working on a project to replace our existing call centre with Twilio’s TaskRouter and Voice APIs.
This project is very different from our normal insurance-related applications and we encountered a few problems we usually don’t face, mostly around how to setup continuous integration test and we would like to share our experience with you.
We didn’t come up with the final solution in a day. We started off by automating a simple user journey scenario, then iterated over our process to the point that it could be fully automated on Semaphore CI, an external Continuous Integration (CI) service.
Just to give you an idea of how our application works, the below diagram is the modified version of how our frontend, backend, and Twilio work together with end users and and our call centre consultants (who act as the Worker in Twilio’s task router terminology).
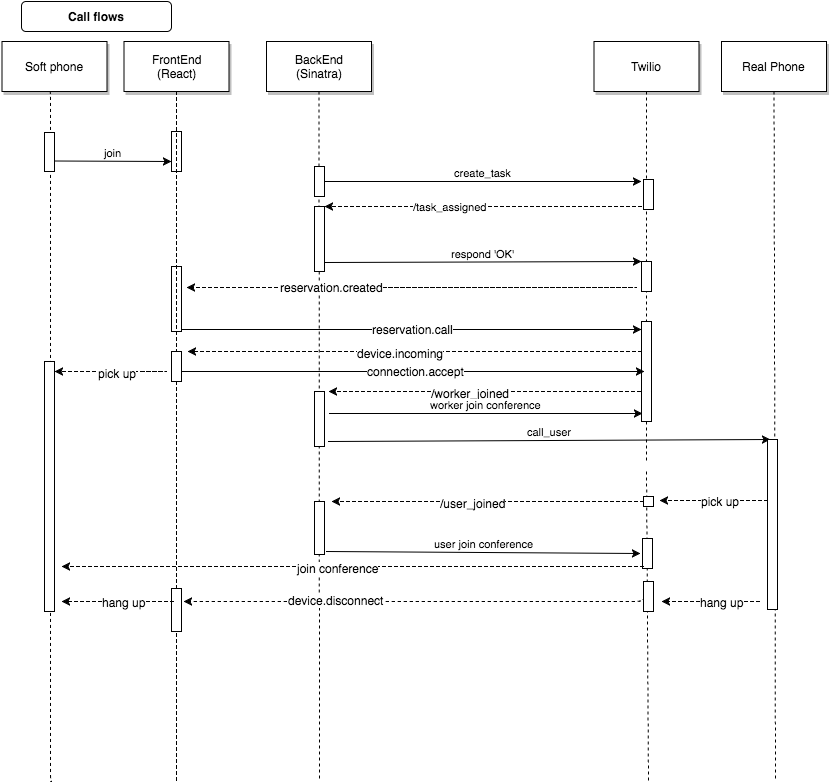
- Our application sends a task to Twilio
- Twilio calls back our backend /task_assigned
- Once acknowledged, Twilio sends WebSocket event to frontend reservation.created
- Once receiving the event on frontend, we call Worker.
- Worker receives the call via frontend Soft phone (WebRTC encapsulated by Twilio.Device JS object)
- Twilio calls back our backend /worker_joined and connects to a conference.
- Once worker joins, backend calls user’s real phone.
- User picks it up
- Twilio calls back our backend (/user_joined) and connects to the conference.
- We use sinatra.rb for a simple backend service and React.js for building Single Page App (SPA)
.
Before the user and worker join the same conference to start the conversation, we have to send many messages back and forth between our application and Twilio. As you can see, the core logic of our application is tightly integrated with the Twilio environment.
Testing Integration Made Easier
We wanted to have a set of integration tests which give us the confidence that our code integrates with Twilio properly every time we deploy to production environment.
Over the course of three months, we improved our configuration to remove repetitive tasks a bit by bit. Then one day, one of our engineers Peter said “Actually, we could just put this test onto a CI environment”. He spent a couple of hours working on this and it just worked!
We will look back how we reached this point in three steps
1. Hop
2. Step
3. Jump.
Hop
Hop is your first step to start writing local integration tests.
Create a separate environment for an integration test that hits a third party endpoint.
As a developer you want to be able perform end to end testing without mocks, so you can be sure the system is working as you expect it to.
Our test will avoid mocks, and will actually hit the third party Twilio endpoint. Our spec helper will run the full end to end test if we run it with the #integration tag.
There are a few things to point out in this code snippet
- config.filter_run_excluding integration: true will exclude #integration tag from normal RSpec call so that it is excluded from CI environment.
- WebMock.disable_net_connect disable external connection by default.
- We enable MyApp.fake_connection! to mock the behavior of Twilio Ruby gem like follows (alternatively you can use VCR which r ecords your HTTP request and response).
Then for #integration tag,
- We run WebMock.allow_net_connect! allowing tests to hit external service.
- Swap Capybara.javascript_driver to :selenium_chrome so that it runs the test on a real browser rather than the default headless browser.
Assert Events From Twilio Within Your Browser
Now that we’ve gotten a basic integration environment configured, let’s move on to write a simple feature that allows that Worker to receives a new Task and calls a user, then hangs up, so that the worker is ready to pick up another call.
We use Turnip, which allows you to write tests in Gherkin format and run them through your RSpec environment.
Any methods in MyApp are server side REST API calls to Twilio server so that we can ensure the certain state of TaskRouter. MyApp.clear_tasks truncate any existing Task while MyApp.update_worker_activity ensures that the Worker is in certain Activity state.
Anything happening on Twilio TaskRouter can be easily asserted by calling Twilio REST Ruby gem but we did not do that as checking the Twilio Activity state is not the representation of what users see.
Instead, we assert front-end behaviors in two different ways.
This is one of the typical tactics to assert an event on the client side by assigning QA-specific ID into the DOM.
Once the ID is specified, you can use a normal matcher to wait until Gone Home appears on the specific DOM you are interested in (and Capybara is clever enough to wait for the element to appear).
However, how do you know that your headset is actually connected via WebRTC? If it’s disconnected it may not be obvious.
For peace of mind, we’ll evaluate Twilio.Device.status to grab the internal state of the JS object.
Unlike the first approach, this method does not wait for the desired status to appear. Thus, you need to write your logic to loop until the status changes to the one you expected.
Get task created callback from Twilio
We’re almost done with automation our intergration test. Before we assert all the events, we have to send a Task to Twilio.
Here’s how we create a new Task
Our entire infrastructure consists of multiple applications and we implement evented architecture to send one event from one system to another using RabbitMQ. RabbitFeed is a Ruby gem developed by our very own joshuafleck and it provides a nice DSL to define event consumer and publisher, though the usage is out of scope (Check out this and this blog post to find out more detail).
Once the event is published, our app consumes the event and runs MyApp.create_task to create a task.
Once a new Task is created, you need to configure so that Twilio can call back your local machine. You can either use ssl tunnel through an existing AWS instance (in our environment, we can easily create integration instance for each developer) or ngrok, a freemium service to provide dynamically assigned public url (eg: akvk1c.ngrok.com).
We initially choose the ssl tunnel because it gave you a static URL, but we switched to ngrok because we wanted to have dedicated URL endpoint not only per developer but also for different environment (such as dev, test, and integration).
Another thing worth noting about our custom setting is that we have subaccounts not only per environment but also per developer. If you have 6 developers on your team, it needs a total of 21 subaccounts.
- (dev, test, integration ) * number of developers = 3 env * 6 engineers = 18
- integration , staging, production for system account = 3
Thanks to these changes, our #integration features launch browser and do real end to end testing with Twilio.
The downside is that you still have to be part of the test suite to run certain tasks such as the following:
- Click “Allow” to use microphone.
- Pick up phones every time a new Task is assigned.
- Change the task router callback url every time ngrok reallocates a new URL (which happens infrequently).
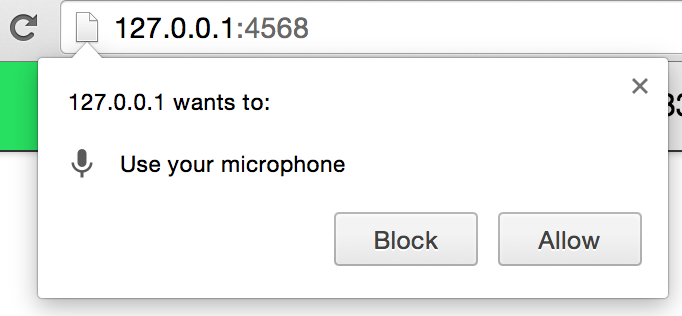
Our second step (Step!!) was focused on eliminating these nuisances: (1) use-fake-ui-for-media-stream and (2) use-fake-device-for-media-stream
The first one, use-fake-ui-for-media-stream, is relatively easy to get rid of. Let’s go back to our
spec_helper.rb and change our driver setting slightly.
These extra settings will fake connecting to browser microphone — you no longer receive ‘allow this app to access microphone’ popups (see here for a more detailed explanation). As an added bonus, this option enables us to run the test on a machine which does not have sound card and microphone. This is one step towards moving these tests into an external CI environment.
Automatic answer by TwiML
While (1) only happens once per test suite, (2) happened multiple times across one test run, and the number kept growing as our integration scenarios increased.
- Scenario: Worker hangs up
- Scenario: User hangs up
- Scenario: Call timeouts
- Scenario: Call fails due to busy
- Scenario: Call fails due to immediate hangup
The problem is not just taking many calls, but you also have to pay attention to test runner logs to be aware which scenarios you are in hence you have to act differently (eg: you hang up real phone for User hang up scenario while you wait tests to hangup for Worker hang up scenario).
To make matters worse, we have a QA engineer who worked abroad and it was too costly for him to pick up his test call. Hence every time he ran a test, it was calling one of our London engineers’ numbers. It’s not difficult to imagine how disruptive this could become.
This is where Twilio’s TwiML comes handy.
As you know, Twilio provides its own markup language for Interactive Voice Response (IVR). The above example will wait 10 seconds, say something, then hangup.
You can create multiple TwiML endpoints for each scenario, serve the XML somewhere (or use third party TwiML paste bin called TwiMLbin), then register each url to Twilio incoming numbers.
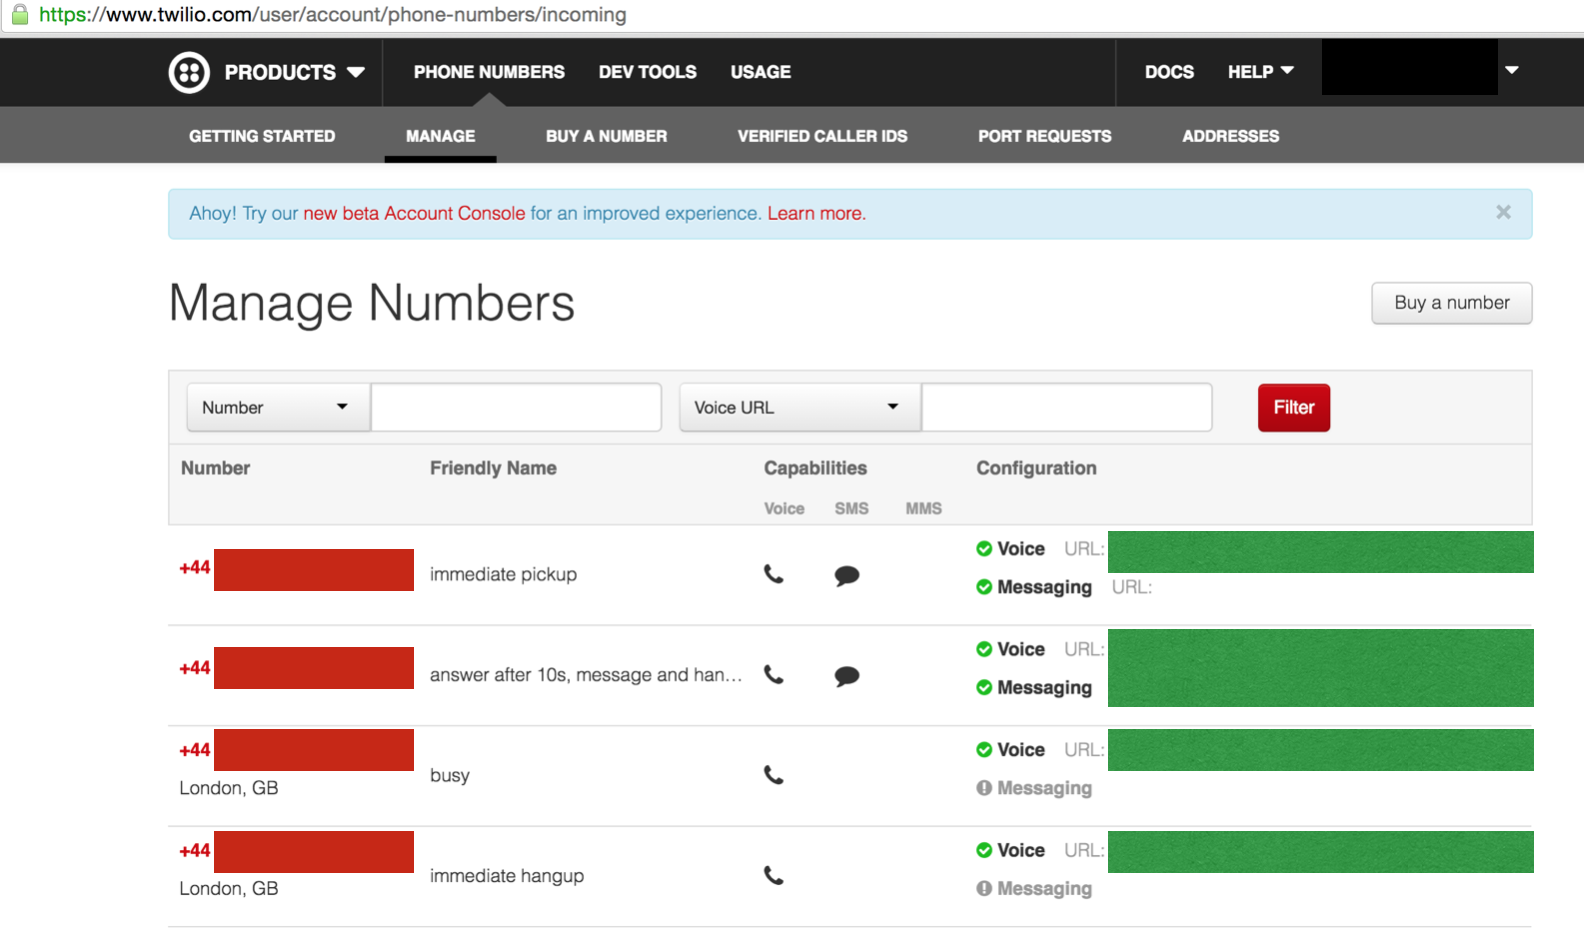
When we tried this approach, we were initially worried about the phone lines becoming busy if two tests called the same number at exactly the same time. This was not the case. It was great news because we have 21 subaccounts and did not want to set multiple incoming numbers per every subaccount. You can set these once on your master account and that’s it!
Dynamically detect ngrok url.
Solving (1) and (2) problems allowed us to run automated test almost “Hands free”, except for the times when ngrok URL changes (eg: it will change the URL if you restart ngrok).
The good news is that ngrok has API endpoints (default at localhost:4040) and you can programmatically obtain up to date ngrok url there.
So we created the following ruby module that starts up ngrok (either in port 3000 or 3001), enquire its url via API endpoint (4040 or 4041), then injects the url as a TaskRouter endpoint. This is invoked only when we start our application using foreman.
You can start ngrok per environment with NgrokRunner.start_for(@env).
Once started, you can access to the ngrok url with NgrokRunner.url(@env)
You may wonder what is test_integration environment in the source code.
That’s a special environment we inject only when you run test with #integration tag.
This is how you configure the setting at your spec_helper.rb
Jump!
Thanks to our script to dynamically detect ngrok URL, we unblocked the biggest hurdle of running callback tests on third party CI environment such as Semaphore CI where we have limited capability to customise their settings.
What else is left? Actually, not much. We initially thought that installing the Chrome executable into Semaphore would be challenging, but it turned out that it is already installed according to their website.
So the only things you still have left to install are ngrok and chrome driver. They can be installed using npm. We created a file called script/ci and configured Semaphore to run the file as part of the test.
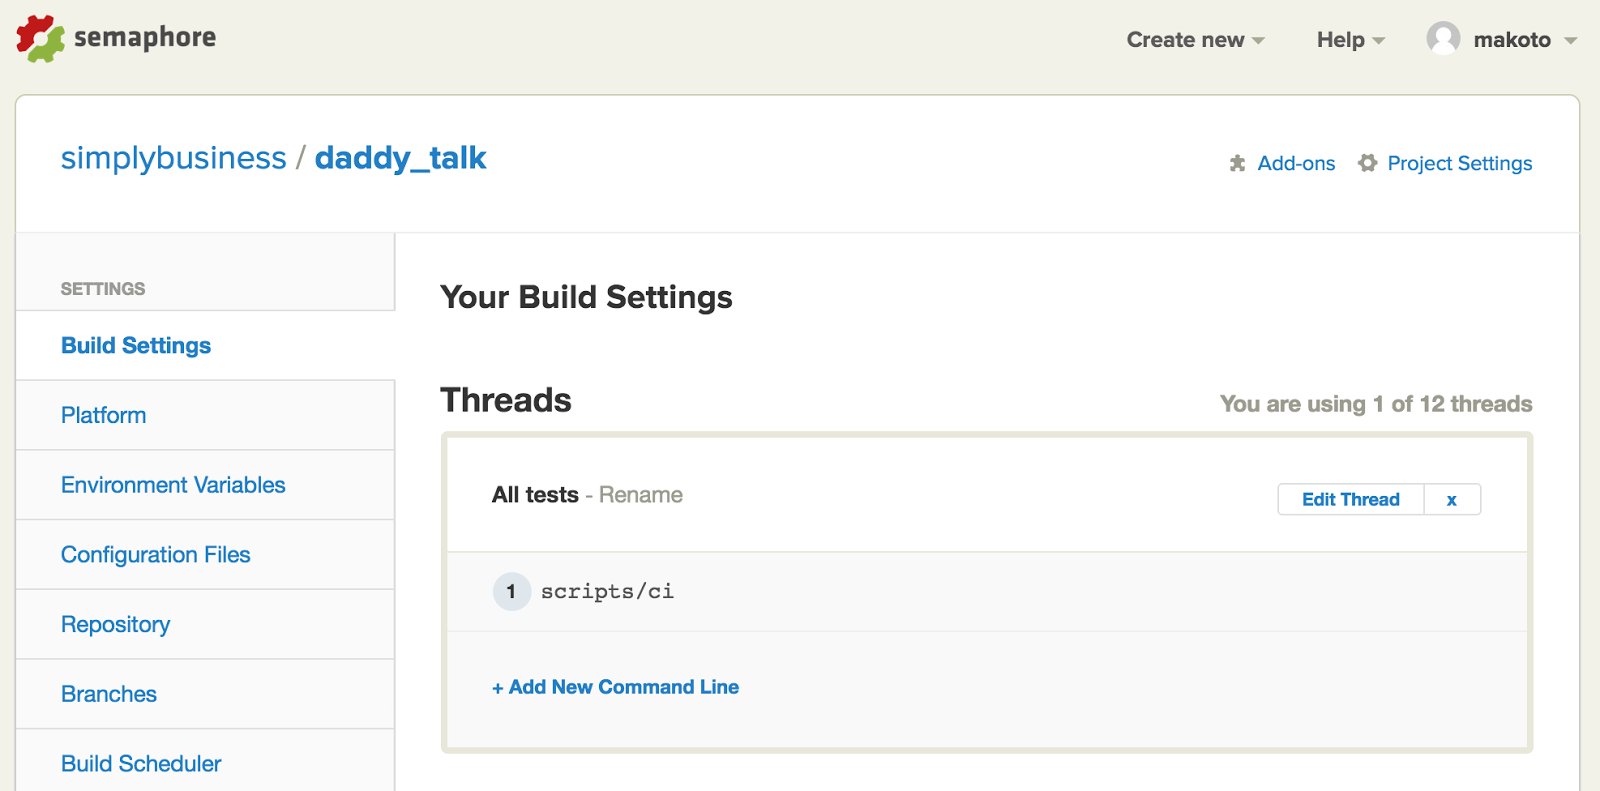
/script/ci script installs drivers and runs full test if the branch is
master.
We could invoke this test suite for each branch, but each call to Twilio actually costs money so we decided to run it only against master branch.
Within this final blog post, we talked about the following:
- Change chrome driver to fake microphone settings.
- Setup TwiML to pickup test phone calls.
- Dynamically inject ngrok callback URL.
- Run the integration test suits on Sempahore.
These test suites not only save time manually performing tests, but also allow us to refactor our internal code with confidence.
In fact, we had one big internal refactoring where we changed the calling order (initially we were calling users before worker pick up the phone, which left some blank silence when users picked up phones) and it would have been scary to do so without end to end test.
Related Posts
Related Resources
Twilio Docs
From APIs to SDKs to sample apps
API reference documentation, SDKs, helper libraries, quickstarts, and tutorials for your language and platform.
Resource Center
The latest ebooks, industry reports, and webinars
Learn from customer engagement experts to improve your own communication.
Ahoy
Twilio's developer community hub
Best practices, code samples, and inspiration to build communications and digital engagement experiences.