User Secrets in a .NET Core Console App
Time to read:
May 18, 2018
Written by

Ever had that sinking moment of realisation when you push your secrets to GitHub? I have and I doubt I’m the only one.
There are many reasons why you wouldn’t want your sensitive configurations shared and I’m not just talking about on GitHub. Members of a development team may not use the same test databases or connection strings. Maybe the dev team only has access to the test keys for apps such as Twitter but the live keys are squirrelled away in Azure.
A common way to deal with sensitive data in an app is by using Environment Variables. With the arrival of .NET Core we now have a tidy way of managing configuration and sensitive data in the form of User Secrets, which can be managed by the Secrets Manager Tool (SMT) from the command line. User Secrets are stored outside of the project tree in a JSON configuration file in the user profile directory and are therefore outside of source control.
See this post on adding User Secrets in a web app.
I have created a solution on GitHub so feel free to follow along with the completed project or have a go at implementing it into your own .NET Core application with your own secrets.
If you would like to see a full integration of Twilio APIs in a .NET Core application then checkout this free 5-part video series I created. It's separate from this blog post tutorial but will give you a full run down of many APIs at once.
Adding user secrets to your project
As I mentioned, User Secrets are stored outside of your project tree.
On Windows they are stored in %APPDATA%microsoftUserSecretssecrets.json and on Linux and macOS in ~/.microsoft/usersecrets//secrets.json.
If the .microsoft folder is not present on Linux or macOS, then you’ll need to create it. Remember it may be hidden, so check for that before creating a new file. You can list hidden as well as non hidden files with the ls -la command in your terminal. If you do need to create a new .microsoft folder you can do so by running the following command in your terminal:
If you are working in an existing project you can go ahead and modify its .csproj file or if you just want to test this, create a new console project using mkdir MyDotNetProject && cd MyDotNetProject && dotnet new console.
We will need to create a GUID for your USER_SECRETS_GUID and you can do so using a generator such as this one.
Add the tag to the .csproj underneath the tag. We will also need to add the SMT and the nuget packages we will need for later:
Update: As of .NET Core 2.1, the SMT will be included on the dotnet cli, so you won’t need to add it separately.
Then just restore NuGet packages, either from the console with dotnet restore or by right-clicking on the solution and selecting Restore NuGet Packages.
Now we can create and update the User Secrets from the command line, this goes for any project type in any OS. To do this, navigate to the root of the project, where the .csproj file is, and enter the following command:
If you already have a value stored in your environment variables, you can replace MY_SECRET with the name of your environment variable prefixed with $ to read it and save it to the User Secrets. For example $MY_SECRET.
If you are not comfortable in the command line then don’t worry, you can navigate to the Microsoft directory and add a new folder with your new GUID as a file name, create a new file called secrets.json and then open this file in the editor of your choice.
Your secrets.json content should look similar to this, I have demonstrated the two ways that you can declare json objects as well as a simple key/value pair:
User Secrets can be shared across multiple projects via their GUID or even a different set of User Secrets for each branch of your solution, making maintenance of shared data that little bit easier.
It is worth noting that user secrets are not encrypted and are only available during development.
Mapping user secrets to a model
The best way to consume user secrets, in my opinion, is to map them to a model. This will give type safety and prevent any errors from misspelt string names. It also makes your code that little bit more testable.
There are a few steps to do this, the first being to add the secrets to the appsettings.json, found in the root of your project. If appsettings.json does not yet exist there, just add it. This will need to correlate closely to your secrets.json file, only with sensitive data removed. I usually add a note to myself about where I have actually set my sensitive data as in the following example:
Next we need to create the C# model that we want to map the secrets to. To keep my solution organised I tend to add a Configuration folder to my Models folder whether that be in the same project or in a dedicated models project being referenced. Make sure that the names in the secrets.json file are the same in both the appsettings.json file and the C# models.
I will repeat this process for each json object or key/value pair I have created in my secrets.json.
Restore your NuGet packages from within Visual Studio, by right-clicking on the solution and selecting Restore NuGet Packages, or from the command line by using dotnet restore in the root of your project.
Now that we have the models, we can bind the values in configuration.
Adding the Configuration
We should already have the relevant nuget packages added to support the upcoming code, but we will need to ensure our appsettings.json gets included in the build by adding the following to the .csproj:
In the code below I have manually created my service collection in the Program.cs file, in readiness to configure my service. As well as mapping my User Secrets, I have mapped a concrete instance of a class, SecretRevealer to its interface, ISecretRevealer, so that when the class is constructed the correct implementation of the interface is provided. I have utilised constructor injection in SecretRevealer to inject the mapped User Secrets, in this case SecretStuff – but more on this later. Constructor injection is one of the most common ways to inject dependencies. For more information on Dependency Injection in .NET Core have a look at this post from Microsoft.
Using your mapped secrets
Now that our secrets have been mapped, we can use .NET Core’s built in dependency inject to inject the secrets into the constructors of classes and services. This is done via the IOptions<> interface.
Overwriting AppSettings on Azure
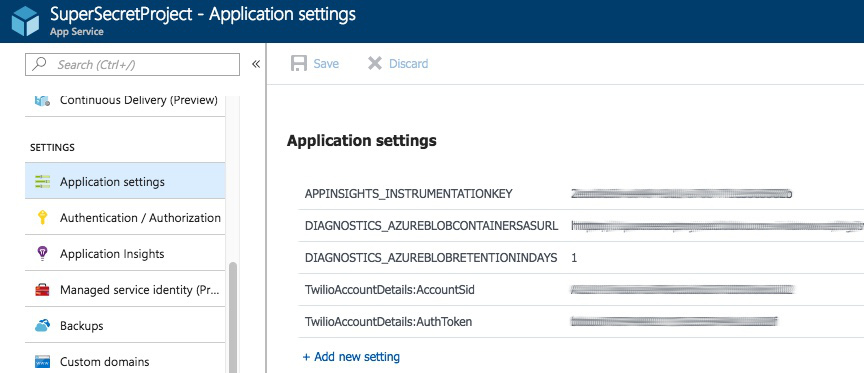
If you’re deploying your console app as a web job to Azure it’s relatively straightforward to add your secrets, requiring only a single step. From within the portal select your web app and then scroll down the menu until you find application settings.
Then enter your secrets, matching case, as key/value pairs.
Summary
That’s it! You can now extract your configuration and sensitive data from your code. This affords you and your team more flexibility and security.
Remember that User Secrets are not encrypted and can only be used within the development environment.

If you want to review the code in its entirety checkout out the GitHub repo. Drop a comment below or tweet me at @LaylaCodesIt if you have any questions. I can’t wait to see what you build!


Related Resources
Twilio Docs
From APIs to SDKs to sample apps
API reference documentation, SDKs, helper libraries, quickstarts, and tutorials for your language and platform.
Resource Center
The latest ebooks, industry reports, and webinars
Learn from customer engagement experts to improve your own communication.
Ahoy
Twilio's developer community hub
Best practices, code samples, and inspiration to build communications and digital engagement experiences.