Add Video Chat to WordPress with a Plugin
Time to read:
February 23, 2016
Written by
This post is part of Twilio’s archive and may contain outdated information. We’re always building something new, so be sure to check out our latest posts for the most up-to-date insights.

“Chat with us now!”
We’ve all seen those popups on popular websites, letting you know that if you have a question or need some help there is someone (or something) that you can turn to. Sometimes though chat is just not the right medium for getting your question answered or the support you need. For a higher fidelity experience, stepping it up to video is the best option.
In this post I’ll show you how using Twilio Video and a little bit of JavaScript and PHP, you can build a Video Chat plugin for WordPress, the world’s most popular CMS system. Never built a WordPress plugin? Don’t worry, it’s a straight-forward and simple process. Want to head straight for the finished product? No problem. Grab the complete code for the plugin from this Github repository. Otherwise, let’s get building!
Getting Setup
Before we get coding we’ll need to gather a few items that we’ll use to build our plugin. First, you’ll need an installation of WordPress that allows plugins. This can be either installed on your local machine, or remotely on a hosting provider like DigitalOcean. Unfortunately WordPress.com does not allow you to upload custom plugins.
Next, you’ll need a Twilio account. If you don’t already have one go right now and sign up for free!
With a WordPress install and Twilio account in hand we can begin building our plugin.
Start with Structure
WordPress plugins are bits of PHP code, JavaScript and CSS that can extend and expand the functionality of your WordPress site. When you install a plugin, WordPress places the assets of that plugin in a new directory under the /wp-content/plugins/ folder of your WordPress installation. That’s where we will start building our new plugin, by creating the folder and file structure that we need.
Create a new folder named twilio-video under the plugins directory. In that directory, create a folder and file structure that matches the list below. For now you can leave the files empty, we’ll add content to them as we go along.
- /wp-content/plugins/twilio-video
- twilio-video.php
- randos.php
- twilio-video.html
- /js
- twilio-video.js
- /css
- twilio-video.css
- /lib
With the basic plugin structure in place let’s start adding some content. Grab the CSS styles for the plugin from the Github repository and place them in the twilio-video.css file.
Now is also a good time to add the twilio-php helper library to our project. Because Twilio Video is still in beta, you’ll need to grab the help library from either the Twilio Video for JavaScript’s PHP quickstart starter app, or from the edge-release branch of the twilio-php repository in Github. Once you have the helper library files copy them into /lib folder.
Finally, we’ll need one final prepared resource. A random name picker which we will use later on to assign an identity to each customer who connects to an agent. Open randos.php and drop the code from the corresponding Github file into it.
Awesome. We’re now ready to write some code for our plugin. To begin we need to create a plugin header which is simply metadata that WordPress uses to know some stuff about our plugin. That metadata goes into the twilio-video.php. Open that file in your favorite editor and add the following:
The Plugin Name header is the only required header, but there are lots of others that you can use to provide even more details about your plugin to WordPress.
At this point the PHP file is now a valid WordPress plugin, and you can head into your WordPress admin site and install it. The plugin doesn’t do anything yet so it’s pretty boring. Lets spice it up by having WordPress add the Twilio Video JavaScript SDK and our plugin UI to any page it renders.
Back in twilio-video.php, call the add_action function to wire up the wp_enqueue_scripts action. This action lets us tell WordPress about a function defined in our plugin that we want it to call when it’s figuring out which resources to include in the rendered web page. In that function we’ll call the wp_enqueue_style and wp_enqueue_script functions to let WordPress know about the scripts and styles our plugin needs to include in the web page.
For our plugin we’re enqueuing that single twilio-video.css file, jQuery, the Twilio Video JavaScript SDK and the twilio-video.js file we created earlier.
Once the scripts and CSS are in the rendered HTML we can use the API’s and styles they contain to create our plugin UI. Open the twilio-video.html in your text editor and add the following HTML:
Save that file and open your WordPress site in a browser. You should see the plugin show up as a fixed element in the lower right corner of the site.
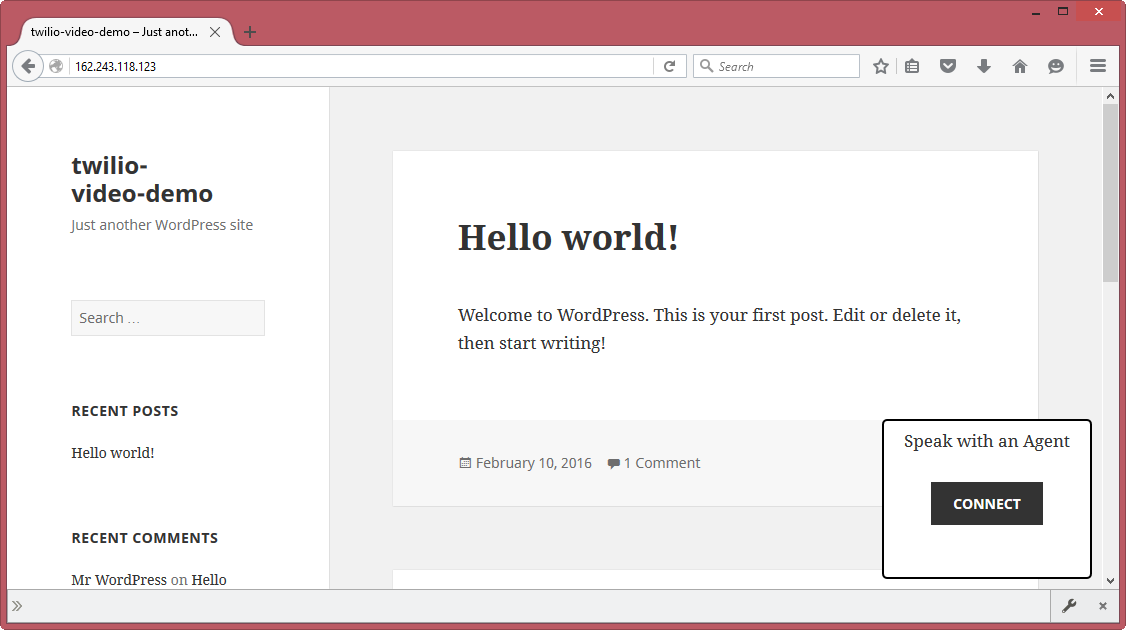
Let’s look at the HTML template we added. It has three basic parts to it:
- A
that prompts the user to talk to an agent for support. - A
that tells the user they are connecting to an agent. - A
that shows the user and agent video streams allowing them to converse.
As the user interacts with the plugin UI, we’ll use JavaScript to show and hide those different elements. Open the twilio-video.js file where we’ll add that client side logic to our plugin.
To start, we first need to use jQuery to make an asynchronous request to get the contents of the twilio-video.html file and then append that HTML to the element of the web page.
Save the file and load up your WordPress site in browser to see the plugin UI come to life.

Now that we’ve got a bit of UI for our plugin, let’s add some interactivity. Back in our JavaScript file, add a click handler to the enter-queue button. When that button is clicked we will toggle the plugin UI to the next stage letting the user know that we’re connecting them to an agent.
Refresh your browser, click the “Connect” button.
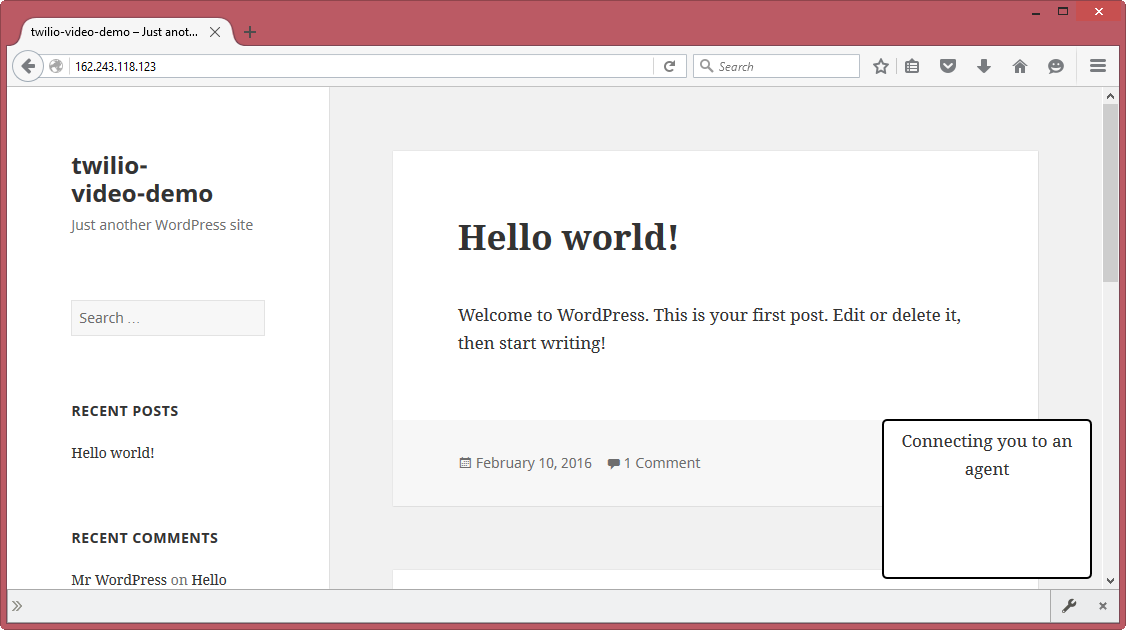
Great, you’re being connected to an agent! No, not really because we’ve not wired up Twilio Video yet.
In order to start a video conversation between the user and an agent we need to create a new Conversation Client for the user and have that client begin listening for conversation invitations. We want to do that only when the user presses “Connect” telling us they want to talk to an agent.
Creating a Conversation Client requires an Access Token which encapsulates the identity of the client and the credentials they need to authenticate with Twilio. Creating an Access Token requires Twilio secrets. To help keep those secrets well, secret, we’ll generate the token on the server and expose it via a REST API that can be called by our JavaScript.
WordPress already exposes its own REST API and makes it really easy to add your own endpoints to it. Pop open twilio-video.php again and use the add_action function to wire up the rest_api_init action.
This action gets called when WordPress initializes its REST API and gives us a chance to register our own routes using the register_rest_route function.
Here we are telling WordPress to register a route that responds to GET requests at the path /wp-json/twilio-video-api/v1/twilio-video-token/. When a request is made to that URL, WordPress calls the twilio_video_get_token function which uses the twilio-php helper library to generate a new Access Token that contains a Grant allowing the client to participate in a Video Conversation. This token along with a randomly chosen identity is returned as a JSON object from the function.
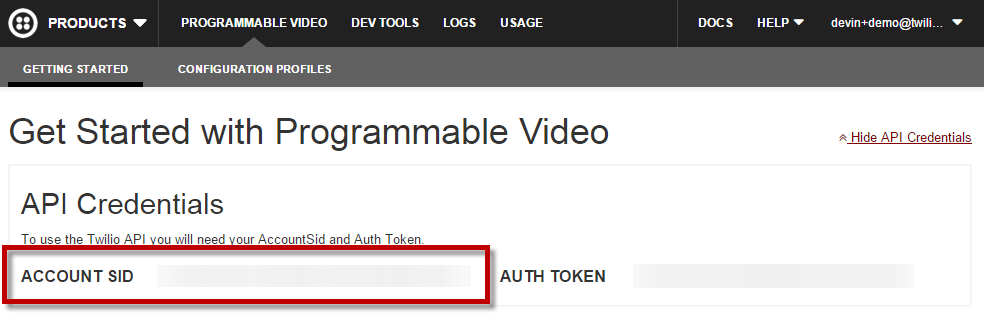
With the code in place the last thing we need to do is add our Twilio secrets. The secrets we need are:
- Account SID
- API Key SID
- API Secret
- Configuration Profile SID
To get all of these secrets we’ll need to head on over to the Programmable Video section of the Twilio Developer Console. Once there grab your Account SID:
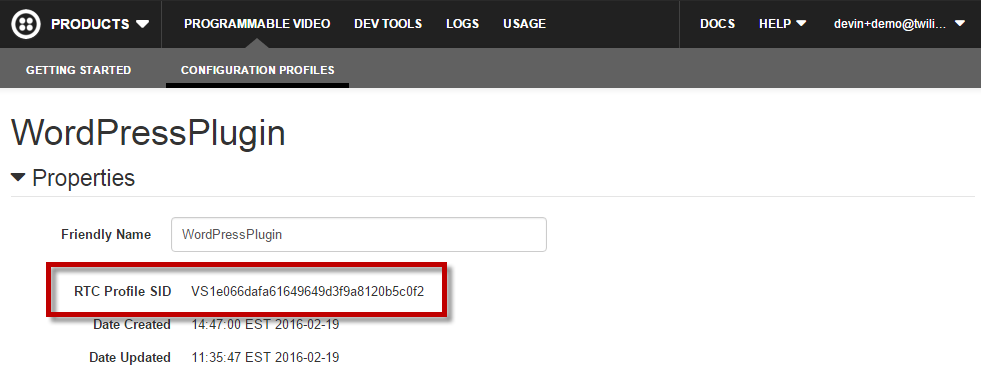
Next create a new Configuration Profile. A Configuration Profile is a set of configuration values for webhooks and other options for Programmable Video.
Drop in a Friendly Name for your Configuration Profile, click Save and grab the RTC Profile SID:
Finally we need an API Key and Secret. These are used to authenticate our Conversation Client with Twilio. Create a new API Key and grab its SID and Secret:
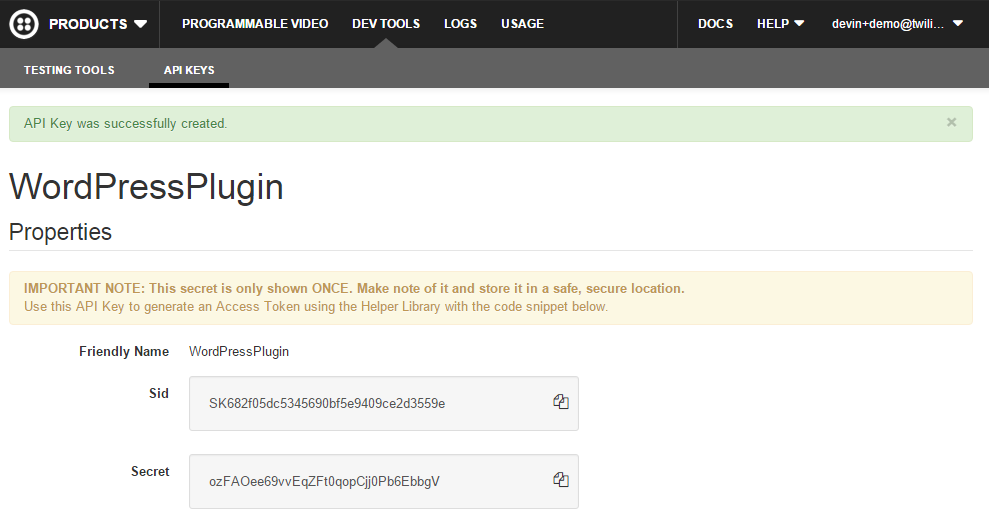
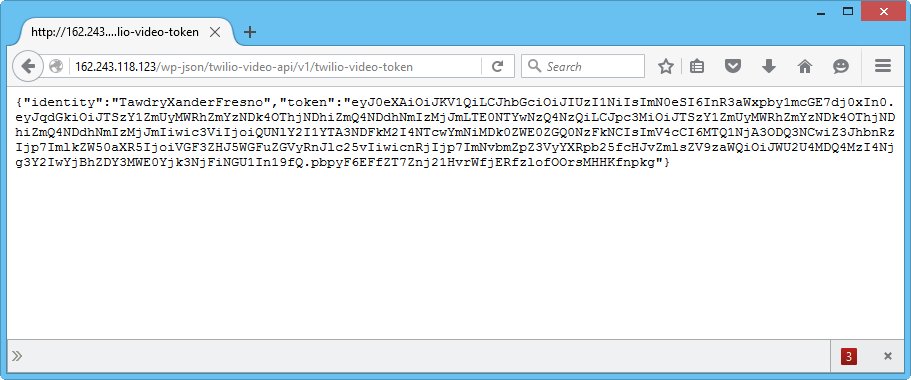
Put your Twilio secrets into the PHP code and give your new WordPress REST API endpoint a spin by opening up a browser pointed to the API URL.
Fantastic! Now we can get back to creating that video conversation.
Back in twilio-video.js we’ll reach for jQuery again to grab a newly generated Access Token from the API we just created. Using that token, create a new AccessManager object to pass into the Conversation Client objects constructor.
Once we have an instance of a Conversation Client we tell it to connect to Twilio and start listening for incoming conversation invitations.
The final step is to handle the incoming invitation and let the user and agent actually converse. To do that we’ll wire up the Conversation Clients invite event handler. This event hands us an IncomingInvite object which we’ll use to have the client automatically accept the invitation. Once the invite is accepted we’re ready to start the call which we do by calling the conversationStarted function.
The conversationStarted function starts by swapping the plugin UI to the conversation view, and using the attach function of the LocalMedia object exposed by the provided Conversation object, directs the local video stream into the plugin UI.
It also starts to listen for the participantConnected event which will fire once the agent who invited the user begins to stream their video. When that event fires the plugin uses the attach function of the Media object exposed by the Participant object passed into the event to direct that video stream into the plugin UI.
Finally, the function starts listening for the conversations participantDisconnected and disconnected events which tell it to reset the plugin back to its original state.
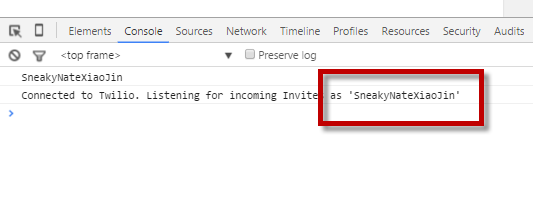
That completes the code for our video chat plugin. To give it an end-to-end test, reload your browser and press the “Connect” button to have the client wait for a conversation invite. Open up the developer console in your browser and grab the identity that was logged to it. We’ll need that in order to have the agent know what client to invite.
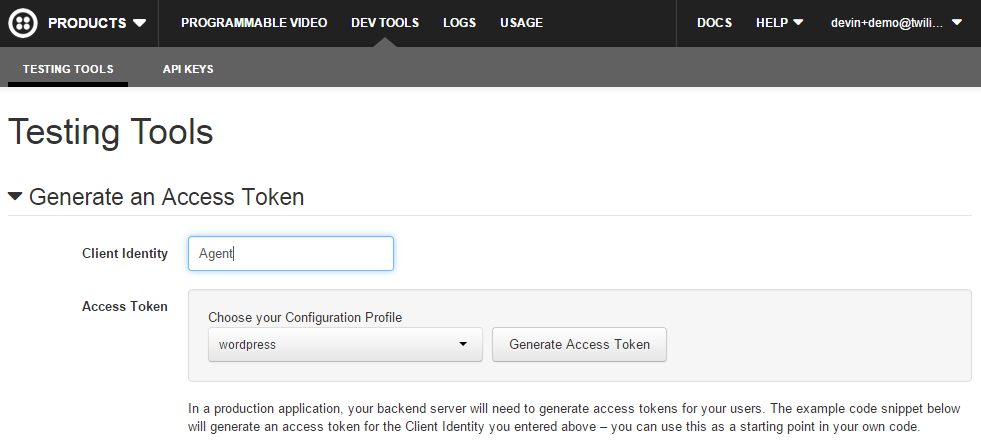
To test the role of the Agent head back into the Programmable Video section of the Developer Console and open up the Testing Tools section of the Dev Tools tab. These testing tools allow you to create a Conversation Client connected to your Configuration Profile and invite another client into a conversation.
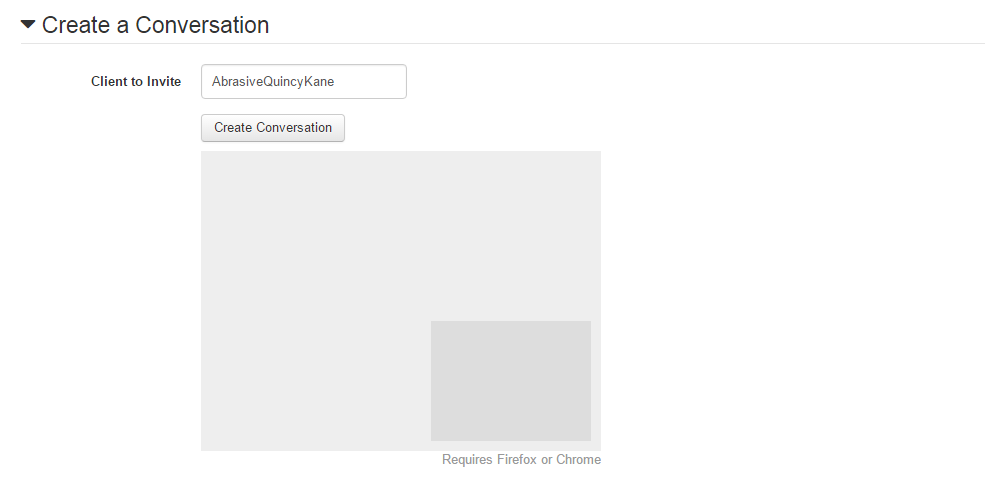
Enter a name like “Agent” into the Client Identity field, select your Configuration Profile from the drop down and click the Generate Token button.
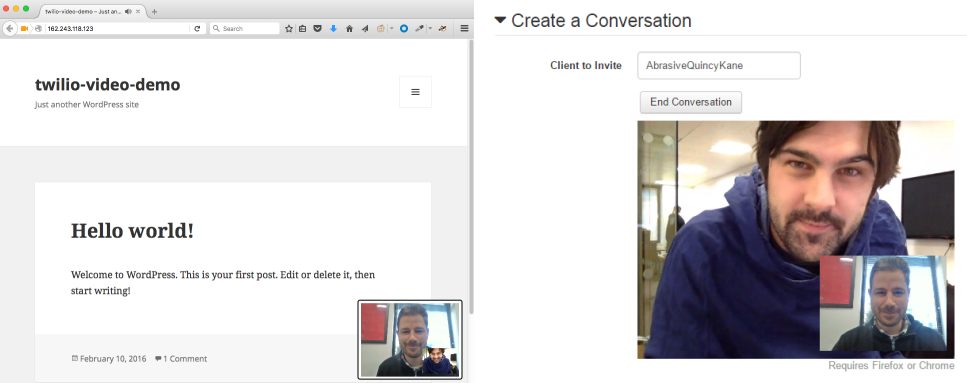
Now scroll down, enter the identity you grabbed earlier from the browser’s console and click the Create Conversation button.
This will send an invite to the client running in the browser plugin and start a video conversation between the testing tools and your WordPress user.
Congratulations! You now have Video Chat plugin that you can drop into any WordPress powered site.
Wrapup
WordPress underlies an impressive number of websites and is used to build everything from personal blogs to full featured e-commerce applications. If you or your company use it as the foundation of a website, adding Twilio-powered video chat is a high-fidelity way to connect with your customers. Plugins are a great way to enhance your site with this capability.
In this post I showed how with a bit of PHP and JavaScript you can build a plugin that inserts Twilio Video Chat. The sample in this post is just the start of what you could do with Twilio Video and WordPress. Grab the source and start experimenting.
Some cool ways you could continue this project would be adding video controls to the plugin UI, integrating the WordPress user system into the plugin so the Agent knows which customer is calling, and even integrating TaskRouter to route incoming video calls to the right available agent.
I’d love to see where you take Twilio Video and WordPress. Drop me an email or hit me up on Twitter with your hacks.
Related Posts
Related Resources
Twilio Docs
From APIs to SDKs to sample apps
API reference documentation, SDKs, helper libraries, quickstarts, and tutorials for your language and platform.
Resource Center
The latest ebooks, industry reports, and webinars
Learn from customer engagement experts to improve your own communication.
Ahoy
Twilio's developer community hub
Best practices, code samples, and inspiration to build communications and digital engagement experiences.