How to verify a user's phone number in your Replit app
Time to read:
August 12, 2026
Written by
Reviewed by
AI generated summary
- Use Twilio Verify for phone number authentication in your Replit app.
- Replit's Secrets manager securely stores necessary Twilio credentials.
- Twilio handles SMS OTPs, simplifying ownership verification and enhancing security.
This summary was generated by AI.
Whether you want to validate users at sign up, prove phone number ownership, or just make sure you're communicating with a real person, you need phone verification. Phone verification is an important feature in nearly every modern application and verifying that number helps ensure every future phone number interaction can be trusted.
Twilio Verify handles sending and checking SMS One-Time Passwords (OTPs) for phone verification so you can focus on your application’s logic. And when you build and host your application on Replit, you can have a working prototype in minutes.
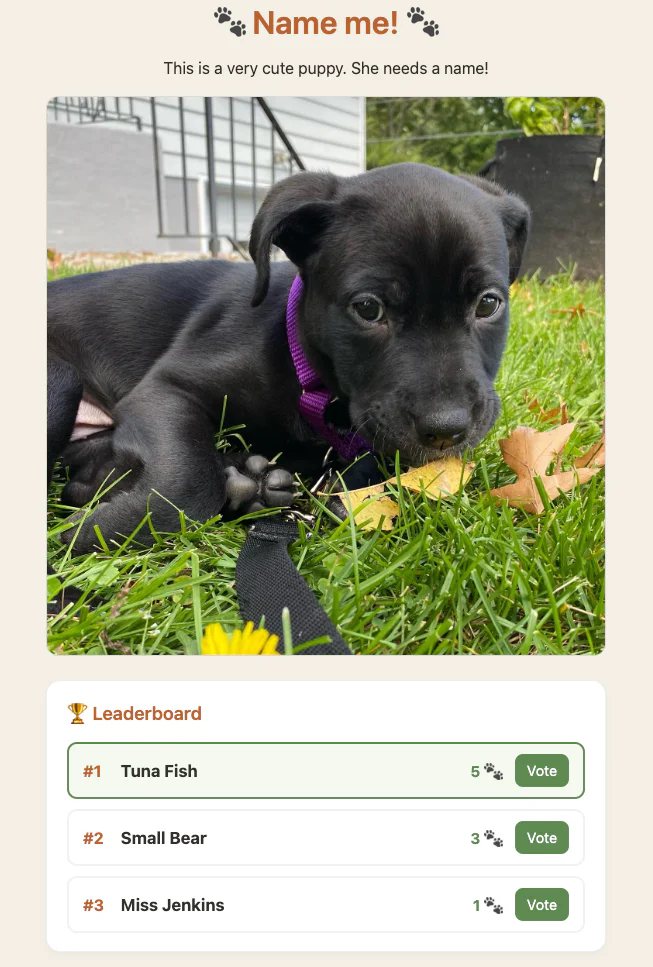
In this post, I’ve put together a sample application that lets you vote on the name for my puppy, after you've verified your phone number, providing a useful gate that limits voting to one vote per phone number. To build along, you can grab the code on GitHub or follow the instructions below to add Verify into your own Replit application.

My very real puppy
Prerequisites
Before we dive in, make sure you have the following ready:
- A free Twilio account. Sign up here or login.
- A free Replit account.
- A Twilio Verify Service: Create one in the Twilio Console. (Twilio Console => Verify => Services). Keep that Verify Service SID (it starts with VA...) handy for the next step.
Step 1: Create your Replit application
Head over to Replit and click the option to " Import Code or Design". Choose GitHub then paste in the sample repo: https://github.com/twilio-samples/replit-verify. This uses a lightweight Node.js and Express stack to serve the front end and handle routing for verifications.
Step 2: Store secrets securely
Never paste your credentials directly into your source code. Instead, use Replit’s built-in Secrets manager. If you haven't done this before, check out our guide on How to Store Twilio Credentials Securely in Replit.
Add these variables ( create a new API Key in the console):
- TWILIO_ACCOUNT_SID
- TWILIO_API_KEY
- TWILIO_API_SECRET
- TWILIO_VERIFY_SERVICE_SID
Step 3: Sending the Verification Code
The logic for sending and checking verification codes lives in /lib/verify.js.When a user submits their phone number, we tell Twilio to send them an SMS with a few lines of code:
This sendVerificationCode function call tells Twilio to generate and dispatch a One-Time Password (OTP) to the user via SMS. Using a temporary, single-use code ensures that the person signing up actually owns the phone number, without you needing to build custom code-generation or expiration logic yourself. Twilio manages all of the telephony, including the sender number, so you can spend less time on compliance and more time with your teething fluff ball.
Step 4: Checking the Verification Code
Once the user receives the 6-digit code, they’ll input it into your app. The app then sends that code back to Twilio to verify it’s correct:
And that checkVerificationCode() function is Verify’s gate – if a user enters a fake code, they’ll never get to the next step, whatever that is in your app. If they enter the actual code, check.status comes back as approved, and you can let your users move onto the next step…whether you’re running a puppy name voting app or gating signups.
And with that, you’re ready to deploy and test it out!.
Test it out!
Now hit that big Run button in Replit.
Once the app is deployed, you’ll want to open it up and vote! Hit the Vote button next to your favorite name:
That will prompt you to enter your phone number for verification. Enter it in E.164 format, then click Confirm Vote.
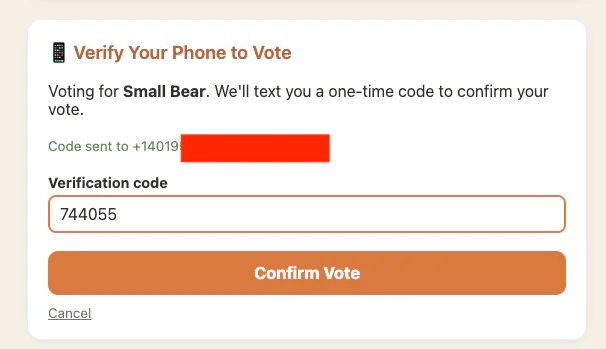
If everything is set up correctly – and you enter the right code – you’ll see the vote counter tick up by one after verifying your number. Try voting again and you should be blocked from voting twice.
Debugging common issues
Vote not counted? Common errors you might hit include:
- Phone format: Make sure you're using E.164 format (e.g., +1234567890).
- Secrets: Double-check that your Replit Secrets are mapped correctly.
- Rate limits: If you're testing repeatedly, requesting a code to the same number more than 5 times in 10 minutes will start returning errors.
Next steps
Congratulations! You've just built phone verification into your application. Next, to take the puppy name voting app further, you could add a Replit database to store the phone numbers that have already voted in your app (a requirement for productionalizing something like this!), persist the vote counts outside of local memory, or extend voting to include the ability to submit new name ideas.
You can use the same Verify Service to verify users via WhatsApp, Email, or Voice all by changing the channel parameter in the request. If you're looking for more options, check out everything you can do with the Verify API in our documentation. In the meantime, support your local animal shelter!
Kelley Robinson is a Developer Evangelist at Twilio specializing in Authentication and Identity. The puppy in question was adopted from CGHS , is actually 4 now, and somehow answers to all of the disparate name options, including several others not listed.



Related Resources
Twilio Docs
From APIs to SDKs to sample apps
API reference documentation, SDKs, helper libraries, quickstarts, and tutorials for your language and platform.
Resource Center
The latest ebooks, industry reports, and webinars
Learn from customer engagement experts to improve your own communication.
Ahoy
Twilio's developer community hub
Best practices, code samples, and inspiration to build communications and digital engagement experiences.