How To Build An AI Phone Agent With Twilio Conversation Relay in Node.js
Time to read:
July 10, 2026
Written by
AI generated summary
- Use Twilio Conversation Relay to handle the voice pipeline, freeing you to focus on AI logic.
- Configure Conversation Relay with Deepgram Flux for speech recognition and ElevenLabs for text-to-speech.
- Connect OpenAI's API to manage natural language processing and real-time tool calling.
This summary was generated by AI.
How To Build An AI Phone Agent With Twilio Conversation Relay in Node.js
Building a voice AI agent from scratch means wiring together speech recognition, text-to-speech, turn detection, and real-time audio streaming, all at low enough latency to feel natural. Twilio Conversation Relay handles the entire voice pipeline for you, so you can focus on the AI logic. In this tutorial, you will build a fully functional AI phone agent in Node.js using Express, the OpenAI API as the language model, and Deepgram Flux for state-of-the-art speech recognition.
Prerequisites
To follow this tutorial, you will need:
- A free Twilio account with a voice-capable phone number
- An OpenAI API key
- Node.js 18 or later installed
- ngrok to expose your local server to Twilio
Build the app
Step 1: How Conversation Relay works
Before writing any code, it helps to understand how Conversation Relay fits into the call flow. When someone dials your Twilio number, Twilio requests TwiML from a webhook you configure. Your server returns a <ConversationRelay> verb inside a <Connect> block, which tells Twilio to open a WebSocket connection to your server and hand the call off to Conversation Relay.
From that point on, Conversation Relay acts as the voice pipeline. It transcribes everything the caller says using speech-to-text (STT) and sends the transcript to your WebSocket server as a JSON message. Your server calls an AI model with the transcript, streams the response back over the WebSocket, and Conversation Relay synthesises each token into speech using text-to-speech (TTS), playing it to the caller in real time.
The flow looks like this:
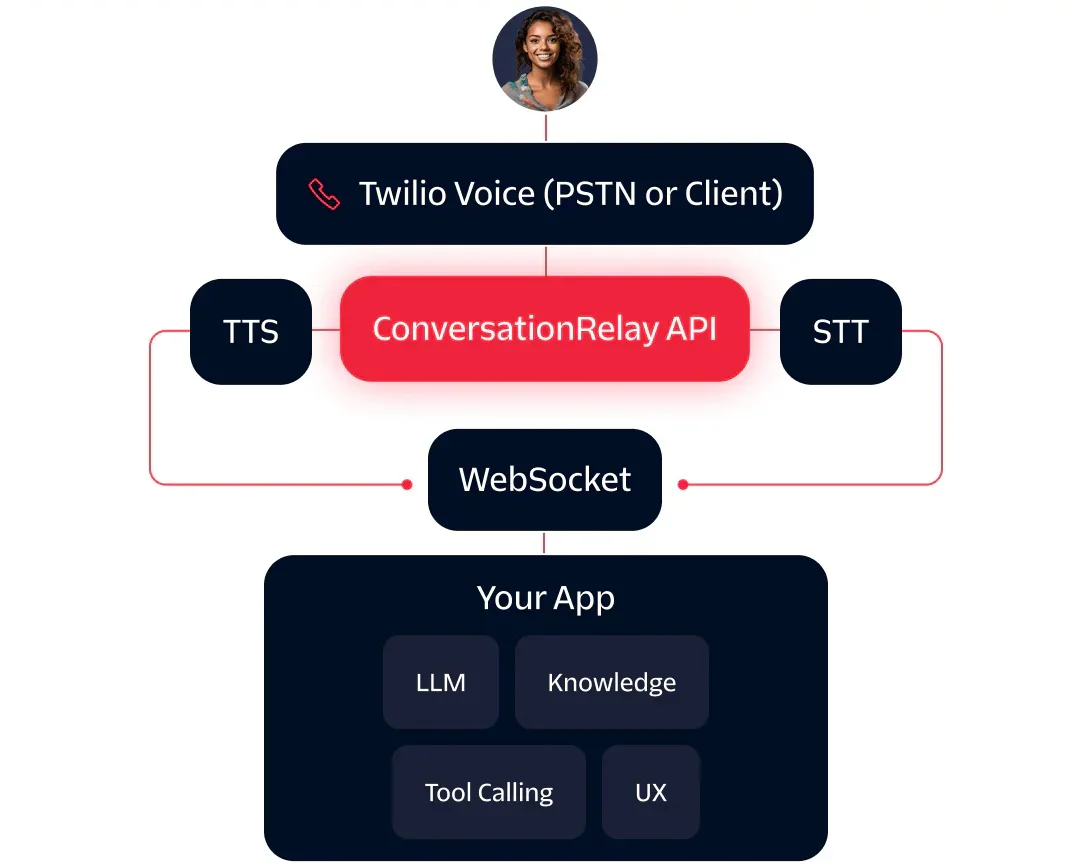
Conversation Relay's median response latency is under 0.5 seconds, so conversations feel natural rather than robotic.
For this tutorial, you will build Hoot, an AI phone support agent for Owl Air, a fictional airline. Hoot can answer questions about flight status, baggage policy, loyalty points, and booking changes.
Step 2: Setting up your project
Start by creating a project directory and initializing it as an npm project:
The npm init -y command creates a package.json file with default values. Install the dependencies you will need:
This installs Express as the web server framework, express-ws for WebSocket support, the Twilio and OpenAI SDKs, and dotenv for loading environment variables.
Now create a .env file for the environment variables your application needs and add the following placeholders while replacing the values:
DOMAIN should be your ngrok hostname without the https:// prefix. You will get this value in a later step once ngrok is running.
Open package.json and add "type": "module" to enable ES6 module syntax:
Finally, create index.js as your entry point. Add the following imports and application setup at the top of the file:
Step 3: Writing a voice-optimized system prompt
The system prompt is one of the most important parts of a phone agent. Text-to-speech synthesizers read your agent's responses verbatim, so responses that look fine on screen can sound unnatural when spoken aloud. Markdown formatting, bullet points, emoji, and symbols like $ or % all produce awkward output.
Add the following system prompt to index.js below your imports:
Spelling out numbers in the prompt itself (thirty dollars instead of $30) can encourage the model to use the same format in its responses. Capping replies at two or three sentences keeps the conversation from sounding like a wall of text being read aloud. Explicitly forbidding markdown prevents the model from adding asterisks, headers, or lists that would be spoken as literal characters.
Step 4: Building the TwiML endpoint
The Twilio Node.js SDK includes TwiML helpers that let you build the response programmatically instead of writing raw XML strings. You already imported the required modules at the top of index.js.
Now, add the endpoint below your system prompt:
The url attribute points to the WebSocket endpoint on your server. It must use wss:// (the secure WebSocket protocol), not ws://. The welcomeGreeting is played to the caller immediately after Conversation Relay connects, before your WebSocket handler sends any response. Listing Hoot's four topic areas in the greeting orients callers right away and reduces the chance they ask for something outside the agent's scope.
Step 5: Configuring Conversation Relay attributes
The <ConversationRelay> verb accepts a rich set of attributes for tuning STT and TTS behaviour. The configuration above uses several that are worth understanding in detail.
ttsProvider="ElevenLabs" and transcriptionProvider="Deepgram" select the voice and speech recognition providers. ElevenLabs is the default TTS provider as of the Conversation Relay GA release, and it produces the most natural-sounding voices. Deepgram is the default STT provider and supports Deepgram Flux, the latest speech model.
speechModel="nova-3-general" enables Deepgram Flux, which combines transcription and end-of-turn detection in a single model. Compared to earlier models, Flux delivers 200 to 600 milliseconds less latency per response turn and approximately thirty percent fewer false interruptions. This means Hoot is less likely to cut a caller off mid-sentence or wait awkwardly after they have finished speaking.
eotThreshold="0.8" controls how confident Deepgram Flux must be that a speaker has finished before finalising the transcript. The value ranges from 0.5 (more aggressive, fires sooner) to 0.9 (more conservative, waits longer). A value of 0.8 is a good starting point for most use cases.
ignoreBackchannel="true" filters out conversational filler words like "yeah", "uh huh", and "okay" that callers say while listening. Without this setting, those sounds would trigger your WebSocket handler and send unnecessary requests to the model mid-response.
hints is a comma-separated list of words and phrases that Deepgram should give extra weight to during transcription. Business-specific terms like product names, place names, and technical vocabulary often trip up general speech recognition models. Adding them as hints improves accuracy for your specific use case.
interruptible="any" and interruptSensitivity="medium" control how the agent responds when a caller speaks while it is talking. Setting interruptible to any means both speech and DTMF keypresses can interrupt the agent. The medium sensitivity setting reduces false interruptions in noisier environments while still responding quickly to intentional interruptions.
elevenlabsTextNormalization="auto" tells ElevenLabs to automatically normalise numbers and abbreviations in the text before synthesising speech. This is useful as a safety net if your LLM occasionally outputs a digit or symbol despite your instructions.
Step 6: Building the WebSocket handler
Add the WebSocket endpoint to index.js below your TwiML endpoint:
The setup message arrives first, immediately after Conversation Relay opens the WebSocket connection. It contains the callSid for the call and any custom parameters you passed via <Parameter> elements in your TwiML. The messages array is initialised as empty here; the system prompt is prepended inside stream_response before each OpenAI API call.
The prompt message carries the caller's transcribed speech in data.voicePrompt. The last field indicates whether this is the final transcript for a turn. When partialPrompts is disabled (the default), you will only receive prompt messages with last: true, so the data.last check ensures you only send requests to the model once the caller has finished speaking.
The interrupt message fires when the caller speaks while Hoot is talking. The utteranceUntilInterrupt field tells you how much of Hoot's response was played before the interruption. Because that response was cut short, it would be misleading to keep it in the conversation history as a complete assistant turn. The handler removes the last assistant message from the messages array, so the next request starts from a clean state.
The error message carries a numeric error code and a description. Common errors include invalid provider configurations and WebSocket timeout events. Logging them makes debugging significantly easier.
Step 7: Streaming responses and calling tools
Right now Hoot can only answer questions about facts baked into the system prompt. To look up real flight status, you need to give the model a tool it can call. The OpenAI function calling API lets you define tools as JSON schemas, and the model decides whether to call one based on the caller's request.
Start by adding the tool definition, mock data, and a dispatcher function to index.js after SYSTEM_PROMPT:
TOOLS is the schema you pass to the OpenAI API. MOCK_FLIGHT_DATA is a stand in for a real database or API call. In a production agent you would replace execute_tool with a live lookup. When a caller gives a flight number that is not in the data, execute_tool returns "No flight found with that number." so Hoot always has a graceful response rather than hallucinating status information. The flight data uses spelled-out times ("two thirty PM") following the same voice-optimized convention as the system prompt, so ElevenLabs reads them naturally when they appear in Hoot's response.
If you add more Owl Air–specific flight numbers to your real data, add them to the hints attribute in your TwiML as well. Deepgram gives extra weight to hinted terms during transcription, which reduces misheard flight numbers like "OA one oh one" being transcribed as "0-8101".
Now add the stream_response function:
The function runs in two phases. In phase one, the OpenAI stream includes tools: TOOLS. If the model decides to answer directly (a baggage or loyalty question, for example), it returns tokens and finish_reason is "stop", so the function is done after sending the last: true sentinel. If it wants to call a tool, finish_reason is "tool_calls" and the streamed deltas contain a tool call rather than content.
Phase two only runs when there are tool calls to execute. The function appends the model's tool-call message to the conversation, calls execute_tool for each one, appends the results as "tool" role messages, and makes a second streaming call. This second stream produces the spoken response, because the model now has the tool result and can answer the question in natural language.
Each text message you send to Conversation Relay contains a token (a text fragment) and a last flag. Sending tokens one by one as they arrive with last: false lets Conversation Relay begin synthesising and playing speech before the full response is ready. The final message with last: true and an empty token signals the end of the turn. The function returns the full accumulated text so the WebSocket handler can append it to the conversation history.
Step 8: Running your server
You are ready to run the server. Add the server listener at the end of index.js:
Open a terminal and start ngrok:
ngrok will display a Forwarding line that looks something like this:
Copy the hostname (1234abcd.ngrok.app, without https://) and update your .env file:
Open a second terminal and start the Node.js server with the following command:
The DOMAIN variable is read once at startup and baked into the TwiML response, so changes to .env only take effect after a restart.
Step 9: Configuring your Twilio phone number
Log in to the Twilio Console and navigate to Phone Numbers in the left sidebar, then Manage, then Active Numbers. Click your voice-capable phone number to open its configuration page.
Under the Voice Configuration section, set A Call Comes In to Webhook and enter the URL for your TwiML endpoint:
Replace 1234abcd.ngrok.app with your actual ngrok hostname. Set the HTTP method to HTTP POST, then click Save Configuration.
Testing your agent
Call your Twilio phone number. You should hear Hoot's greeting within a second or two of the call connecting:
"Thanks for calling Owl Air! I'm Hoot. I can help with flight status, baggage policy, loyalty points, or booking changes. Which of those can I help you with?"
Try a few test questions to verify the full flow is working:
- "What's the baggage policy?" - Hoot should describe carry-on and checked bag rules in natural spoken language.
- "How do loyalty points work?" - Hoot should explain the earn and redemption rates.
- "Can I change my flight?" - Hoot should give the change fee policy, with amounts spelled out in words.
- "When does check-in open?" - Hoot should mention the twenty-four hour window.
- "What's the status of flight OA205?" - Hoot should call the
lookup_flight_statustool and report that the flight is delayed by forty minutes. You will see the tool call and its result printed in your terminal. - "What's the status of flight OA318?" - Hoot should report the flight is cancelled.
- "What's the status of flight OA999?" - Hoot should gracefully report that no flight was found with that number.
Watch your terminal as you speak. You will see each caller turn printed as it arrives, Hoot's streamed response tokens accumulating, and the complete response logged once the turn is finished.
If Hoot does not respond, check that your ngrok tunnel is still running and that the DOMAIN value in .env matches your current ngrok hostname. ngrok generates a new hostname each time you restart the free tier, so you will need to update your Twilio webhook URL and restart node index.js whenever you restart ngrok.
If you hear an error message on the call or see an error message in your terminal logs, check the error code against the Conversation Relay error code reference in the Twilio documentation.
What's next
The agent you built here covers the core Conversation Relay pattern, but there are several natural extensions worth exploring.
Proactive topic re-offering - If a caller seems uncertain, Hoot will stay silent and wait. You can fix this with a single addition to the system prompt: instruct Hoot to re-offer the four topic areas if the caller has not asked a clear question after one or two exchanges. No code change required.
Human handoff - The system prompt already tells Hoot to offer to connect callers with a live agent. To implement it, detect when the model's response includes that offer and send {"type": "end-session", "handoffData": "caller needs live support"} from the WebSocket handler. You will also need to add an action attribute to the <ConversationRelay> element in your TwiML (e.g. action="/handoff"). Twilio POSTs to that URL when the session ends, passing the handoffData string, where you can return new TwiML to route the call to a queue or a direct number using standard <Dial> logic.
Caller personalization - You can pass data into the setup message using <Parameter> elements inside <Connect> in your TwiML. For example, <Parameter name="customerName" value="Alex"/> makes customParameters.customerName available in the setup message, so you can have Hoot greet the caller by name. In a real deployment you would look up the caller's name from the From phone number before generating the TwiML.
Conclusion
You have built a fully functional AI phone agent using Twilio Conversation Relay, Express, and the OpenAI API. Conversation Relay handled the speech-to-text and text-to-speech pipeline, while your WebSocket server connected the model to the call and managed the conversation history, including live flight lookups via tool calling. See the Conversation Relay documentation for the full list of attributes and message types.
Dhruv Patel is a Developer on Twilio's Developer Voices team. You can find Dhruv working in a coffee shop with a glass of cold brew or he can be reached at dhrpatel [at] twilio.com .

Related Resources
Twilio Docs
From APIs to SDKs to sample apps
API reference documentation, SDKs, helper libraries, quickstarts, and tutorials for your language and platform.
Resource Center
The latest ebooks, industry reports, and webinars
Learn from customer engagement experts to improve your own communication.
Ahoy
Twilio's developer community hub
Best practices, code samples, and inspiration to build communications and digital engagement experiences.