How to Use Google Sheets as a Database for Your PHP App

March 23, 2026
Written by
Reviewed by

How to Use Google Sheets as a Database for Your PHP App

As developers, we're not short of options when it comes to databases, whether commercial or open source, for making our application data available to business users for further analysis. For example, you're likely already familiar with MySQL, Postgres, Microsoft SQL Server, Oracle, SAP, as well as so many others.

But, do business users need all of the functionality that databases offer?

It's easy to assume so. However, what if the business needed something lighter, more familiar, and more readily accessible? What if, as is still so common — sometimes ubiquitous, even — all the business wanted was a spreadsheet?

Before you change tabs, hear me out. Spreadsheets have been around (admittedly, not in electronic form) since at least 1906, and in electronic form since VisiCalc debuted on the Apple II way back in 1979; which in turn was followed by Lotus 1-2-3 and Microsoft Excel.

A screenshot of VisiCalc, showing four rows of records with four columns for each record: Item, No., Unit, and Cost. Underneath the four records are columns for the subtotal, tax (at a rate of 9.75%) and grand total.

Whether we, as developers, like them or not, they're a mainstay of organisations, both large and small, in so many countries around the world, regardless of industry sector. And, for good reason! They're easy to use, quick to get started with, don't require a steep learning curve (at least initially), and make data relatively easy to manipulate, analyse, and visualise.

So, why not use them in PHP applications to store application data for analysis by business users?

However, before you think I'm talking about Microsoft Excel. I'm not. I'm talking about its direct competitor: Google Sheets. It's easy to start using, easy to collaborate on with others, whether inside or outside of an organisation, has in-built version control, plus so much more; oh, and it costs nothing to get started.

But, as good as Google Sheets is, it has no native notification functionality. Notifications would be helpful when you want to notify users and stakeholders that more data is available to analyse for that next, last minute report.

So, in this tutorial, you're going to learn how to backup data from Order Desk, an ecommerce order management tool, to Google Sheets and notify users afterward via SMS.

Prerequisites

Before you begin, make sure you have the following:

Application overview

The application will be quite simple; a small, web-based application with a single route. When that route is requested, the route's handler will retrieve all of the current orders from your Order Desk account and write them to a Google Sheet. After that, thanks to the power of Twilio's Programmable Messaging API, you'll be notified that new data is available via SMS.

Set up the project directory

The first thing that we need to do is to set up the project directory structure, by running the following commands.

mkdir -p twilio-sheets/src/App/{Handler,Service} twilio-sheets/{data,public}
cd twilio-sheets

If you're using Microsoft Windows, use the commands below, instead.

mkdir twilio-sheets/data
mkdir twilio-sheets/public
mkdir twilio-sheets/src/App/Handler
mkdir twilio-sheets/src/App/Service
cd twilio-sheets

Here's what's going on:

  • The data directory will store your Google Service Account's credentials file (credentials.json)
  • The public directory will store the application's bootstrap file (index.php) where all requests will be routed
  • The src/App directory will store the application's PSR-4 namespaced code files, in a namespace, unoriginally named "App". The App directory contains two subdirectories: Handler for handler classes, and Service for some service, utility classes to simplify interacting with Order Desk and Google Sheets.

Install the required packages

Next, we need to install the application's PHP dependencies. These are:

To install the packages, run the following command.

composer require google/apiclient slim/slim slim/psr7 php-di/slim-bridge twilio/sdk vlucas/phpdotenv

Then, add the following to the newly generated composer.json file to register a PSR-4 autoload namespace named "App".

"autoload": {
    "psr-4": {
        "App\\": "src/App/"
    }
}

Set the required environment variables

To communicate with Order Desk, Google Sheets, and Twilio, the application will need a series of environment variables; these are:

Paste the following into a new file named .env in the project's top-level directory.

GOOGLE_APPLICATION_CREDENTIALS=
GOOGLE_API_KEY=
GOOGLE_SERVICE_ACCOUNT_NAME=
ORDERDESK_STORE_ID=
ORDERDESK_API_KEY=
RECIPIENT=
SPREADSHEET_ID=
TWILIO_ACCOUNT_SID=
TWILIO_AUTH_TOKEN=
TWILIO_PHONE_NUMBER=

Then, add your phone number in E.164 format as the value of RECIPIENT.

Now, let's retrieve all of the required credentials.

Retrieve your Twilio credentials and phone number

You need to retrieve your Twilio credentials, and your Twilio phone number, so that. With them, the app can make authenticated requests to Twilio's APIs, and Twilio knows who's sending the SMS.

A screenshot of the Account Info panel in the Twilio Console, with the values of the Account SID and My Twilio phone number redacted.

To retrieve them, log in to your Twilio Console. There, from the Account Info panel copy your Account SID, Auth Token, and phone number and paste them into .env as the values for TWILIO_ACCOUNT_SID, TWILIO_AUTH_TOKEN, and TWILIO_PHONE_NUMBER, respectively.

Retrieve your Google credentials

Next up, you need to retrieve your Google credentials. It's a little involved, but bear with me. Log in to your Google Cloud Console, open the navigation menu (the three horizontal bars in the top-left hand corner), and open IAM and admin > Service accounts. There, click Create service account.

A screenshot of the Google Cloud Console in the "IAM and admin / Service accounts" section, emphasising the "Create service account" button.

Then, fill in the details for "Service account name" and click Done. I named mine "Twilio Sheets", but feel free to name yours whatever you prefer.

A screenshot of the Google Cloud Console in the "IAM and admin / Service accounts" section, showing the "Create service account" form with the Service account name and Service account ID fields filled out.

After that, click the Action menu on the far right of your new service account, and click Manage keys.

A screenshot of the Google Cloud Console in the "IAM and admin / Service accounts" section, emphasising the Actions popup next to a service account record.

Then, click Add key > Create new key. In the popup that appears, leave "Key type" set to "JSON" and click Create.

A screenshot of the Google Cloud Console in the "IAM and admin / Service accounts" section, where the Create private key dialog is visible, with the Key type set to JSON.

A JSON file will then start downloading. When it's downloaded, move it to the project's data directory and rename it credentials.json. Then, set the absolute path to credentials.json as the value of GOOGLE_APPLICATION_CREDENTIALS in .env.

If you're not sure how to find the absolute path, in your terminal, cd into the project's data directory, then run pwd. That will print the information that you need.

After that, go back to your Google Cloud Console and reload it. Now, you'll see a key in the table at the bottom of the page. Copy the value in the Key column and paste it into .env as the value of GOOGLE_API_KEY.

A screenshot of the Google Cloud Console in the "IAM and admin / Service accounts" section, where the Key field in the Keys table is redacted, but emphasised.

Then, go to the Details tab of your new service account and copy the email address to .env as the value of GOOGLE_SERVICE_ACCOUNT_NAME.

A screenshot of the Google Cloud Console in the "IAM and admin / Service accounts" section, viewing the details of a service account. The Email field is highlighted, but redacted.

Retrieve your Order Desk credentials

To retrieve them, log in to your Order Desk account. Then, go to Settings > Store Settings, and click the API tab.

The API tab of the Store Settings section of the Order Desk dashboard, where no keys have been created.

Then, click Create API Key.

The API tab of the Store Settings section of the Order Desk dashboard, where an API key has been created. The Store ID and API Key values have been redacted.

You'll then see your Store ID and API Key. Copy and paste them into .env in place of ORDERDESK_STORE_ID and ORDERDESK_API_KEY, respectively.

While you're there, create at least one new order, so that the PHP app has some data to retrieve. To do that, in the left-hand side navigation menu, click "Add New Order" under TOOLS.

The Add New Order form in the Order Desk dashboard.

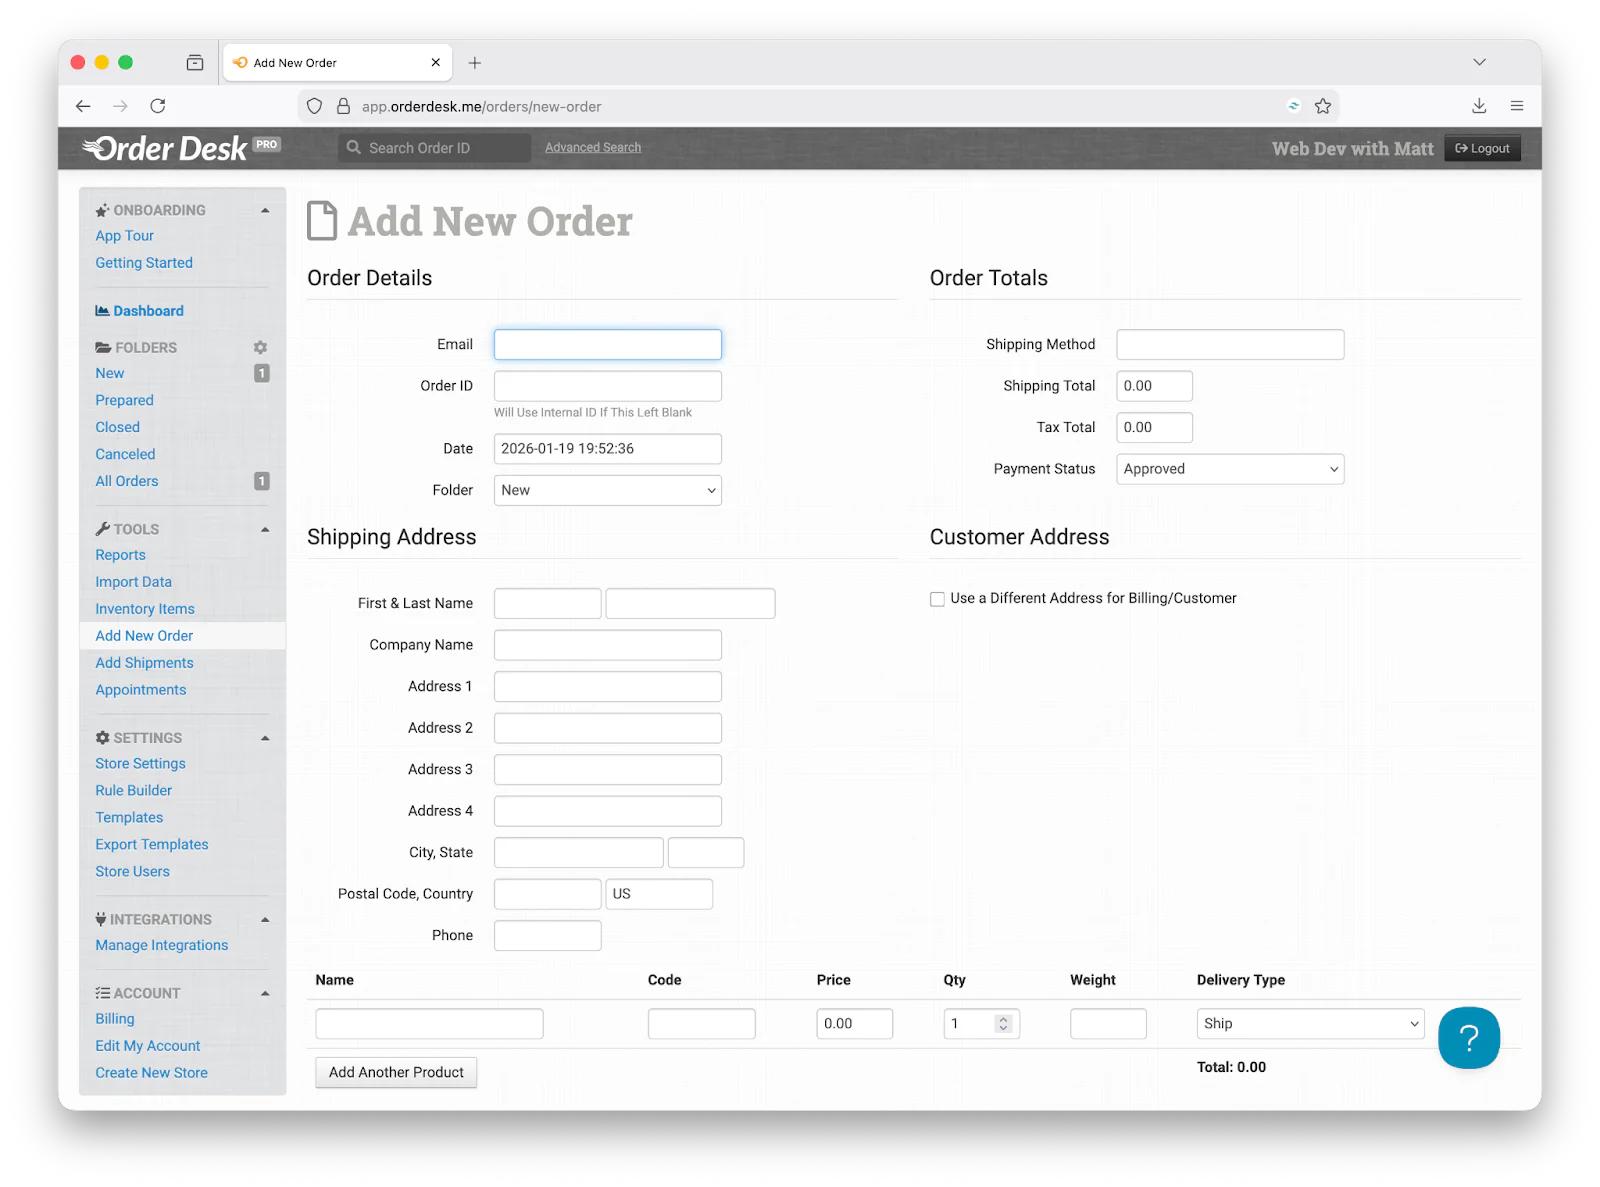
Fill in as many details as possible, making sure that you fill in Shipping Method, Shipping Total and Tax Total, and Payment Status, along with your email address and first and last names.

Create the PHP application

With all of the application setup completed, it's now time to write the PHP code. Start by creating a new file named OrderDeskService.php in src/App/Service. Then, paste the code below into the file.

<?php

declare(strict_types=1);

namespace App\Service;

use Exception;

use function curl_exec;
use function curl_getinfo;
use function curl_init;
use function curl_setopt;
use function hash_hmac;
use function header;
use function http_build_query;
use function is_array;
use function json_decode;
use function json_encode;
use function rawurldecode;
use function strpos;
use function trim;

use const CURLOPT_CONNECTTIMEOUT;
use const CURLOPT_CUSTOMREQUEST;
use const CURLOPT_HTTPHEADER;
use const CURLOPT_POSTFIELDS;
use const CURLOPT_RETURNTRANSFER;
use const CURLOPT_TIMEOUT;
use const CURLOPT_URL;
use const CURLOPT_USERAGENT;

final class OrderDeskService
{
    private string $baseUrl        = "https://app.orderdesk.me/api/v2";
    
    private ?int $lastStatusCode;

    public function __construct(private readonly string $storeId, private readonly string $apiKey) {}

    public function get(string $url = "", ?array $post = null): array
    {
        return $this->go("GET", $url, $post);
    }

    public function post(string $url, ?array $post = null): array
    {
        return $this->go("POST", $url, $post);
    }

    public function put(string $url, ?array $post = null): array
    {
        return $this->go("PUT", $url, $post);
    }

    public function delete(string $url, ?array $post = null): array
    {
        return $this->go("DELETE", $url, $post);
    }

    public function go(string $method, string $url, ?array $post = null): array
    {
        if (! is_array($post)) {
            $post = null;
        }
        if (! $url) {
            throw new Exception("Please enter a destination url");
        }
        $url     = $this->baseUrl . "/" . $url;

        $headers = $this->getHeaders();
        if ($method === "GET" && $post !== null) {
            $url .= (strpos($url, "?") === false ? "?" : "") . http_build_query($post);
            $post = "";
        }
        $ch = curl_init();
        curl_setopt($ch, CURLOPT_URL, $url);
        curl_setopt($ch, CURLOPT_HTTPHEADER, $headers);
        curl_setopt($ch, CURLOPT_CUSTOMREQUEST, $method);
        if ($post) {
            curl_setopt($ch, CURLOPT_POSTFIELDS, json_encode($post));
        }
        curl_setopt($ch, CURLOPT_RETURNTRANSFER, true);
        curl_setopt($ch, CURLOPT_CONNECTTIMEOUT, 10);
        curl_setopt($ch, CURLOPT_TIMEOUT, 10);
        curl_setopt($ch, CURLOPT_USERAGENT, "orderdesk/orderdesk_client");

        $response = trim(curl_exec($ch));
        $info     = curl_getinfo($ch);
        $json     = json_decode($response, true);
        if (! is_array($json)) {
            return $response;
        }
        $this->lastStatusCode = (int) $info['http_code'];
        return $json;
    }

    public function getHeaders(): array
    {
        return [
            "ORDERDESK-STORE-ID: {$this->storeId}",
            "ORDERDESK-API-KEY: {$this->apiKey}",
            "Content-Type: application/json",
        ];
    }

    public function validatePostedJson(): void
    {
        if (! isset($_POST['order'])) {
            header(':', true, 400);
            die('No Data Found');
        }

        if (
            ! isset($_SERVER['HTTP_X_ORDER_DESK_STORE_ID'])
            || $_SERVER['HTTP_X_ORDER_DESK_STORE_ID'] !== $this->storeId
        ) {
            header(':', true, 403);
            die('Unauthorized Request');
        }

        if (
            ! isset($_SERVER['HTTP_X_ORDER_DESK_HASH'])
            || hash_hmac(
                'sha256',
                rawurldecode($_POST['order']),
                $this->apiKey
            ) !== $_SERVER['HTTP_X_ORDER_DESK_HASH']
        ) {
            header(':', true, 403);
            die('Unauthorized Request');
        }

        $order = json_decode($_POST['order'], 1);
        if (! is_array($order)) {
            header(':', true, 400);
            die('Invalid Order Data');
        }
    }
}

The above code is a minimally refactored version of Order Desk's PHP client, so that it better complies with PHP 8.4. It simplifies making authenticated API requests to Order Desk's API and validates the responses returned. There are packages available on Packagist, but I found this class to be sufficient.

With that done, create a second file, this time in src/App/Service, named GoogleSheetsService.php. In the file, paste the code below.

<?php

declare(strict_types=1);

namespace App\Service;

use Google\Client;
use Google\Service\Sheets;
use Google\Service\Sheets\AppendValuesResponse;
use Google\Service\Sheets\ValueRange;

final class GoogleSheetsService
{
    private Sheets $sheetsService;

    public function __construct(string $apiKey, string $serviceAccountName)
    {
        $client = new Client();
        $client->setAccessType('offline');
        $client->useApplicationDefaultCredentials();
        $client->setDeveloperKey($apiKey);
        $client->setSubject($serviceAccountName);
        $client->setScopes(
            [
                'https://www.googleapis.com/auth/spreadsheets',
            ],
        );
        $this->sheetsService = new Sheets($client);
    }

    public function addRow(
        array $values, 
        string $range, 
        string $spreadsheetId
    ): AppendValuesResponse
    {
        $requestBody = new ValueRange(
            [
                'values' => $values,
            ],
        );
        $params = [
            'valueInputOption' => 'USER_ENTERED',
        ];

        return $this->sheetsService->spreadsheets_values->append(
            $spreadsheetId,
            $range,
            $requestBody,
            $params,
        );
    }

    public function getRows(string $spreadsheetId): ValueRange
    {
        return $this->sheetsService->spreadsheets_values
            ->get($spreadsheetId, "Sheet1");
    }
}

The class' constructor initialises a new Google API PHP Client object (which provides low-level access to Google's APIs) using your API key and service account's name. Its scope is limited to only interacting with Google Sheets. Then, two further functions are defined:

  • addRows() appends one or more rows ($values) to a Google Sheet identified by $spreadsheetId, at the range defined by $range
  • getRows() returns all of the current rows in a Google Sheet with the id in $spreadsheetId. These two functions are used together to determine where to append new rows to the Google Sheet as well as the new rows to append.

After that, create a blank Google Sheet. Then, copy its unique id and set it as the value of SPREADSHEET_ID in .env. Its unique id is in the Sheet's URL between "/d/" and "/edit?gid=0#gid=0".

Following that, in the Google Sheet label columns A through F with the following column headers:

Here's an example of what it should look like.

A Google Sheet with six columns labeled: First Name, Last Name, Email, Shipping Method, Payment Type, and Order Total.
Feel free to apply some basic formatting to the Sheet, as I have, if you want to make it a bit more interesting to look at.

Then, near the top right-hand corner, click Share. Then, under General Access, change "Restricted" to "Anyone with the link", change the role from "Viewer" to "Editor", then click Done.

The Google Sheets Share dialog showing "General access" has been set to "Anyone with the link" and the role has been set to "Editor".

Next, create a file named TwilioSheetsHandler.php in src/App/Handler. Then, paste the code below into the file.

<?php

declare(strict_types=1);

namespace App\Handler;

use App\Service\{GoogleSheetsService, OrderDeskService};
use Google\Service\Sheets\UpdateValuesResponse;
use Psr\Http\Message\{ResponseInterface, ServerRequestInterface};
use Psr\Log\LoggerInterface;
use Twilio\Rest\Client as TwilioRestClient;

use function array_push;
use function count;
use function sprintf;

final class TwilioSheetsHandler
{
    public const int DEFAULT_START_ROW      = 2;
    public const string SHEET_RANGE_PATTERN = "Sheet1!A%d:F6";
    private ?string $recipient     = null;
    private ?string $sender        = null;
    private ?string $spreadsheetId = null;

    public function __construct(
        private OrderDeskService $orderDeskService,
        private GoogleSheetsService $googleSheetsService,
        private TwilioRestClient $twilioRestClient,
        private array $opts = [],
        private ?LoggerInterface $logger = null,
    ) {
        $this->recipient     = $this->opts['RECIPIENT'];
        $this->sender        = $this->opts['TWILIO_PHONE_NUMBER'];
        $this->spreadsheetId = $this->opts['SPREADSHEET_ID'];
    }

    public function __invoke(
        ServerRequestInterface $request, 
        ResponseInterface $response
    ): ResponseInterface
    {
        $orders = $this->orderDeskService->get("orders");
        $values = [];
        if (! empty($orders["orders"])) {
            $this->logger?->debug("Retrieved orders", $orders["orders"]);
            foreach ($orders["orders"] as $order) {
                $value = [
                    $order["shipping"]["first_name"],
                    $order["shipping"]["last_name"],
                    $order["email"],
                    $order["shipping_method"],
                    $order["payment_type"],
                    $order["order_total"],
                ];
                array_push($values, $value);
            }
            $updates = $this->addOrdersToGoogleSheets($values);
            if ($updates->getUpdatedRows() > 0) {
                $this->sendSms($updates->getUpdatedRows());
            }
        }
        $orderCount = count($orders["orders"]);
        $response->getBody()->write(
            sprintf(
                "Retrieved %d %s",
                $orderCount,
                $orderCount === 1 ? "order" : "orders",
            ),
        );
        return $response;
    }

    private function addOrdersToGoogleSheets(array $sheetData): UpdateValuesResponse
    {
        $rows     = $this->googleSheetsService->getRows($this->spreadsheetId);
        $startRow = count($rows->getValues()) === 1
            ? self::DEFAULT_START_ROW
            : count($rows->getValues()) + 1;
        $result = $this->googleSheetsService->addRow(
            $sheetData,
            sprintf(self::SHEET_RANGE_PATTERN, $startRow),
            $this->spreadsheetId,
        );
        return $result->getUpdates();
    }

    private function sendSms(int $orderCount): void
    {
        $this->twilioRestClient
            ->messages
            ->create(
                $this->recipient,
                [
                    "from" => $this->sender,
                    "body" => sprintf(
                        "Hey! %d %s been added to your Google Sheet!",
                        $orderCount,
                        $orderCount === 1 ? "order has" : "orders have",
                    ),
                ]
            );
    }
}

This is the omnibus class, invoked when the application's default route is requested. The class' constructor takes instances of the three classes that we've defined so far, and an array of configuration options containing the recipient's phone number, your Twilio phone number, and the Google Sheet's unique id.

The __invoke() magic method, invoked when the application's default route is called:

  • Retrieves all orders from your Order Desk account
  • Extracts the order information
  • Calls addOrdersToGoogleSheets() to write them to the Google Sheet
  • Calls sendSms() to send an SMS notification to the recipient

The addOrdersToGoogleSheets() function uses the GoogleSheetsService instance to write the supplied orders to the Google Sheet. If there are no rows, it writes the orders to the Sheet starting on the second row, so that the header cells are not overwritten. Otherwise, it appends them after the existing orders in the Sheet.

The sendSms() function uses the Twilio Rest Client to send an SMS to the recipient from your Twilio phone number, with the message: "Hey! %d orders have been added to your Google Sheet!", where "%d" is replaced by the number of orders retrieved from your Order Desk account.

Finally, create a fourth file, named index.php, this time in the public directory. Then, paste the code below into the file.

<?php

declare(strict_types=1);

use App\Handler\TwilioSheetsHandler;
use App\Service\{GoogleSheetsService, OrderDeskService};
use Dotenv\Dotenv;
use Monolog\{Level, Logger};
use Monolog\Handler\StreamHandler;
use Slim\Factory\AppFactory;
use Twilio\Rest\Client as TwilioRestClient;

require __DIR__ . '/../vendor/autoload.php';
$dotenv = Dotenv::createImmutable(__DIR__ . "/../");
$dotenv->load();

$gsheetsService = new GoogleSheetsService(
    $_ENV['GOOGLE_API_KEY'],
    $_ENV['GOOGLE_SERVICE_ACCOUNT_NAME'],
);

$logger = new Logger("app-log")->pushHandler(
    new StreamHandler(__DIR__ . "/../data/log/app.log", Level::Debug),
);

$orderDeskService = new OrderDeskService(
    $_ENV['ORDERDESK_STORE_ID'],
    $_ENV['ORDERDESK_API_KEY'],
);

$twilioRestClient = new TwilioRestClient(
    $_ENV['TWILIO_ACCOUNT_SID'],
    $_ENV['TWILIO_AUTH_TOKEN'],
);

$app = AppFactory::create();
$app->get(
    '/update',
    new TwilioSheetsHandler(
        $orderDeskService,
        $gsheetsService,
        $twilioRestClient,
        [
            "RECIPIENT"           => $_ENV["RECIPIENT"],
            "SPREADSHEET_ID"      => $_ENV["SPREADSHEET_ID"],
            "TWILIO_PHONE_NUMBER" => $_ENV["TWILIO_PHONE_NUMBER"],
        ],
        $logger,
    ),
);
$app->run();

This file is the core of the application, its bootstrap file, where all requests are initially sent. It starts by initialising the GoogleSheetsService, OrderDeskService, and TwilioRestClient objects.

Following that, it initialises a new Slim Framework App instance, the central instance of a Slim Framework application, and registers a single route ("/update") in the application's routing table. That route is handled by, as previously mentioned, the TwilioSheetsHandler's __invoke() magic method.

Test that the application works as expected

Now that the application's built, it's time to start it and test it. Start the application running using PHP's in-built webserver, by running the command below.

php -S 127.0.0.1:8080 -t public

Then, in a separate terminal session or tab, run the following command to call the application's sole endpoint.

curl --quiet http://localhost:8080/update

When the request is completed, you should see "Retrieved %d orders" printed to the terminal, where "%d" is replaced by the total number of orders in your Order Desk account.

Take a look at your Google Sheet, where you'll find that it's populated with the order(s) from your Order Desk account, as in the screenshot below.

The earlier Google Sheet with a row of data.

Now, check your phone to see that you've received the SMS notification, telling you that your Order Desk orders have been added to your Google Sheet.

A mockup of an Android phone with the messages app open and viewing a message. The message reads: "Hey! 1 order has been added to your Google Sheet!".

That's how to backup data in Google Sheets in your PHP applications

While there are a number of, proverbial, moving parts, there wasn't a lot of code to write to integrate Order Desk, Google Sheets, and Twilio into a small, PHP-powered web application.

I hope that this tutorial has shown you how easy it is to backup an online service, such as Order Desk, using PHP and Google Sheets as your backup tool, and send post-backup notifications using Twilio's infrastructure.

What service does your application integrate with, and where would you back it up to? Also, what kind of customer notifications would you send?

What's Next?

If you're keen to go further and keep on learning, how about sending an MMS or WhatsApp message instead of an SMS. Finally, here is a selection of resources to continue growing your knowledge:

Matthew Setter is (primarily) the PHP, Go, and Rust editor on the Twilio Voices team. He’s also the author of Mezzio Essentials and Deploy with Docker Compose. You can find him at msetter[at]twilio.com. He's also on LinkedIn and GitHub.

Sheet icons created by Freepik on Flaticon.