A Phone Number Input Field for Flask Forms
Time to read:
December 11, 2019
Written by

The Flask-WTF package makes working with forms in Flask straightforward and even fun – unless you need to include a field that falls outside of the standard primitive field types.
Consider an application that needs to ask users for their phone number in a friendly way, regardless of the country or region the user is in. You could use a standard text input and hope your users know how to enter their phone number, but based on my experience, you are going to find that many users do not know the rules to enter a full phone number that includes the country code and can be used internationally.
In this post, we’ll build an example Flask application that includes a phone number field that makes it virtually impossible to enter an invalid number.

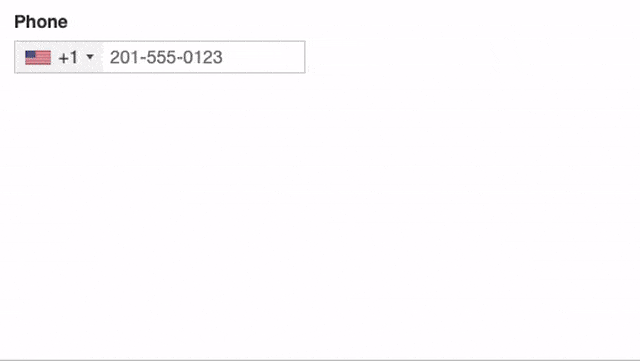
As you can see, this field includes a dropdown that lists all the countries, with cute little flag icons and their corresponding numeric country codes. Once a country is selected, the content portion of the field shows a phone number template that helps the user know how to enter their number correctly.
Once a user enters a number, this field provides it in the canonical E.164 format, which Twilio users know and love.
JavaScript to the Rescue!
I know what you are thinking: you looked at the demo animation above and immediately realized that as cool as this phone number input field is, Flask and Python have nothing to do with the implementation.
To some extent you are correct – I’m using the intlTelInput JavaScript library. The goal of this article is to have this awesome project fully integrated with Flask-WTF and Bootstrap-Flask, which is not as trivial as it may appear.
Project Directory and Virtual Environment
When you create a new project, it’s a best practice to create a directory where it will live. In my case, I decided to call it *flask-phone-input* (but of course you can use any name for it that you like):
The Python packages that we are going to use are all going to be installed in a virtual environment.
There are several ways to create virtual environments in Python, so for this step I encourage you to use your favorite method. As I’m old school, I like to create my virtual environments using the venv package from the Python standard library:
If you are following this tutorial on a Windows computer, the virtual environment activation command is different. Use the commands below instead:
The last preparation step that we need is to install all the Python dependencies for the project:
The Flask package needs no introduction – it’s the Python web microframework. Flask-WTF is a Flask friendly wrapper for the amazing WTForms library (pronounced “witty forms”). Bootstrap-Flask is a Flask extension that makes it easy to create Flask templates based on the Bootstrap 4 CSS/JavaScript framework. The last dependency is phonenumbers, which we are going to use to perform server-side validation on these phone numbers provided by users.
You are unlikely to have any problems when you install the latest versions of these packages, but just in case, below you can see a copy of my pip freeze output. This will give you a reference of all the package versions that I have used and tested to work:
A Base Bootstrap 4 Application
Let’s begin by designing a base application and template using the Bootstrap-Flask extension. Write the following Flask application to an app.py file:
As is normal for Flask applications, the template files will be stored in a templates sub-directory that you need to create:
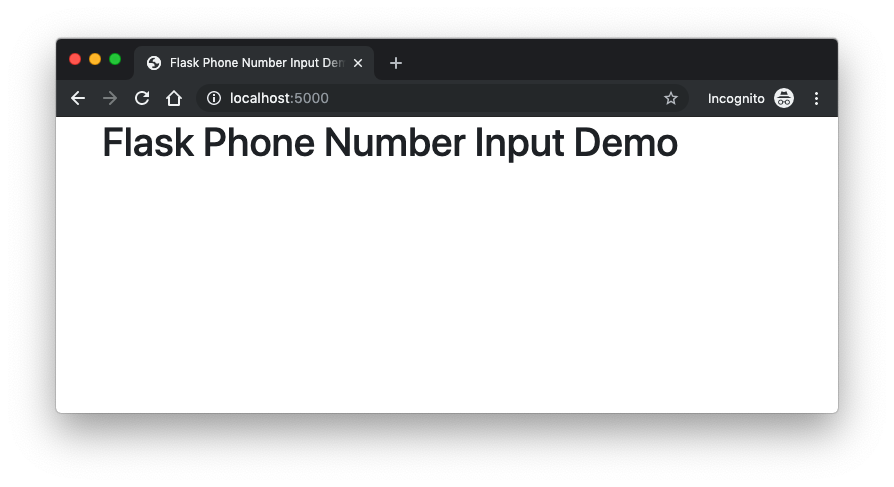
For now, the templates/index.html template referenced by the only route in the application can have just a heading:
The extends clause at the top of this template indicates that we are using the template inheritance feature of Jinja2. This lets us define the parts of our page layout common to all pages in a single file to avoid duplication. The base template file is going to be called templates/base.html:
Here we define an HTML5 page structure that uses Jinja2 blocks to mark the parts where the derived page templates can insert their own content. The styles and scripts blocks define the code that loads CSS and JavaScript dependencies. The Bootstrap-Flask extension makes it easy to import the Bootstrap framework using the load_css() and load_js() methods.
We are also going to use the intTelInput.js library, so we have to explicitly import the corresponding .css and .js files. The title block is defined empty in this base template because its purpose is to be redefined in each page template like it was done above in index.html.
The content block is also defined empty in the base template. This is the most important block, where derived templates will insert the main content of the page. You can see that our initial version of index.html defines a short content block that only includes an <h1> element with the page title.
The base application is now complete. You can start the Flask development web server from the terminal as follows:
Enter http://localhost:5000 in the address bar of your web browser to see the application running.
Form Creation and Handling
We are now ready to add a web form to our base application. Below is a new version of file app.py that adds a Flask-WTF form class, expands the index route to handle it, and finally adds a new show_phone route that displays the submitted phone number:
The web form represented by the PhoneForm class includes just a phone number field and a submit button. Note that I have defined the phone number field as a simple text field (class StringField from WTForms), since we will be doing some JavaScript magic to swap this field out with the fancier field. I have included a custom validation method for the phone field that uses the phonenumbers.is_valid_number() function to reject invalid numbers. If the number is invalid, then the message given in the ValidationError exception will be sent to the form and displayed in red as an error message.
The updated index() view function creates an instance of this form and handles validation and rendering in the standard way. When the form is submitted and validation on it passes, the phone number is stored in the user session. Then, a redirect to the show_phone() view function is issued where the submitted phone number will be displayed.
Form Rendering
The templates/index.html template file needs to be expanded to render the form object passed on from the index() view function.
The Bootstrap-Flask extension provides a macro for Jinja2 that greatly simplifies the rendering of forms using proper Bootstrap markup. Unfortunately with this macro, the phone field would render as a standard text field, since the macro cannot configure fields to be rendered in a custom way – which is what we need for the phone field based on the intTelInput.js library. We could ignore the Bootstrap-Flask macros and render the field manually. However, this is tedious – we’d not only need to render the field but also the field’s label and the validation error message (when present).
I did not want to lose the power of the form rendering macro, so I decided to implement a hybrid approach. The idea is to render the form with the macro, then dynamically insert a phone field based on the JavaScript library in the correct position. To keep everything looking good the original phone text field can be hidden. The new phone field will not be part of the form, it will be a standalone field.
Each time the user modifies the new form’s contents, an event handler copies the new value of the field into the hidden field, which will still be submitted with the form. I know it sounds crazy, but this solution is not too hard to implement and works quite well.
Below you can see the updated templates/index.html file with the form rendering changes:
The second line of the template imports the render_form macro from Bootstrap-Flask. This macro takes a Flask-WTF form object as an argument and renders a complete Bootstrap compliant form. This is done in the content block below the <h1> heading.
The scripts block is where the field swapping trick is done. We start by calling super() to include all the contents for this block defined in the base template, which we do not want to lose. The <script> tag that follows performs a number of important tasks, so let’s look at the contents of this tag in detail.
Here the phone field rendered by the Bootstrap-Flask macro is moved outside of the visible range of the page, which is an effective way to make the field invisible. These changes are made through the position, top, and left CSS properties.
Next, we insert a manually created JavaScript-based phone input field, which I’m going to call the “fancy” phone field. This new field is added under the same parent as the original phone field so that it appears on the page in the same location. The important thing is that we are not touching the label and the validation error messages, we are just surgically adding the fancy version of this field in the same position as the original, now hidden field.
According to the intTelInput.js documentation, the window.intlTelInput() function must be called to initialize the fancy phone field. The dictionary passed as a second argument includes a short list of options that I decided to use, but there are many other options that can be used to alter the behavior and looks of this field in different ways, so be sure to check out the documentation.
If the original field has a value (which would be the case if the form failed validation and is presented back to the user for editing), then this value is copied from the original field into the new field by calling the setNumber() method.
Finally, we add an event handler for the blur event on the fancy field. This event will be invoked every time the field loses its focus, which is the perfect opportunity to move the value entered by the user back into the original field that will be submitted with the form. The getNumber() method of the intTelInput.js field returns the phone number in canonical E.164 form regardless of how the user entered it on the field, so the backend will see a cleaned up version of the phone number.
Tying Up Loose Ends
The last piece of this application is the template file used by the show_phone() view function, which we are using as a way to see the phone number that the server received from the user. This goes in the templates/show_phone.html file:
Running the Application
The application is now complete. If you prefer to get the code instead of typing it up, clone or download the Flask-Phone-Input repository on GitHub.
Make sure you have created a virtual environment and installed the requirements on it as described above, and then start the Flask server once again:
After the server starts, open http://localhost:5000 in your web browser and play with the phone input field.
Conclusion: A Phone Number Input Field Linked with Flask
I hope this tutorial not only gives you an awesome new field that you can add to your Flask forms, but also a greater understanding of how you can work with client-side libraries that in general are considered a bit difficult to integrate with the standard Flask form workflow.
I’d love to know if you improve upon my solution or implement more integrations using the techniques you learned in this article!
Miguel Grinberg is a Python Developer for Technical Content at Twilio. Reach out to him at mgrinberg [at] twilio.com if you have a cool Python project you’d like to share on the Twilio blog!

Related Resources
Twilio Docs
From APIs to SDKs to sample apps
API reference documentation, SDKs, helper libraries, quickstarts, and tutorials for your language and platform.
Resource Center
The latest ebooks, industry reports, and webinars
Learn from customer engagement experts to improve your own communication.
Ahoy
Twilio's developer community hub
Best practices, code samples, and inspiration to build communications and digital engagement experiences.