Building a Microlearning Application with Python and Twilio SendGrid
Time to read:
March 13, 2020
Written by

The sheer amount of information we have out there is enormous and it can be overwhelming for people trying to learn a new skill to decide what resource to use and actually follow through on learning these skills. For the worker especially, it can be really difficult finding the time to focus on learning these skills. Courses take months to complete and books have hundreds of scary pages. This difficulty calls for a need to modify the way we learn, and Microlearning is one successful attempt at adaptation.
Microlearning is a learning approach that involves getting your learning material in micro-units over a period of time. What this means is, if you want to read an online book that has 600 pages, you can read a few pages of the book per day. This way, you can estimate how long it will take you to complete the book and you’re less overwhelmed by the size of it, I hope.
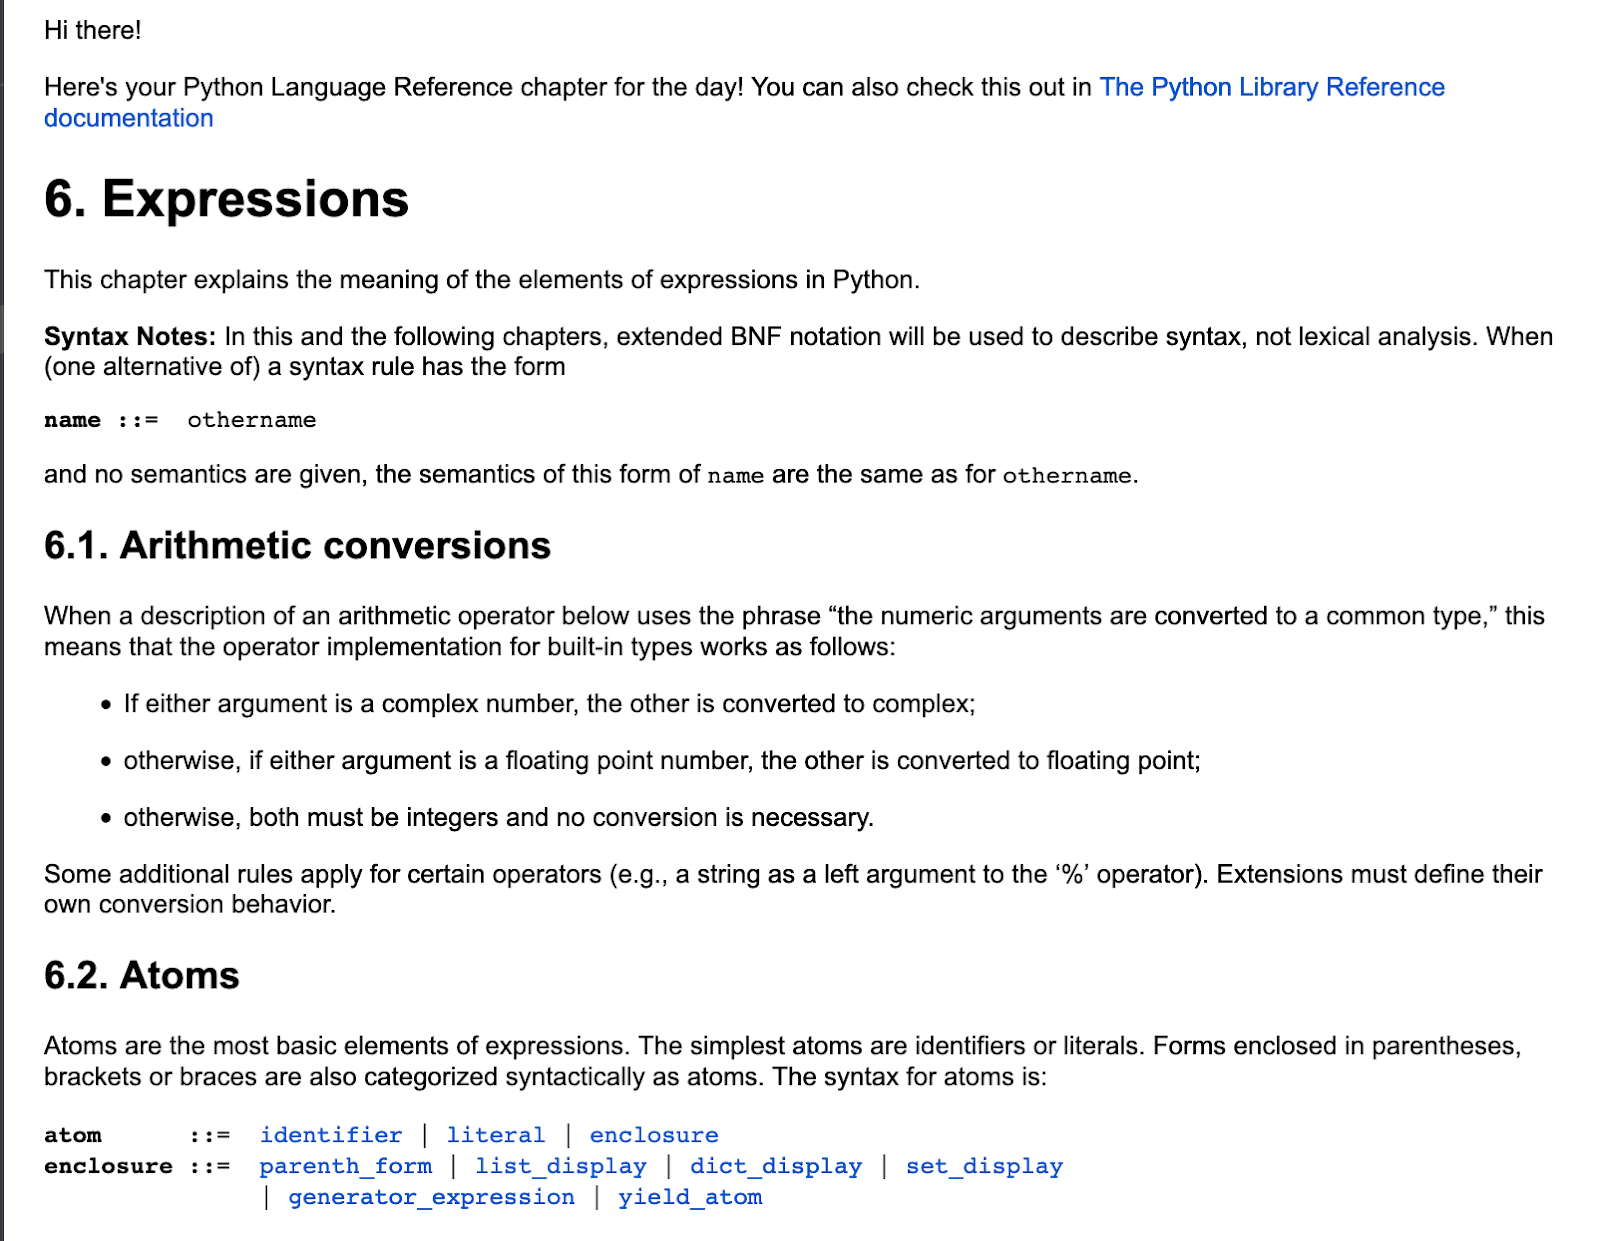
I had been trying to hone my Python skills by reading the entire Python Language Reference. I tried doing this once every day, but it was difficult remembering to do it or just finding the time to. But somehow, I remember to take my daily Duolingo course when the little bird notifies me. I decided to try to apply this approach to my Python reference problem and see how it goes.
What I built is an application that gets data from the Python Language Reference and delivers a chapter of the reference to me, each day, by email.
What we are building
These are the steps we’ll take in building this application
- Get the data we need from the Python Language Reference.
- Set up an email service.
- Deploy our application to Heroku and set up daily scheduling using the Heroku scheduler add-on.
Tutorial requirements
To follow along with this tutorial, you will need the following components:
- Python 3.6 or higher
- Virtualenv
- Virtualenvwrapper
- A Twilio SendGrid account. If you are new to Twilio SendGrid you can create a free account, which allows you to send 100 emails per day.
- A Github account
- A Heroku account.
You will also need to have some understanding of HTML.
Scraping the Python documentation
To get the data we need, we will need to scrape (accessing and extracting data from a website) the Python Library Reference documentation, format this data to suit our specifications and return this data.
Setting up our Github Repository
Let’s start by creating a GitHub repository for our project. If you don’t already have one, you can create a GitHub account. If you do have an account, you can go ahead and create a repository for the project and follow the setup instructions. I’m going to use the name python-microlearning-app for this repository, but you can use a different name if you like. Add a .gitignore file for the Python language while creating your repository.
Installing packages
Now let’s clone our repository and then create our virtual environment.
Now that we have our virtual environment created, we can start installing the packages we need.
We will be installing the following packages:
- Beautiful Soup: For parsing HTML and XML files.
- Requests: Allows us to send HTTP requests easily.
- Python-dotenv: Reads the key-value pairs from our .env file and creates environment variables.
Now when we run pip freeze we see the packages we installed and the packages that were installed along with them (some packages depend on other packages).
Writing the scraper
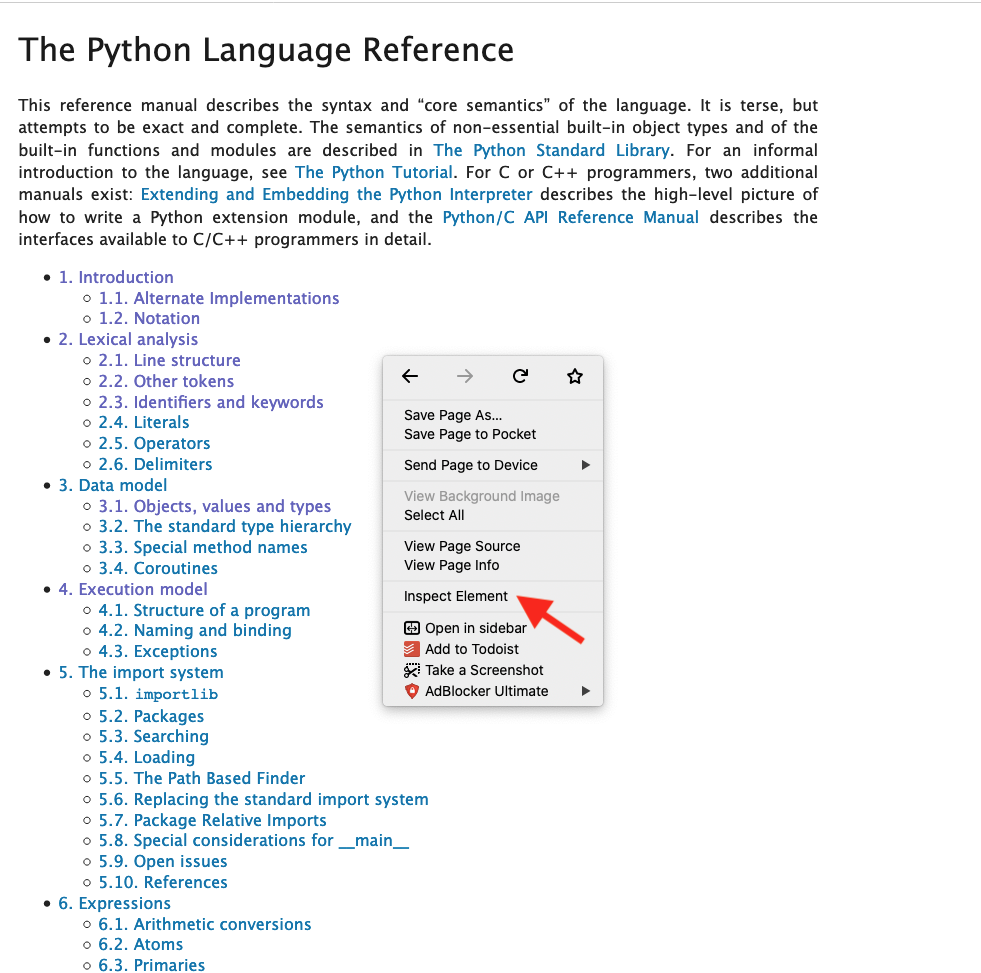
The first thing we want to do when scraping a website is to inspect the pages to see the data we want to extract and the HTML tags surrounding it. To do this, we can go on the website and inspect it using the “developer tools” of our web browser.
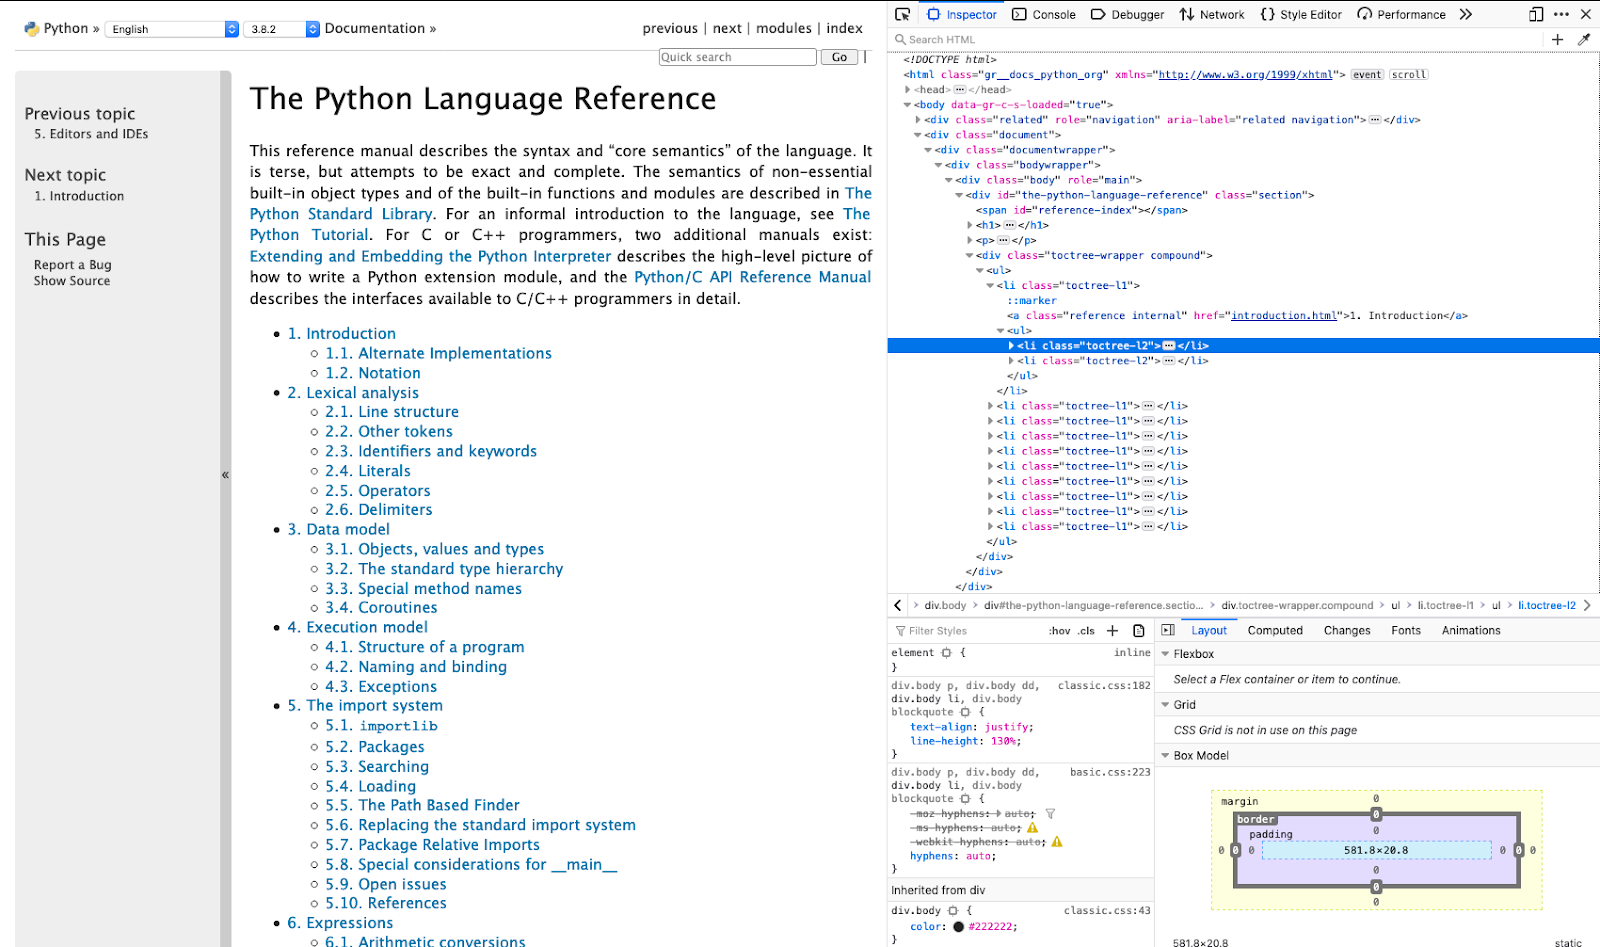
After inspecting the page structure, we can write the code to extract the data we need. Add this code snippet to a new file called scraper.py:
I’ll explain what we’ve just done from the last function to the first.
_decompose: Within each link, we have some data we don’t really care for, but this data is embedded in the data we need. This function loops through each link and uses BeautifulSoup’s decompose method to remove the tags and their content._scraper: This function makes an HTTP request to the URL we want to scrape. If we get a response status code of 200, that means the HTTP request was successful. If the request was not successful, we throw an exception. The function then converts our HTML tree into a more readable and understandable data format and then returns this data._handle_link: Each link is a chapter of the Python language reference and so we will need to get data from the links. This function prepares the data within each link by making an HTTP request to a link, getting the top-level heading which will be used as the subject of our email, getting the main body of the HTML which will be the body of our email and decomposing unwanted data from each link. The body of the HTML is enclosed within a div with class name “document” and the heading is enclosed within a<h1>tag. The heading comes with the chapter number and a period at the beginning of the text, so we get rid of those._has_no_hashtag: From inspecting the page in the first step, I noticed that some pages have some internal links that jump to a section of the page. We want to remove those because we will be sending the entire page per day and not just a section of it. That is what this function does. The function simply searches for tags with the “href” attribute that don’t contain the character “#” in them.main: This is the function that puts it all together and returns our prepared data. The function scrapes the library reference’s URL and finds all chapter links. It then passes one of those links, given by theidxargument to the_handle_linkfunction which retrieves the data from this link and returns to us the header, url and body.
Now that we have our data, we’ll set up our email service for sending this data to our email addresses.
Setting up the email service
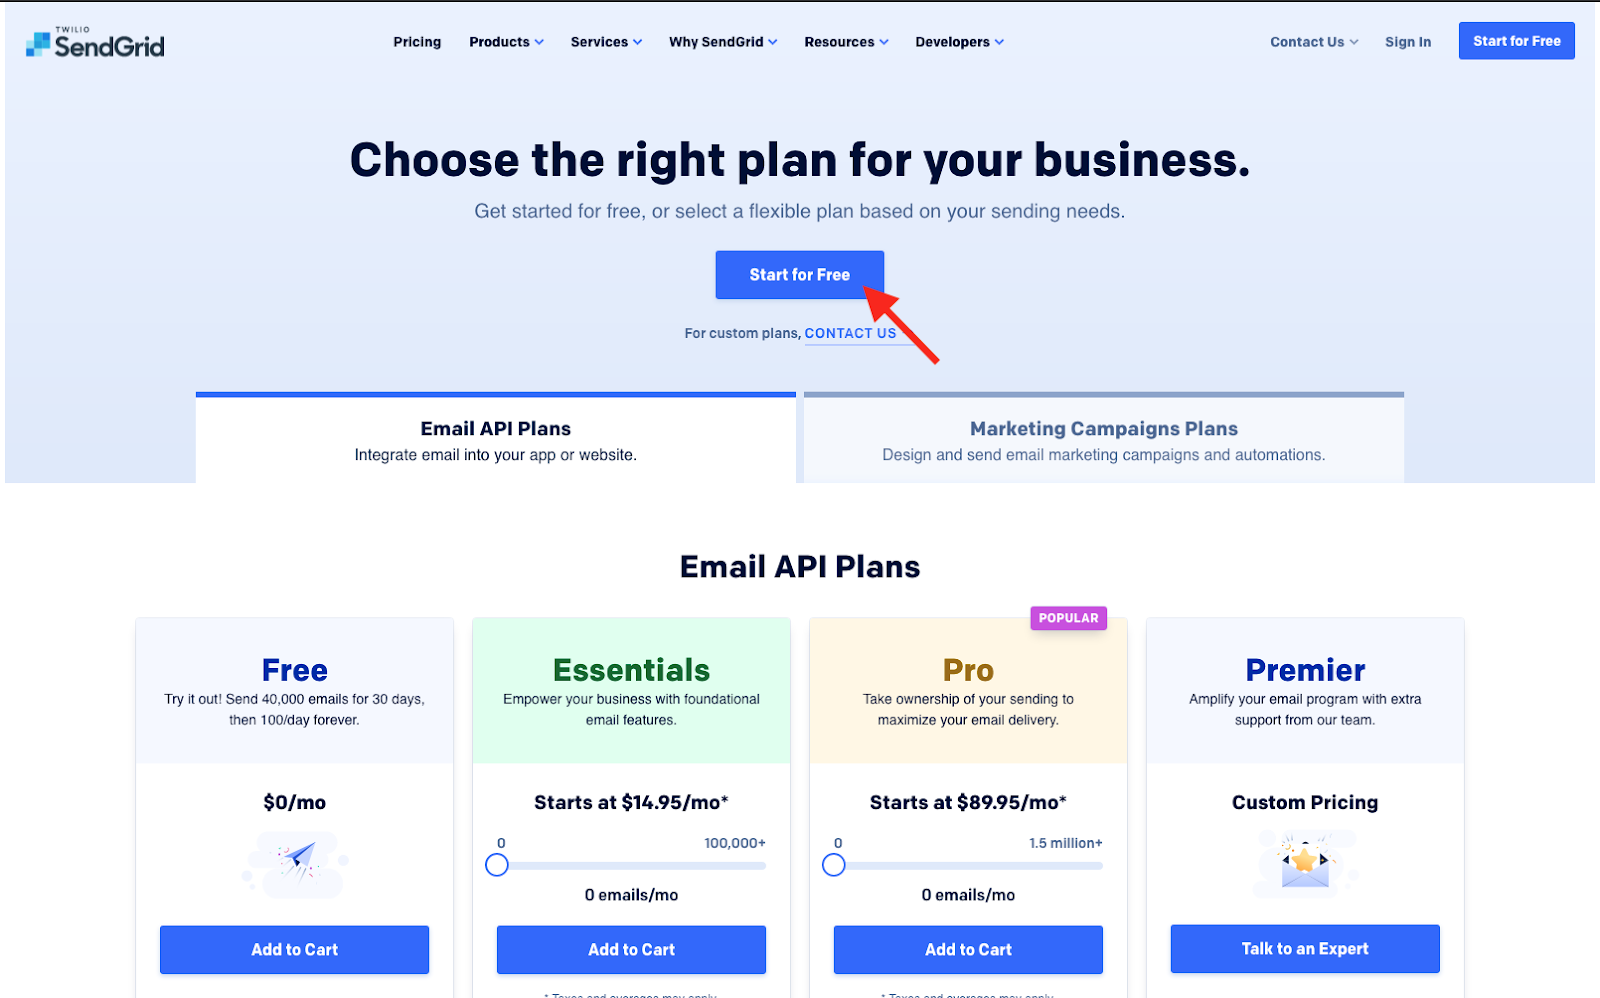
We will use Twilio SendGrid to send the daily email. A SendGrid account gives you 100 free emails per day.
Setting up a Twilio SendGrid account
Create a Twilio SendGrid account opting for the free plan. Follow the set up instructions.
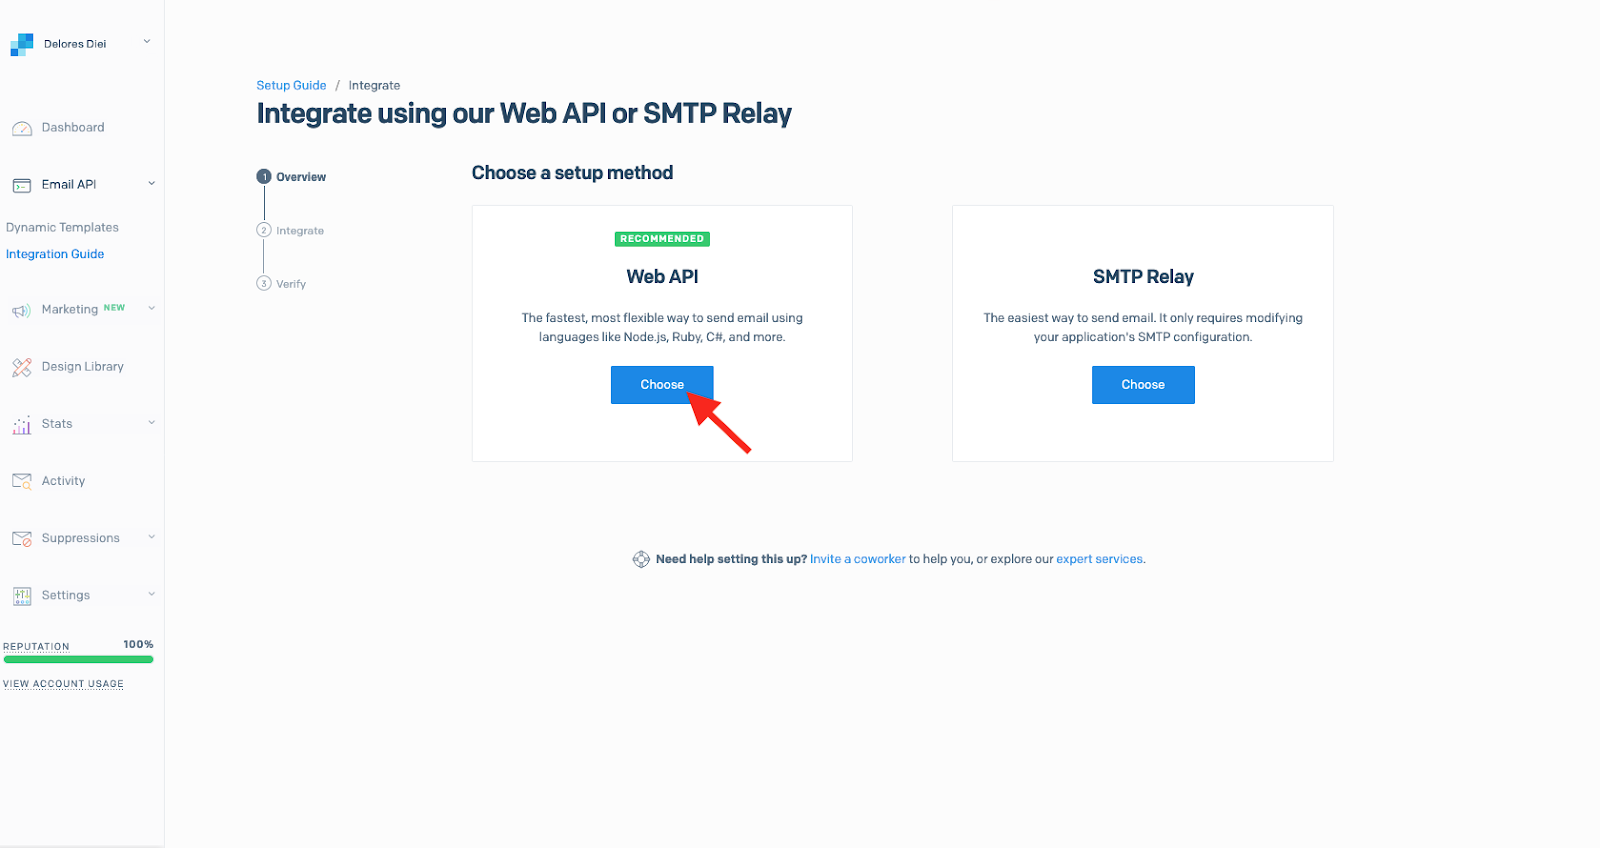
Integrate SendGrid using Web API and create an API key
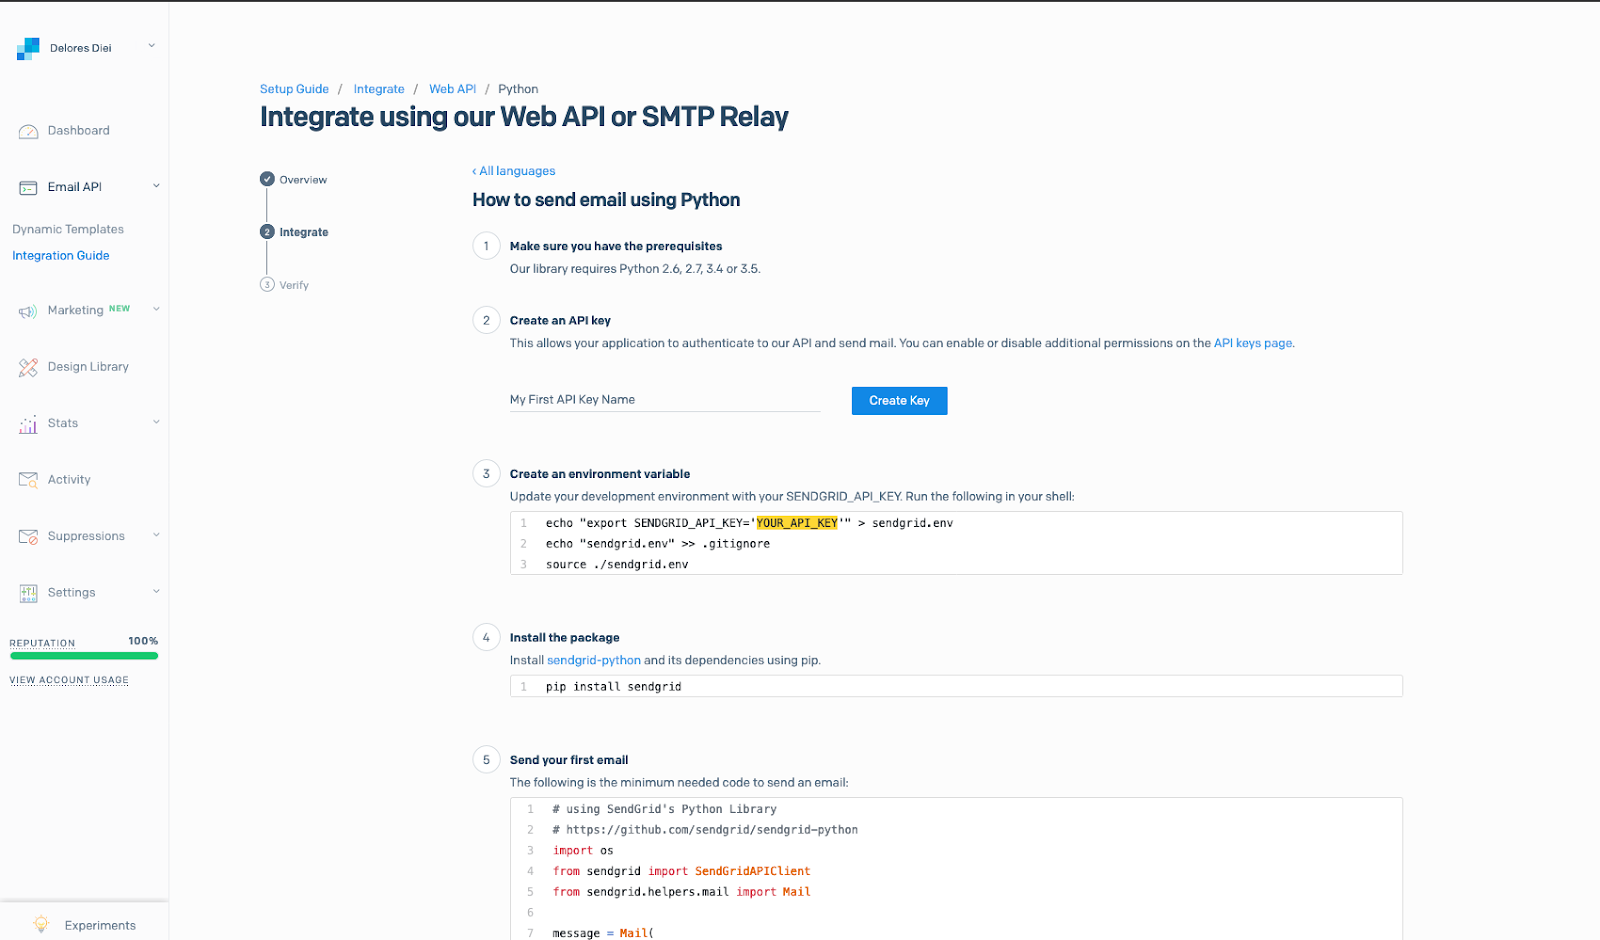
After setting up the Twilio SendGrid account, we’ll need to install the SendGrid package in the Python virtual environment.
Create a new file in your directory, call it mailer.py and add the following code snippet to it.
What this file does is:
- Import our needed packages.
- Import the
mainfunction from scraper.py. - Load our configuration from environment variables stored in a .env file that we will create in a minute.
- Instantiate SendGrid’s mail helper with the subject, body of the email.
- Send an email.
- Assert that the email was sent successfully.
To make this work, I had to get the right chapter of the reference for each day. The logic I went for was to create a constant, START_DATE which is the date of the deployment. The function will be set to run once a day, so the “today” variable is incremented every day and so, every day the function scrapes and sends the next chapter of the library reference.
We want to keep our email address and especially our SendGrid API key a secret so we won’t want to have them open in our code and pushed to our Github account, we will instead put them in a .env file which will be ignored in our .gitignore file. The .env file will contain three environment variables;
SENDER_EMAIL: The email address you want to send the emails from. This could be a new or an existing email address.RECEIVER_EMAIL: The email address the daily emails will be sent to. This could be the same as theSENDER_EMAIL.SENDGRID_API_KEY: The API key you created while integrating SendGrid.
Create a .env file and add this to it.
Now we can test that our application works. On your terminal, run the send_email function in mailer.py.
Your RECEIVER_EMAIL address should receive an email with a page of the documentation.
Now let’s add our .env file to the .gitignore file we created while creating our GitHub repository.
Deploying the application
Now that we have our code ready, it’s time to have it deployed and see it work!
For this I decided to use Heroku, which provides a scheduler add-on that can run the function automatically once a day. For an in-depth walkthrough on how to deploy to Heroku, you can check out this tutorial.
To successfully deploy to Heroku, we’ll need to create two files.
- requirements.txt: This contains the packages our app depends on.
- runtime.txt: The Heroku server looks here for our python runtime version.
So let’s create them.
The pip freeze > requirements.txt command creates a file requirements.txt and puts in it all the packages we just installed with their versions. This is what our requirements.txt file should look like:
Create a runtime.txt file and add our runtime python version to it.
And that’s it! Now we can push our changes to Github and set up Heroku scheduler.
Remember to update the START_DATE variable in your mailer.py file to your deploy date before pushing to GitHub.
Deploying to Heroku and setting up the scheduler
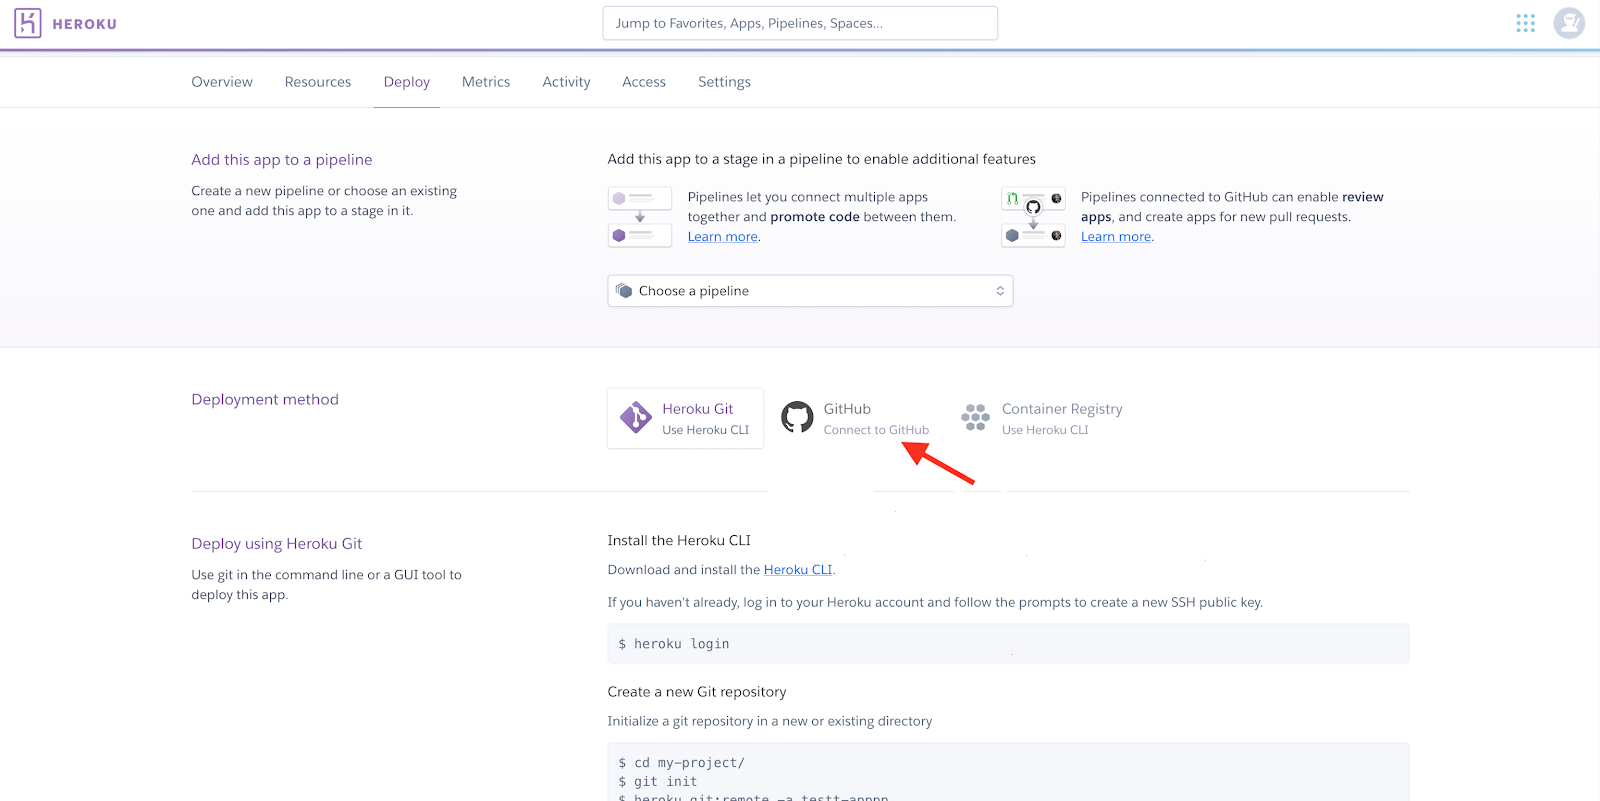
To set up deployment on Heroku, on your Heroku dashboard, create a new app and set up a deployment from your Github repository. This way, pushing to your branch will automatically deploy that change on Heroku.
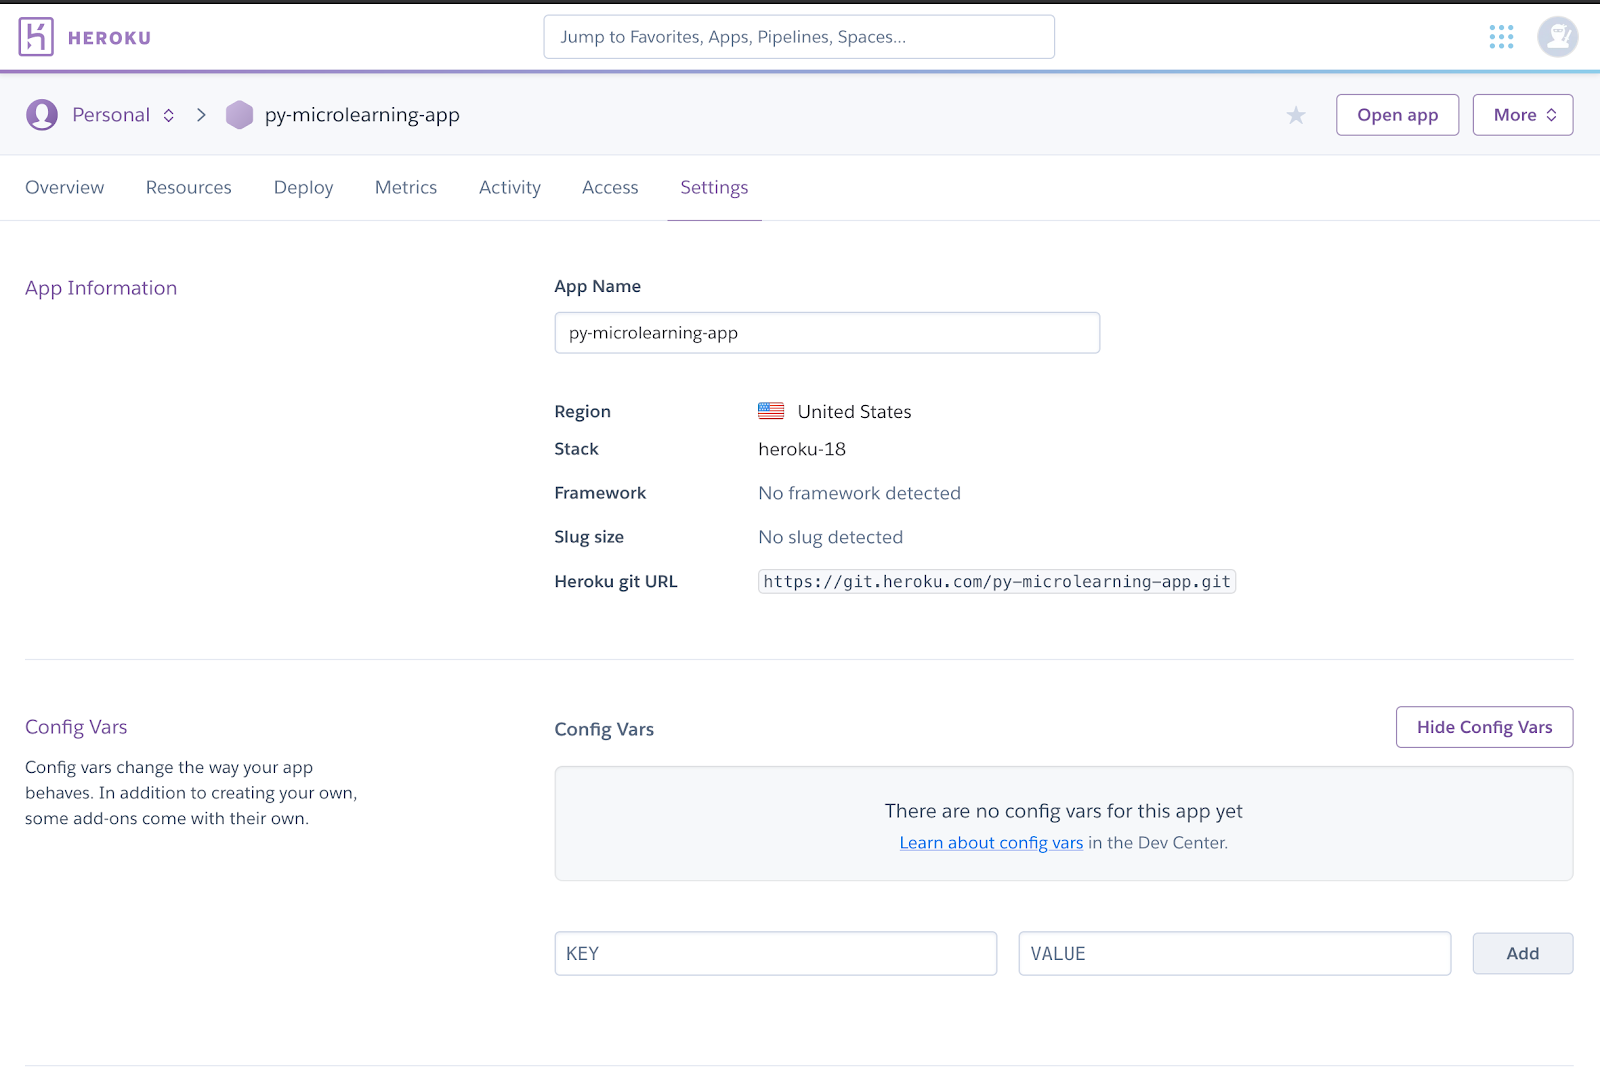
The .env file we created during development was only for local testing. We’ll need to add those environment variables to Heroku for our deployed application to work.
On your Heroku dashboard, click on “Settings” and add the SENDER_EMAIL, RECEIVER_EMAIL and SENDGRID_API_KEY environment variables to “Config Vars”.
After our app has been deployed on Heroku, we can set up Heroku scheduler.
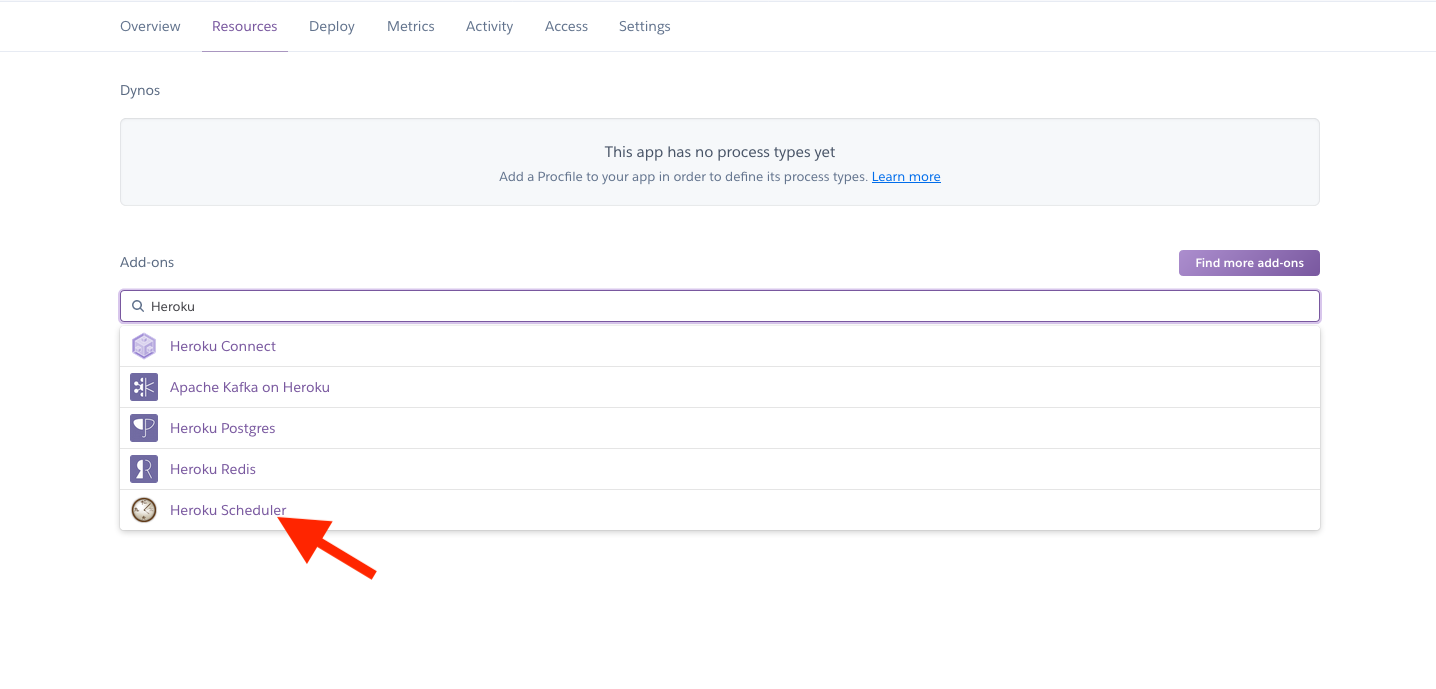
On your dashboard, click on “Resources” and then in the “Add-ons” search bar, search for “Heroku Scheduler” and click on it.
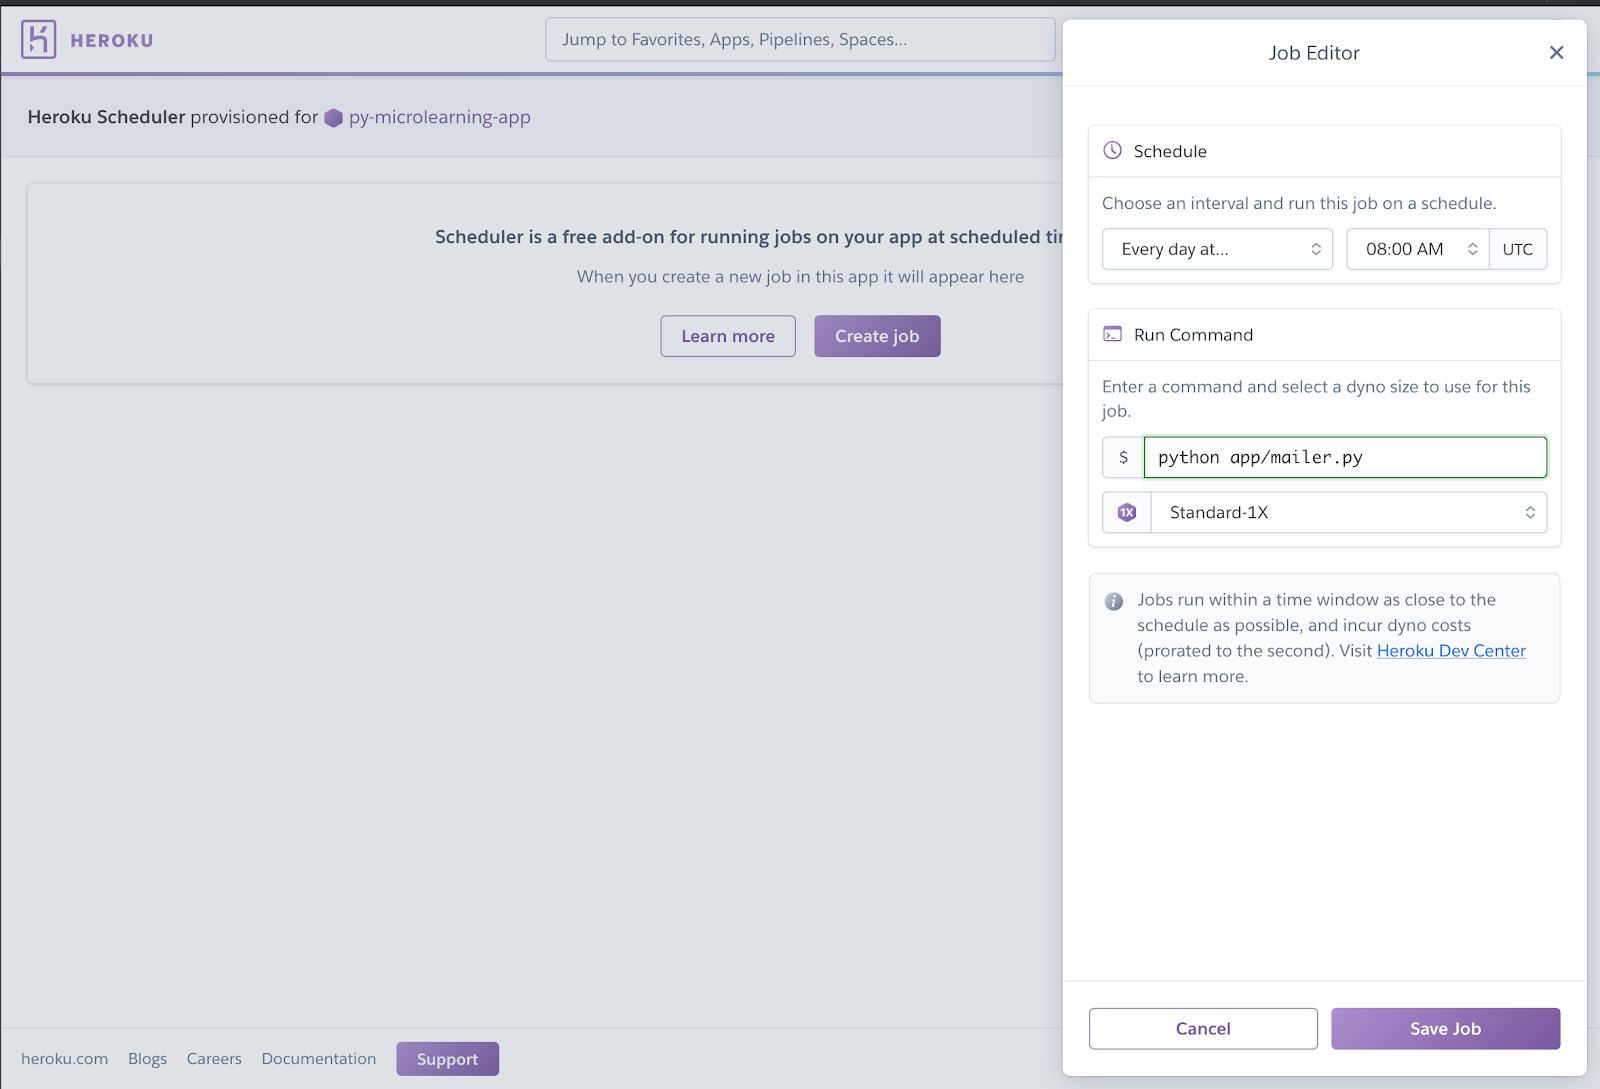
Configure your scheduler; choose what time every day you want the job to run (I chose 8:00AM UTC), enter the command the job to run, which is python mailer.py and then click on “Save Job”.
We made it! Our job has been set up and we should get our email each day at 8:00AM UTC!
Thanks for reading. The full project is available on Github.
Delores is a Software Engineer focusing mainly on Python. She loves solving problems and discovering new ways to do things. She also loves sharing knowledge, so she tries to volunteer as a Python teacher as often as she can. When she isn’t working, you can find her playing board games, watching movies or trying out new food.
GitHub: https://www.github.com/del-sama
Twitter: @del_sama

Related Resources
Twilio Docs
From APIs to SDKs to sample apps
API reference documentation, SDKs, helper libraries, quickstarts, and tutorials for your language and platform.
Resource Center
The latest ebooks, industry reports, and webinars
Learn from customer engagement experts to improve your own communication.
Ahoy
Twilio's developer community hub
Best practices, code samples, and inspiration to build communications and digital engagement experiences.